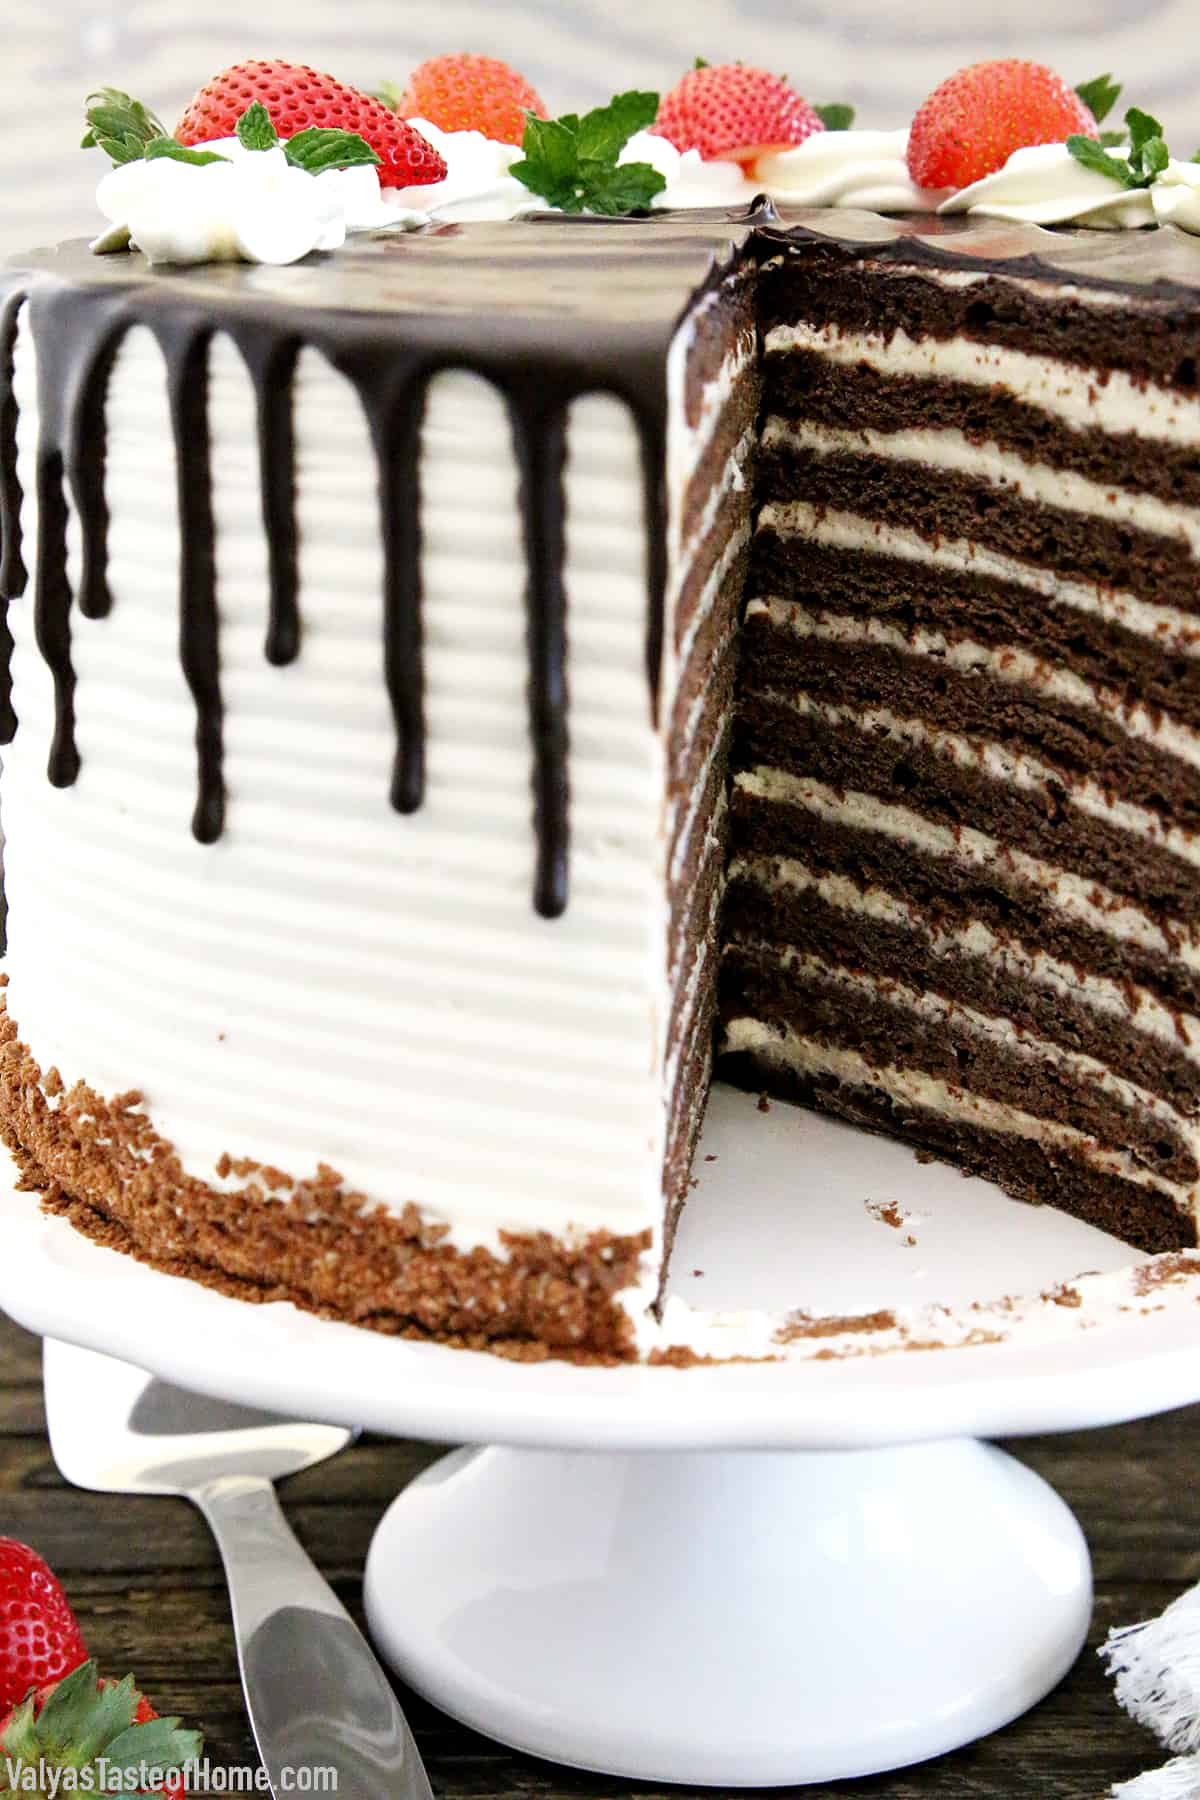
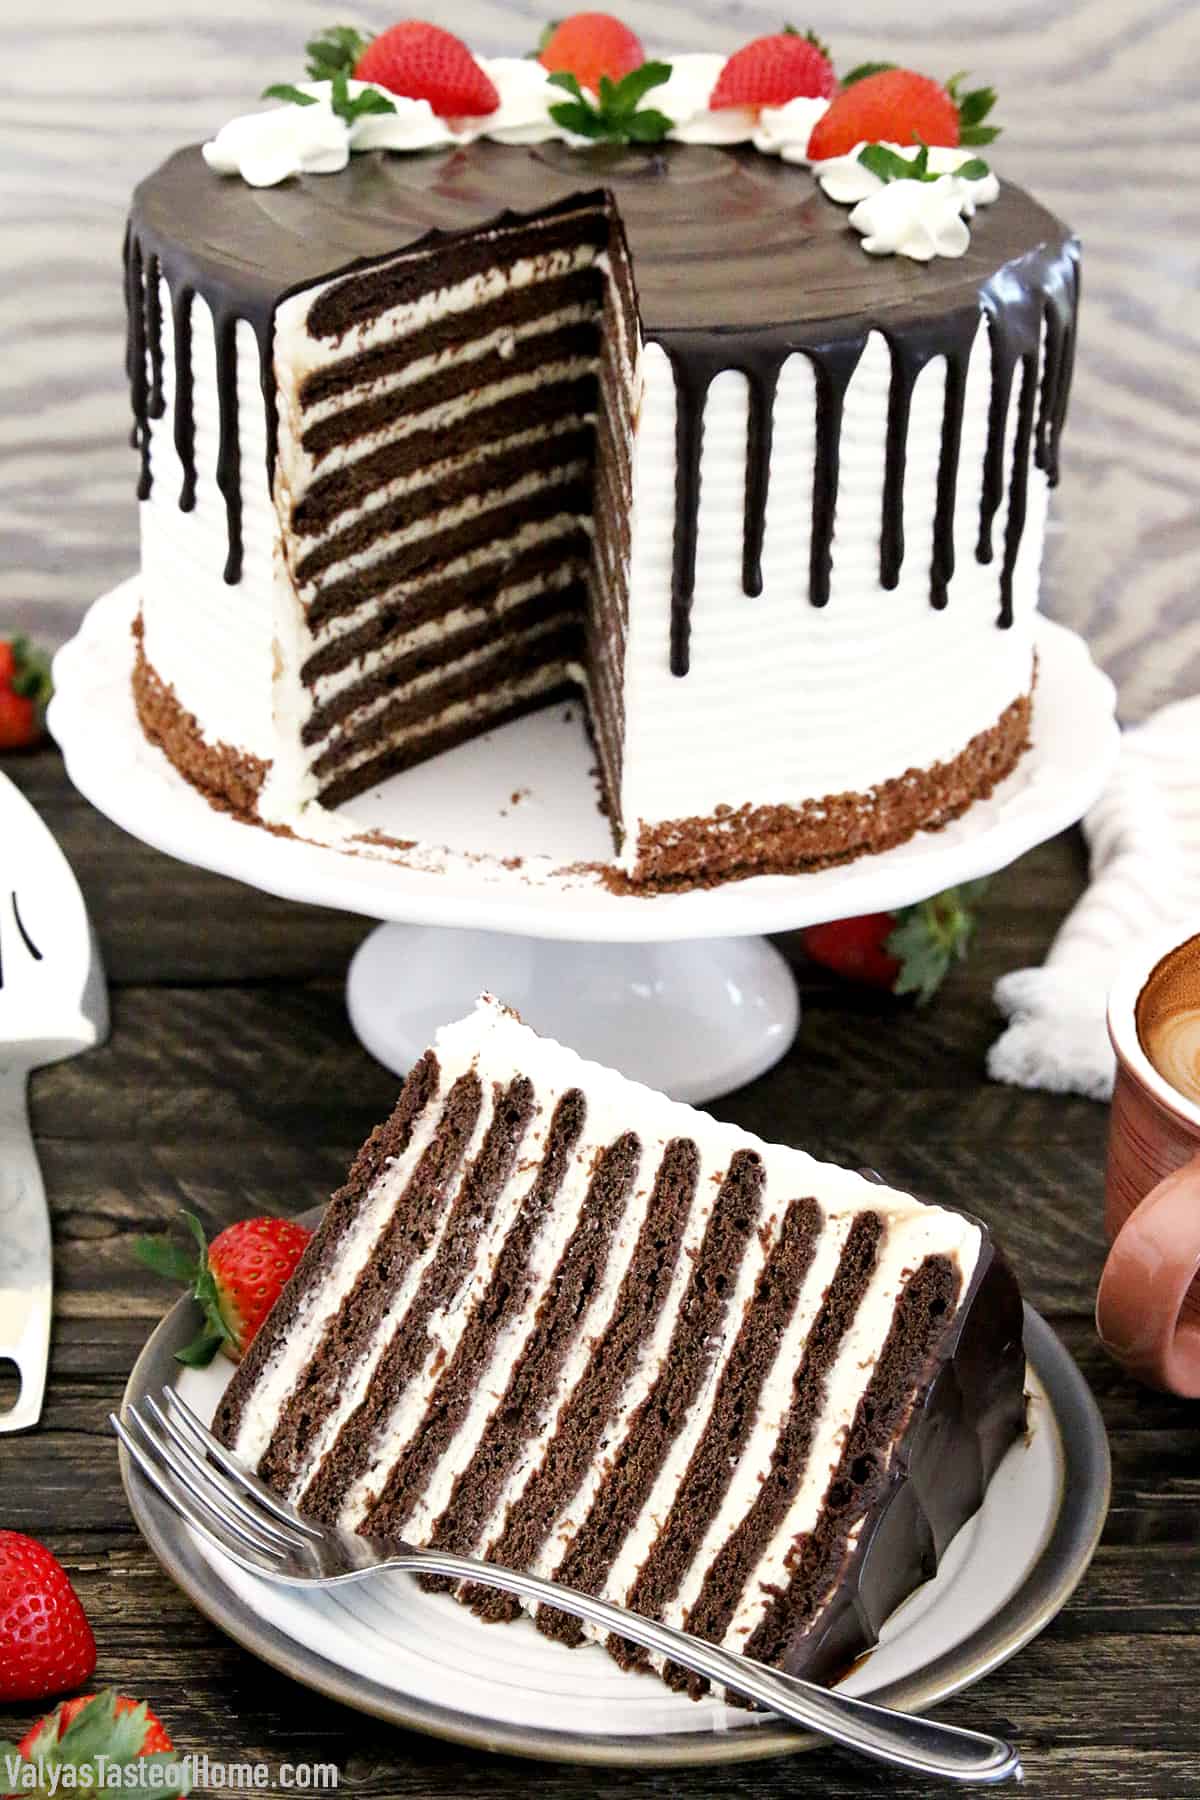
The Best Chocolate Spartak Cake (Authentic Recipe!)
This Spartak cake recipe, also known as Spartak layer cake, is a traditional Russian cake that has been a favorite for generations. This cake consists of multiple thin layers of cake with a sweet and creamy filling made of cream cheese, condensed milk, and whipping cream. The layers are held together with this creamy filling, and the cake is topped with a layer of rich melted chocolate.
If you’ve been looking for an authentic Spartak cake recipe, then this is the one for you! It has passed down to me by my mother, who sadly left us more than twenty years ago on Christmas day to be at home with the Lord.
This is the recipe she shared with me and it’s one that I’ve been making for more than two decades now. It’s foolproof for the most delicious flavors every single time!
Spartak cake is the perfect dessert for any occasion, from birthdays to holiday parties, or even just as a sweet treat for yourself. Its moist and flavorful layers and rich, creamy filling make it a crowd-pleaser, and it’s easy to customize by adding your favorite ingredients or decorations.
In this recipe, I’ll guide you step-by-step on how to make a delicious Spartak cake from scratch, using high-quality ingredients to ensure that your cake turns out perfect every time. So let’s get started and make a delightful Spartak cake that’s sure to become a fast favorite!
Want to learn how to make Spartak cake? Then keep on reading!
What is Spartak Cake?
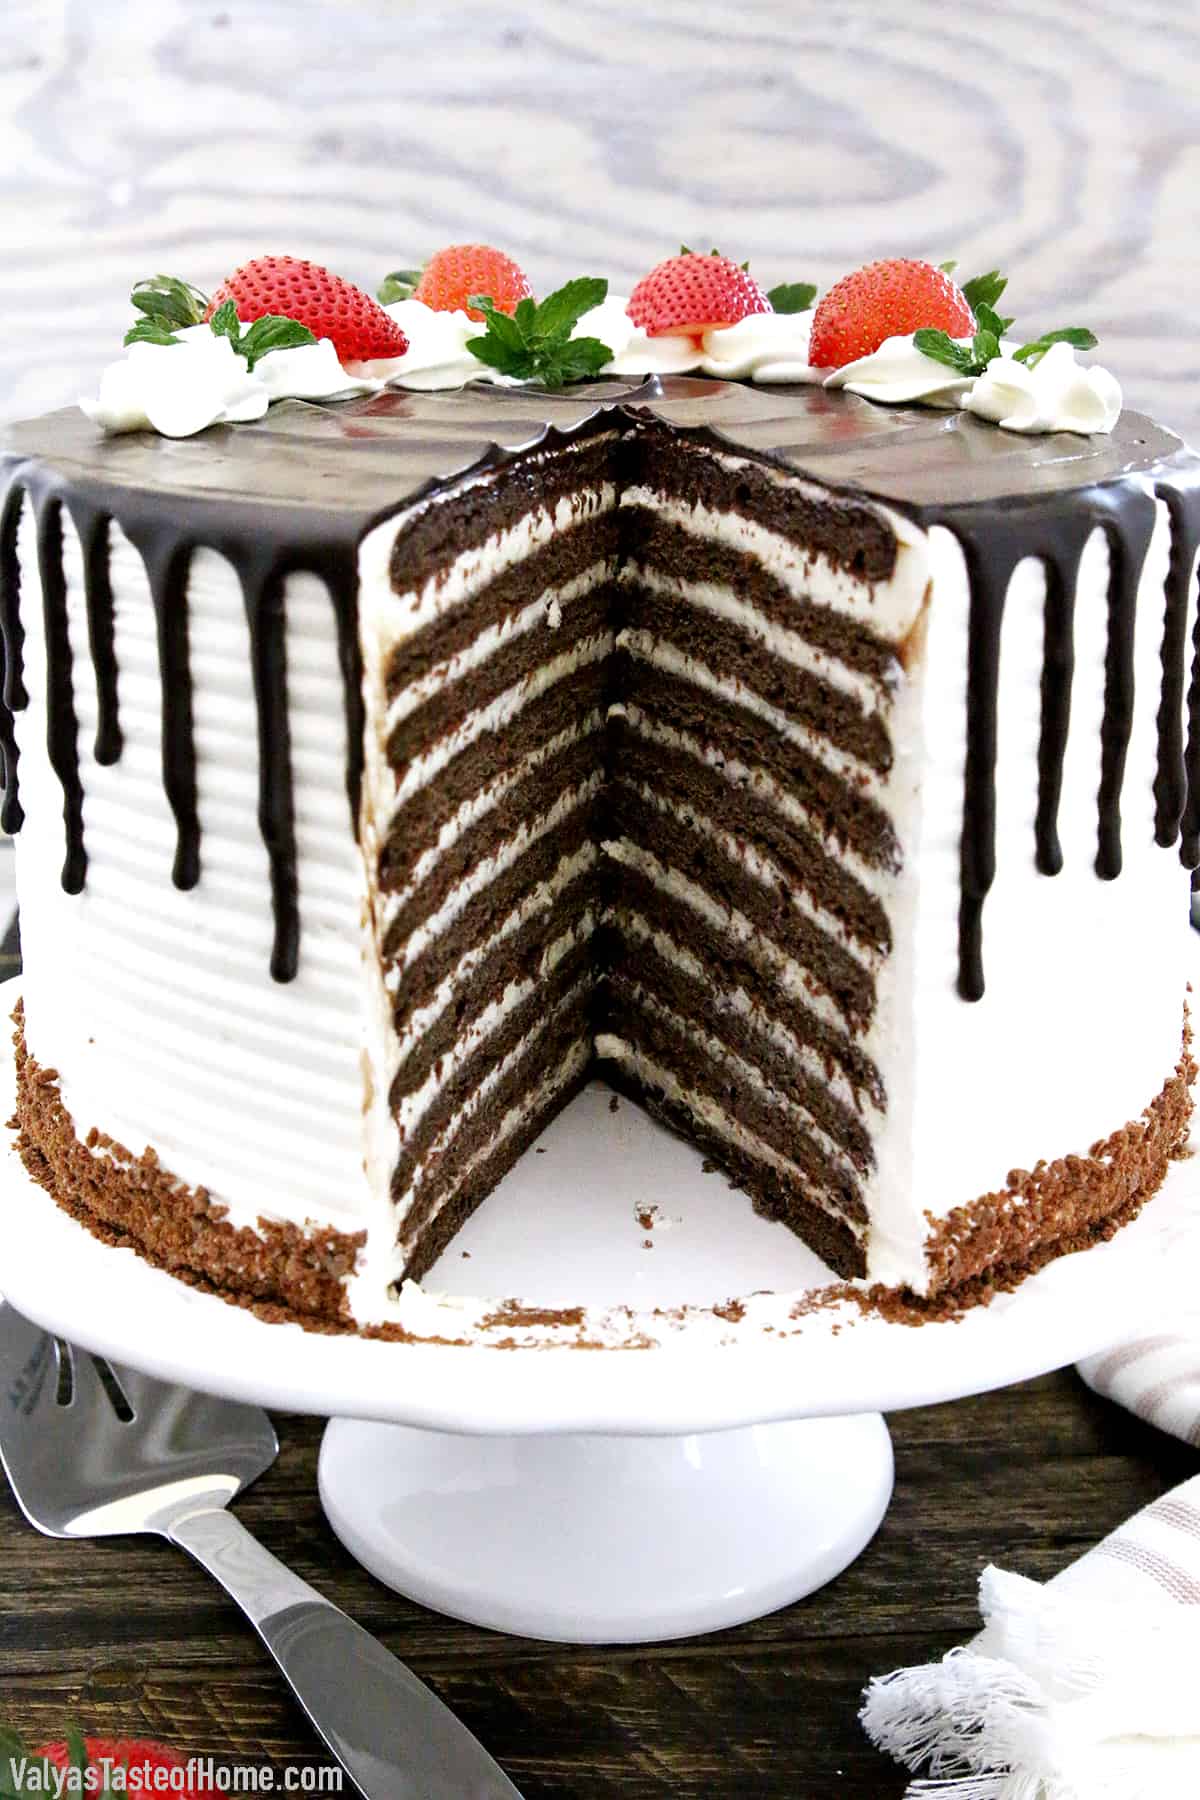
Spartak cake is a multi-layered cake with layers of thin, tender cake that give it a soft and moist texture. It’s often also known as a honey cake when honey is used alongside sugar to sweeten it.
The layers are made with a combination of flour, cocoa powder, vanilla extract, and a few more staple pantry ingredients. Each layer is baked separately to make sure they are perfectly even and thin, making this cake light and airy.
The creamy filling is made by whipping together cream cheese, condensed milk, whipping cream, vanilla extract, and a pinch of salt until it’s light and fluffy. This creamy filling is spread generously between each layer of cake, creating a beautiful, delicate stack.
We’re also going to top it with a rich layer of melted dark chocolate, which adds a beautiful finish to the cake’s appearance. The chocolate layer on top also provides a delicious contrast to the sweet and creamy filling and the light, tender cake layers.
What Makes This Spartak Cake Recipe Special?
This Spartak cake recipe is special because it utilizes high-quality ingredients and a few simple techniques to make sure the cake turns out perfectly every time. Let’s look at some of the main reasons why this is the best recipe out there that you’ll absolutely love:
Authentic: My recipe for Spartak cake is something that was passed down to me by my mother more than twenty years ago, and that’s also how long I’ve been making this cake. It tastes incredible and turns out perfect every single time.
Light and airy: This Spartak cake recipe is made with multiple thin, tender layers of cake. It gives the cake an absolutely scrumptious light and airy taste.
Perfect flavor: We’ll be making this cake with sweet cream on the bottom and topped with riched chocolate. It makes a delicious taste contrast that’s sure to please your taste buds!
Customizable: This cake is also very customizable to your liking. With a couple of adjustments to the ingredients and decorations, it’s like a whole new cake!
What You Need to Make Spartak Cake at Home
All you need are some simple, pantry-staple ingredients to make the tastiest Spartak cake you’ve ever had. Let’s look at each of them in more detail:
For the Batter:
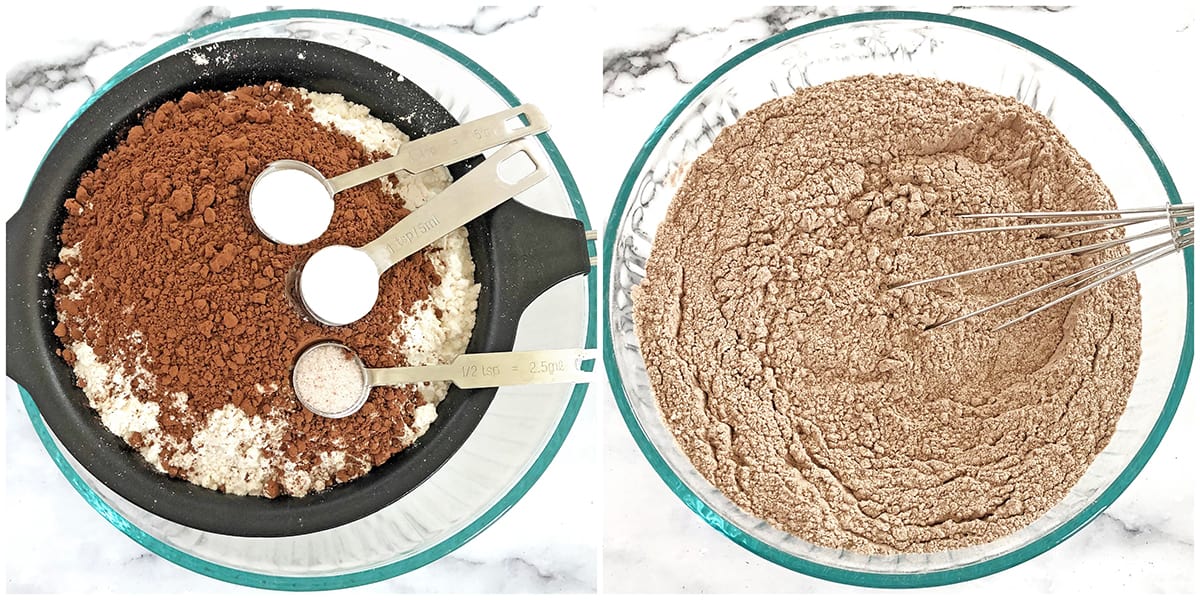
- Flour: First of all we’ll need some all-purpose flour for the base of our cake. It will bind the rest of the ingredients together to give you light and fluffy layers.
- Cocoa powder: Next we’re going to add cocoa powder. This will give our cake layers a delicious chocolatey taste.
- Baking powder: We need a little baking powder too. It creates air pockets in the cake when baking, making it even fluffier.
- Baking soda: The next ingredient we need is some baking soda. It will neutralize any acidic tastes in our cake and really bring out the richness of all the flavors
- Salt: We’ll also be needing a little salt for our tasty cake. It’ll help bring out the other flavors in the cake and balance some of the sweetness for the perfect taste in every bite.
- Eggs: We’re going to add some eggs to our batter too. I use home-raised eggs, but store-bought ones work just as well. This will help make your cake rich, fluffy, and absolutely delicious.
- Sugar: We need sugar to give our Spartak cake just the right amount of sweetness. I prefer to use organic, but regular sugar is fine as well and will make your cake incredibly delicious.
- Milk: You’ll also need some milk for the batter. I recommend using whole milk for this cake since the extra rich taste from the higher fat content is perfect for this recipe.
- Vanilla extract: Next we’ll use some pure vanilla extract in the batter. It has a slightly sweet taste with a delectable floral aroma that works beautifully for our cake layers.
- Unsalted butter: The last ingredient we need for the batter is unsalted butter. Make sure it’s unsalted so your cake doesn’t come out too salty! It’ll make your cake beautifully soft and delicious.
For the Butter Cream Frosting:
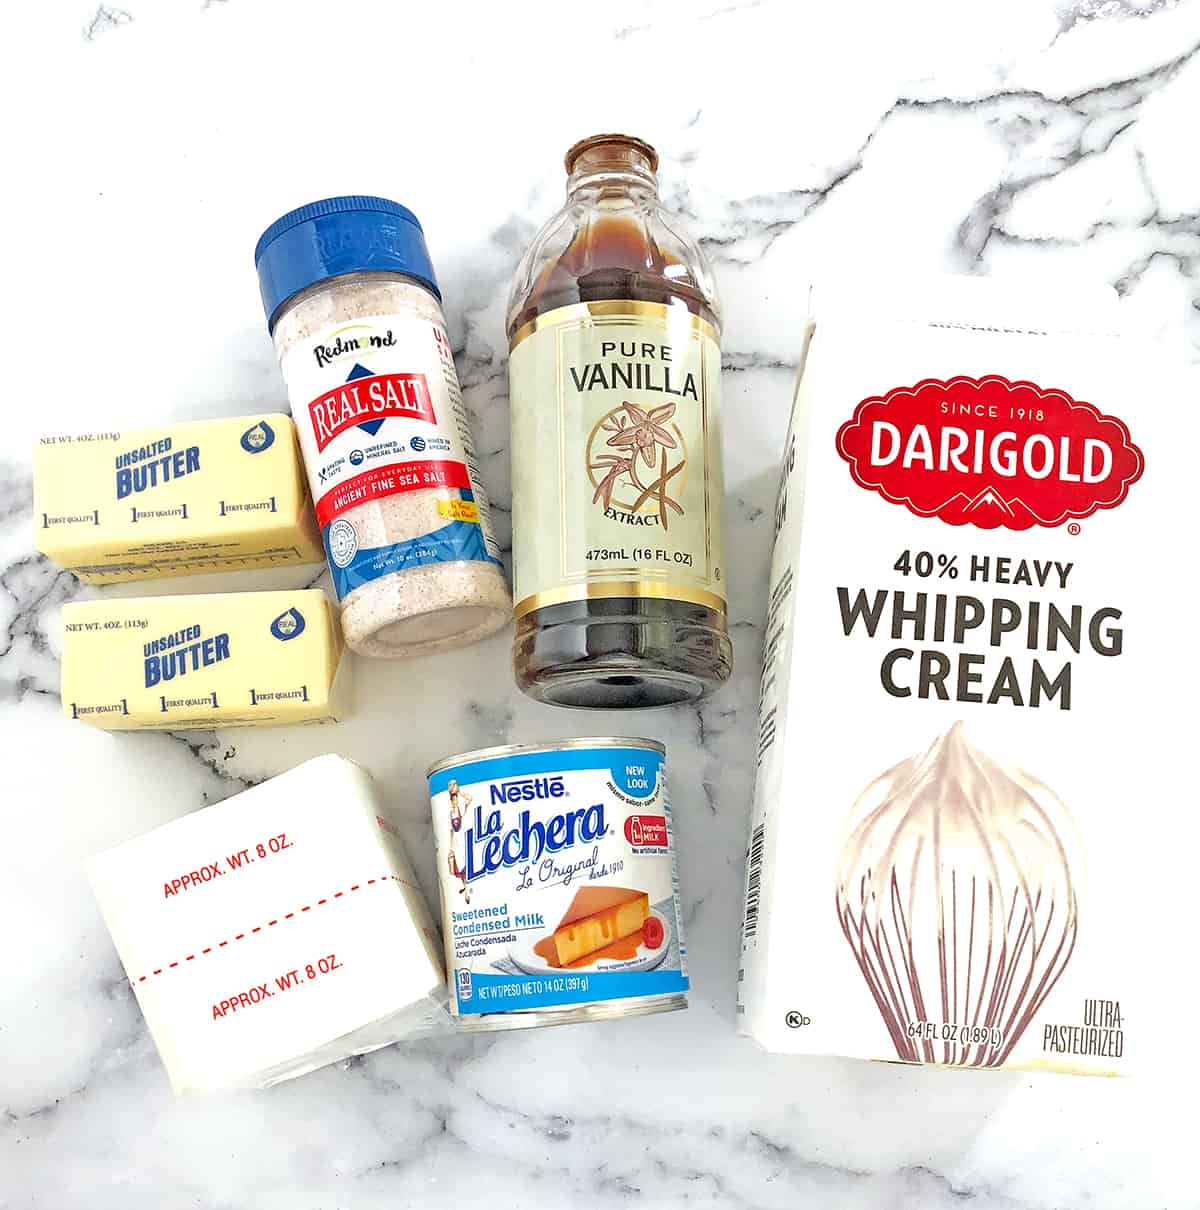
- Unsalted butter: First we’ll need more unsalted butter for the frosting. Just like the cake, make sure it’s unsalted so it doesn’t add any more salty taste.
- Cream cheese: Next we’re going to use some cream cheese in our frosting. The tanginess is perfect for balancing out the sweetness of the other ingredients.
- Condensed milk: After that, we’ll use sweetened condensed milk. It has a rich, sweet flavor and will help make our frosting nice and thick.
- Vanilla extract: We’ll add some vanilla extract to the frosting as well as the cake for a delicious vanilla flavor in every single bite.
- Salt: You’ll also need a little bit of salt that’ll perfectly balance out all the flavors for the tastiest buttercream frosting ever!
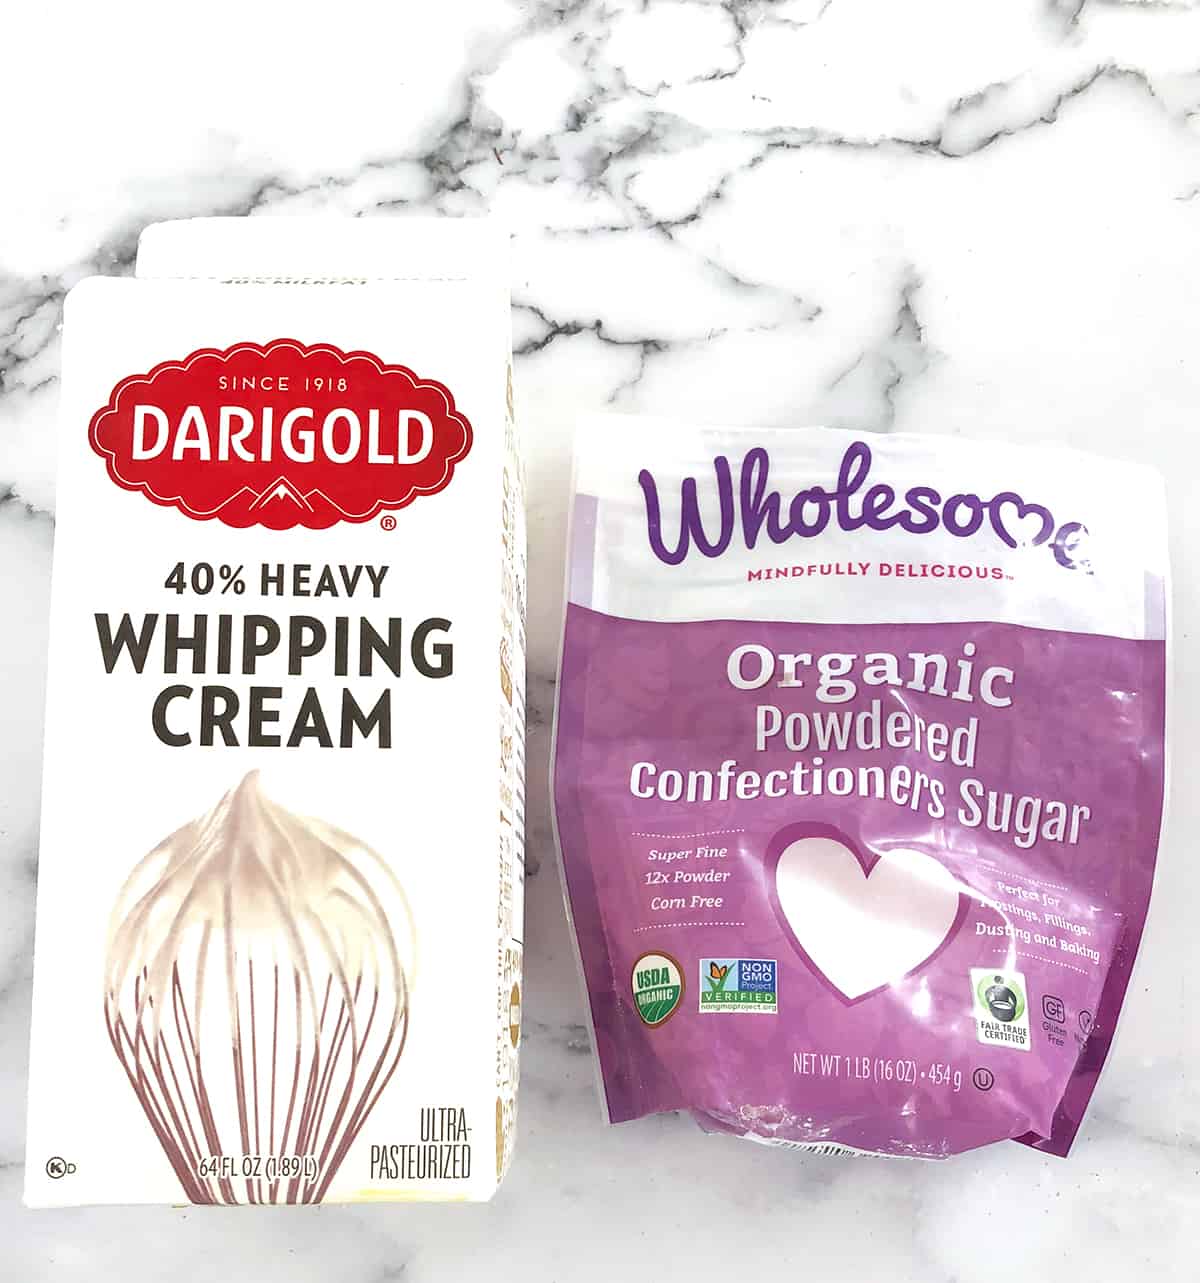
- Whipping cream: Lastly, we’ll need some heavy whipping cream. It has a rich and sweet taste and will make our frosting nice and light when whipped.
For the Chocolate Ganache:
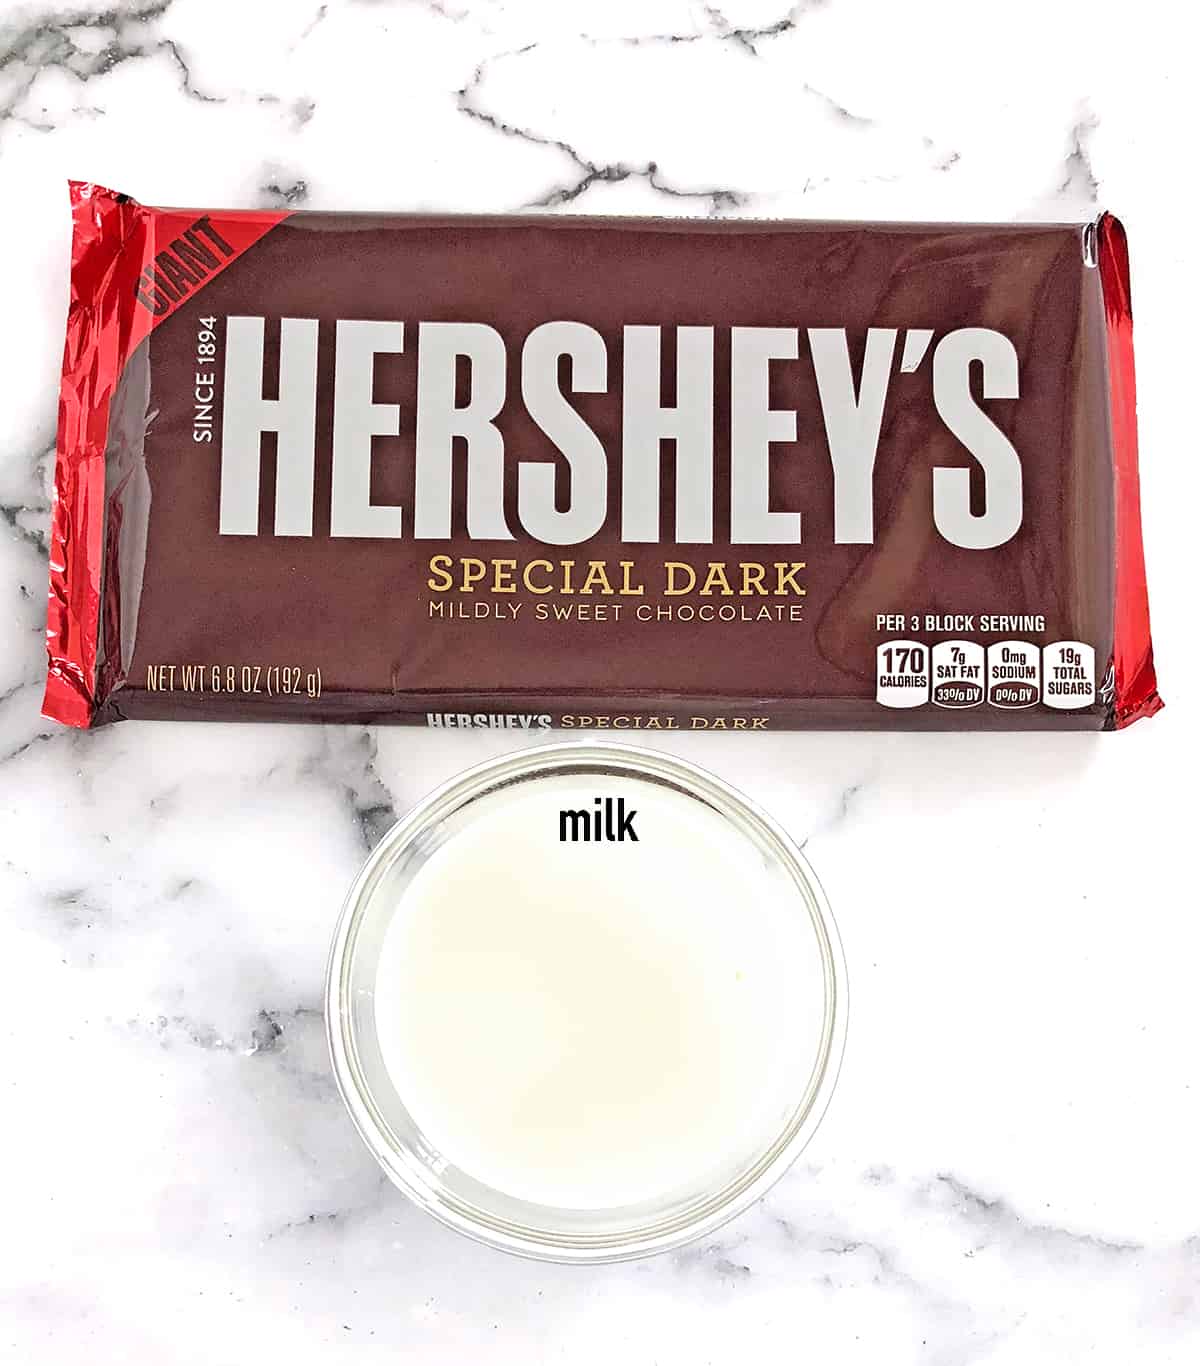
- Hershey’s dark chocolate: Dark chocolate has flavor notes of sweetness, bitterness, and earthiness. It will pair fantastically with the sweet ingredients in our cake and frosting for the perfect Spartak cake.
- Milk: We’re going to use whole milk again in our chocolate ganache topping. It will help the chocolate be even richer with a slightly sweet taste.
For the Whipped Cream Frosting:
- Whipping cream: We need some more heavy whipping cream for our cream frosting also. It’s perfectly light and airy for the perfect balance of flavors.
- Powdered sugar: The last ingredient we need is powdered sugar. It’s delightfully sweet and makes a great frosting every single time!
How to Make Spartak Cake (Step-by-Step)
Making Spartak cake might seem complicated, but it’s incredibly easy. Here’s how to make it step by step:
How to Make Spartak Cake Batter
Start by measuring and sifting the dry ingredients namely flour, cocoa powder, baking soda, baking powder, and salt in a medium bowl and whisk them together. Set this bowl aside until we’re ready to use it later.
Next, prepare a water bath by pouring water into a saucepan. Make sure this saucepan fits under your KitchenAid mixer, then bring the water to a boil.
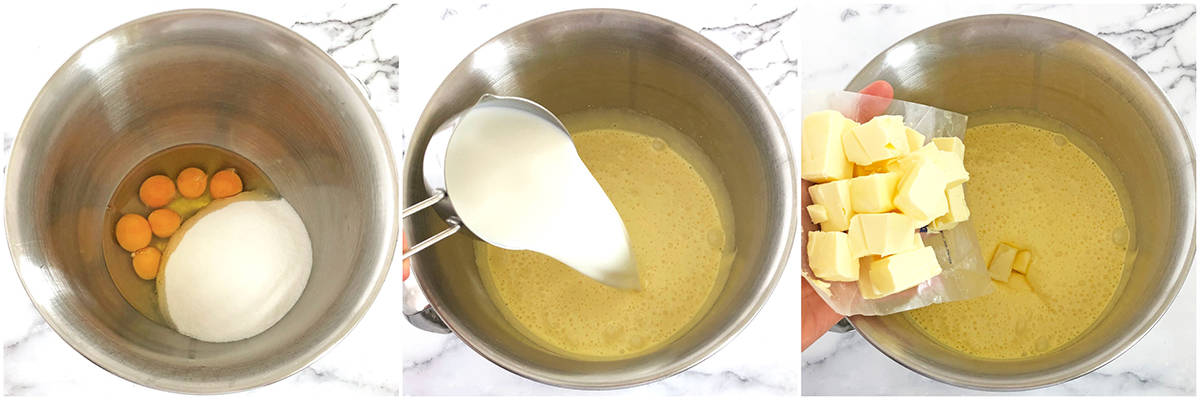
While the water is coming to a boil, beat the eggs along with two and a half cups sugar on high for 5 minutes. It should be light, fluffy, and pale yellow in color.
Now add one cup milk, vanilla, and softened butter cut into cubes into the mixer bowl with the egg mixture.
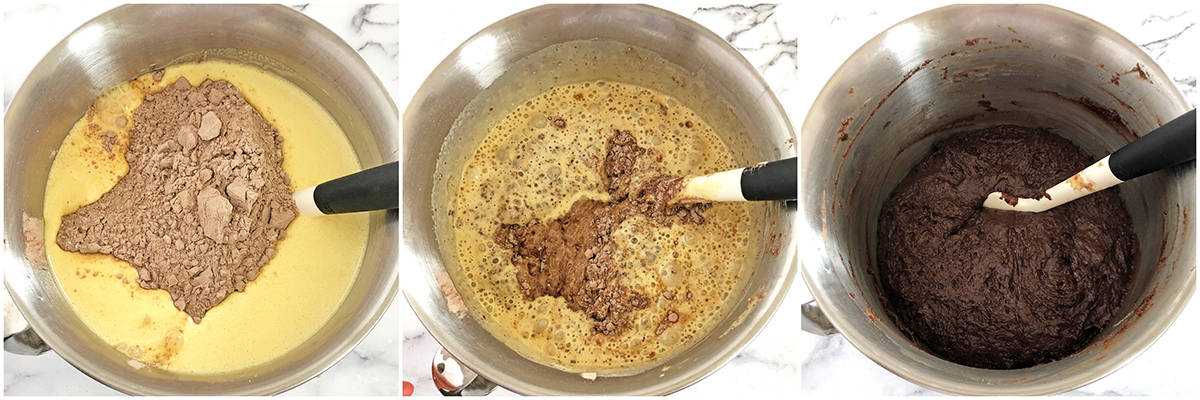
Reduce the water bath heat to medium-high heat and place the mixer bowl over the saucepan with boiling water. Make sure that the bowl doesn’t touch the water.
Cook the mixture for 8 minutes while stirring constantly using a silicone spatula. The consistency will thin out at first and then start foaming and doubling in size.
Remove the mixer bowl from the heat and immediately add in the mixture of dry ingredients we made earlier.
Using a firm silicone spatula, mix the hot foamy wet mixture with the dry mixture from the bottom of the bowl upward until well combined. It should have a smooth and stretchy consistency when it’s fully mixed.
Set the dough aside and cool it to room temperature for about 30 minutes or so before working with it. The dough will thicken as it cools.
How to Shape Spartak Cake Layers
Using a silicone spatula, scoop and weigh out 8 oz. of the dough. I recommend being precise with the measurement for even layers.
Sprinkle flour over the dough and place it over a floured surface of parchment paper dusted with more flour. This way, the dough won’t stick to your rolling pin. Next, flatten it into a disc.
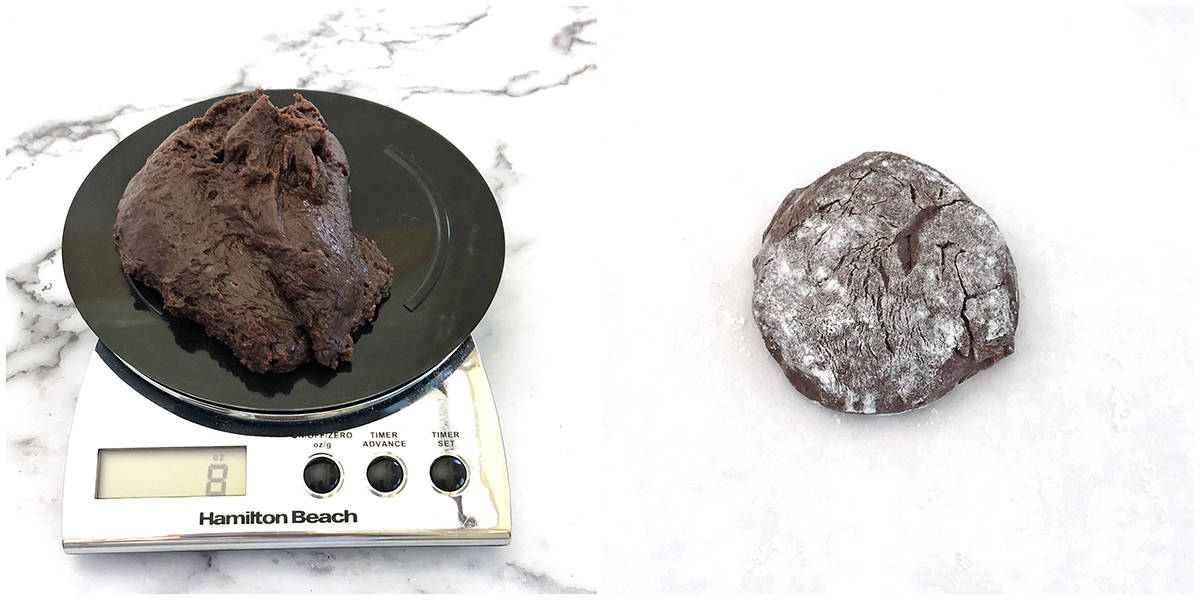
Using a rolling pin, roll the dough out flat, working from the center outward. Flip the disc over from the bottom side up just like you would with some pizza dough. Dust the paper with additional flour if the dough gets sticky and roll it until it’s spread out ¼ inch beyond your preferred cutting form.
Place the round disc (I use the bottom disc of a springform pan) over the rolled-out dough. Then, using a pizza cutter, cut along the perimeter of the disk. In case the dough gets stuck to the pizza cutter, dust it with more flour.
NOTE: I use an 8″ inch disk to cut out 8 oz. of rolled-out dough for tall cakes (the layers will be thicker) or a 10″ disk to cut out 8 oz. of rolled-out dough for shorter cakes. The look is up to you, however thick or thin you like your layers. You can even make a 12″ wide in diameter using the same amount (8 oz.) of dough.
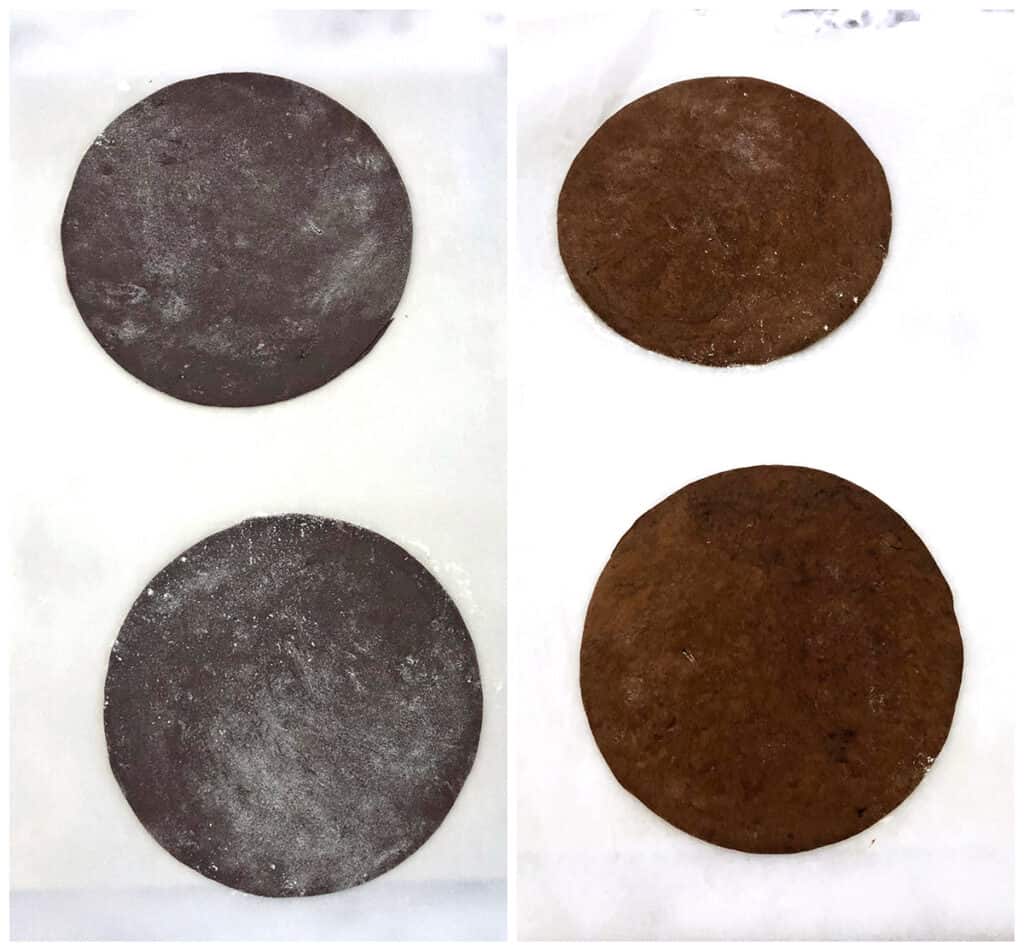
I use a large sheet (16 x 24) of parchment paper when making my layers and roll and bake 2 layers at a time.
After 2 layers of dough are ready to bake, transfer the parchment paper by sliding it onto a cookie baking sheet.
How to Bake Spartak Cake Layers
Time to bake our cake layers! Bake the layers in a preheated oven at 350 F for 8 minutes. While the cake layers are baking, repeat the rolling instructions above to make 2 more layers.
Once done, remove the layers from the oven and slide the parchment paper with baked layers onto the countertop. Let them cool for 5 mins before transferring them to a cooling rack. Immediately place the second set of rolled-out cake layers into the oven and repeat the same baking instructions.
Next, using a cake spatula, separate the baked cake layers from the parchment paper by running it under the layer and gently. Transfer the layers onto cooling racks to cool completely before frosting. The layers will be pretty soft after baking so be careful not to chip or break them during the transfer process.
NOTE: I use 3 sheets of parchment paper and rotate them. While the first set of layers is cooling down and the second is baking, I roll out the next layers on the third sheet. I repeat these rotation steps until all the cake layers are baked.
How to Make Butter Cream Frosting
While all the chocolate cake layers are cooling, let’s make the frosting.
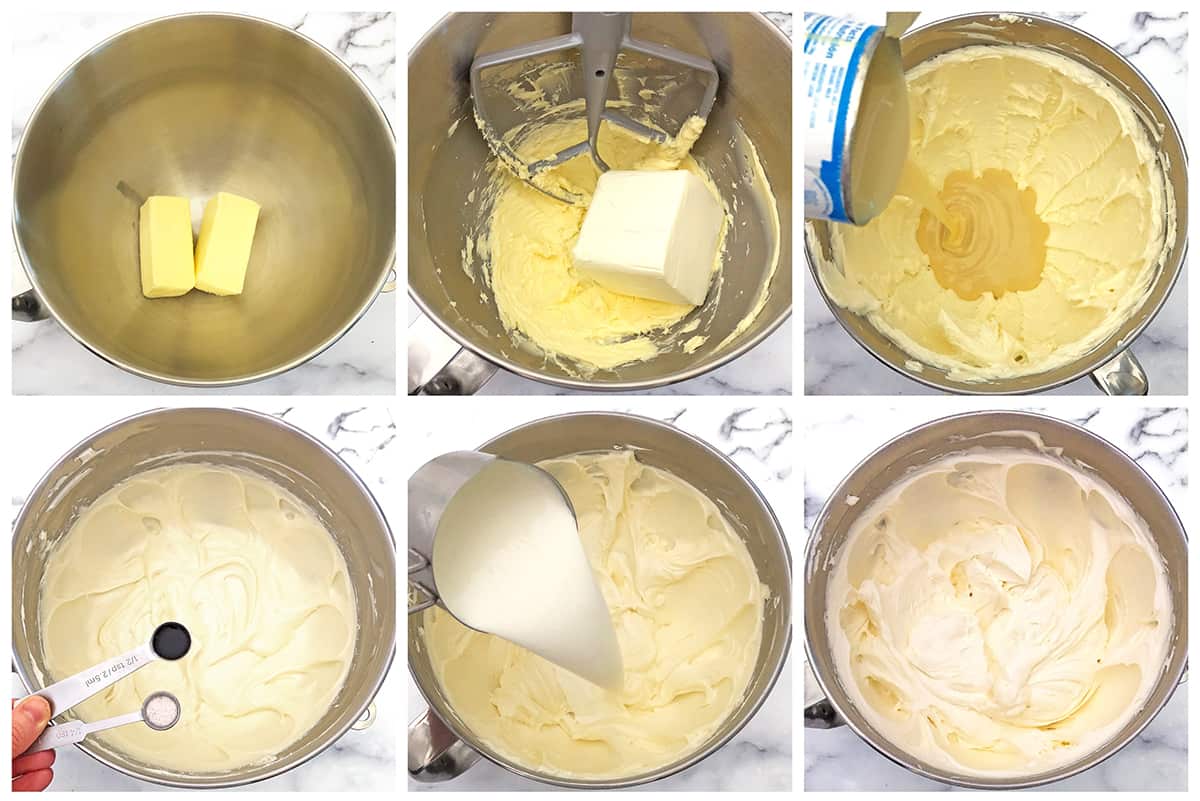
Start by beating softened butter until creamy and smooth, which takes about a minute or so. Add softened cream cheese and beat again until both are well combined, about another minute. Scrape the cream off the sides of the mixer bowl halfway through beating.
Next, add condensed milk and beat again for another minute, scraping the cream off the sides of the mixer bowl halfway through mixing.
Then add vanilla and salt and mix again for another minute.
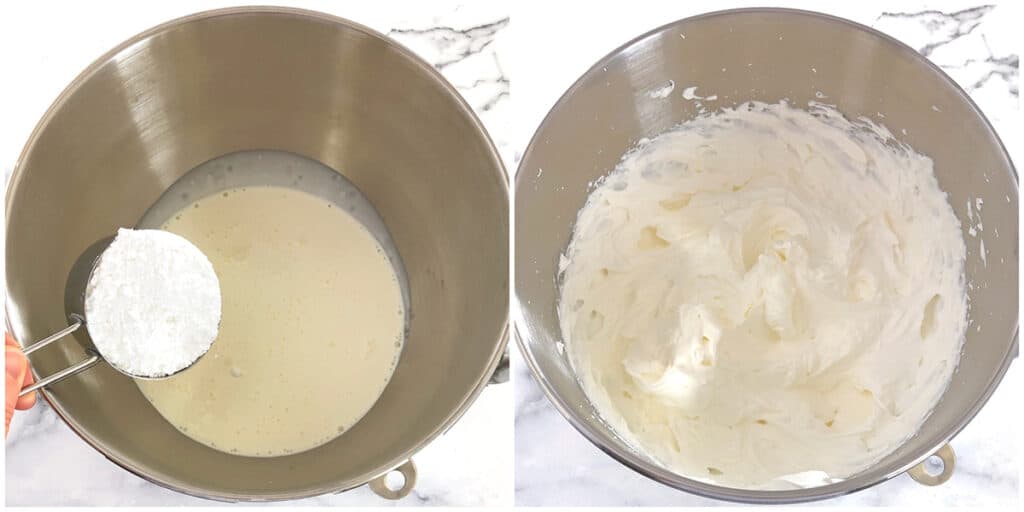
Finally, add cold heavy cream. Start beating the cream slowly on low, then gradually increase the mixing speed to medium. Again, scrape the cream off the bowl multiple times to ensure all the ingredients are well-mixed.
As the heavy whipping cream combines with the buttercream it will liquefy more. The frosting will thicken during the mixing process. Make sure to not overbeat the frosting! As soon as it starts to hold its shape the frosting is ready.
How to Assemble Spartak Cake
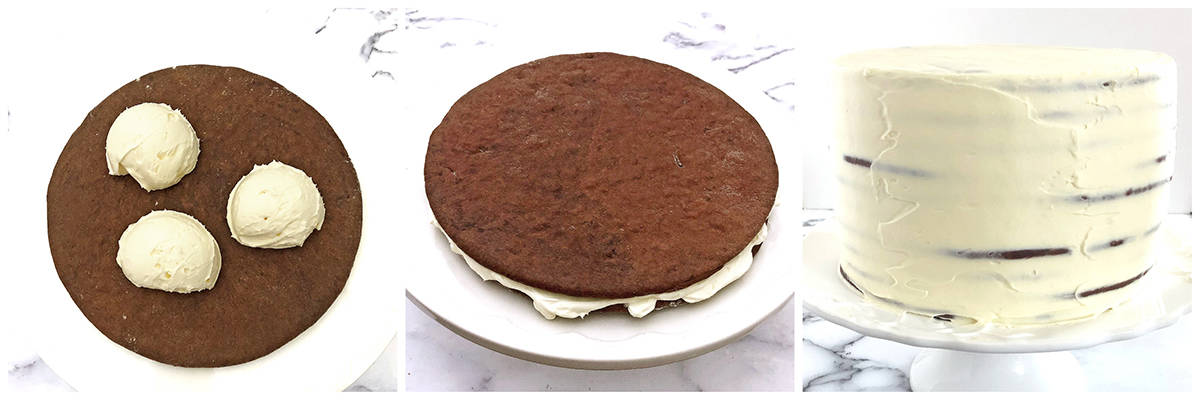
Place the first chocolate cake layer onto a cake stand. Personally, I use one that’s 2″ wider than the cake layers. Using a ½ cup ice cream scoop, scoop 3 scoops of frosting and spread it out evenly over the cake layer.
Place the second chocolate cake layer over the frosting and repeat the same scooping and spreading instructions until you’re done frosting all the cake layers.
Using the remaining cream, frost the sides and the top of the cake.
NOTE: Because this cake is almost 6″ inches tall and the frosting is not very thick, you need to frost the cake carefully for the layers to stay in place and not slide off or lean.
As soon as you’re done frosting the cake, gently transfer the cake into the fridge for the buttercream frosting to harden. Chill it for at least 4 hours, but overnight is preferable.
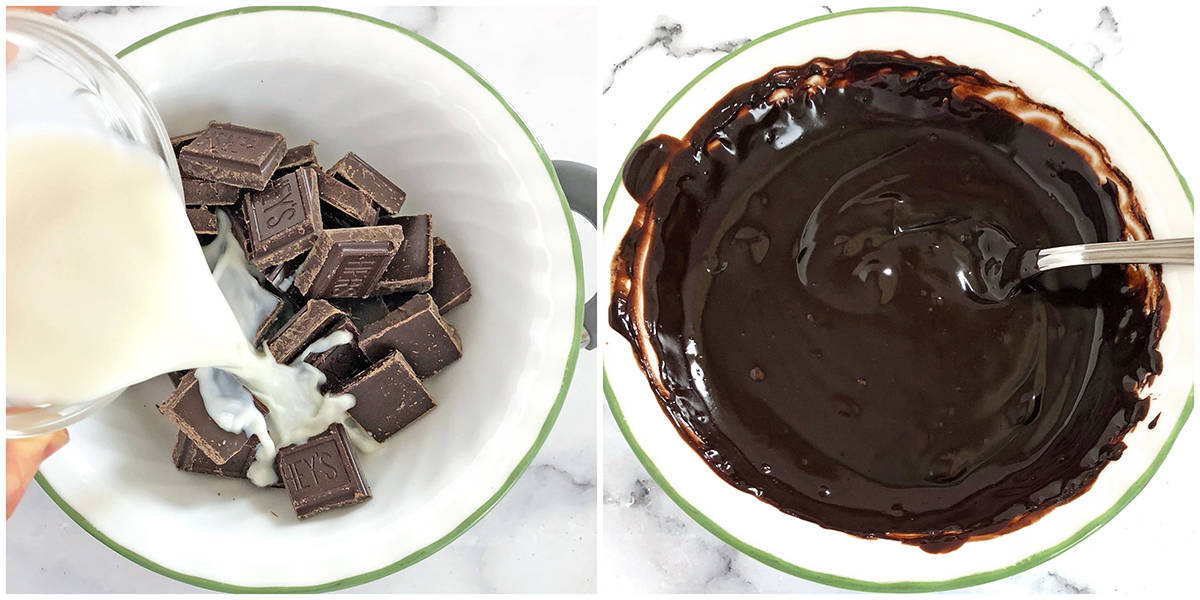
How to Make Chocolate Ganache
Break the chocolate bar into small pieces and place them in a glass bowl. Add milk and place the bowl over a saucepan with 1″ of water.
Place the saucepan on the stove over high heat and bring the water to a boil.
When the water boils, reduce the heat to low and mix the milk with the chocolate. Stir it frequently until it has a smooth texture with no lumps.
Carefully remove the bowl from the saucepan and set aside for the ganache to cool to room temperature.
If the ganache gets too thick you can soften it with warm milk to the desired dripping consistency.
How to Make Whipped Cream Frosting
Beat cold heavy cream with powdered sugar just until it thickens and you get stiff peaks. Don’t overbeat the cream or you’ll end up with butter! Set it aside until ready to use.
How to Decorate Spartak Cake
NOTE: If you want to crumb the cake instead of decorating it, simply roll out the dough of the last chocolate cake layer very thinly and bake it for 15 minutes. The layer will dry out and be great for crushing into crumbs.
Spread out the cream frosting over the sides of the cake evenly. Using a cake icing smoother, engrave the design on the sides of the cake.
Transfer half of the ganache into a ganache bottle and make drips all around the cake. Then pour the rest of the ganache on top of the cake. Using a regular cake spatula, make a swirly design on top of the cake.
NOTE: I prefer to place the cake in the freezer for a while before decorating it with chocolate ganache. This helps the ganache stick to the whipping cream frosting faster.
Pipe some roses or any desired design, place fresh strawberries over the roses, garnish with mint leaves, and your delicious Spartak cake is ready to serve!
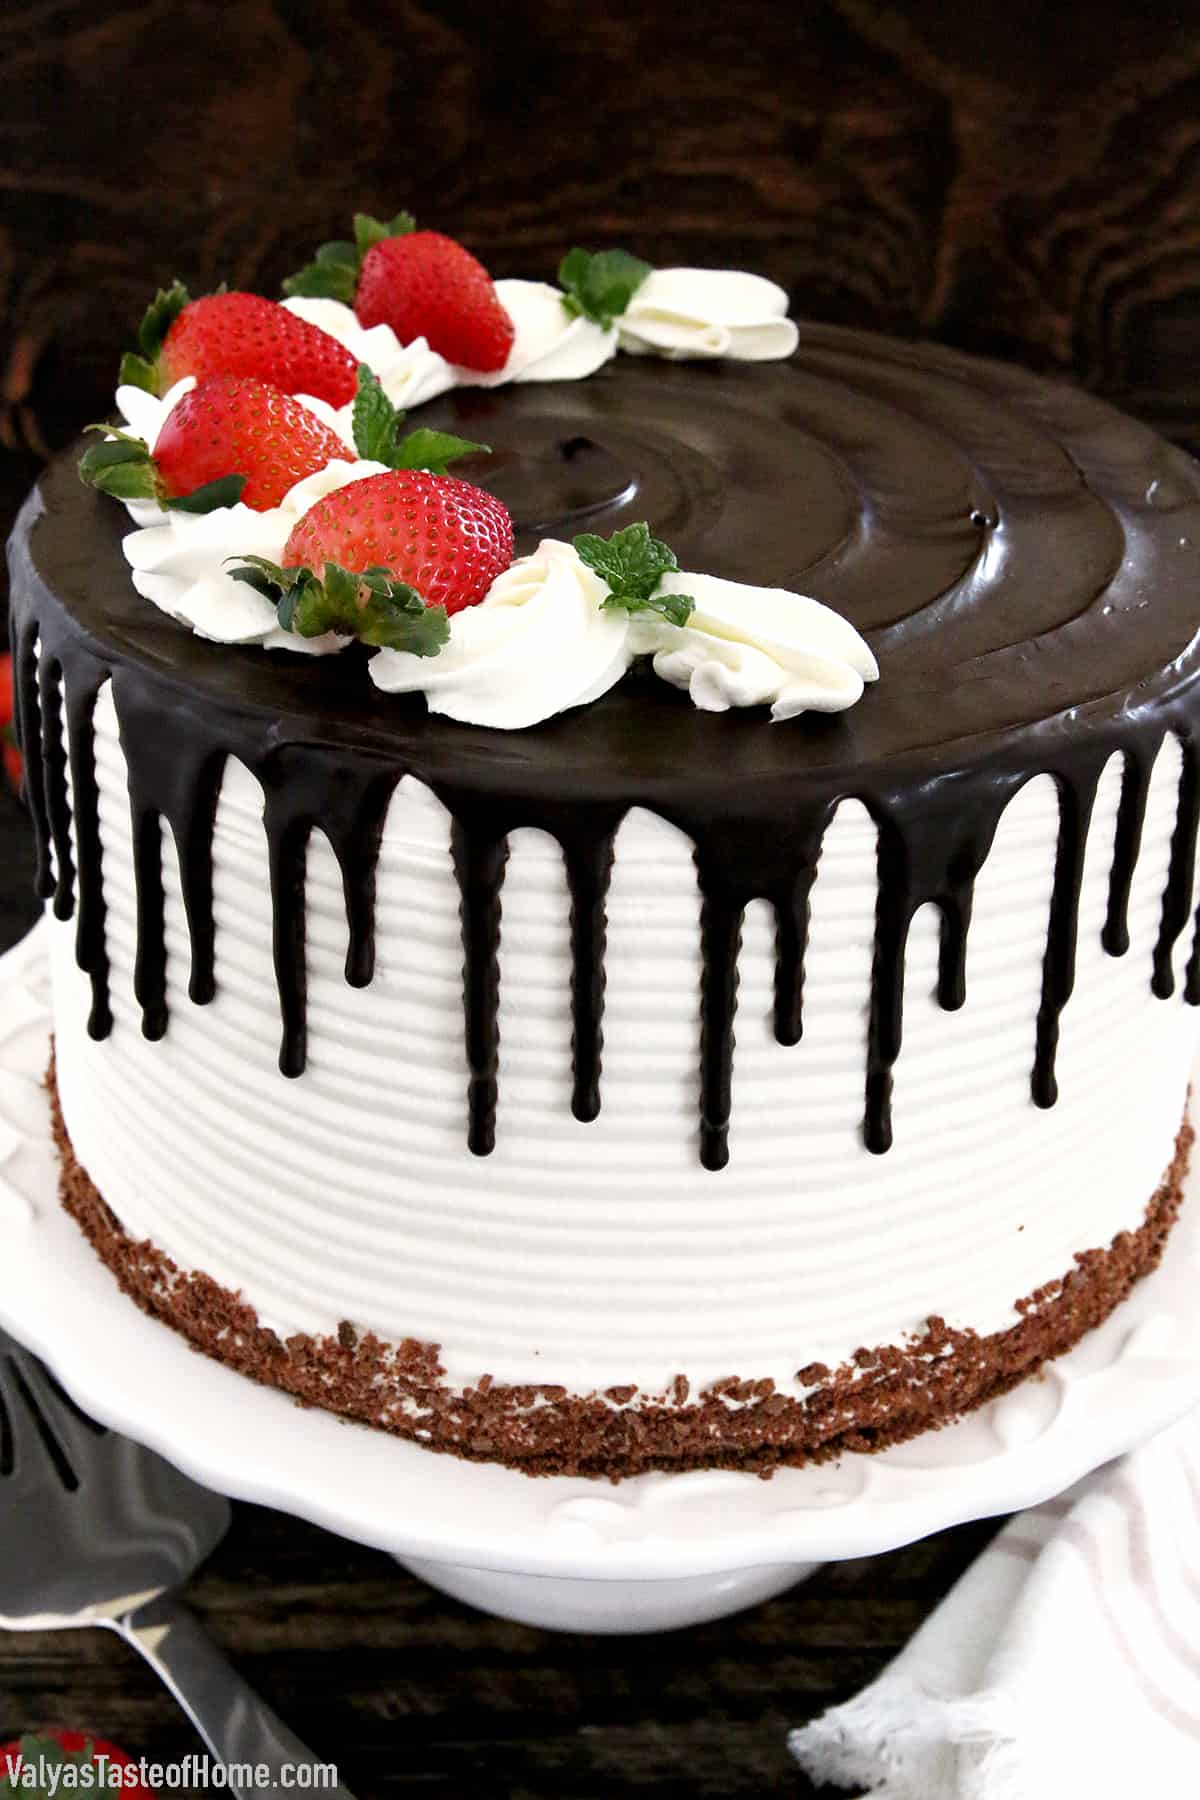
Chill the cake for an hour or so for the outer cake frosting to set.
Tips for Making the Best Spartak Cake Ever
Be precise: Measure out all your ingredients before you start so you have them on hand when you need them. Be sure to weigh the cake dough precisely for even cake layers.
Don’t overbeat: The frosting will become too thin or runny if you overbeat it. Also, be sure your cake is properly chilled so the frosting hardens and stays in place.
Let the ganache cool: Make sure the ganache is at room temperature and not too thick or runny before you use it. This will help with the desired dripping effect.
How to Cut Clean Slices of Spartak Cake Every Time
If you like to see nice and clean slices of cake as I do, it is important to know a few tips that will help you get that satisfying look. Slicing the cake with a warmed, clean knife will ensure each and every slice of the cake is clean and beautiful.
To do this, place a long knife into a tall cup filled with hot water for about 20 seconds. Remove the knife from the water and dry it using a paper towel. The hot knife will melt away stickiness and cleanly slice through the layers of the cake. Cut only in one downward direction and pull the knife out at the base of the cake.
Repeat these instructions each time you make a slice and you’ll have a drool-worthy presentation with each slice of this deliciousness you worked so hard on. You’ll end up with the most beautiful cake ever!
Recipe Variation Ideas for Spartak Cake
This Spartak cake recipe will give you an absolutely delicious cake every single time. But if you’re looking to change things up, here are a few variation ideas:
Add mousse: For a more decadent version, top it off with a creamy chocolate mousse. Start with a basic mousse recipe and add some dark chocolate chips or cocoa powder for extra flavor.
Different frosting: You can also go for some sour cream frosting to add a tangy flavor to each bite and change up the taste some more!
Fruity version: If you want to make a lighter version of this cake, try substituting whipped cream frosting for heavy cream and adding a layer of fresh fruit, like raspberries or blueberries, between each cake layer.
Different ganache: For an even more unique twist on this classic cake, use flavored ganache like white chocolate raspberry, or even peppermint.

How to Store Leftover Spartak Cake
To store leftover Spartak Cake, place it in an airtight container and store it in the refrigerator for up to 3 days.
You can also freeze the cake for up to 1 month. When you’re ready to eat it, thaw it in the refrigerator overnight before serving.
Enjoy with a hot cup of tea or a homemade latte.
More Cake Recipes You’ll Love
- The Best Tree Stump Cake
- Simple Pumpkin Spice Latte Cake Recipe
- Strawberry Biskvit Cake with Greek Yogurt Cream
- Chocolate Cherry Cake
- Mint Chocolate Cake
- Korolevsky Cake (Kings Cake)
- Honey Chocolate and Strawberry Cake
- Cake “Broken Glass”
- Cake “Curly Boy”
Check out all dessert recipes.

The Best Chocolate Spartak Cake (Authentic Recipe!)
Ingredients
Chocolate Spartak Batter Cake Ingredients
- 6 cups – organic all-purpose flour (+1/2 for rolling)
- 1 cup – cocoa powder
- 1 tsp. – baking powder
- 1 tsp. – baking soda
- ½ tsp. – sea salt
- 6 large – eggs (I used home-raised chicken eggs)
- 2 ½ cups – sugar
- 1 cup – organic whole milk
- 2 tsp. – vanilla
- 8 oz. – unsalted butter
Chocolate Spartak Butter Cream Frosting Ingredients
- 8 oz. – unsalted butter (softened to room temperature)
- 16 oz. – plain cream cheese (softened to room temperature)
- 14 oz. – uncooked condensed milk
- ½ tsp. – pure vanilla extract
- 1/8 tsp. – sea salt
- 3 cups – cold heavy whipping cream
Chocolate Spartak Chocolate Ganache Ingredients
- 6.6 oz – Hershey dark chocolate milk
- ¼ cup – organic whole milk
Chocolate Spartak Cake Whipped Cream Frosting Ingredients
- 2 cups – cold heavy whipping cream
- ¼ cup – organic powdered sugar
Instructions
How to Make Spartak Cake Batter
- Start by measuring and sifting the dry ingredients namely flour, cocoa powder, baking soda, baking powder, and salt in a medium bowl and whisk them together. Set this bowl aside until we’re ready to use it later.
- Next, prepare a water bath by pouring water into a saucepan. Make sure this saucepan fits under your KitchenAid mixer, then bring the water to a boil.
- While the water is coming to a boil, beat the eggs along with two and a half cups sugar on high for 5 minutes. It should be light, fluffy, and pale yellow in color.
- Now add one cup milk, vanilla, and softened butter cut into cubes into the mixer bowl with the egg mixture.
- Reduce the water bath heat to medium-high heat and place the mixer bowl over the saucepan with boiling water. Make sure that the bowl doesn’t touch the water.
- Cook the mixture for 8 minutes while stirring constantly using a silicone spatula. The consistency will thin out at first and then start foaming and doubling in size.
- Remove the mixer bowl from the heat and immediately add in the mixture of dry ingredients we made earlier.
- Using a firm silicone spatula, mix the hot foamy wet mixture with the dry mixture from the bottom of the bowl upward until well combined. It should have a smooth and stretchy consistency when it’s fully mixed.
- Set the dough aside and cool it to room temperature for about 30 minutes or so before working with it. The dough will thicken as it cools.
How to Shape Spartak Cake Layers
- Using a silicone spatula, scoop and weigh out 8 oz. of the dough. I recommend being precise with the measurement for even layers.
- Sprinkle flour over the dough and place it over a floured surface of parchment paper dusted with more flour. This way, the dough won’t stick to your rolling pin. Next, flatten it into a disc.
- Using a rolling pin, roll the dough out flat, working from the center outward. Flip the disc over from the bottom side up just like you would with some pizza dough. Dust the paper with additional flour if the dough gets sticky and roll it until it’s spread out ¼ inch beyond your preferred cutting form.
- Place the round disc (I use the bottom disc of a springform pan) over the rolled-out dough. Then, using a pizza cutter, cut along the perimeter of the disk. In case the dough gets stuck to the pizza cutter, dust it with more flour.
- NOTE: I use an 8" inch disk to cut out 8 oz. of rolled-out dough for tall cakes (the layers will be thicker) or a 10" disk to cut out 8 oz. of rolled-out dough for shorter cakes. The look is up to you, however thick or thin you like your layers. You can even make a 12" wide in diameter using the same amount (8 oz.) of dough.
- I use a large sheet (16 x 24) of parchment paper when making my layers and roll and bake 2 layers at a time.
- After 2 layers of dough are ready to bake, transfer the parchment paper by sliding it onto a cookie baking sheet.
How to Bake Spartak Cake Layers
- Time to bake our cake layers! Bake the layers in a preheated oven at 350 F for 8 minutes. While the cake layers are baking, repeat the rolling instructions above to make 2 more layers.
- Once done, remove the layers from the oven and slide the parchment paper with baked layers onto the countertop. Let them cool for 5 mins before transferring them to a cooling rack. Immediately place the second set of rolled-out cake layers into the oven and repeat the same baking instructions.
- Next, using a cake spatula, separate the baked cake layers from the parchment paper by running it under the layer and gently. Transfer the layers onto cooling racks to cool completely before frosting. The layers will be pretty soft after baking so be careful not to chip or break them during the transfer process.
- NOTE: I use 3 sheets of parchment paper and rotate them. While the first set of layers is cooling down and the second is baking, I roll out the next layers on the third sheet. I repeat these rotation steps until all the cake layers are baked.
How to Make Butter Cream Frosting
- While all the chocolate cake layers are cooling, let’s make the frosting.
- Start by beating softened butter until creamy and smooth, which takes about a minute or so. Add softened cream cheese and beat again until both are well combined, about another minute. Scrape the cream off the sides of the mixer bowl halfway through beating.
- Next, add condensed milk and beat again for another minute, scraping the cream off the sides of the mixer bowl halfway through mixing.
- Then add vanilla and salt and mix again for another minute.
- Finally, add cold heavy cream. Start beating the cream slowly on low, then gradually increase the mixing speed to medium. Again, scrape the cream off the bowl multiple times to ensure all the ingredients are well-mixed.
- As the heavy whipping cream combines with the buttercream it will liquefy more. The frosting will thicken during the mixing process. Make sure to not overbeat the frosting! As soon as it starts to hold its shape the frosting is ready.
How to Assemble Spartak Cake
- Place the first chocolate cake layer onto a cake stand. Personally, I use one that’s 2″ wider than the cake layers. Using a ½ cup ice cream scoop, scoop 3 scoops of frosting and spread it out evenly over the cake layer.
- Place the second chocolate cake layer over the frosting and repeat the same scooping and spreading instructions until you’re done frosting all the cake layers.
- Using the remaining cream, frost the sides and the top of the cake.
- NOTE: Because this cake is almost 6" inches tall and the frosting is not very thick, you need to frost the cake carefully for the layers to stay in place and not slide off or lean.
- As soon as you’re done frosting the cake, gently transfer the cake into the fridge for the buttercream frosting to harden. Chill it for at least 4 hours, but overnight is preferable.
How to Make Chocolate Ganache
- Break the chocolate bar into small pieces and place them in a glass bowl. Add milk and place the bowl over a saucepan with 1″ of water.
- Place the saucepan on the stove over high heat and bring the water to a boil.
- When the water boils, reduce the heat to low and mix the milk with the chocolate. Stir it frequently until it has a smooth texture with no lumps.
- Carefully remove the bowl from the saucepan and set aside for the ganache to cool to room temperature.
- If the ganache gets too thick you can soften it with warm milk to the desired dripping consistency.
How to Make Whipped Cream Frosting
- Beat cold heavy cream with powdered sugar just until it thickens and you get stiff peaks. Don’t overbeat the cream or you’ll end up with butter! Set it aside until ready to use.
How to Decorate Spartak Cake
- NOTE: If you want to crumb the cake instead of decorating it, simply roll out the dough of the last chocolate cake layer very thinly and bake it for 15 minutes. The layer will dry out and be great for crushing into crumbs.
- Spread out the cream frosting over the sides of the cake evenly. Using a cake icing smoother, engrave the design on the sides of the cake.
- Transfer half of the ganache into a ganache bottle and make drips all around the cake. Then pour the rest of the ganache on top of the cake. Using a regular cake spatula, make a swirly design on top of the cake.
- NOTE: I prefer to place the cake in the freezer for a while before decorating it with chocolate ganache. This helps the ganache stick to the whipping cream frosting faster.
- Pipe some roses or any desired design, place fresh strawberries over the roses, garnish with mint leaves, and your delicious Spartak cake is ready to serve!
Thank you for following me on Instagram, Facebook, and Pinterest!
The post may contain affiliate links. Read my disclosure.

Hello, Does this recipe really call for 6 cups of flour? All other spartak recipes I saw, ask for a lot less…just making sure uts 6 cups!
Yes, it’s a bigger portion.