The Best Tree Stump Cake
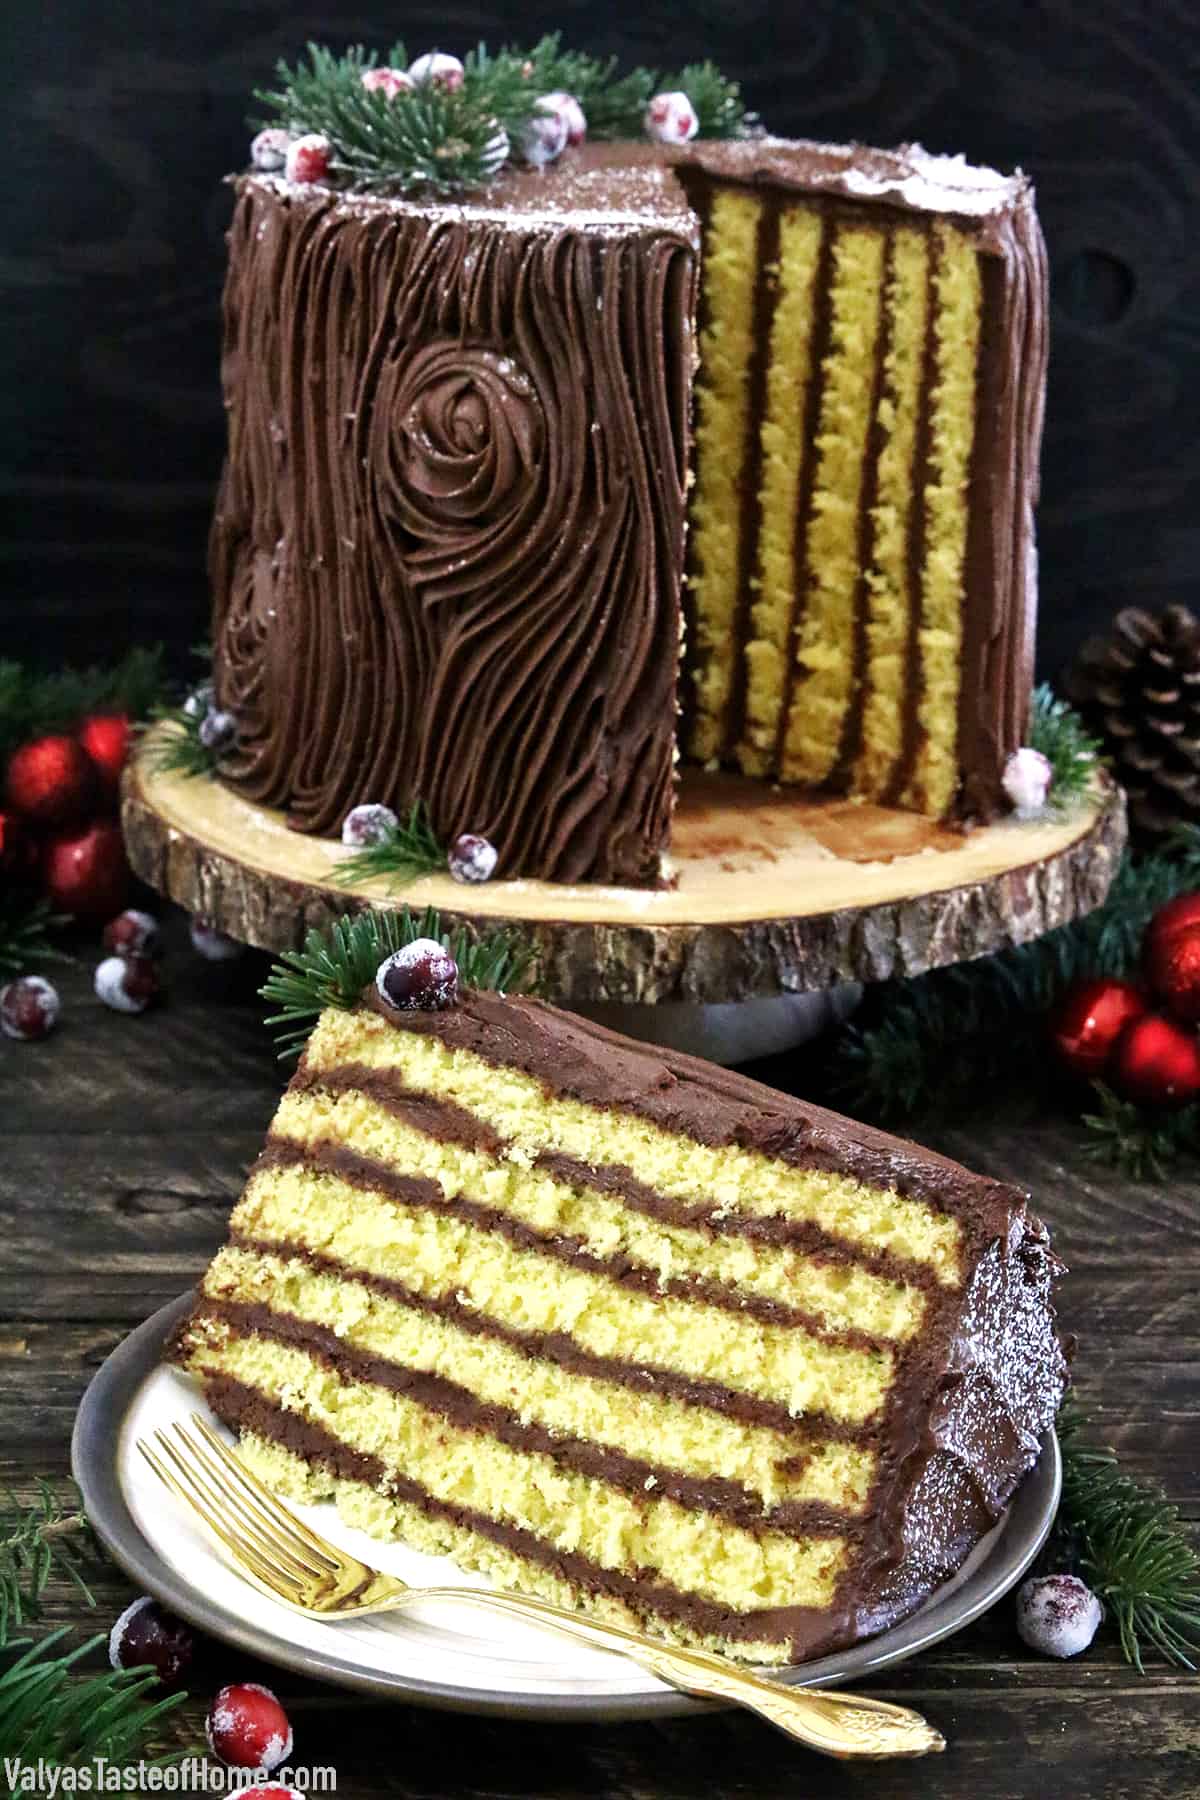
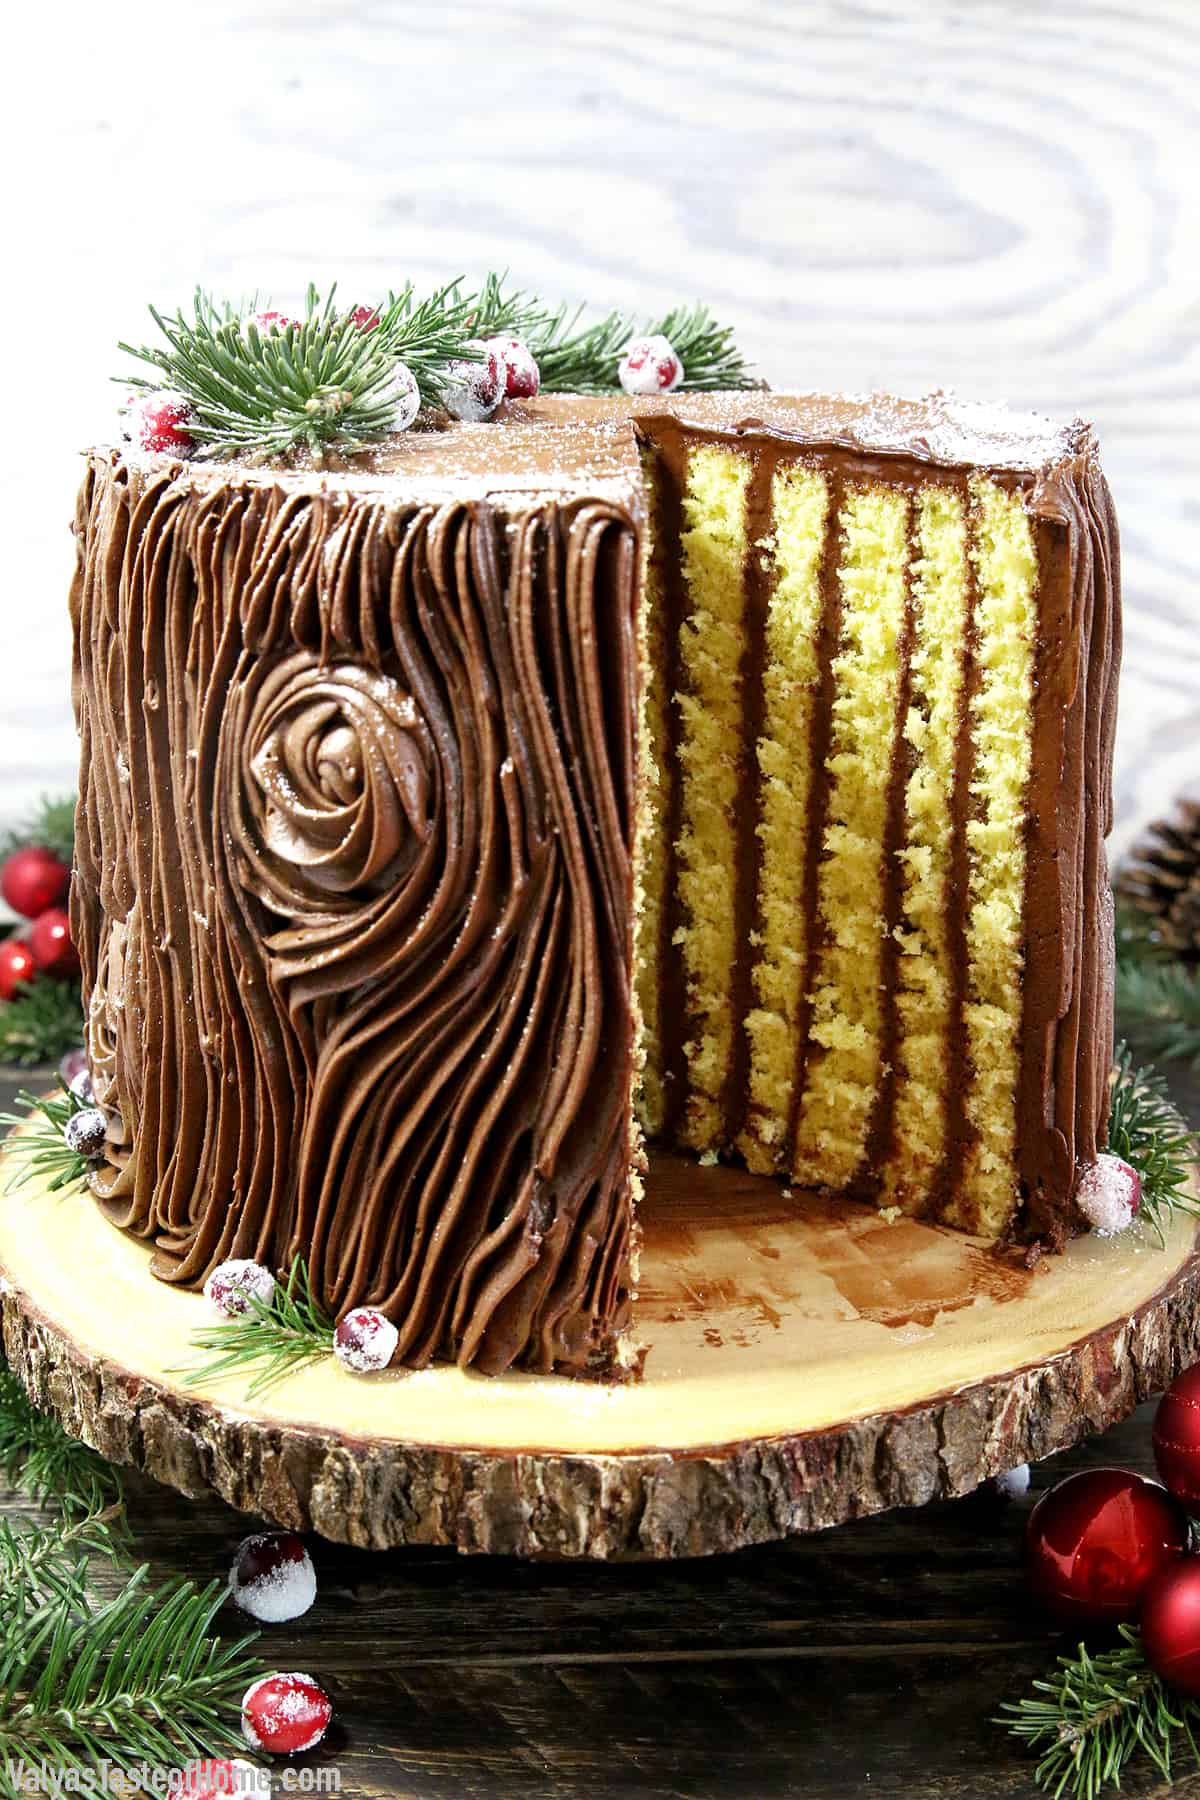
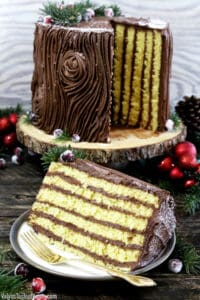
Whenever I think of trees around Christmas time, this is what comes to my mind (instead of a messy, out-of-place forest dweller): the Best Tree Stump Cake. This dessert is a complete showstopper with its irresistible chocolate buttercream frosting that mimics a tree stump. It’s perfect for Christmas, any holiday, or a woodland theme party.
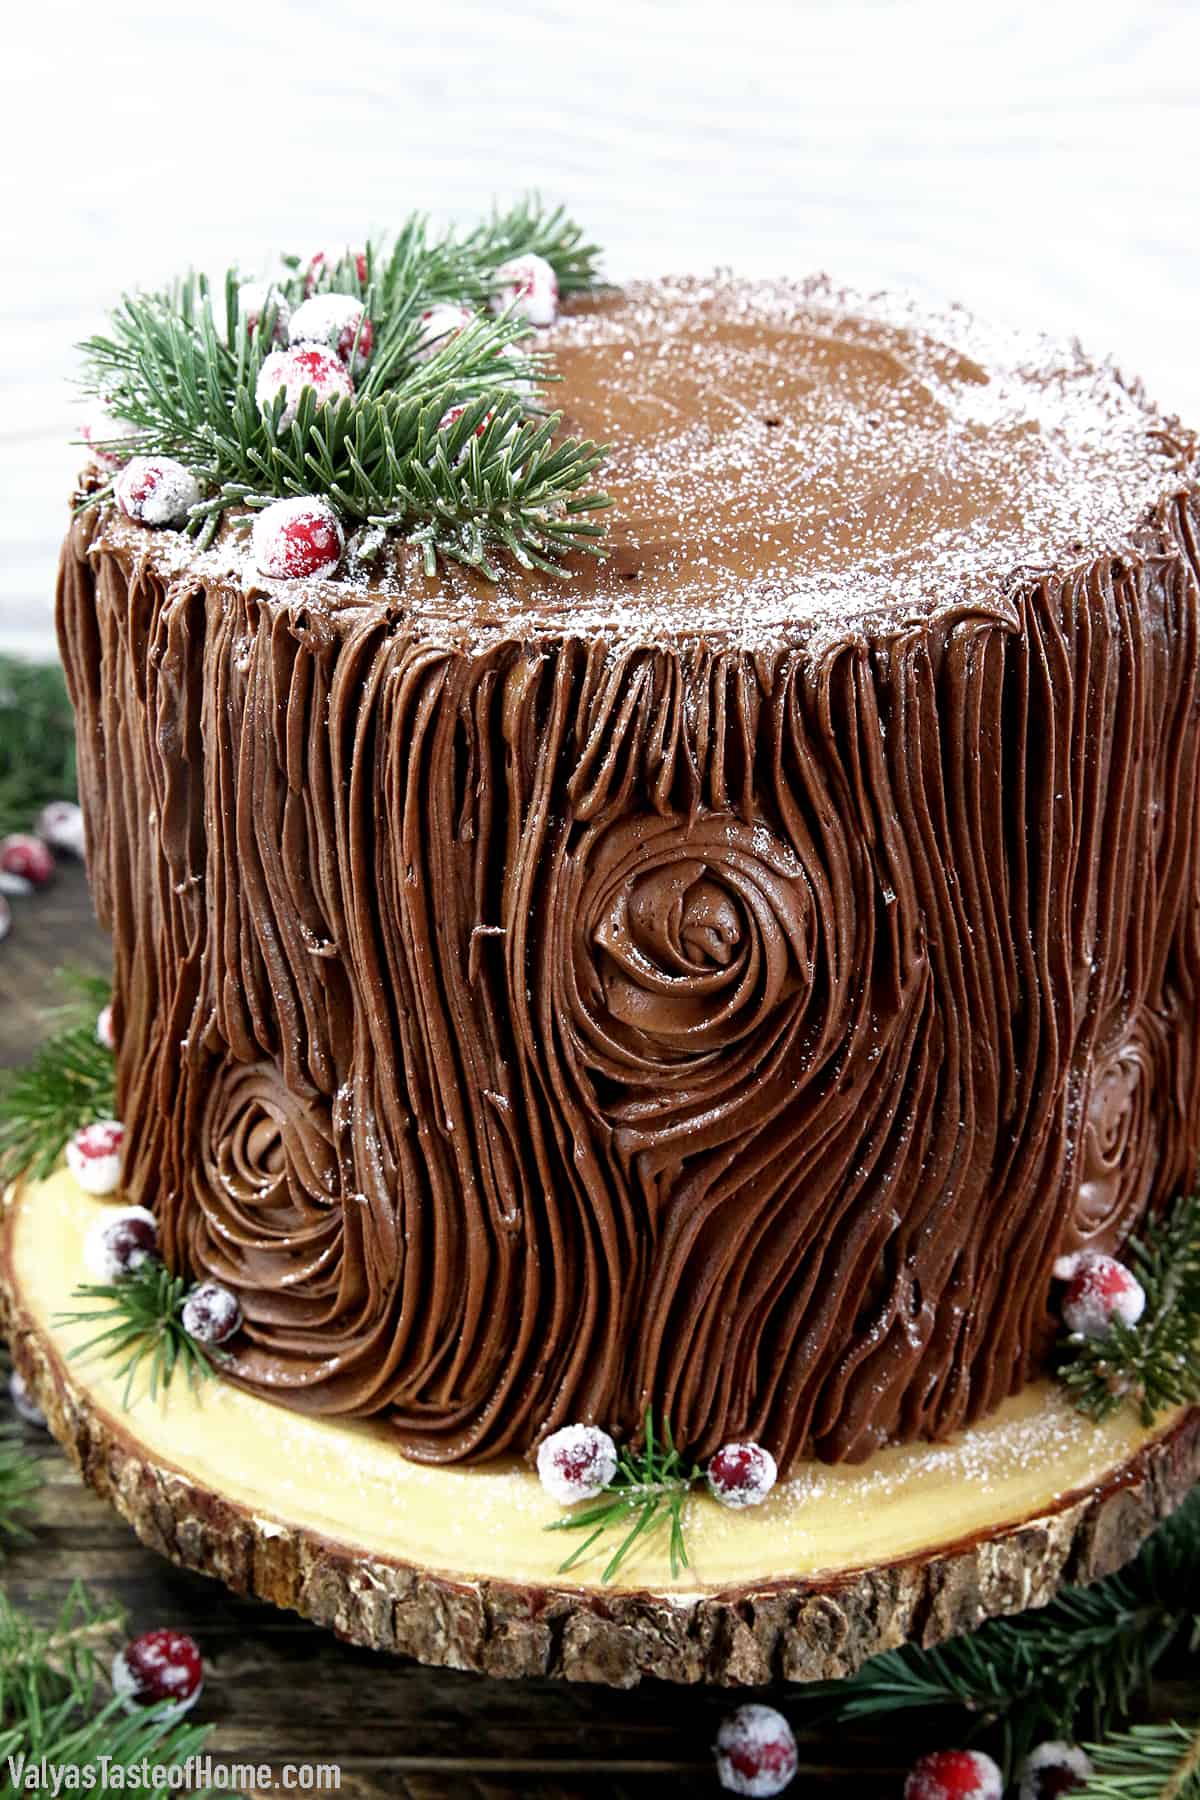
Its unique design will make you want to grab a piece. Layers and layers of soft and moist vertical cake sponges hugged with super delicious and delicate chocolate buttercream frosting that looks just like festive tree bark. And that is just the beginning of the delight of this outdoorsy-styled creation. It’s incredibly rich, and a sweet lover’s dream come true.
This cake combines the rich, velvety texture of the cake sponge, combined with the sweet and tangy chocolate ganache frosting, creating a flavor combination that’s simply irresistible. The added crunch from the frosted cranberries and pine tree stems not only adds a wonderful texture contrast but makes the cake look even better.
It’s a fun and creative way to bring a touch of nature into your kitchen. This cake is perfect for birthdays, holidays, or any special occasion where you want to impress your guests with your baking skills. The recipe instructions are detailed and easy, making it possible for even beginners to make this cake with ease.
Want to learn how to make this tree stump cake recipe? Then keep on reading.
What is a Tree Stump Cake?
A tree stump cake is a unique and delightful dessert that’s sure to impress at any gathering. This cake recipe, as the name suggests, is designed to resemble a tree stump, complete with bark-like frosting and optional edible decorations such as frosted cranberries.
The cake itself is made from a delicious sponge, which is baked, cooled, and then rolled tightly with layers of a rich, chocolate ganache-infused cream cheese frosting.
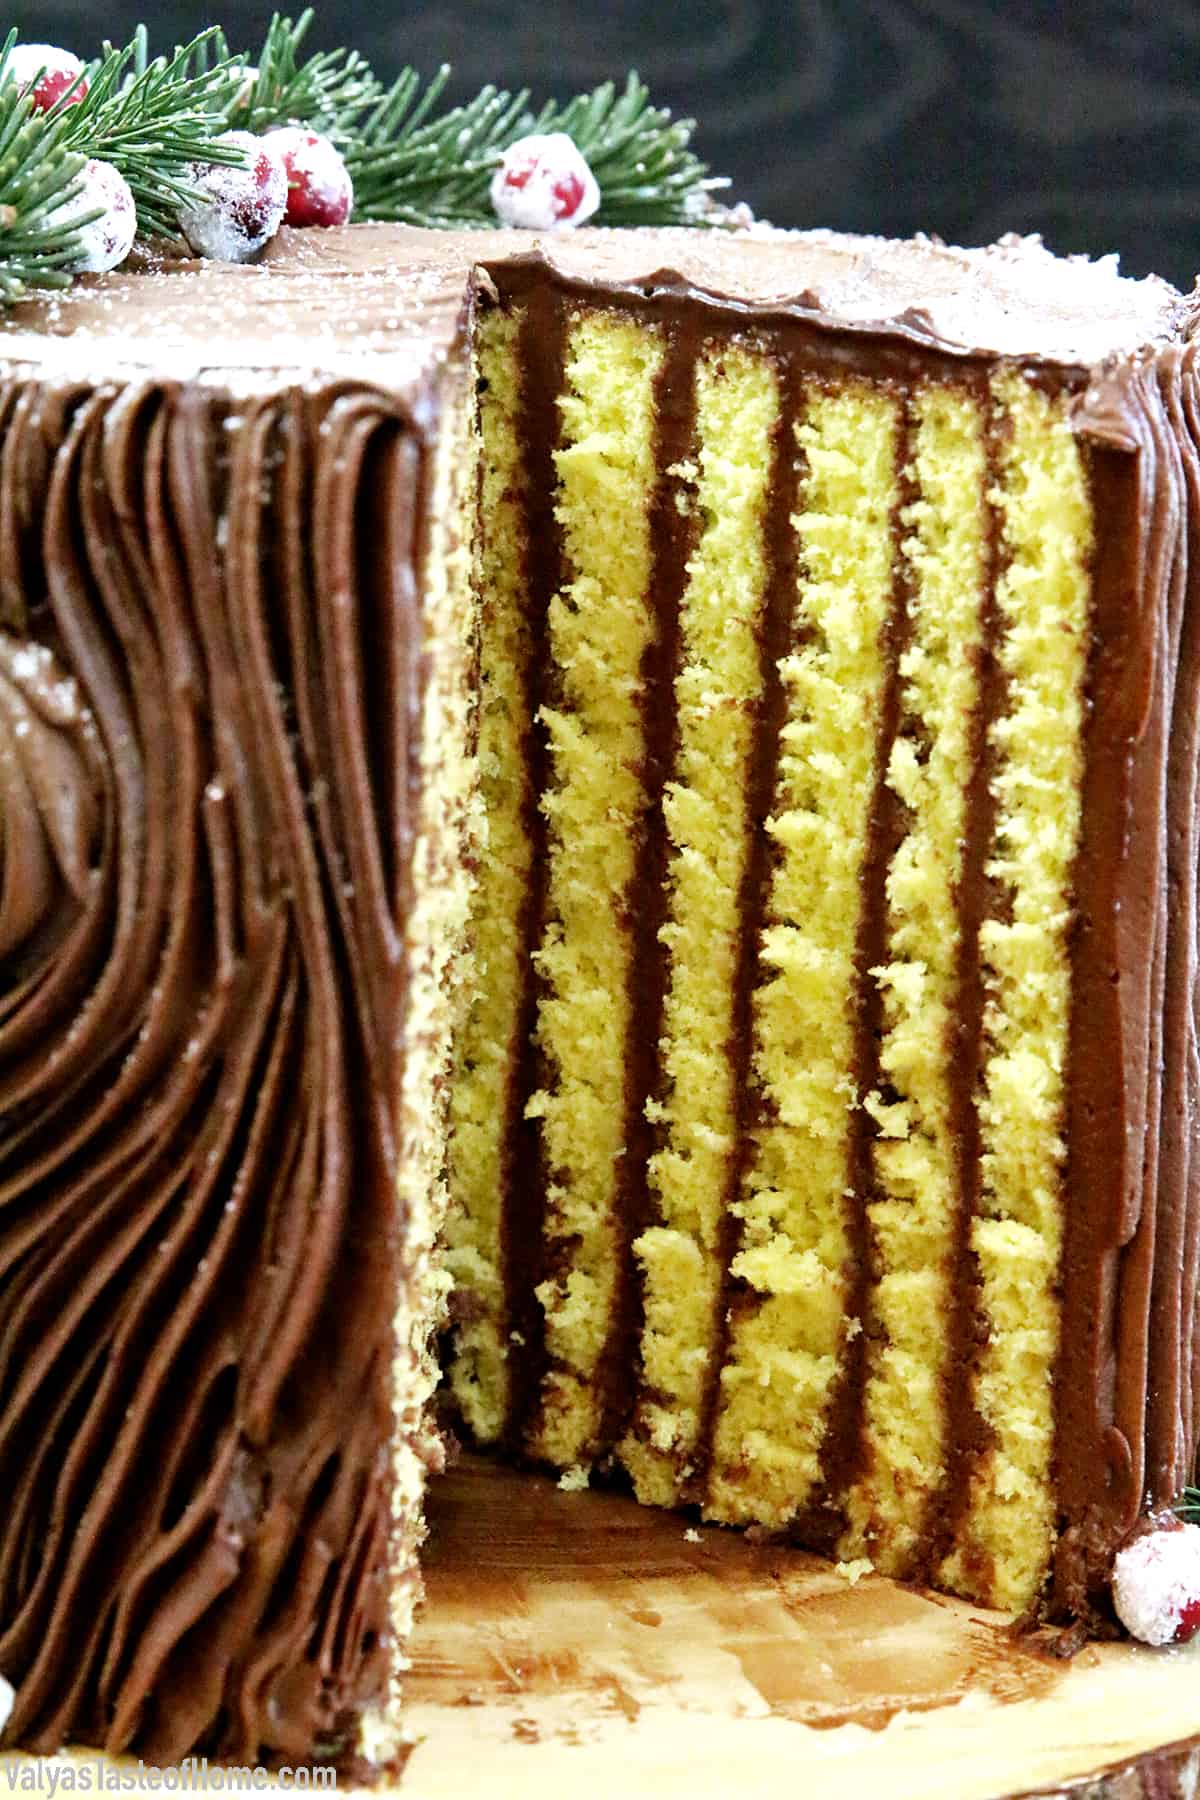
What makes this cake special is not just its visual appeal, but also the techniques used in its creation. This isn’t your standard bake-and-frost cake recipe. It involves a rolling process similar to a Swiss roll, but with the added complexity of a vertical assembly to create the stump shape.
The frosting is not just slathered on but carefully piped to create the illusion of tree bark. The recipe instructions also include a clever tip for achieving clean cake slices: heating the knife in hot water before each cut.
This tree stump cake is a wonderful cake to make at home, especially for a special occasion or a birthday. Not only will you enjoy the process of creating something so visually stunning, but the taste is absolutely divine. The cake sponge is moist and fluffy, and the chocolate cream cheese frosting is deliciously rich.
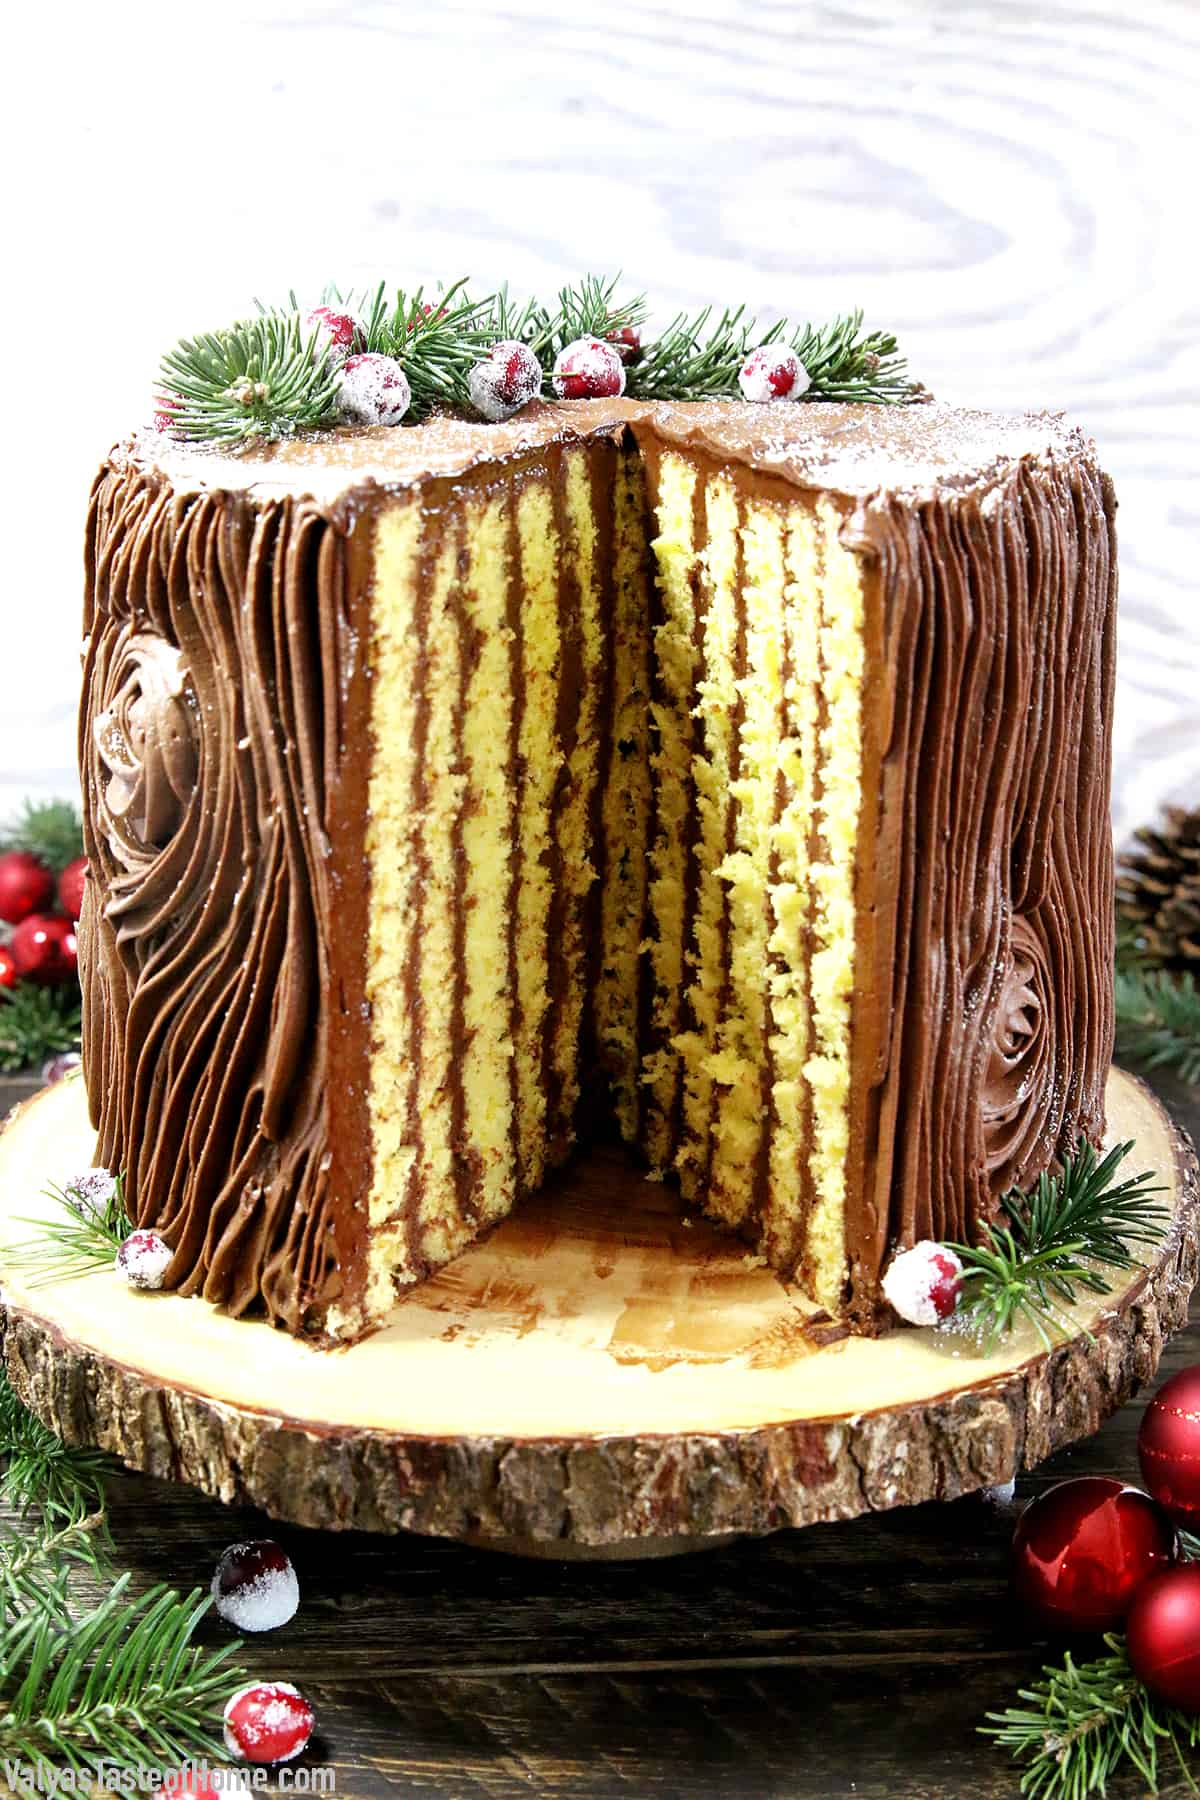
When you slice into it, the beautiful spiral layers of cake and frosting are revealed, making for a dessert that’s as pleasing to the eye as it is to the palate.
What Makes This Tree Stump Cake Recipe Special?
- Easy to make: Despite its intricate appearance, this tree stump cake recipe is surprisingly easy to follow. From the simple cake batter to the creamy frosting, each step is clearly outlined in the instructions.
- Family favorite: With its rich chocolate ganache and cream cheese frosting, this cake is a sure hit with the kids. Plus, the whimsical tree stump design will definitely bring smiles to their faces.
- Versatile: This cake is versatile and can be decorated in numerous ways. You can use frosted cranberries, pine tree stems, or even meringue mushrooms to create your own unique forest-themed cake.
- Delicious: This cake isn’t just pleasing to the eyes but also tastes absolutely delicious. The combination of moist cake sponge and decadent chocolate frosting makes for a truly satisfying dessert.
- Crowd pleaser: Whether it’s for a birthday, a holiday, or a simple family gathering, this tree stump cake is sure to impress. Its unique design and mouth-watering flavor make it a standout in any dessert table.
What You Need to Make Tree Stump Cake at Home
All you need are some simple pantry staple ingredients to make this tree stump cake recipe at home. Let’s look at them in more detail:
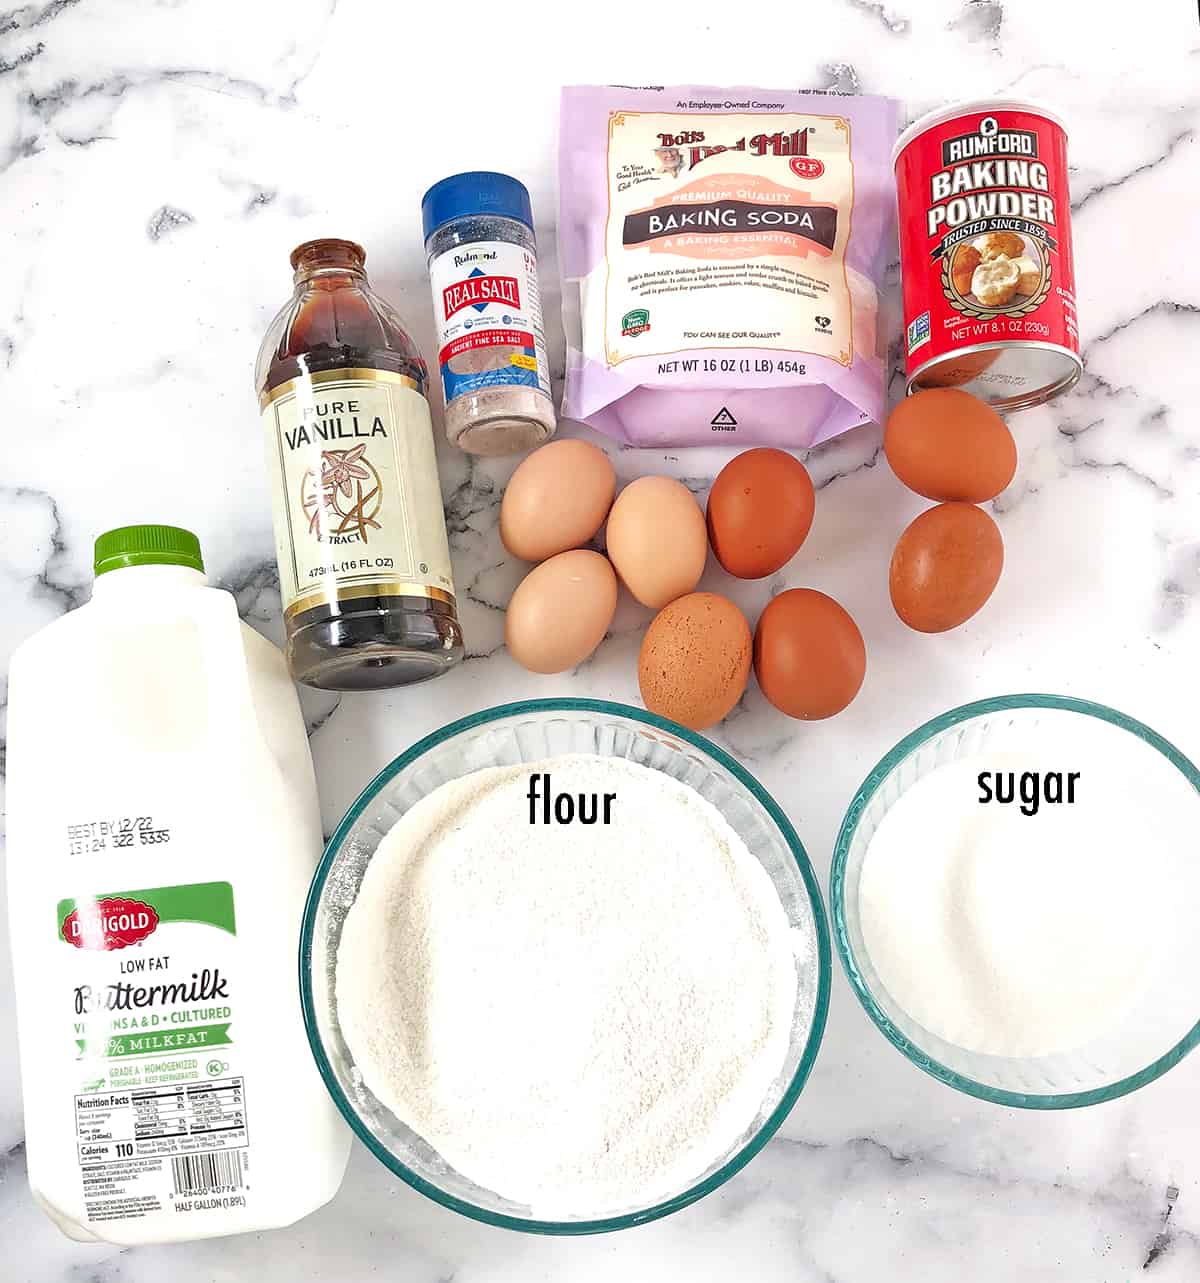
For the Cake:
- All-purpose flour: This is the primary dry ingredient in our cake recipe. It provides the structure and helps to create a light and fluffy texture.
- Baking soda and Baking powder: These are both leavening agents, which means they help the cake rise and become light and airy.
- Sea salt: Just a pinch enhances the flavor of the other ingredients, bringing out the sweetness and balancing the flavors.
- Eggs: These are essential for structure and stability. They also add moisture to the cake sponge.
- Granulated sugar: Sweetens the cake and helps to make it moist and tender.
- Vanilla extract: Adds a sweet, creamy aroma that enhances the flavor of the other ingredients.
- Buttermilk: This gives the cake a tender crumb and a slightly tangy flavor.
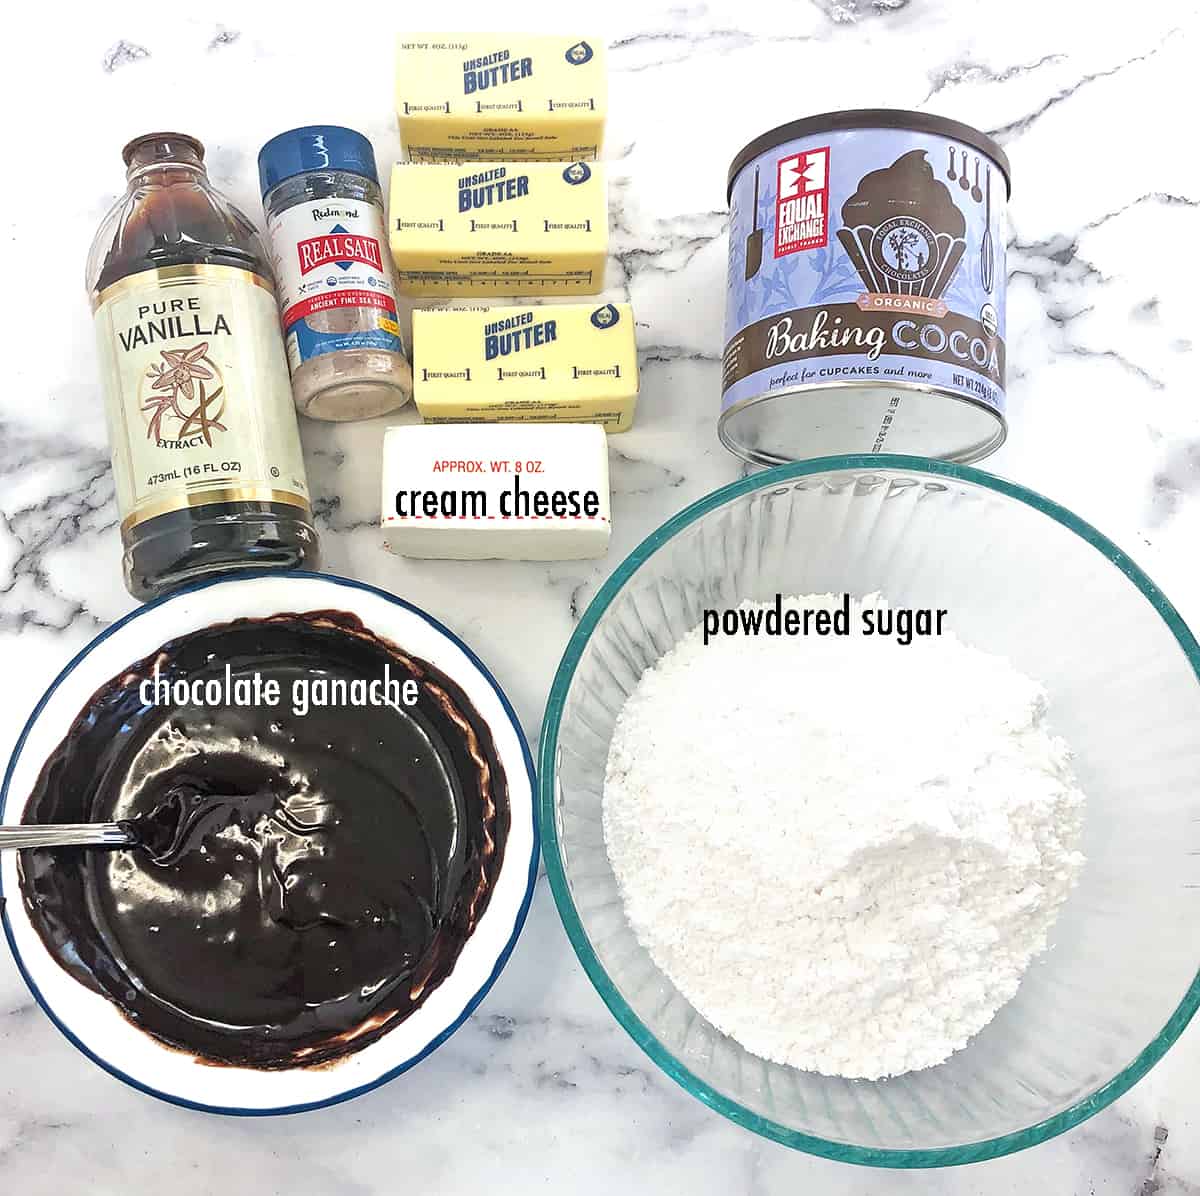
For the Frosting:
- Chocolate ganache: A rich, creamy mixture of chocolate and milk. It gives the frosting a smooth, velvety texture and deep chocolate flavor.
- Unsalted butter: The fat in the frosting, lending it a creamy and rich texture.
- Cream cheese: Adds a tangy flavor to the frosting, complimenting the sweetness of the buttercream.
- Cocoa or cacao powder: Adds a rich chocolate flavor to the frosting.
- Powdered sugar: Sweetens the frosting and helps it become light and fluffy.
- Pine Tree stems, and Frosted Cranberries: These are used for decoration to give the cake a realistic tree stump look. Frosted cranberries add a touch of winter charm.
Supplies You’ll Need to Make this Cake
- Parchment Paper
- Large 16×22 baking sheet
- Stand mixer
- Hand whisker
- Cake spatula:
- Clear 2″ wide Scotch tape
- Wilton 1M tip
- Piping bag (amazing investment!)
How to Make Tree Stump Cake Batter
Start the process by preheating your oven to a temperature of 350 F. Take a baking sheet of approximately 16 x 22-inches and grease it thoroughly. After greasing, line it with a sheet of baking parchment.
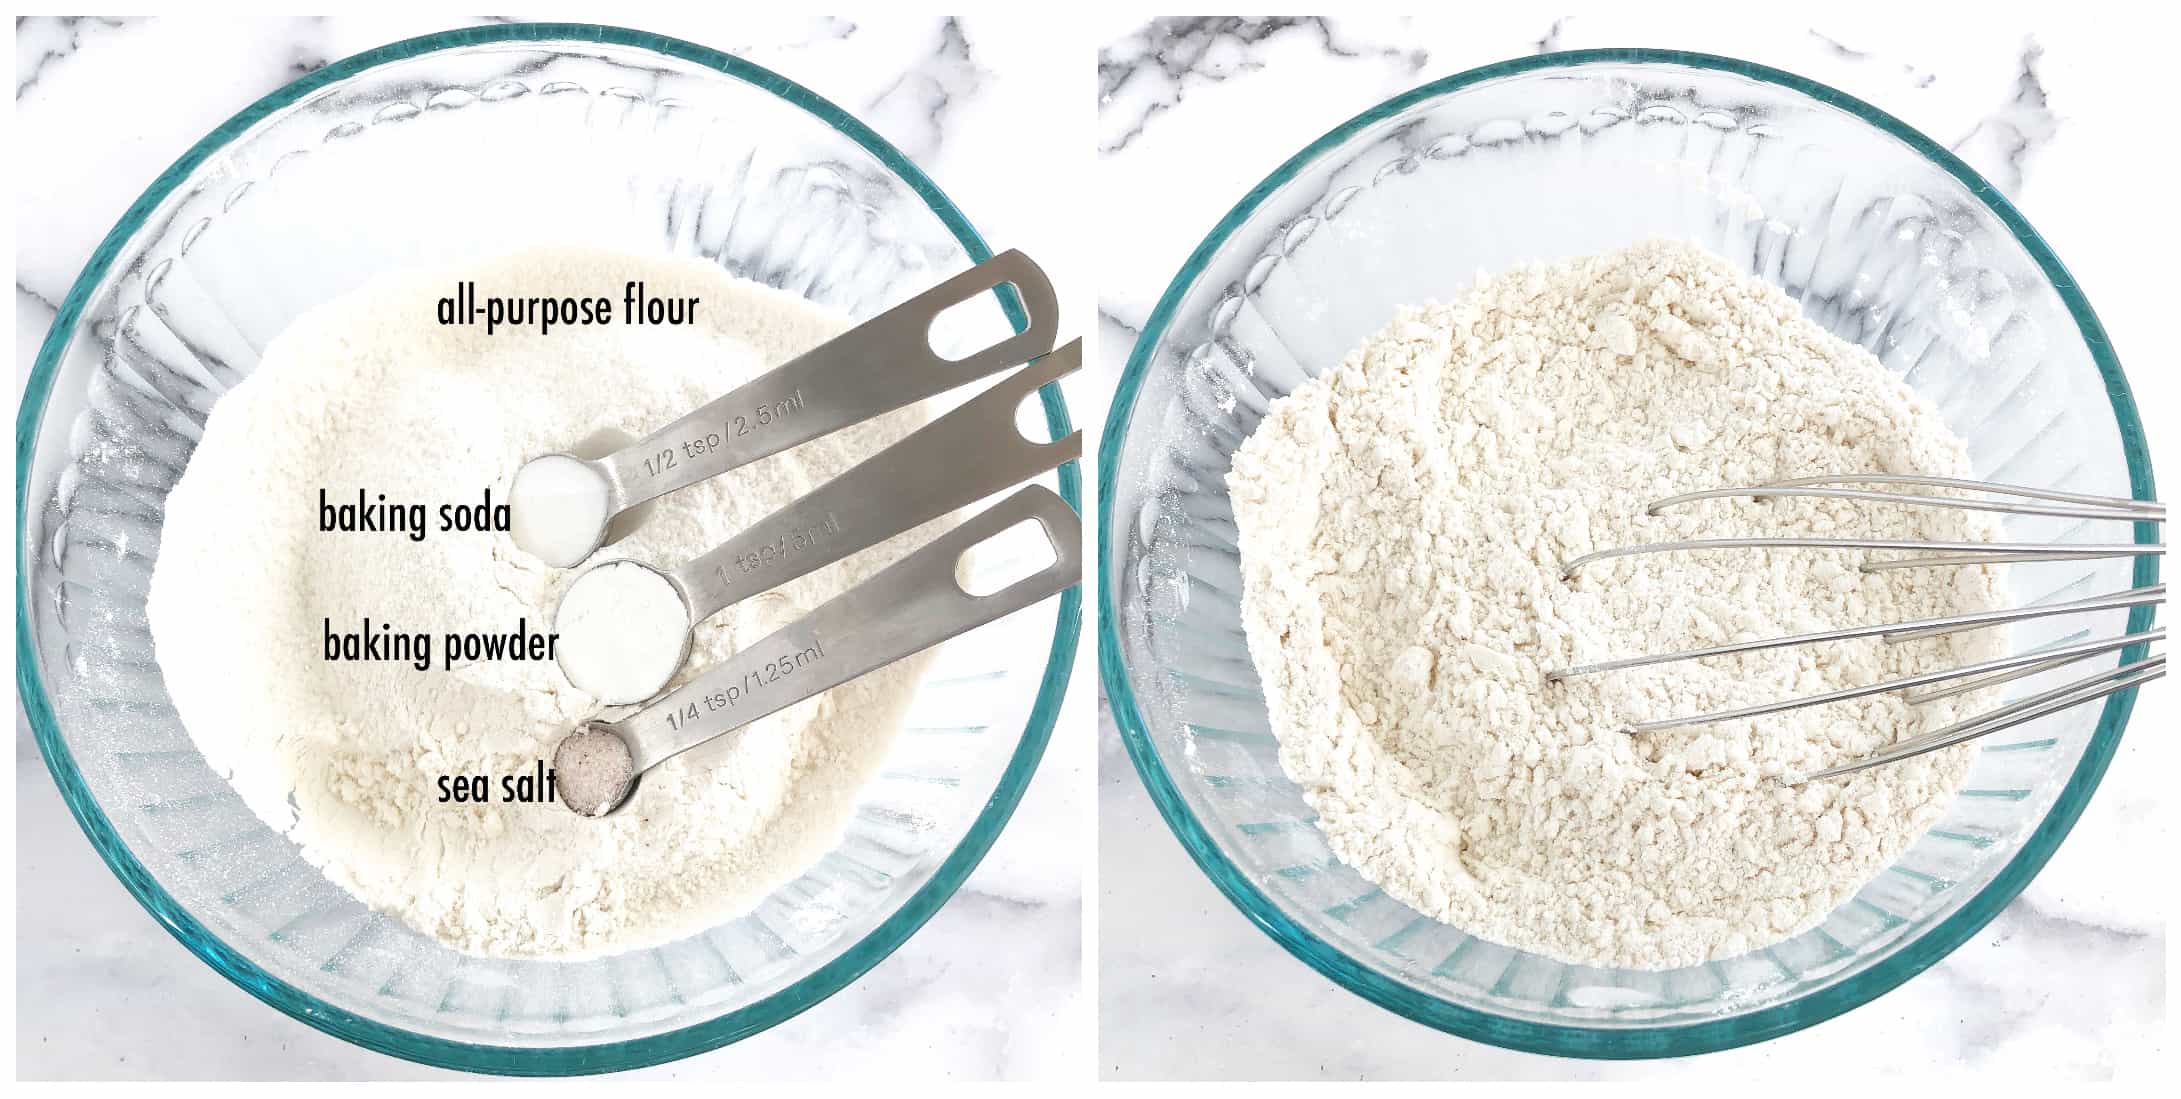
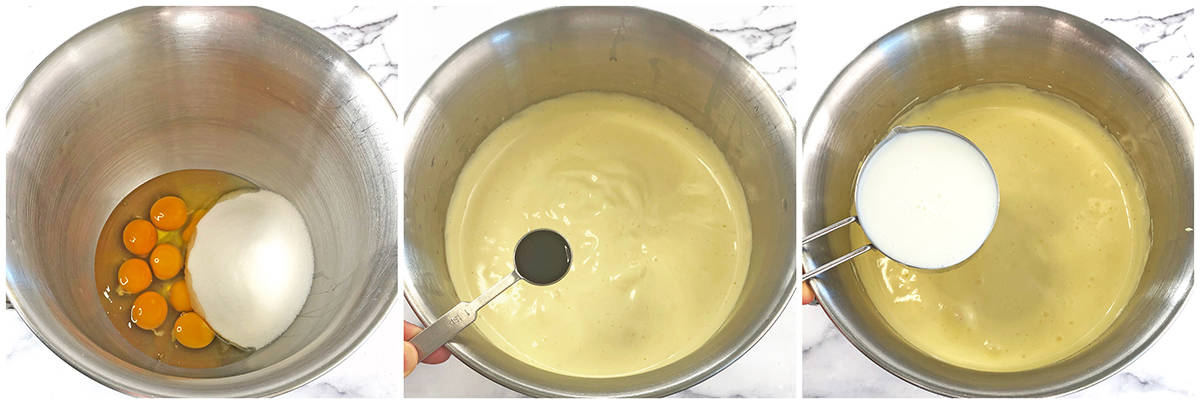
In a medium-sized bowl, combine your dry ingredients. This includes flour, baking soda, baking powder, and a pinch of sea salt. Use a whisk to mix these ingredients together until they’re well blended.
Next, take your eggs and sugar and beat them together at a high speed for about five minutes. The result should be a mixture that’s light, fluffy, and a pale yellow color.
Reduce the speed of your mixer to medium/low and add in the vanilla extract and buttermilk. Continue to mix these ingredients for a minute to guarantee they blend well into the batter. The batter will be a little thin, and that’s what you actually want.
Remove the mixing bowl from the stand and gradually add the dry ingredients you prepared earlier into the batter. Add about half a cup at a time and gently stir in the dry ingredients after each addition.
Using a hand whisk, gently mix in the dry ingredients with each addition, trying not to deflate air pockets as much as possible.

How to Bake the Tree Stump Cake
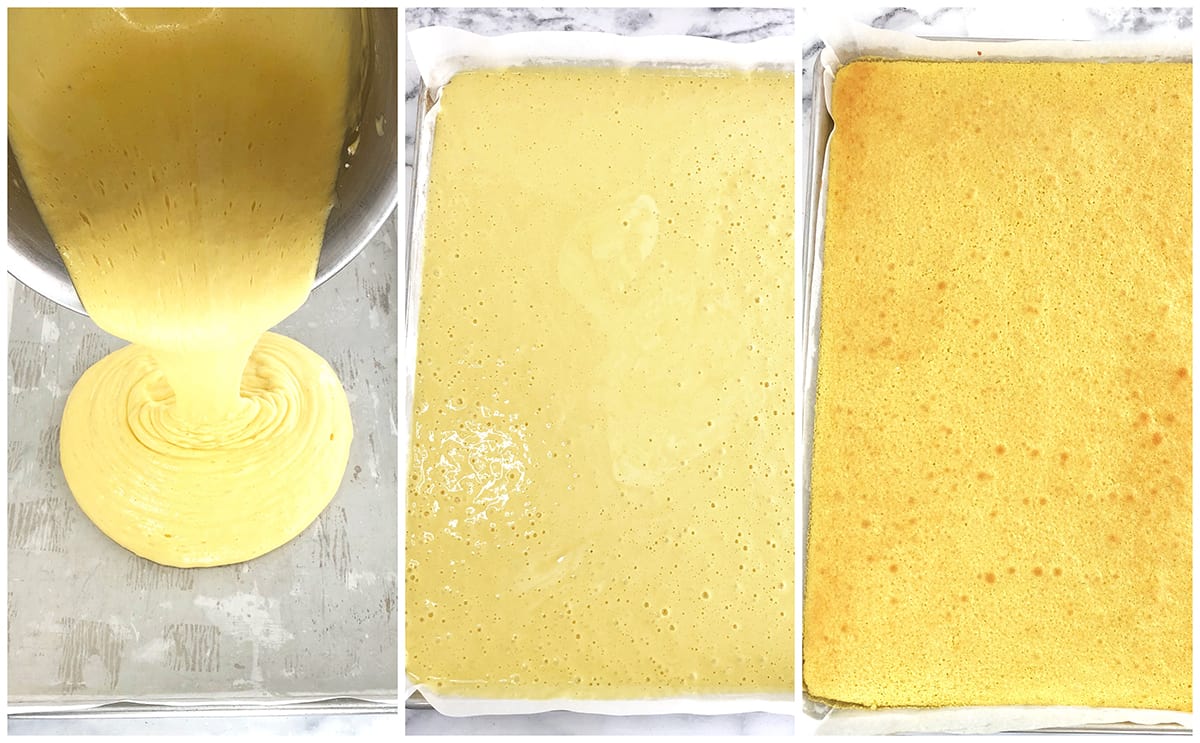
Transfer the batter to the earlier greased 16×22-inch baking sheet lined with parchment paper.
Bake in a preheated oven at 350 F (180 C) for 15 minutes.
Remove from the oven. Allow the cake sponge to cool on the baking sheet for about 10 minutes before transferring it from the baking sheet onto a cooling rack.
Make another batch of this sheet cake sponge using the same ingredients for this cake.
Cool both sheet cake sponges completely before frosting.
How to Make the Tree Stump Cake Frosting
While the cake sponges are cooling, make the frosting.
First, you will need to make the chocolate ganache (my favorite NO FAIL recipe) and cool it completely before proceeding with the rest of the frosting instructions.
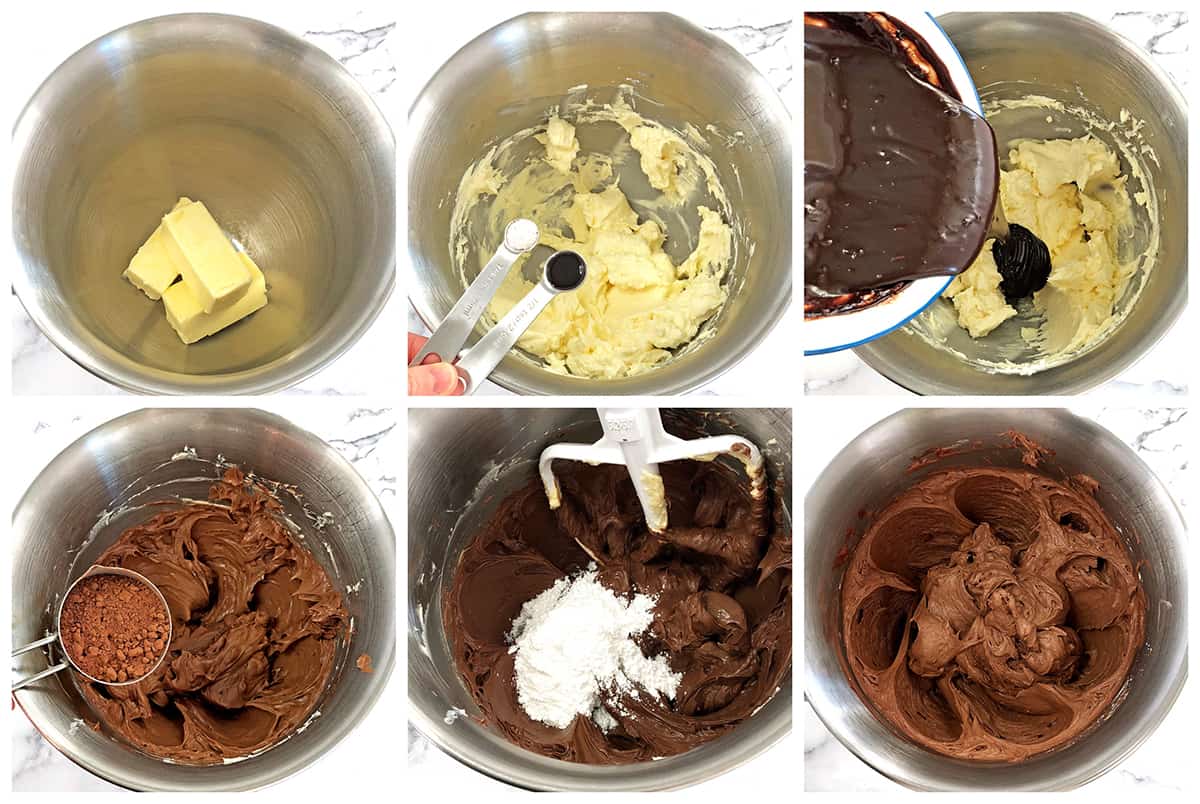
Start by beating softened butter until creamy and smooth. Add softened cream cheese and beat again until both are well combined.
Then add cooled chocolate ganache and mix until well combined, for a minute or so. Scrape the cream off the sides of the mixer bowl halfway through.
Mix in cocoa powder and then add powdered sugar, half a cup at a time. Once the powdered sugar is well blended in, increase the mixing speed to high and beat for a minute.
NOTE: This entire batch of frosting is for the inside of the cake only. You will need to make another batch of this frosting recipe to decorate the top and the sides of the cake later on after the cake sets for at least 4 hours, or overnight.
How to Assemble the Tree Stump Cake
You should have your 2 sheets of 16×22 cake sponges cooled completely before frosting them.
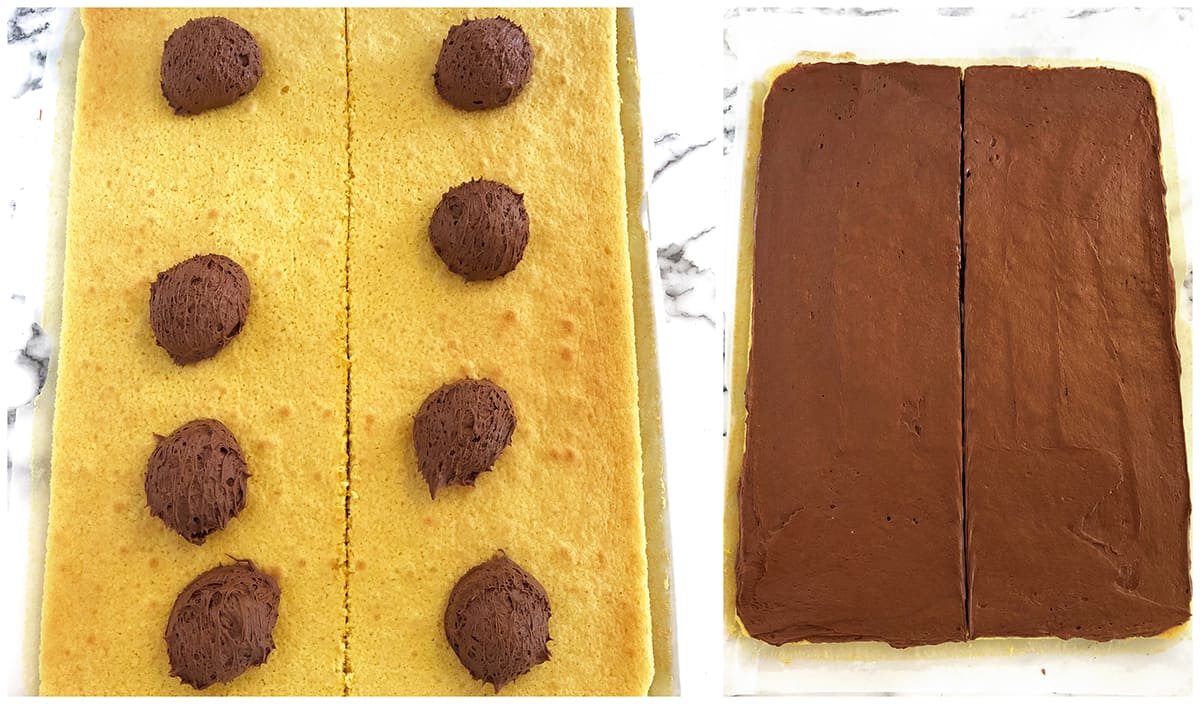
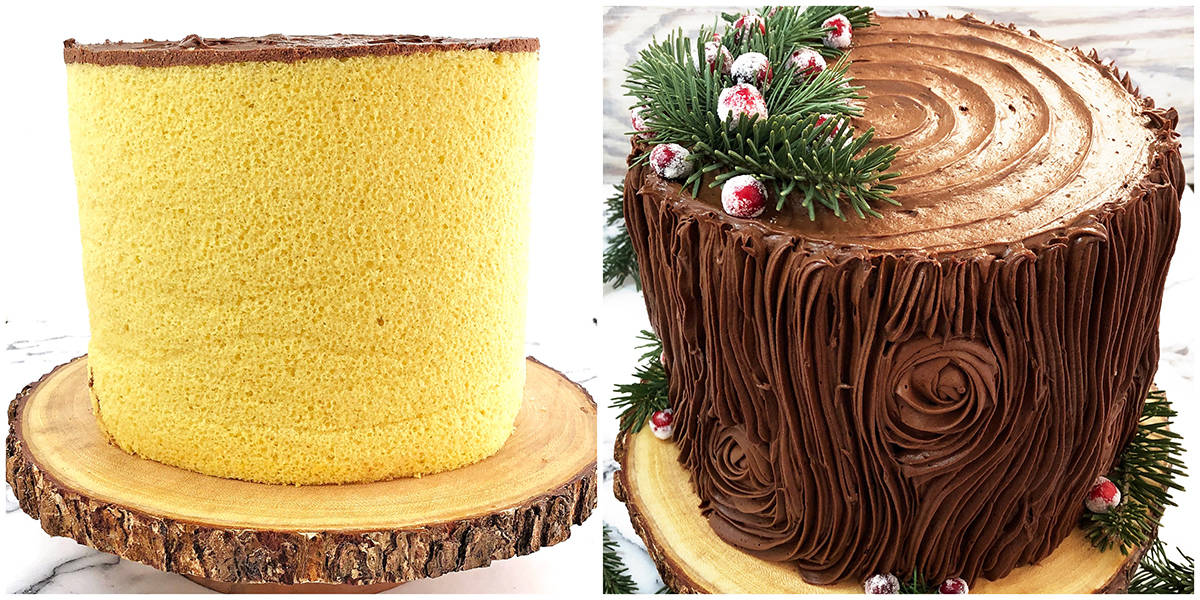
Split each sheet cake sponge in half vertically to have four 7×20 (approximate) inch cake sponges (even though the photo below is showing just one sheet).
Using a half-cup ice cream scoop, add 4 scoops of frosting to each of the 4 strips of sponge cake.
Using a cake spatula spread out the frosting evenly over all 4 strips of cake sponges. (The image below shows only one sheet of cake sponge, repeat the same frosting steps with the second sheet).
This is a tricky and very important step. Start rolling the first strip like you would roll a regular cake roll. Firmly roll the sponge while at the same time focusing on preventing the cake sponges from breaking. Add the next strip by lining up the short sides next to each other as soon as the previous one ends.
Use the parchment paper for stability to help hold the roll together during the rolling process so that it does not unroll. Use all 4 strips of sheet cake sponges as one continuous long roll.
When rolling up the last strip leave the parchment paper on and wrap additional strips of parchment paper (the ones you baked the cakes on) around the entire perimeter to hold this cake in place.
Flip the cake log upright. You will need an assistant to hold both ends of the parchment paper snugly around the cake, while you secure the parchment papers together by taping a long strip of 2″ wide clear scotch tape over the parchment paper all the way around the cake.
If you have some frosting left (usually a cup or so), use it up by spreading it over the top of the cake. Then refrigerate the cake for 4 hours or overnight (my preference).
Make the Frosted Cranberries the night before to give them time to dry and be ready for decorating the cake the next day.

How to Decorate the Tree Strump Cake
The next day I start by making another batch of the frosting. Once the frosting is done, cut the clear tape and peel the parchment paper off the cake. The cake should be set, firm, and stable at this point. It is ready to be decorated.
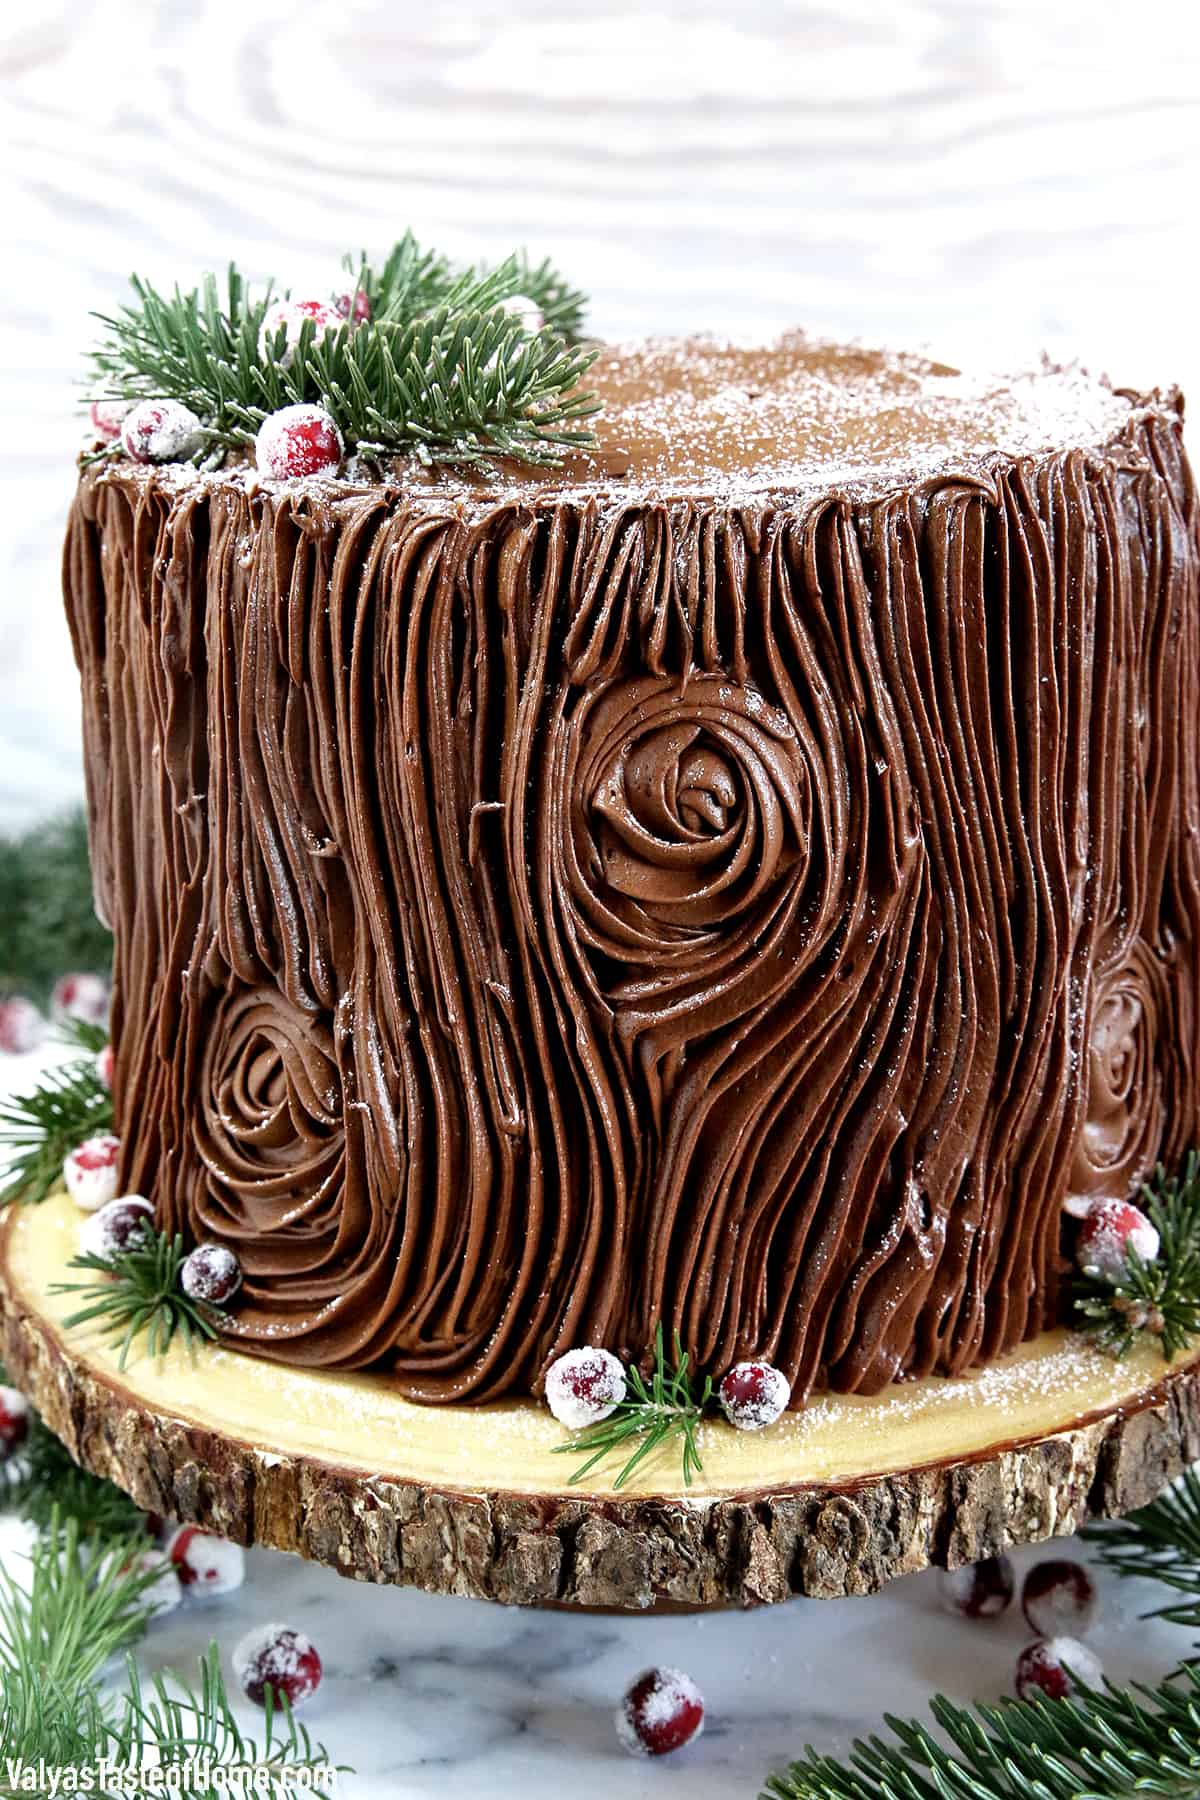
Add about one and a half cups more of the frosting on top of the cake. Spread it out evenly. Then using a cake spatula, make the swirl design.
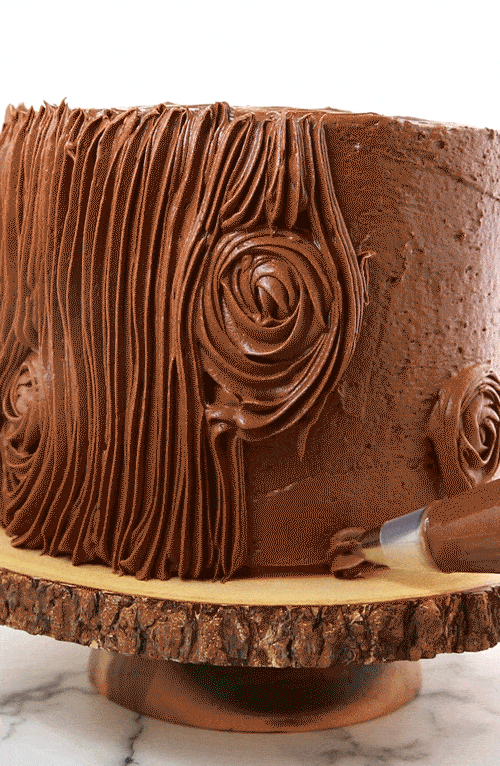
Then fit a piping bag with a Wilton 1M attachment and fill with chocolate buttercream. First, pipe rose shape spread out randomly all around the cake.
Then pipe vertical strips of cream in between the rose-shaped design starting from the base of the case to the top around the perimeter to represent the bark of the tree.
Decorate the cake with fresh pine tree stems and frosted cranberries. You may also decorate the cake with meringue mushrooms (using this meringue cookies recipe) or however, you like.
Place the cake into the fridge for a couple more hours.
Just before serving the cake sprinkle some powdered sugar to resemble the snow.
How to Cut Clean Slices of the Tree Stump Cake
If you like to see nice and clean slices of cake as I do, it is important to know a few tips that will deliver that satisfying look for you. Slicing the cake with a warmed clean knife will turn out each and every slice of the cake clean and beautiful.
Place a long knife into a tall cup filled with hot water for 15 seconds or so. Remove the knife from the water and dry it using a paper towel. The hot knife will melt away stickiness and cleanly slice through the layers if you cut only in one downward direction, and pull the knife out at the base of the cake.
Repeat the same instruction each time you make a slice and you’ve got a drool-worthy presentation with each slice of this deliciousness you worked so hard on.
Tips for Making the Best Tree Stump Cake Ever
- Preheat the oven: Make sure to preheat your oven to the correct temperature before baking your cake. This will guarantee that your cake rises properly and has a nice, even texture.
- Whisk the dry ingredients: Whisk together your flour, baking soda, baking powder, and sea salt before adding them to the wet ingredients. This helps to distribute the leavening agents evenly throughout the batter, resulting in a cake with a uniform crumb.
- Roll the cake carefully: When rolling up the cake, be firm but gentle to avoid breaking the cake sponges. Using parchment paper for stability can help keep the roll tight and even.
- Chill the cake before decorating: Allow the cake to chill in the fridge for at least four hours, or preferably overnight, before decorating. This will make the cake sturdier and easier to work with.
- Use a hot knife for slicing: For clean, beautiful slices, heat your knife in a cup of hot water before each cut. This melts away any stickiness and guarantees a smooth cut through all the layers of the cake.
- Decorate with creativity: Use your imagination when decorating your tree stump cake. Pine tree stems, frosted cranberries, and meringue mushrooms can all add a touch of whimsy and natural beauty to your dessert.
Serving Suggestions for Tree Stump Cake
- For a show-stopping birthday dessert, serve this tree stump cake as the centerpiece. The whimsical design and rich chocolate flavors will delight both kids and adults alike.
- Want to create a woodland-themed party? This tree stump cake pairs perfectly with mushroom-shaped cookies and a bowl of mixed nuts, setting the mood for a rustic, fairy-tale celebration.
- For a delightful breakfast or brunch, serve slices of this tree stump cake with a dollop of whipped cream and a sprinkle of cocoa powder. Pair it with a cup of strong coffee for a luxurious start to the day.
- This cake is also a great option for a sweet, after-dinner treat. Serve it with a glass of milk or a scoop of vanilla ice cream for a delightful end to a meal.
- For a festive touch during the holiday season, garnish the top of the cake with powdered sugar to mimic a dusting of fresh snow. It will look beautiful on your Christmas dessert table.
- If you’re serving this tree stump cake for a special occasion, consider pairing it with a glass of dessert wine. The sweet and fruity notes of the wine will compliment the rich chocolate flavor of the cake.
Frequently Asked Questions
A tree stump cake is a unique dessert that resembles a tree stump, often decorated with elements from nature like pine stems and frosted cranberries. The cake sponge is usually rolled with layers of frosting to resemble the rings of a tree stump.
Yes, you can prepare the cake a day ahead. After assembling the cake, you can refrigerate it overnight to set. The next day, you can proceed with the final frosting and decorating steps.
How to Store Leftover Tree Stump Cake
Storing your leftover tree stump cake properly is crucial to maintaining its delicious taste and texture.
To store the leftover tree stump cake in the fridge, first, let it cool completely. Once cooled, cover the cake with a layer of plastic wrap or transfer it to an airtight container to prevent it from drying out. The cake should be stored in the fridge and consumed within three to four days for the best taste and texture.
Unfortunately, due to the buttercream frosting used in the tree stump cake recipe, it is not recommended to freeze the cake. Buttercream can change in texture and lose its appeal when frozen and then thawed.
If you want to make the cake in advance, consider baking the cake sponge and freezing that separately. When you’re ready to use it, thaw it in the fridge overnight, then proceed with the frosting and decorating steps.
More Cake Recipes You’ll Love
- Simple Pumpkin Spice Latte Cake
- Apple Cake with Cream Cheese Frosting
- Apricot Bee Cake
- Red Velvet Berry Cake
- S’Mores Tiramisu Cake
- Chocolate Meringue Piano Cake
- Fruit Crepe Cake
Check out all cake recipes HERE.
The Best Tree Stump Cake
Ingredients
For the Tree Stump Cake
- 2 cups – all-purpose flour
- ½ tsp. – baking soda
- 1 tsp. – baking powder
- ¼ tsp. – sea salt
- 8 large – eggs (I used home raised chicken eggs)
- 1 ½ cup – granulated sugar
- 1 tsp. – vanilla extract
- 1 cup – buttermilk
For the Tree Stump Cake Frosting
- Chocolate ganache – (6 oz. – Hershey chocolate bar + ¼ cup – whole milk)
- 12 oz – unsalted butter
- 8 oz. – cream cheese
- ½ tsp. – sea salt
- ½ tsp. – vanilla extract
- ½ cup – cocoa or cacao powder
- 3 cup – powdered sugar
For the Tree Stump Cake Decor
- Pine Tree stems
- Frosted Cranberries
Instructions
How to Make Tree Stump Cake Batter
- Preheat the oven to 350 ℉. Grease and line a 16×22 inch baking sheet with parchment paper.
- In a medium bowl, whisk together flour, baking soda, baking powder, and sea salt.
- Beat eggs and sugar on high for 5 minutes or until light, fluffy and pale yellow in color. Reduce the mixing speed to medium/low and add vanilla extract and buttermilk. Mix for a minute for the ingredients to blend well. The batter will be a little thin and that's what you actually want.
- Remove the bowl from the mixer stand and add in the prepped dry ingredients (flour, baking soda, baking powder, and sea salt) into the egg mixture, 1/2 cup at a time. Using a hand whisk, gently mix in the dry ingredients with each addition, trying not to deflate air pockets as much as possible.
Tree Stump Cake Baking Instructions
- Transfer the batter to the earlier greased 16×22-inch baking sheet lined with parchment paper.
- Bake in a preheated oven at 350 ℉ for 15 minutes.
- Remove from the oven. Allow the cake sponge to cool on the baking sheet for about 10 minutes before transferring it from the baking sheet onto a cooling rack.
- Make another batch of this sheet cake sponge using the same ingredients for this cake.
- Cool both sheet cake sponges completely before frosting.
Tree Stump Cake Frosting Instructions
- While the cake sponges are cooling, make the frosting.
- First, you will need to make the chocolate ganache (my favorite NO FAIL recipe) and cool completely before proceeding with the rest of the frosting instructions.
- Start by beating softened butter until creamy and smooth. Add softened cream cheese and beat again until both are well combined.
- Then add cooled chocolate ganache and mix until well combined, for a minute or so. Scrape down the cream off the sides of the mixer bowl halfway through.
- Mix in cocoa powder and then add powdered sugar, half a cup at a time. Once the powdered sugar is well blended in, increase the mixing speed to high and beat for a minute.
- NOTE: This entire batch of frosting is for the inside of the cake only. You will need to make another batch of this frosting recipe to decorate the top and the sides of the cake later on after the cake sets for at least 4 hours, or overnight.
Assembling the Tree Stump Cake
- You should have your 2 sheets of 16×22 cake sponges cooled completely before frosting them.
- Split each sheet cake sponge in half vertically to have four 7×20-inch cake sponges (even though the photo below is showing just one sheet).
- Using a half-cup ice cream scoop, add 4 scoops of frosting to each of the 4 strips of sponge cake.
- Using a cake spatula spread out the frosting evenly over all 4 strips of cake sponges. (The image below shows only one sheet of cake sponge, repeat the same frosting steps with the second sheet).
- This is a tricky and very important step. Start rolling the first strip like you would roll a regular cake roll. Firmly roll the sponge while at the same time focusing on preventing the cake sponges from breaking. Add the next strip by lining it up the short sides next to each other as soon after the previous one ends.
- Use the parchment paper for stability to help hold the roll together during the rolling process so that it does not unroll. Use all 4 strips of sheet cake sponges as one continuous long roll. When rolling up the last strip leave the parchment paper on and wrap additional strips of parchment paper (the ones you baked the cakes on) around the entire perimeter to hold this cake in place.
- Flip the cake log upright. You will need an assistant to hold both ends of the parchment paper snugly around the cake, while you secure the parchment papers together by taping a long strip of 2" wide clear scotch tape over the parchment paper all the way around the cake.
- If you have some frosting left (usually a cup or so), use it up by spreading it over the top of the cake. Then refrigerate the cake for 4 hours or overnight (my preference).
- Make the Frosted Cranberries the night before to give them time to dry and be ready for decorating the cake the next day.
How to Decorate the Tree Strum Cake
- The next day I start by making another batch of the frosting. Once the frosting is done, cut the clear tape and peel the parchment paper off the cake. The cake should be set, firm, and stable at this point. It is ready to be decorated.
- Add about one and a half cup more of the frosting on top of the cake. Spread it out evenly. Then using a cake spatula, make the swirl design.
- Then fit a piping bag with a Wilton 1M attachment and fill with chocolate buttercream. First, pipe rose shape spread out randomly all around the cake. Then pipe vertical strips of cream in between the rose-shaped design starting from the base of the case to the top around the perimeter to represent the bark of the tree.
- Decorate the cake with fresh pine tree stems and frosted cranberries. You may also decorate the cake with meringue mushrooms (using this meringue cookies recipe) or however you like.
- Place the cake into the fridge for a couple more hours.
- Just before serving the cake sprinkle some powdered sugar to resemble the snow.
How to Heat a Knife for Perfectly Clean Slices
- If you like to see nice and clean slices of cake as I do, it is important to know a few tips that will deliver that satisfying look for you. Slicing the cake with a warmed clean knife will turn each and every slice of the cake clean and beautiful.
- Place a long knife into a tall cup filled with hot water for 15 seconds or so. Remove the knife from the water and dry it using a paper towel. The hot knife will melt away stickiness and cleanly slice through the layers if you cut only in one downward direction, and pull the knife out at the base of the cake.
- Repeat the same instruction each time you make a slice and you've got a drool-worthy presentation with each slice of this deliciousness you worked so hard on. Happy slicing and eating!
- Enjoy with a cup of hot tea or latte!
Notes
Thank you for following me on Instagram, Facebook, and Pinterest!
This recipe was originally posted on December 3, 2020, and updated for a better user experience. The post may contain affiliate links. Read my disclosure.

Hi! You mention frosting and chocolate buttercream with 1M tip for decorating. Is this the same frosting you’re referring to, or 2 different kinds?
Is the ganache frosting stable for Florida heat?
This is a buttercream frosting and it will melt fast when exposed to heat. Thank you for asking!
What is the finished size of the cake? I like the wood tray idea but don’t know what size it would be. Thank you!
About 12″ cake in diameter. Thank you for asking!
Looks amazing! Can you freeze the sponges (rather than chilling them overnight) with the filling after it has been rolled? Just not sure I will have time to make this on Christmas Eve 🙂
And do you have any tips on how to roll the sponges so they don’t split?
That is a tough question! I don’t see why not. I’ve never experimented with it myself and am afraid to give a firm ok. But if you do, please come back and leave a comment on how it went, I would love to know! Thank you for your support! 🙂
As far as rolling: 1. Be generous by sprinkling with powdered sugar before rolling, 2. Do not roll the sponges tight, rather roll them loose, 3. Let the sponges cool completely and soften by keeping them covered with a cloth.
Hello, can I use bread flour instead of all-purpose flour? If yes, how much?
Thank you.
No bread flower will not work for this recipe. Thanks for asking!
Wait a minute. I have made Yule Logs for many years. 1st time trying a Tree Stump Cake. I have always inverted the cake onto a cloth covered with powdered sugar, rolled up the cake, allowed to cool. Unroll and add the filling. Is that what I should I should do here as well? Not seeing that in the directions, or I missed it.
I always hated washing the cloth after removing the cake roll, so I came up with a different method, which is simpler in my opinion. I sprinkle the top of the cake generously with powdered sugar and roll the cake with parchment paper that the cake was baked on intact. Then I use that parchment paper as a support when rolling frosted roll and then discard most of it. I do use some of it to hold the cake when invert the cake roll into standing position. I do use the scotch clear tape to hold the parchment paper together. I do have a Reel on my Instagram account how I roll this cake. Thank you for asking! It is a great question.
Hi! Making this cake this weekend for my daughter’s 14th birthday. Is it a 16X22 sheet or a 14X20 as it lists both in the article. Thanks!
The baking sheet is 16×22.
How many servings is this cake?
This cake serve at least 12 people.
Beautiful cake!
Thank you!
Hello, I’m planning to make this cake for this weekend, was wondering if it’s ok to bake the sponge cake the night before and then put it together the next day. That’s what I usually do with round cakes, just wasn’t sure if it’s ok to do with this cake.
Thanks
No, it will not work with this cake. This is basically a large cake roll. After baking the cake sponges you will need to roll them like you would a cake roll. If you leave it rolled and unfrosted until the next day it will stick together and will crumble when unrolling. You can frost rolled sponges, the rolled cake sponges need to stay in the fridge overnight before applying the outer layer of frosting. I hope this helps.