Classic Ukrainian Paska Easter Bread (Cupcake-Sized Paska!)
Paska is a beloved Ukrainian Easter bread in many Eastern European countries, with each region having a unique version of the recipe. Every holiday has its emblem, and colored eggs and Paska bread are the ultimate ones in Slavic tradition by far. Today, we’re taking this traditional bread to the next level and making small cupcake-sized versions that you’re going to fall in love with!
In Ukraine, Paska is an essential part of the Easter tradition, and its preparation is a time-honored practice that is passed down through generations. In fact, the word ‘Paska’ actually even stands for Easter! The bread is usually made a few days before Easter and its significance is not limited to being just a food item. It’s a big part of cultural and religious celebrations!
Traditionally, it’s made as large braided loaves that everyone shares, since it truly is a celebratory bread. But we’re taking it to the next level by making something that kids can enjoy too! These are cupcake-sized Paska bread or Paska cupcakes as I like to call them. They’re not only easy to hold, but also look adorable and really allow the little ones to take part in the holiday with greater enthusiasm.
On top of its significance in the Easter celebrations, Paska is a delightful treat that’s shared with loved ones and this holiday just isn’t complete without it. Its fluffy texture, rich flavor, and sweet aroma will make it one of your favorites!
In this recipe, I’ll guide you through the process of making delicious and traditional Paska bread that is sure to impress your loved ones. With simple instructions and useful tips, you can create a beautiful and tasty Paska bread to share with your family and friends for Easter, or whenever you want a tasty treat!
Want to learn how to make Paska? Then keep on reading!
What is Paska?
Paska is a traditional Easter bread that originated in Eastern Europe and is particularly popular in countries like Ukraine, and Poland. Easter is definitely incomplete without the tradition of making this delicious bread!
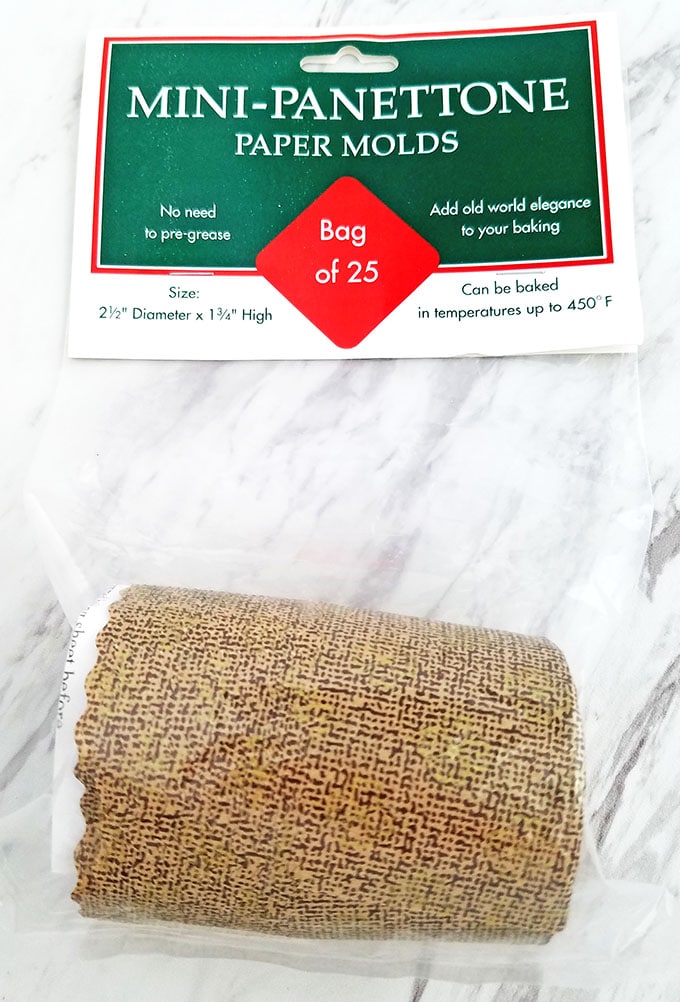
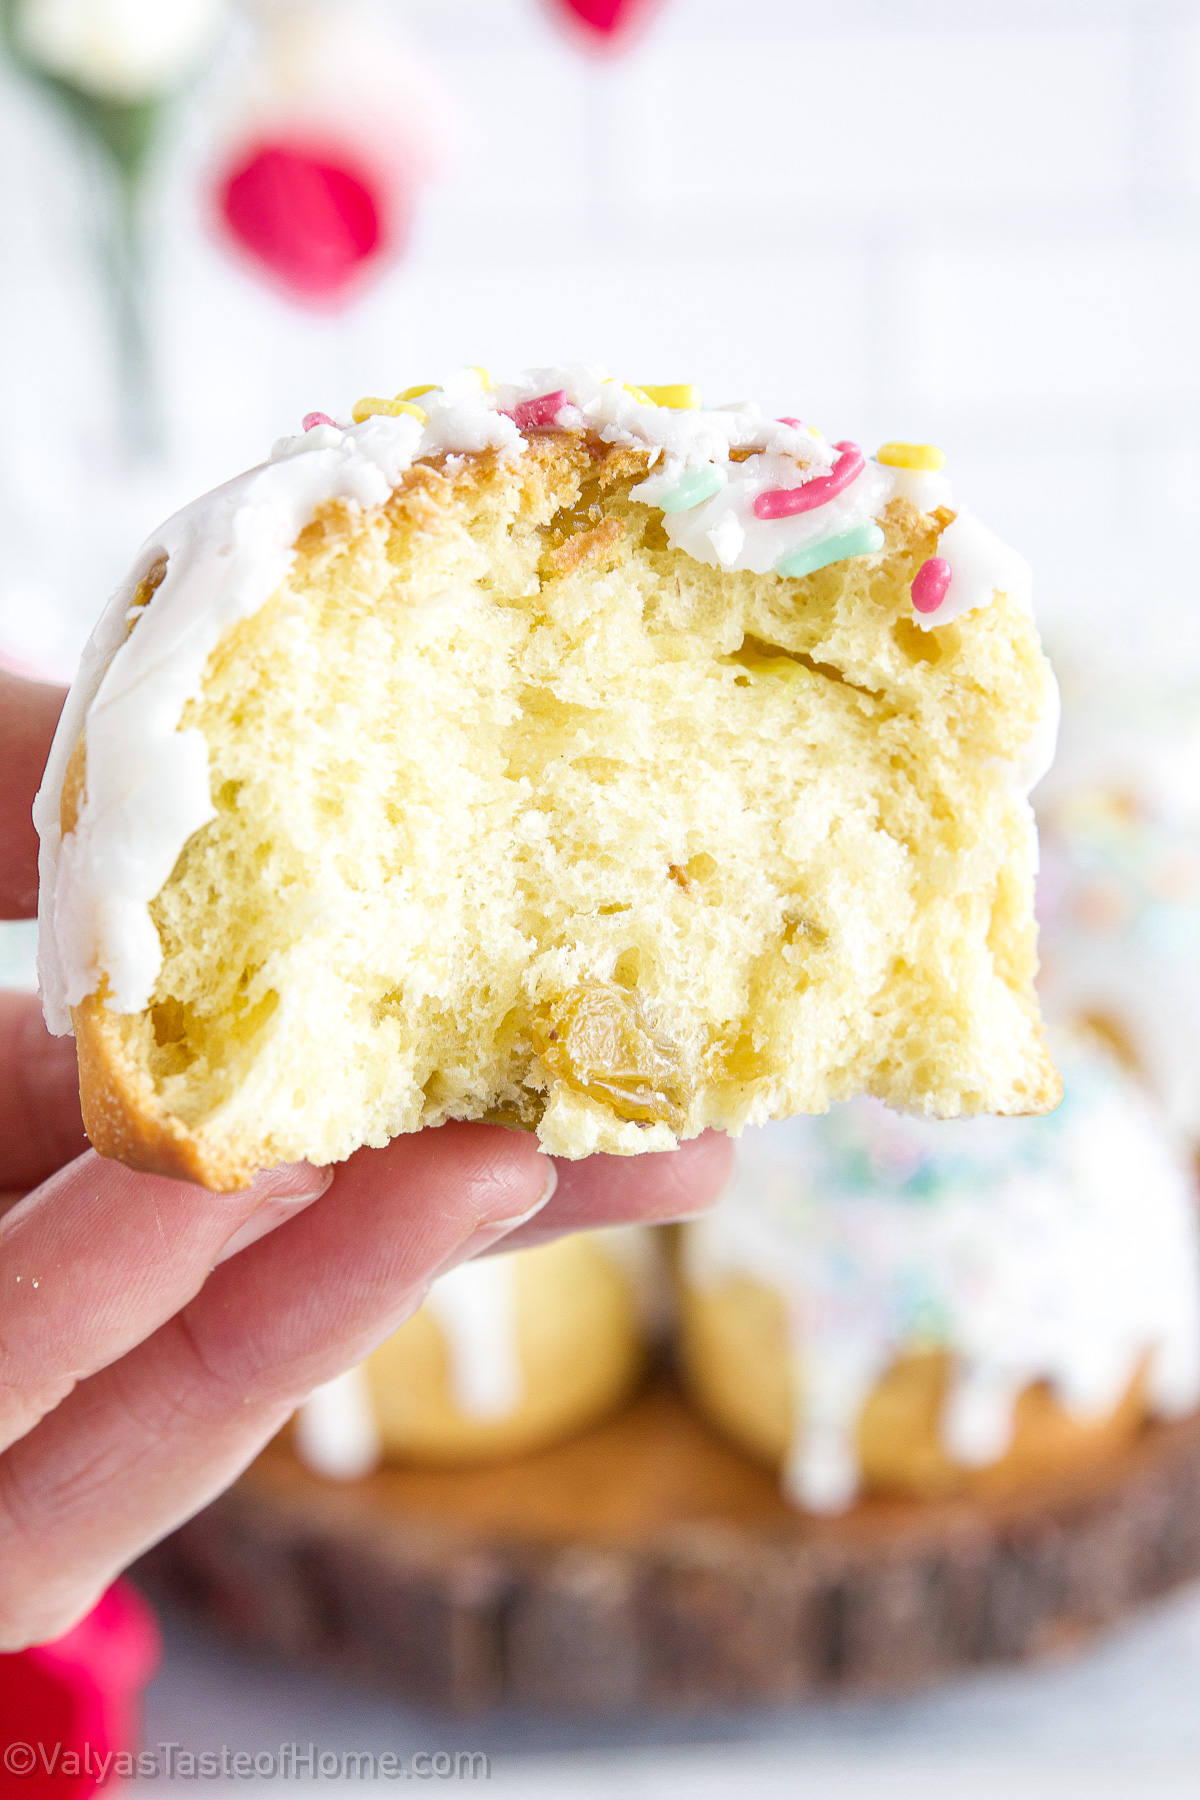
Traditionally, Ukrainian Easter Bread or paska is a tall, cylindrical bread that often contains raisins and is baked in festive paper molds, quite similar to Russian kulich or Italian panettone.
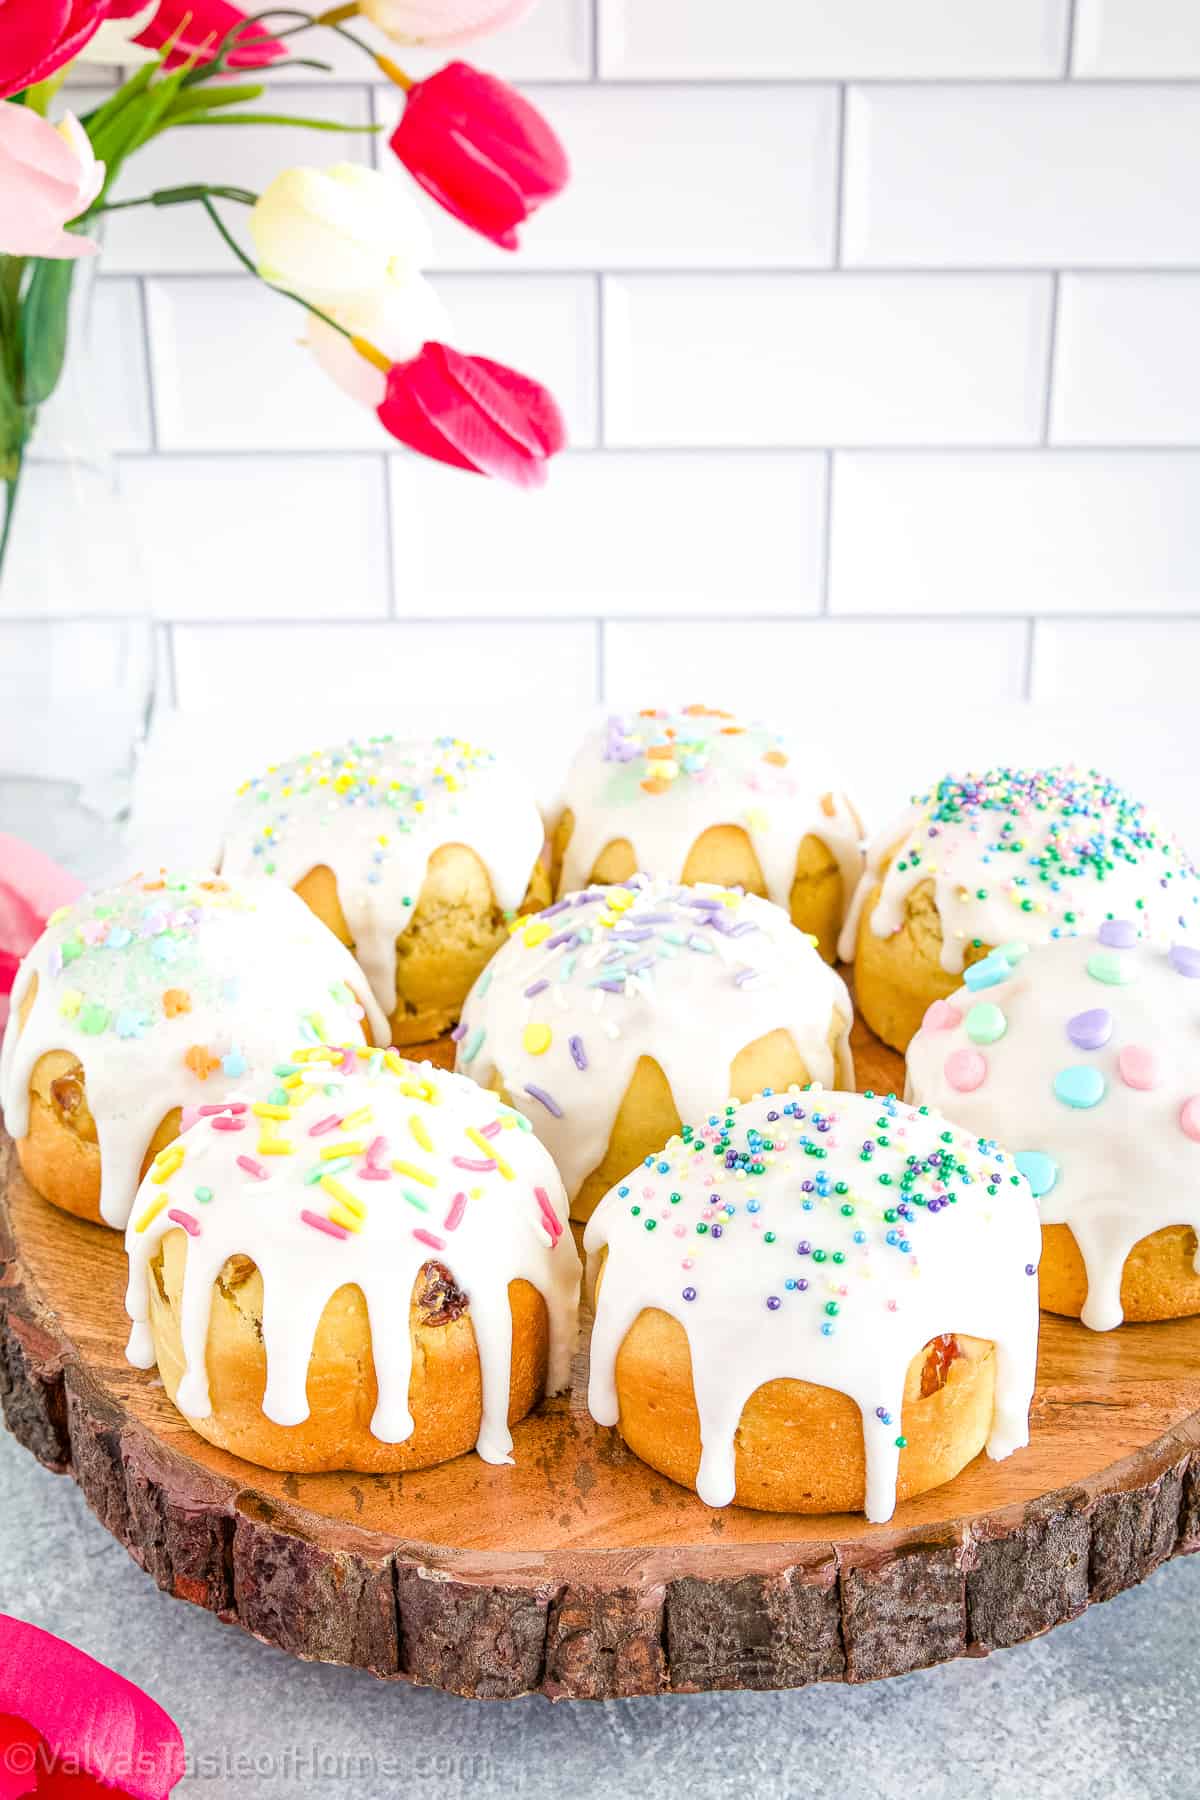
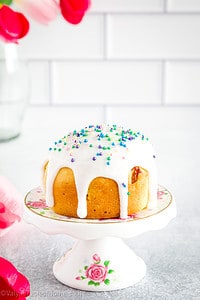
It’s essentially a slightly sweet egg bread that’s decorated with religious symbols to celebrate Easter and is shared with friends and family, along with other bread like babka or brioche braids. It’s often also decorated with colorful sprinkles or dyed eggs, making it a beautiful addition to any Easter celebration.
But today, we’ll be making Paska in a beautiful and unique way that’s sure to impress your friends and family, especially the little ones! We’ll be making small cupcake-sized Paska bread or Paska cupcakes as I like to call them.
And so, we’ll use panettone molds instead of a springform pan or a cake pan, giving them an interesting look that truly takes this traditional bread to the next level!
Paska is truly more than just bread; it is a cultural and religious symbol that has been an essential part of Easter celebrations in Eastern Europe for centuries. It’s often served with eggs, butter, different types of meats, and ham, or with a custard-like cheese called hrudka. Alternatively, it’s also served with a sweet glaze or a sweetened cream cheese spread.
It’s prepared a few days before Easter and is shared with family and friends during the Easter meal or given as gifts to loved ones. Its soft, fluffy texture and sweet, buttery flavor make it a favorite dessert for many people! You’ll fall in love with it as soon as you try it, I’m sure!
What Makes This Paska Recipe Special?
This is not just any Paska recipe, it’s a beautiful version of Paska that’s served in small cupcake-sized servings. Here are some of the top reasons why you’ll love it:
Traditional: This is definitely a recipe with some history behind it! Ukrainian Paska is a staple of Easter meals in Eastern European countries, and these days it has spread around the world.
Fun-sized: Paska bread is usually made in a loaf and cut into pieces. However, today we’ll be making easy-to-share Paska cupcakes that are truly kid-friendly and a crowd-pleaser!
Fluffy: My recipe doesn’t call for a lot of eggs, since too many egg whites can make your bread rubbery. Instead, you’ll get the fluffiest, soft Paska that you’ll absolutely fall in love with!
Delicious: The flavor combinations in this Paska recipe are just scrumptious. With rich raisin bread and a sweet lemon glaze, there’s no way you’ll have just one!
What You Need to Make Paska at Home
All you need are some of the most simple, pantry-staple ingredients to make the tastiest Paska you’ve ever had. Here’s what you’ll need:
For the Paska Dough:
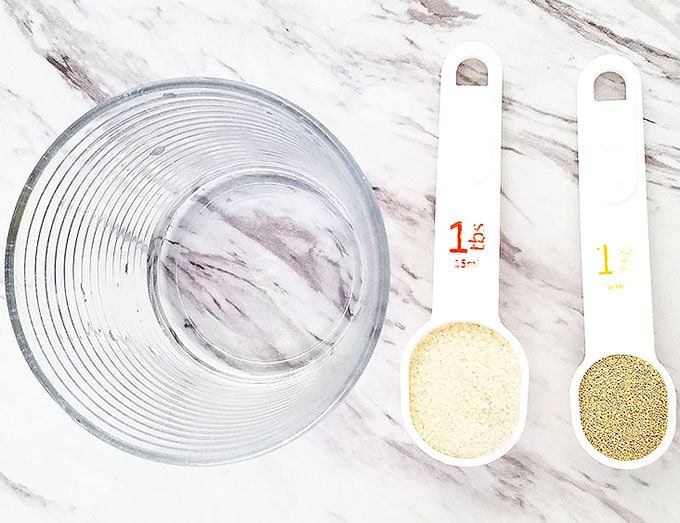
- Water: First we’ll need some water as the liquid base to activate our yeast in. Be sure to use filtered water so it’s free of contaminants.
- Sugar: Next we’re going to use a little sugar. This will activate the yeast to get it ready for use in our dough.
- Dry yeast: Let’s grab some active dry yeast also. When mixed with the water and sugar, it will activate and make our dough rise later to the best fluffy texture!
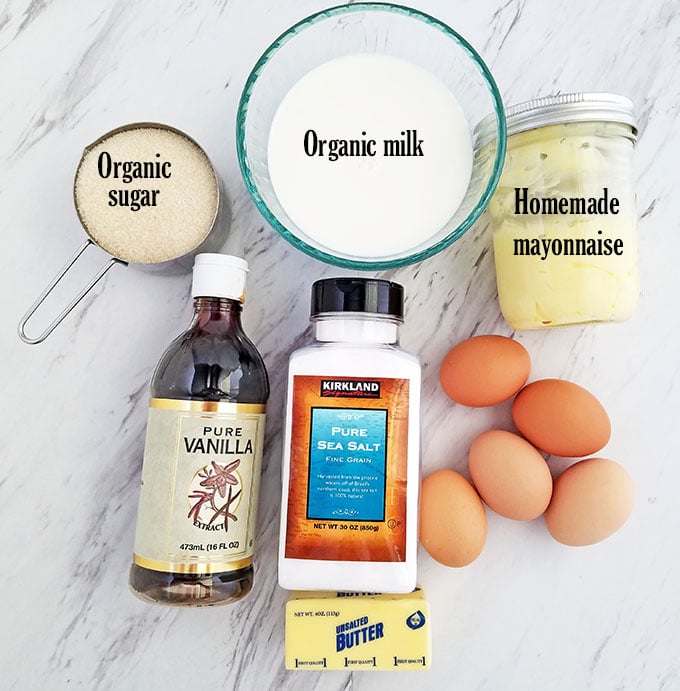
- Milk: The first ingredient we need after making the yeast is milk. Try to use organic whole milk if you can, the extra fats add a great richness to the bread.
- Butter: Next we’re going to use butter in our dough. Be sure to use unsalted butter so we can control the amount of salt in our dough.
- Mayonnaise: After that, we’ll be using mayonnaise (this homemade mayo recipe works great). It adds rich moisture to the bread that gives it a soft, tender texture.
- Eggs: Large eggs are another ingredient we’ll use to give our Paska a rich taste and tender texture. They also hold the dough together, giving it structure as it rises.
- Sugar: We’re going to use some more sugar in the dough. It will give our Paska bread its distinct sweet taste.
- Salt: A little bit of salt will bring out the flavor of all the other ingredients. I personally like to use sea salt, but table salt works too!
- Vanilla extract: We’ll use pure vanilla extract to add a subtle sweet flavor to the bread. Vanilla will also help balance out some of the sweetness in the other ingredients.
- Flour: All-purpose flour will be the base of our Paska dough. It’s great for binding all the ingredients together and absorbing their flavor.
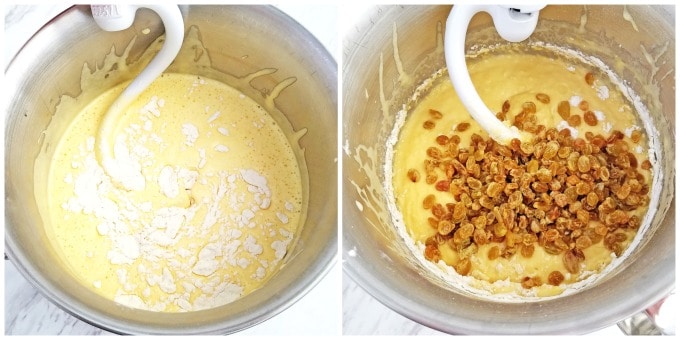
- Raisins: We’ll also be adding some delicious raisins to our bread to give it that sweet, traditional flavor that Paska is known for! We’ll be using one cup raisins in this recipe.
For the Glaze:
Note: I doubled the portion of my Paska Easter Bread glaze recipe.
- Milk: First up for the glaze, we need some more milk. Again, try to use whole milk for the added fats and extra-rich taste.
- Powdered sugar: Instead of regular sugar, we’ll use powdered sugar for the glaze. It dissolves in the milk and makes a smooth consistency that’s easy to drizzle.
- Lemon juice: Next we’ll need some lemon juice to give a bright, tangy flavor to our glaze. I really recommend freshly squeezed lemon juice if you can!
- Sprinkles: Our Paska cupcakes just wouldn’t be complete without some sprinkles on top! Grab these or any other of your favorite decorations.
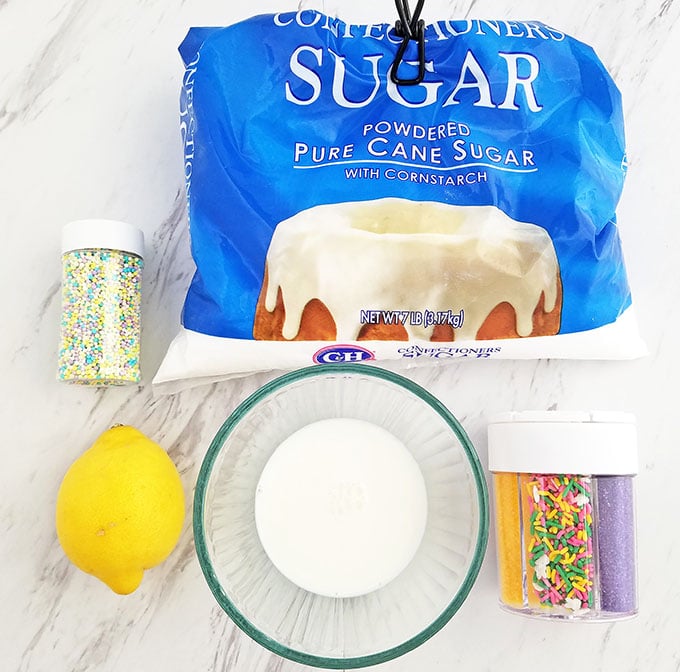
- Mini-Panettone Paper Molds: To give our Paska bread a beautiful cupcake-like shape, we’ll be using these panettone paper molds. You can click this link to order yours.
How to Make Paska (Step-by-Step)
Making Paska is incredibly easy and rewarding for Easter. Here’s how to make it step by step:
How to Make Paska Dough
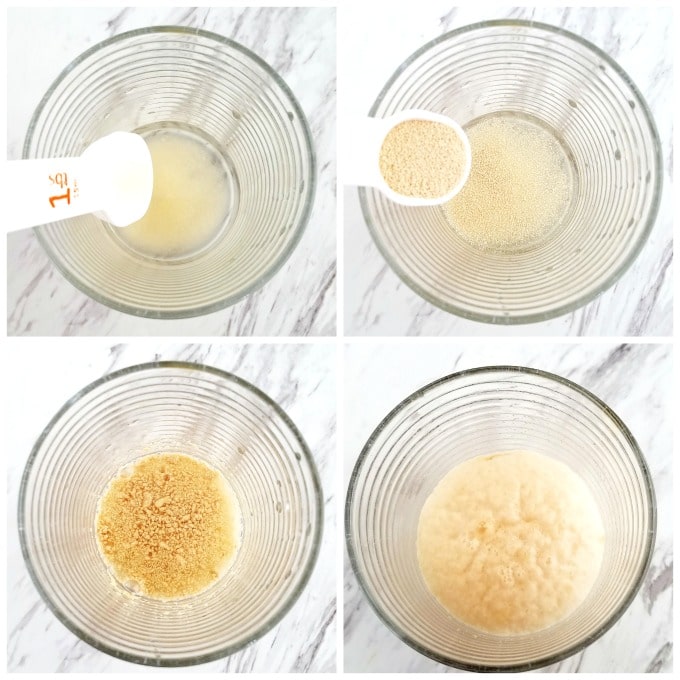
Let’s begin by preparing everything for the dough, starting with proofing the yeast.
First, sprinkle sugar into a glass of warm water. Stir until the sugar is almost dissolved, then add the yeast.
Stir until everything is well combined, then set it aside to proof (about 30 minutes).
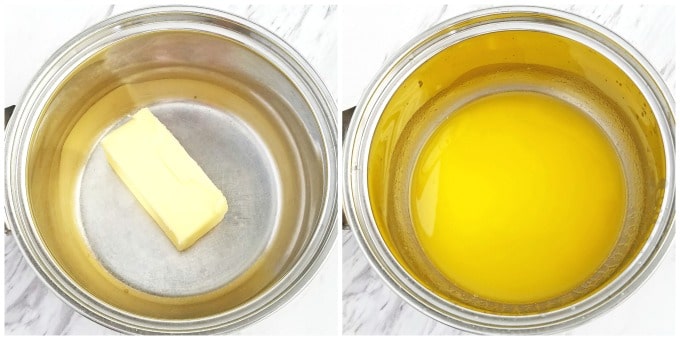
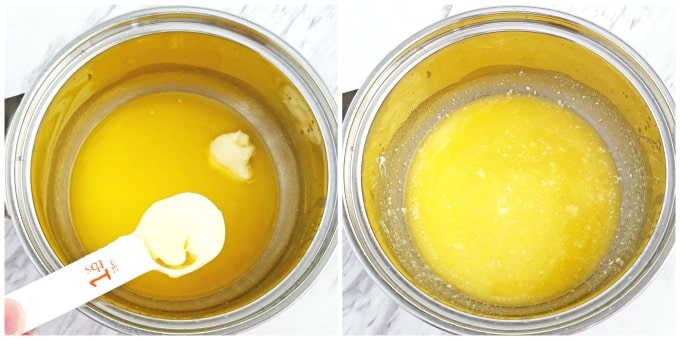
While the yeast is proofing, put the butter into a small saucepan and melt it over a warm burner.
Set the butter aside to cool until it’s just slightly warm.
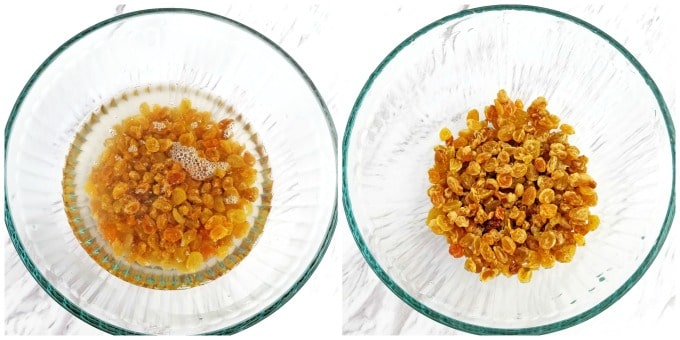
Next, pour hot water into a large bowl with the raisins and let them soak for 15 minutes.
Drain and rinse the raisins, then let them sit in a strainer so the excess water drips off. Set them aside until ready for use.
Your butter should be cooled to a warm temperature now. Add the mayonnaise to it and stir well to combine them.
Set this mixture aside until we’re ready to use it later.
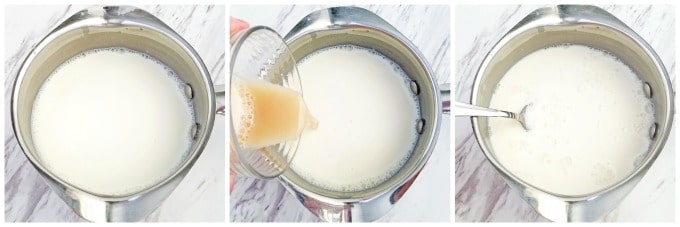
Next, pour the milk into a separate pot and bring it to a boil. When it begins to boil, remove it from the heat and let it cool to slightly warm.
Once it’s cooled, add the activated yeast mixture to the warmed milk and stir it well. Set this mixture aside until later.
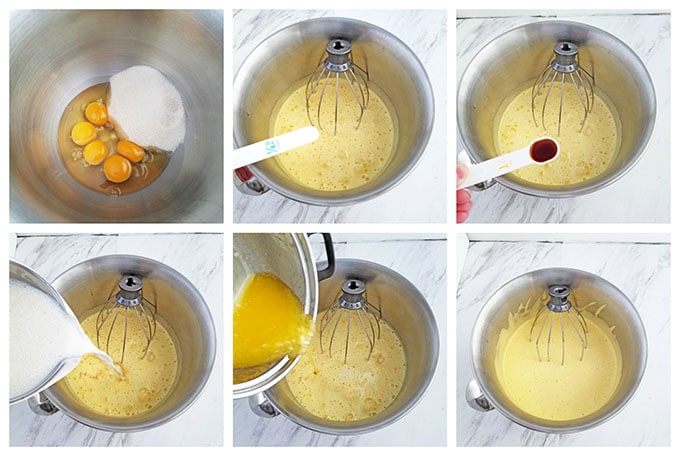
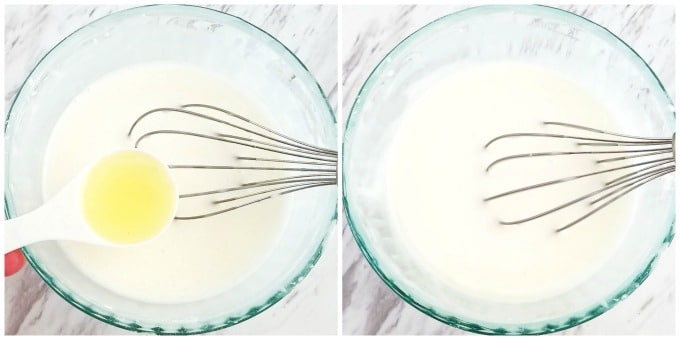
While the milk and yeast are cooling, beat eggs with sugar in the bowl of a stand mixer for 5 minutes on high.
Reduce the speed to low and add salt, vanilla, milk, the yeast/milk mixture, and the melted butter/mayonnaise mixture.
How to Knead Paska Dough
Now, switch to the dough hook attachment and gradually add in sifted flour, 1 cup at a time.
After you’ve added 4 cups of flour, add the raisins we soaked earlier.
Continue adding ½ cup of the flour at a time, scraping down the sides of the bowl with each flour addition. The dough should be soft and shouldn’t stick to a rubber spatula.
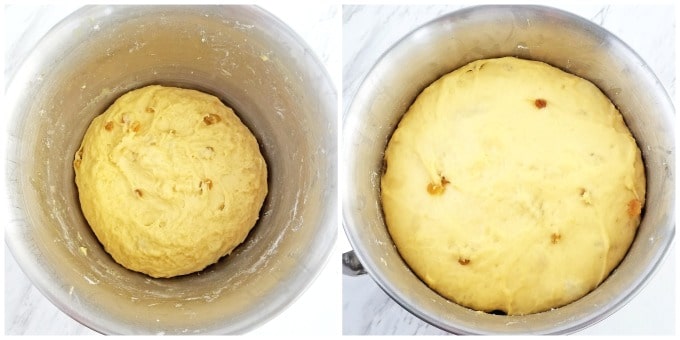
When the dough is fully mixed and not sticky, leave it in the same bowl or transfer it to a lightly greased bowl and cover it with plastic food wrap. Puncture about 5 small holes in the plastic wrap with a knife so the dough can breathe.
Place a clean kitchen towel over the plastic wrap, then put the bowl in a warm place for the dough to rise. This should take about 2 hours.
How to Shape Paska Dough
Time to start shaping our delicious Paska!
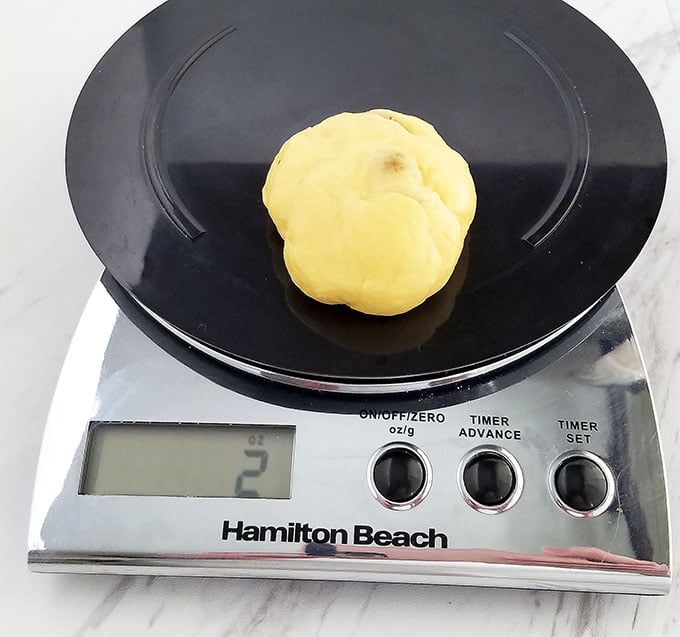
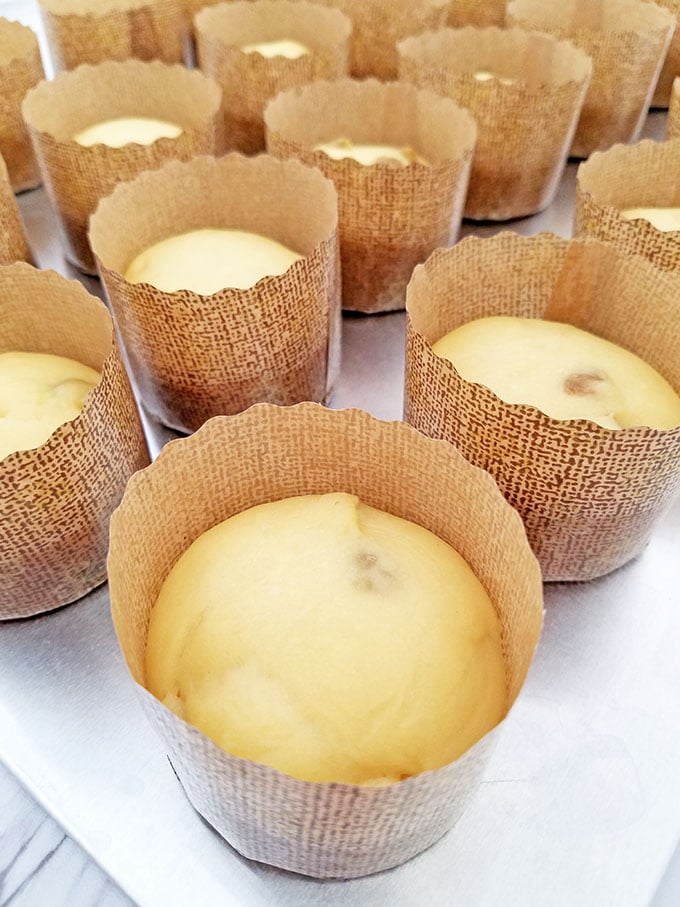
When the dough is done rising, lightly punch the dough and then pinch off a piece. Weigh each piece on a scale to get exactly 2 – 2 1/2 oz.
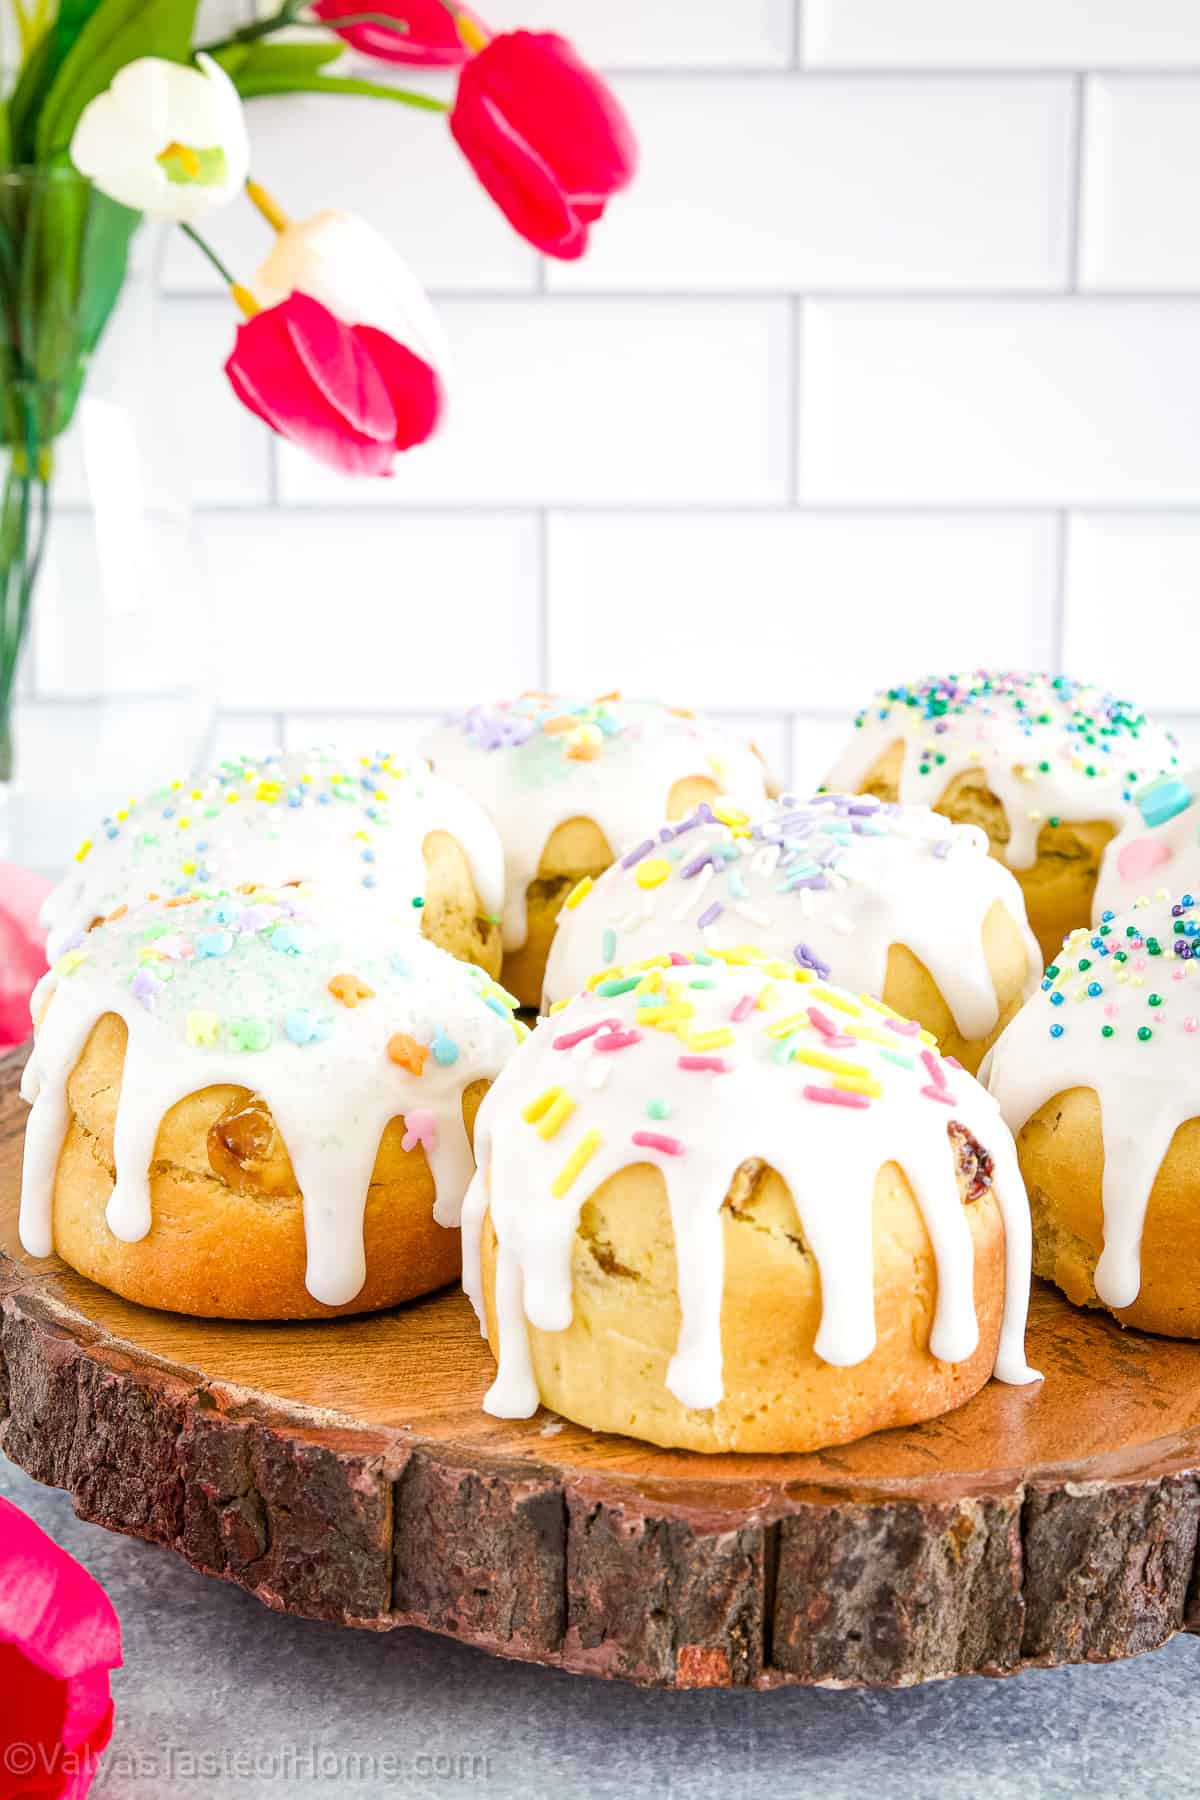
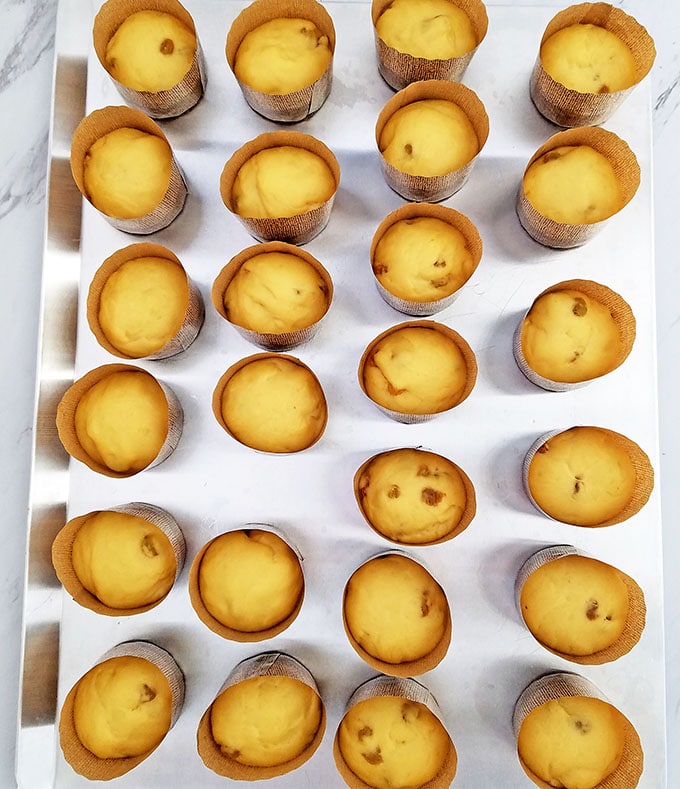
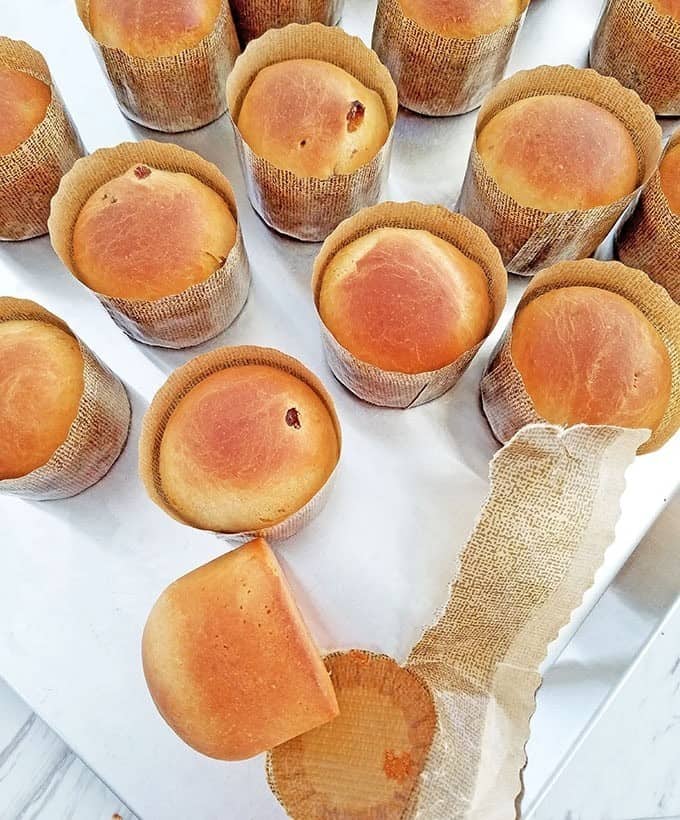
Roll the dough into a round little ball and place it into your panettone mold. The entire dough mix makes 50 mini Paskas. Personally, I like to make 25 little ones and 2 large ones, but it’s up to you.
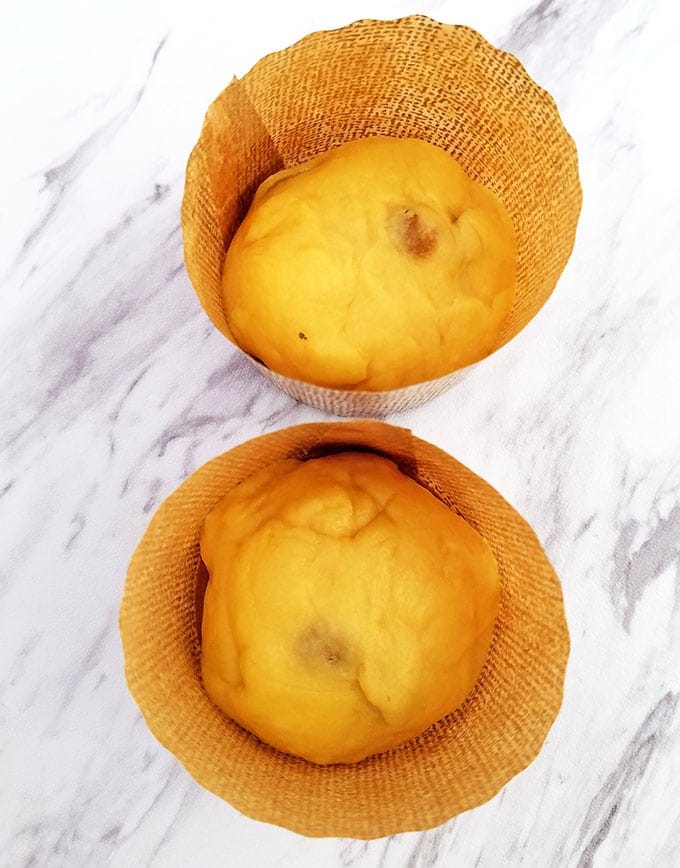
Place all the dough-filled molds on a cookie sheet and let it rise again in a warm place for 1 hour.
How to Bake Paska
Halfway through the rising time, preheat the oven to 350 F.
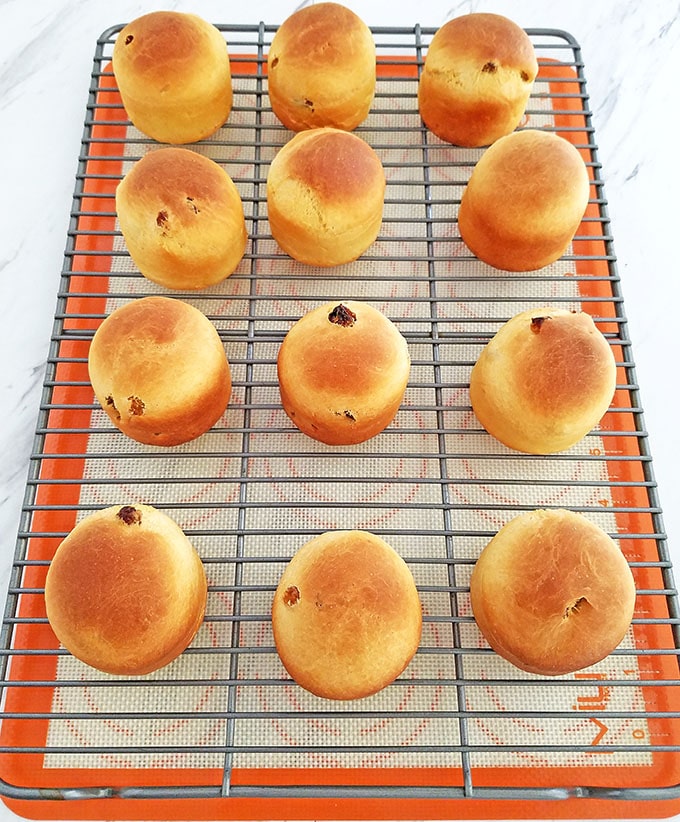
Bake 25 mini Paskas for 40 to 45 minutes or until golden brown. You’ll get a beautiful color like in the picture below without even needing to use an egg wash to brush on top of the bread.
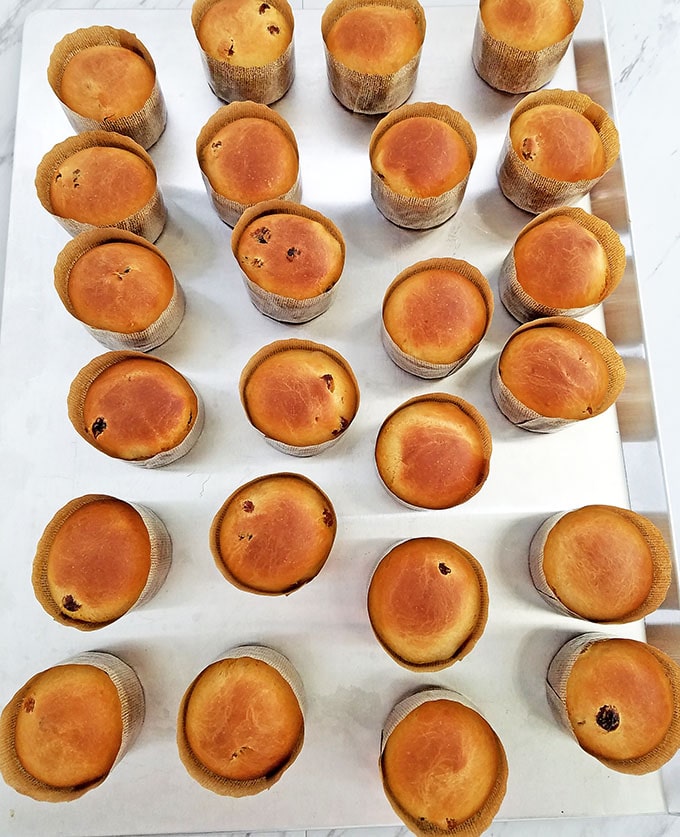
Remove from the oven and let them cool for 10 minutes.
How to Make Paska Glaze
While the mini-Paskas are cooling, let’s prepare the glaze.
Pour milk into a small bowl then add 1 cup of powdered sugar at a time, stirring gently at first then quicker with each addition.
Add freshly squeezed lemon juice and mix it well again. Cover the bowl tightly with a lid (to prevent hardening) and set it aside until ready for use.
How to Decorate Paska Cupcakes
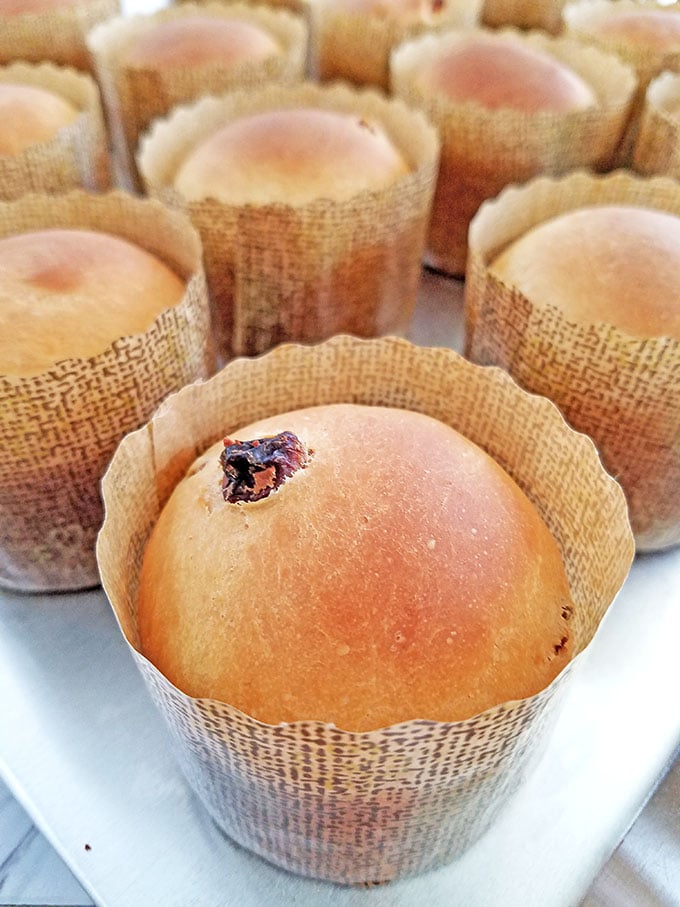
Remove the mini-Paska bread from their molds.
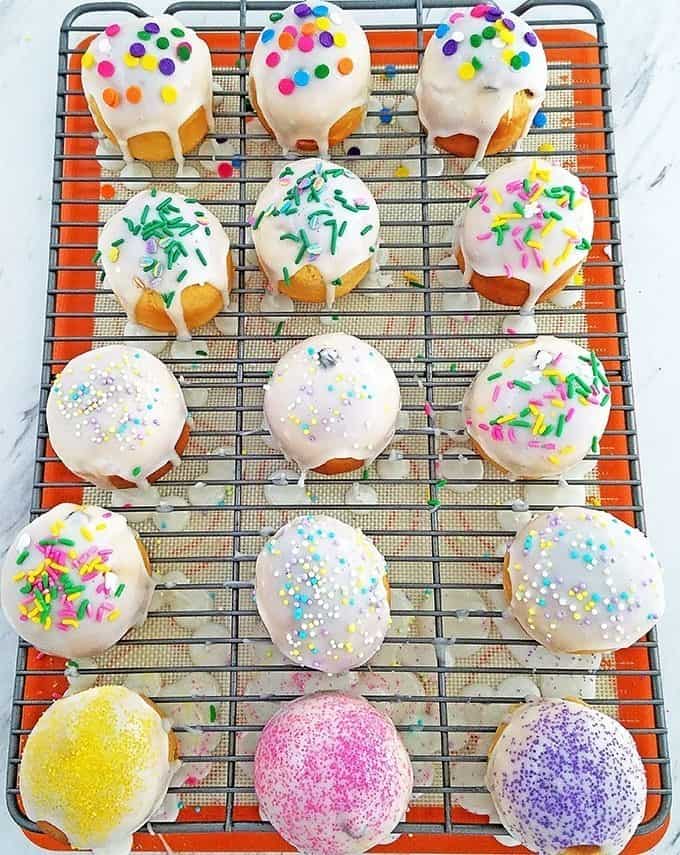
Place them on a wire rack for glazing. Be ready to begin glazing as soon as the mini-Paskas have cooled down to warm.
You can place a silicone mat or aluminum foil under the wire rack for easy cleanup.
Place a piping bag with the biggest round tip attachment into a tall glass, then pour the glaze into the bag. This helps to neatly decorate each individual bread and prevents the glaze from drying out.
While the Paska is still warm, pipe a large circle of glaze on top of a mini-Paska, then create the side drips with the tip.
Sprinkle the mini-Paska with any sprinkles or decorations of your choice. Make sure you add the sprinkles before the glaze dries or they won’t stick. Repeat these same steps until all the mini-Paskas are decorated.
Your delicious Mini Paska are ready to be served!
Have fun! Totally worth it!
Tips for Making the Best Paska Ever
Use high-quality ingredients: Look for good quality butter and mayonnaise that is made with real ingredients and avoid anything processed or artificial. Also, use good quality unbleached flour with a high protein content.
Use good quality baking molds: When making the paska, be sure to use good quality baking molds. I’ve linked to the panettone molds that I recommend using since they’ll help ensure that your paska comes out of the mold with ease.
Proof thoroughly: Before baking your paska, proof it thoroughly in a warm place until it doubles in size. This will ensure that your paska is light and fluffy on the inside.
Recipe Variation Ideas for Paska
If you’re looking to mix things up, there are plenty of different variations you can try out when making paska. Here are a few ideas to get you started:
Fruits and nuts: Use different fruits or nuts in the dough mixture such as dried cranberries, raisins, or walnuts.
Spices: Add different spices such as cinnamon, cardamom, or allspice to the dough mixture.
Flavored glaze: Use flavored glazes such as chocolate or orange for a delicious twist on the traditional paska recipe.
Different decorations: Decorate the mini-paskas with edible flowers or food coloring for a fun and festive look.
How to Store Leftover Paska
Leftover Paska can be stored for up to 3 days at room temperature. Place the pieces on a plate or tray and cover them with plastic wrap. You can also use an airtight container. Make sure to leave some space between each piece so that the air can circulate around them.
If you’re not going to eat your leftover paska within the next few days, you should freeze it for longer storage. You can freeze them this way for up to 3 months, but I recommend doing so before adding the glaze on top.
Place the individual pieces on a parchment-lined baking sheet, then transfer them to a freezer-safe bag or container. To thaw, place the frozen Paska in the refrigerator overnight before decorating and serving.
Similar Recipes You’ll Love
- Paska Easter Bread Recipe
- Classic Sweet Bread Recipe
- Soft and Fluffy Sweet Marbled Bread Recipe
- Easy Poppy Seed Roll Recipe
See all Easter recipes.
Classic Ukrainian Paska Easter Bread (Cupcake-Sized Paska!)
Ingredients
Paska Bread Ingredients
- 3 tbsp. – warm water
- 1 tbsp. – organic sugar
- 1 tsp. – dry east
- 1.5 cups – boiled and cooled to warm organic whole milk
- 4 oz. – unsalted butter
- 2 tbsp. – mayonnaise
- 5 large – eggs
- 1 cup – organic sugar
- ¼ tsp. – sea salt
- 1 tsp. – pure vanilla extract
- 6 – 7 cups – all-purpose organic flour
- 1 cup – raisins
Paska Bread Glaze Ingredients
- ¼ cup – whole organic milk
- 5 cups – powdered sugar
- 2 tbsp. – fresh lemon juice
- Sprinkles of your choice
- Mini – Panettone Paper Molds
Instructions
How to Make Paska Dough
- Let’s begin by preparing everything for the dough, starting with proofing the yeast.
- First, sprinkle sugar into a glass of warm water. Stir until the sugar is almost dissolved, then add the yeast.
- Stir until everything is well combined, then set it aside to proof (about 30 minutes).
- While the yeast is proofing, put the butter into a small saucepan and melt it over a warm burner.
- Set the butter aside to cool until it’s just slightly warm.
- Next, pour hot water into a large bowl with the raisins and let them soak for 15 minutes.
- Drain and rinse the raisins, then let them sit in a strainer so the excess water drips off. Set them aside until ready for use.
- Your butter should be cooled to a warm temperature now. Add the mayonnaise to it and stir well to combine them.
- Set this mixture aside until we’re ready to use it later.
- Next, pour the milk into a separate pot and bring it to a boil. When it begins to boil, remove it from the heat and let it cool to slightly warm.
- Once it’s cooled, add the activated yeast mixture to the warmed milk and stir it well. Set this mixture aside until later.
- While the milk and yeast are cooling, beat eggs with sugar in the bowl of a stand mixer for 5 minutes on high.
- Reduce the speed to low and add salt, vanilla, milk, the yeast/milk mixture, and the melted butter/mayonnaise mixture.
How to Knead Paska Dough
- Now, switch to the dough hook attachment and gradually add in sifted flour, 1 cup at a time.
- After you’ve added 4 cups of flour, add the raisins we soaked earlier.
- Continue adding ½ cup of the flour at a time, scraping down the sides of the bowl with each flour addition. The dough should be soft and shouldn’t stick to a rubber spatula.
- When the dough is fully mixed and not sticky, leave it in the same bowl or transfer it to a lightly greased bowl and cover it with plastic food wrap. Puncture about 5 small holes in the plastic wrap with a knife so the dough can breathe.
- Place a clean kitchen towel over the plastic wrap, then put the bowl in a warm place for the dough to rise. This should take about 2 hours.
How to Shape Paska Dough
- Time to start shaping our delicious Paska!
- When the dough is done rising, lightly punch the dough and then pinch off a piece. weigh each piece on a scale to get exactly 2 – 2 1/2 oz.
- Roll the dough into a round little ball and place it into your panettone mold. The entire dough mix makes 50 mini Paskas. Personally, I like to make 25 little ones and 2 large ones, but it’s up to you.
- Roll the dough into a round little ball and place it into your panettone mold. The entire dough mix makes 50 mini Paskas. Personally, I like to make 25 little ones and 2 large ones, but it’s up to you.
- Place all the dough-filled molds on a cookie sheet and let it rise again in a warm place for 1 hour.
How to Bake Paska
- Halfway through the rising time, preheat the oven to 350 F.
- Bake 25 mini Paskas for 40 to 45 minutes or until golden brown. You’ll get a beautiful color like in the picture below without even needing to use an egg wash to brush on top of the bread.
- Remove from the oven and let them cool for 10 minutes.
How to Make Paska Glaze
- While the mini-Paskas are cooling, let’s prepare the glaze.
- Pour milk into a small bowl then add 1 cup of powdered sugar at a time, stirring gently at first then quicker with each addition.
- Add freshly squeezed lemon juice and mix it well again. Cover the bowl tightly with a lid (to prevent hardening) and set it aside until ready for use.
How to Decorate Paska Cupcakes
- Remove the mini-Paska bread from their molds.
- Place them on a wire rack for glazing. Be ready to begin glazing as soon as the mini-Paskas have cooled down to warm.
- You can place a silicone mat or aluminum foil under the wire rack for easy cleanup.
- Place a piping bag with the biggest round tip attachment into a tall glass, then pour the glaze into the bag. This helps to neatly decorate each individual bread and prevents the glaze from drying out.
- While the Paska is still warm, pipe a large circle of glaze on top of a mini-Paska, then create the side drips with the tip.
- Sprinkle the mini-Paska with any sprinkles or decorations of your choice. Make sure you add the sprinkles before the glaze dries or they won’t stick. Repeat these same steps until all the mini-Paskas are decorated.
Thank you for following me on Instagram, Facebook, and Pinterest!
This recipe was originally posted on March 27, 2017 (original picture below), and updated for a better user experience. The post may contain affiliate links. Read my disclosure.


Can a cupcake baking sheet be used?
Absolutely. Thanks for asking!
Hello, these are beautiful! Love the idea of minis ☺️ I was wondering if baking them on the convection option would make a difference in the way these are baked? Has anyone tried this?
Yes, it does. Convention setting is stronger, so I usually bake at 325 F. You may have to cover them with aluminum foil towards the end of the baking time to prevent the tops from burning.
Just made these today and they turned out so perfect and delicious! My daughter loved helping me decorate the mini paska. Definitely will be making these again as an Easter tradition. Thank you for the recipe!
That is so awesome! I make them every Easter. They are just super adorable not to include on the holiday menu! Thank you for sharing your experience with me! 🙂
Valya, how many days in advance you can bake them? to prevent drying on Easter??
Hi Viktoriya! I bake them (10 minuets less then instructions suggests) early in the week and freeze unglazed in air tight container. Then on Friday night I take them out of the freezer to thaw and the next day I heat/bake them in preheated oven to 350 F for about 10 minutes. Cool to warm then glaze. That way they are really fresh for Sunday. Store them in the same container but uncovered, so the glaze stays beautiful. I hope this helps. Happy Easter!
Hi Valya! These look stunning. Does the icing dry out a bit or stays moist? Thanks in advance.
Thank you, Lena! They are truly delicious little things! The glaze dries out fast, so you need to sprinkle them right away.
Oh, and I’m working on posting a new super delicious glaze recipe (coming to the blog very soon) for those cute mini paska’s, stay tuned!
Am i able to divide this recipe in half? Just to get 25 mini ones?
Yes, that is correct.
These turned out perfect for me! I will be making them next year as well. Ppl use hot milk to delude the yeast and sugar and waiting all day for the dough to rise, it just won’t happen, because the yeast got burned. Thank you so much for amazing recipe Valya!
Im glad to hear that the recipe turn out great for you! I never had a problem with dough rising either. Yes, if the milk is too hot it will rune the rising process. I learned that from my own experience shortly after I got married. You live, you learn, right? Thank you so much for an amazing 5-star review! 🙂
Hello Valentina. I tried your mini kulich recipe and didnt work for me. It took the whole day for the dough to rise..it was standing on the door of my opend oven on to 170° since my house temp is always at 68° finally when i baked it at sundown it did not taste sweet at all.. Im a sweet person so for all who likes sweet bread this one is not sweet at all. If i knew i would add more sugar.. Other recipes i made from your site are great. Love them. Keep up the beautiful job:)
I am so sorry to hear that! It’s hard for me to tell what went wrong with out seeing the actual preparation process. What will cause the dough rise for too long (or not rise at all) is if the yeast got exposed to a high heat such as water and then milk in this recipe.
So what you’re saying is the oven was turned on to 170 degree Fahrenheit entire proofing time while the dough was standing on the door of open oven? If so, that caused the dough to over heat preventing from proper rising. As far as sweetness goes, everyone is different. The bread is sweet enough for me and my family although I consider my self a big sweets fan. Try adding more sugar if you like. Give this recipe another try. Practice makes perfect. Thank you for your comment.
They are so cute! I just have a question. Can I use cupcake liners to make these mini Paskas?
The dough will stick to the liners. You can try using muffins pan instead. Let me know how it turns out for you.
Can i use this recipe to bake big paskas?how many big paskas can be in this recipe? Thanks
Hi Natalia. You sure can. It depends how big of a mold you are going to use. Fill the mold half way with non proof dough. I hope this helps.
That is a absolutely great question! I forgot to mention that in the post. I bake them separately (I have 2 ovens). The big Paskas needs a little more proofing time. So, if you have one oven bake the mini ones first. Then bake the 2 big one’s for about 10 to 15 minutes longer (but use your judgement tho, oven temperature may differ). When the top of the Paska bread is dark golden brown in color, it’s the sign that it is most likely done baking. I hope that helps. Have a blessed Easter Sunday!
Can this recipe be used to make ruleti with walnut and raisins filling? Thanks!
Absolutely! This dough recipe is perfect for ruleti, pirozhki etc… Thank you for your comment 🙂
I made ruleti with this recipe, and they turned out very delicious. The taste of the dough brought back many wonderful childhood memories. This recipe is a keeper for sure. Thank you Valya for sharing this recipe with us.
Aww… you made my day Lily 😉 I’m glad to hear that you liked the recipe. Thank you for trying out my recipes!
Hi Valya! Thank u, I ordered the mini molds and will be making them in couple days. I just have a little question as you stated you made 25 mini ones and two large ones…this mind sound weird but did u bake the mini ones separate than baked the larger two next and was it same baking time ?? Thank you! Love your blog , -all your recipes I made are super delicious and loved by my family.
Absolutely beautiful!
Thank you Emma!
They are absolutely adorable. I ordered mini molds and cannot wait to make them next week. Thanks for the recipe Valya!
Thank you! You will love making them! Have fun 🙂
Valya- they look gorgeous. I am wondering how come you doubled the icing recipe and not the cake recipe? Since you’ve doubled it, I’m assuming it’s a must.
I doubled the icing, because it takes much more icing to decorate mini Paskas, than the regular 2 big Paskas. I hope that clarifies.
Looks good. This reminds me of Italian Panetone bread. You’re pix are so nice too. The lighting is perfect without being overexposed. Your blog is doingg so well. I look to you for inspiration to stick with blogging.
Thank you Joanne! Blogging is definitely not an easy career, especially first couple of years. Do your best and be you, is the most important thing in blogging. Hang in there dear, it will get better!
Hi Valya! Love your site! Great recipes! Question is this dough more on the moist side or dry? Thanks
Hello Oksana! This dough recipe turns out pretty moist, especially when the bread is still warm. Thank you for kind words! 🙂
Valya,what is the difference in texture and taste in this paska and the one you posted a few years ago?
Hi Oksana. They are very similar, but what makes the difference in taste is addition of mayonnaise. You just have to try both recipes to notice the difference. I hope this helps, and thank you very much for your comment.
Hi , Valya ! Your kilich looks amazing! Where did you buy a paper molds . ?
Hi Natasha. Thank you very much, they taste amazing too! I order paper molds on Amazon (I posted this recipe way before Easter so people have enough time to receive their order and make this delicious mini Paska bread). Simply click on any link or a picture of the molds in the recipe post, and it will take you to the right place to order. Thank you for your comment 🙂
Thank you so much !!! God Bless you and your family
You are very welcome! Enjoy!
These are soo adorable! Does the glaze stay white like that or does it dry clear?
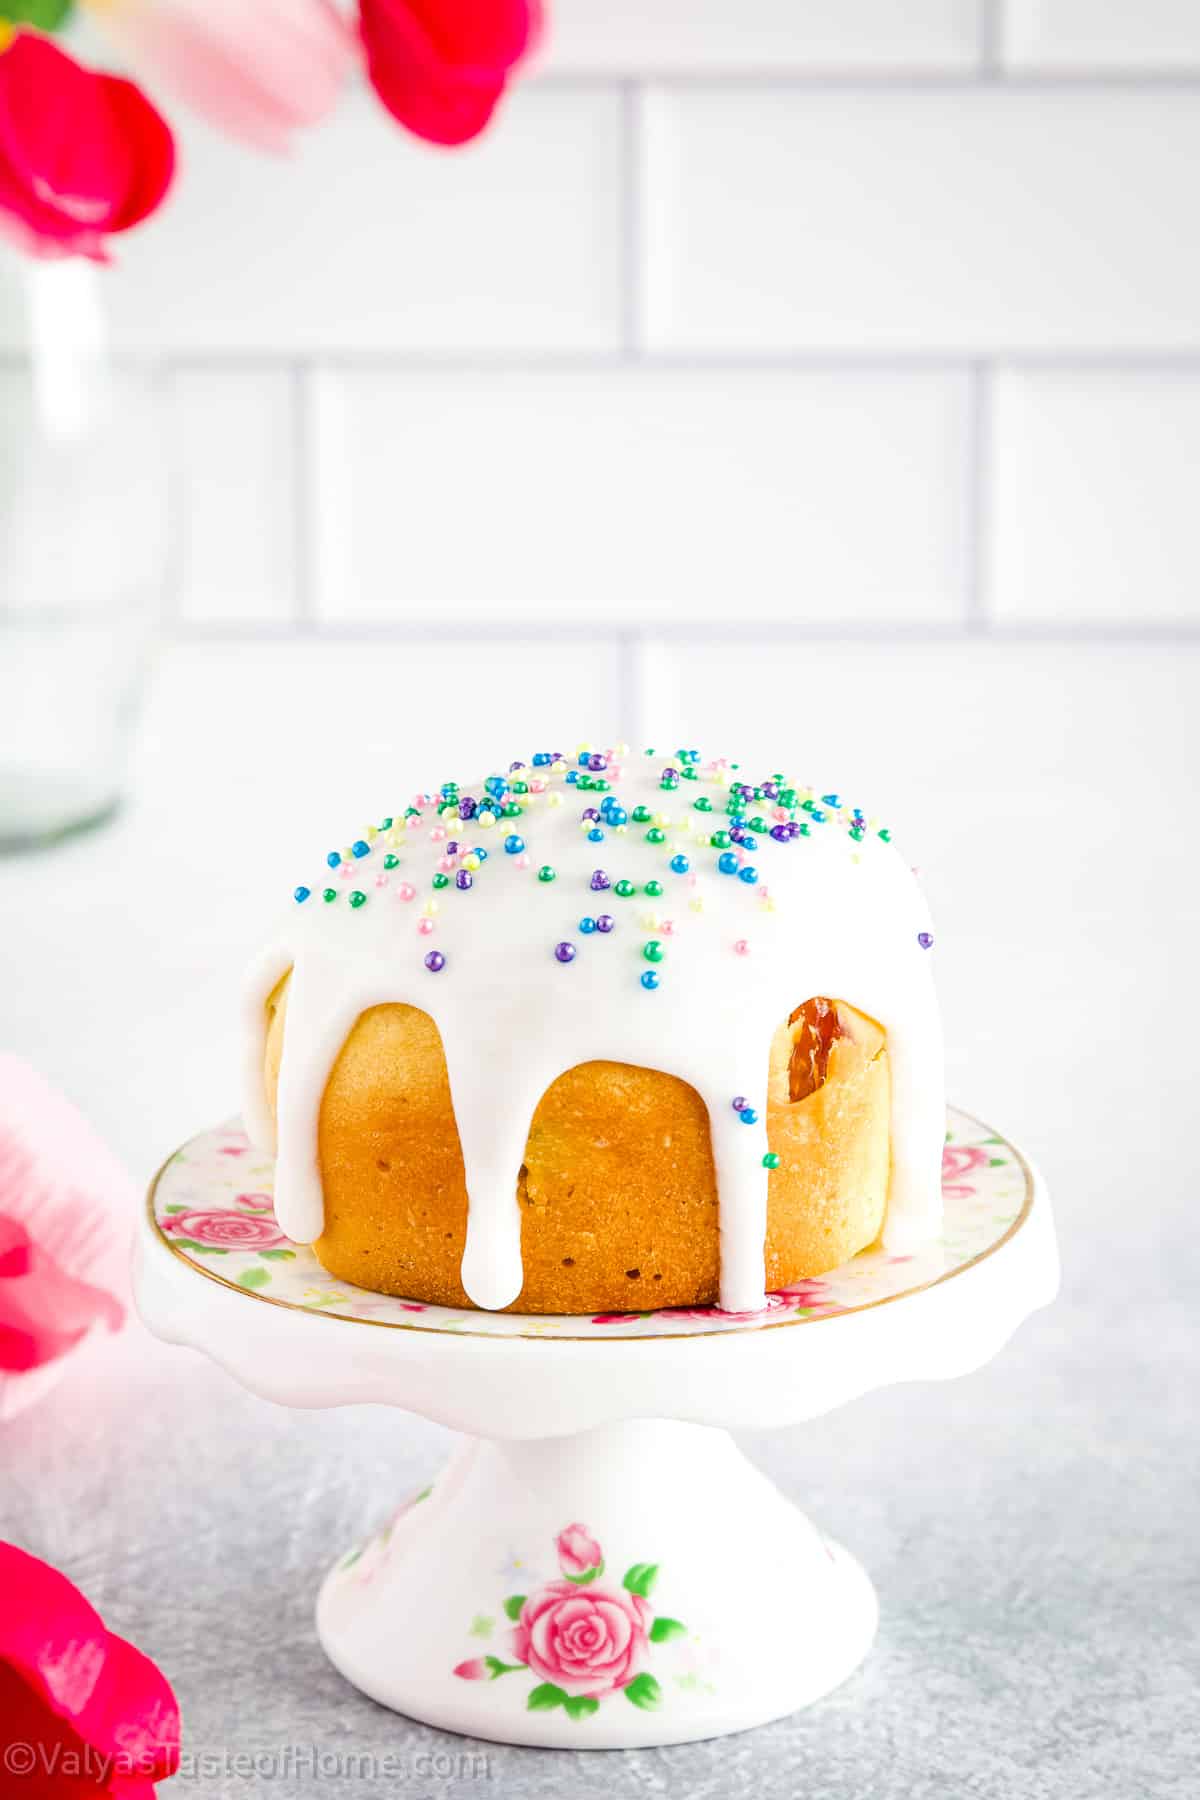
I took final pictures of the product 2 days later after it was glazed, so as you can see, the glaze stayed white. Not thick enough glaze will make the glaze clear after drying like on the large Paska bread in this post (the bread was a little too hot for glazing, which made the glaze melt and translucent after drying). I hope this helps.