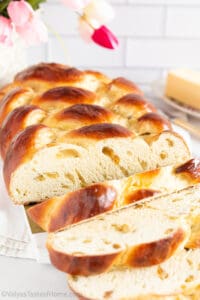
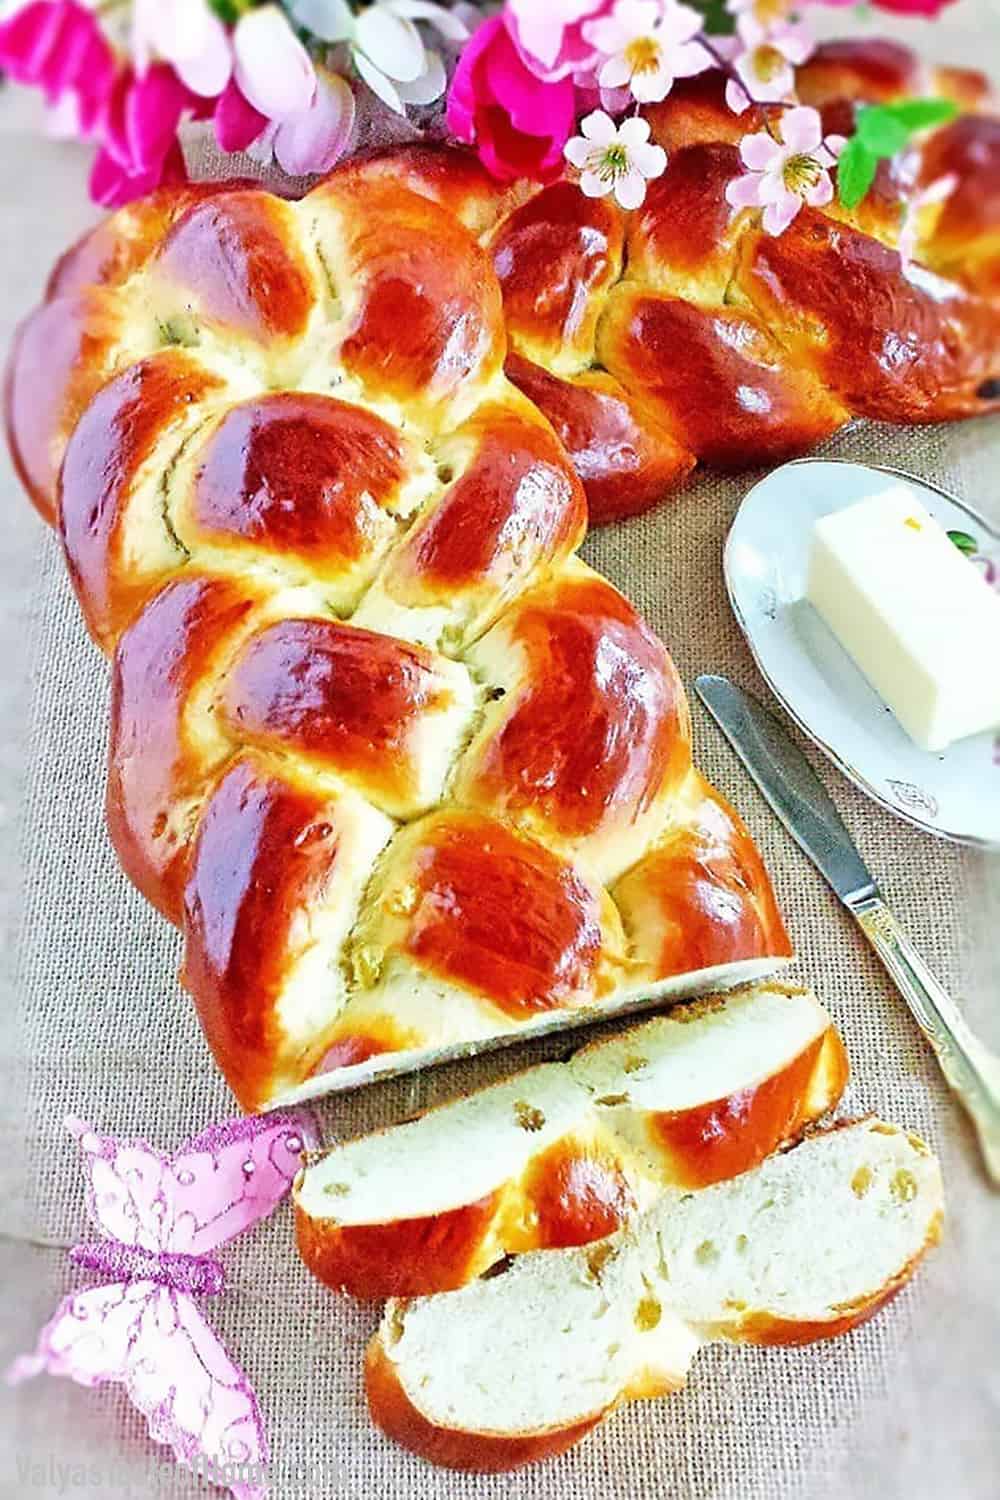
Braided Sweet Bread (with Golden Raisins)
Braided Sweet Bread recipe is perfect for any holiday! This is a classic bread with a subtle, sweet flavor that goes perfectly with a little butter spread and a hot cup of tea or coffee.
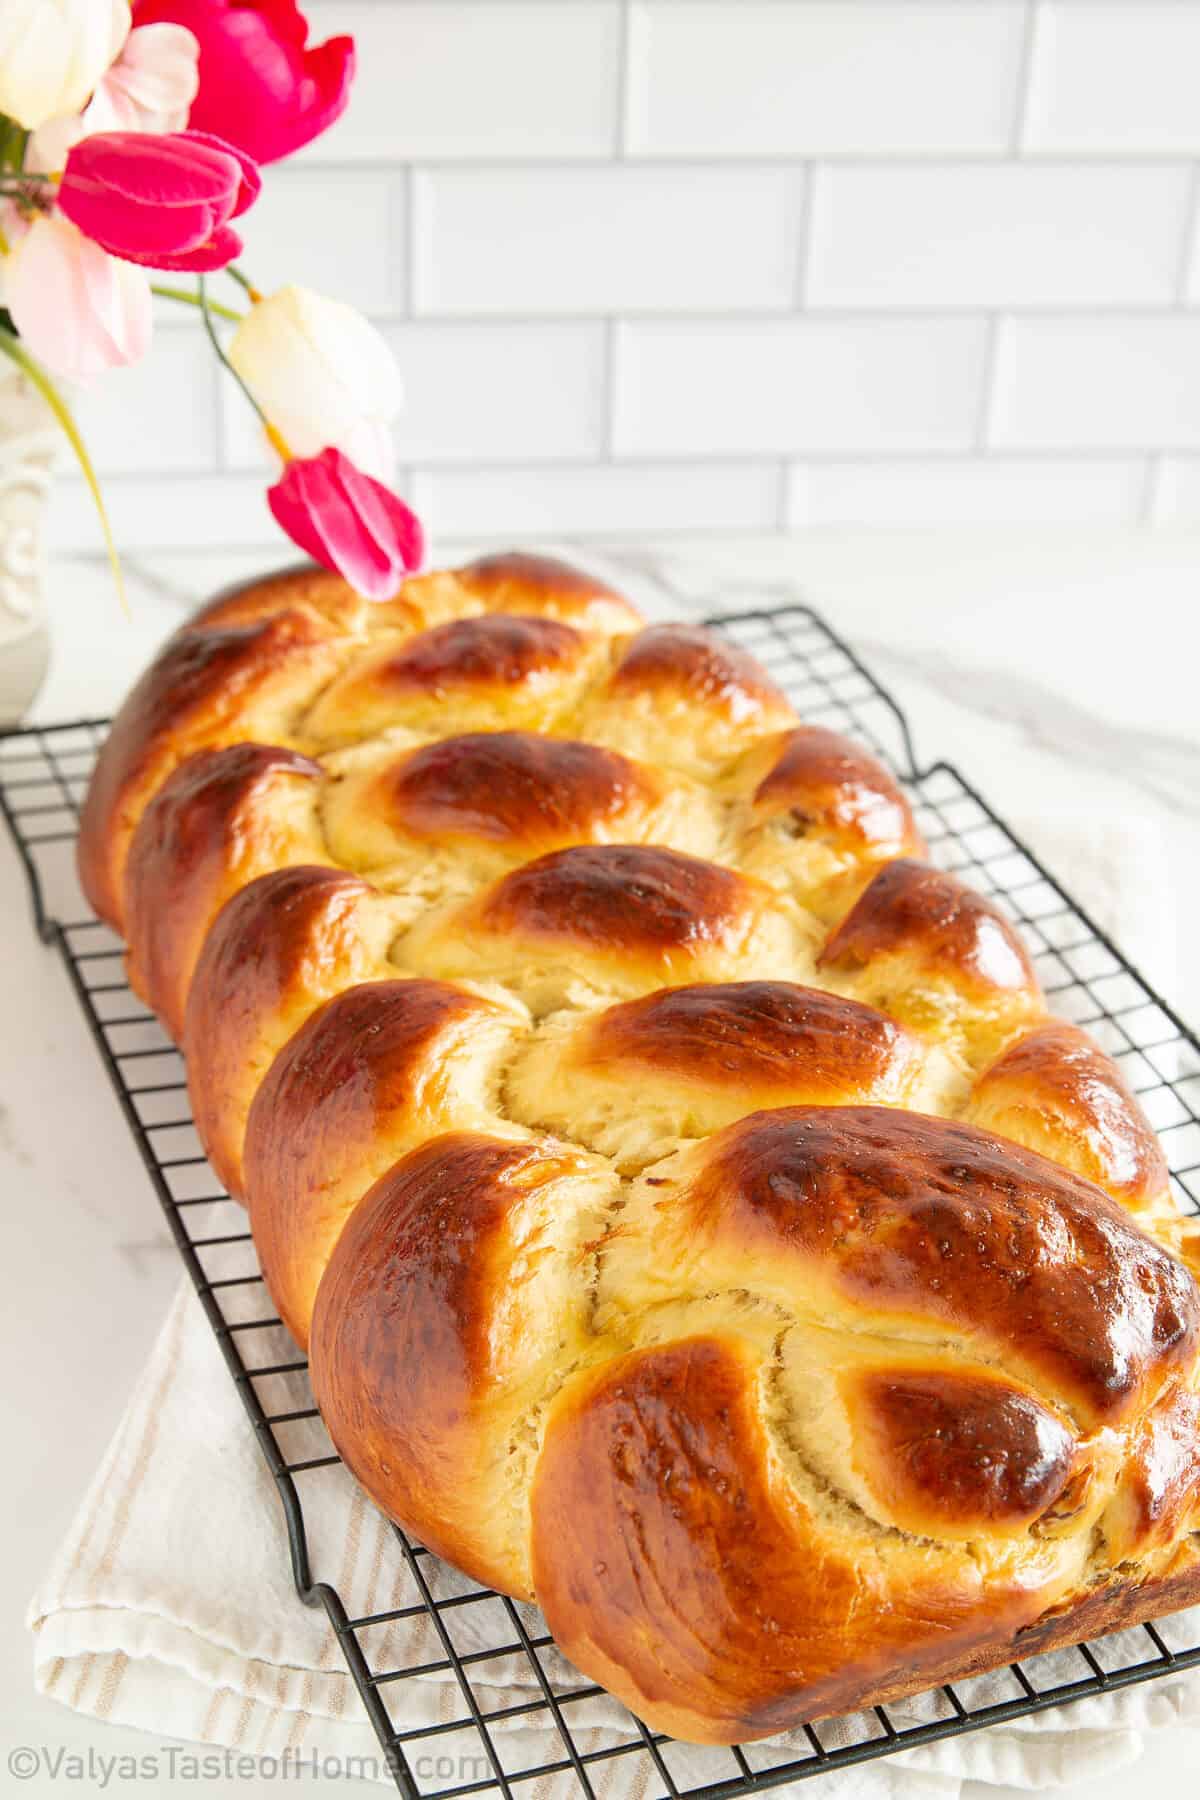
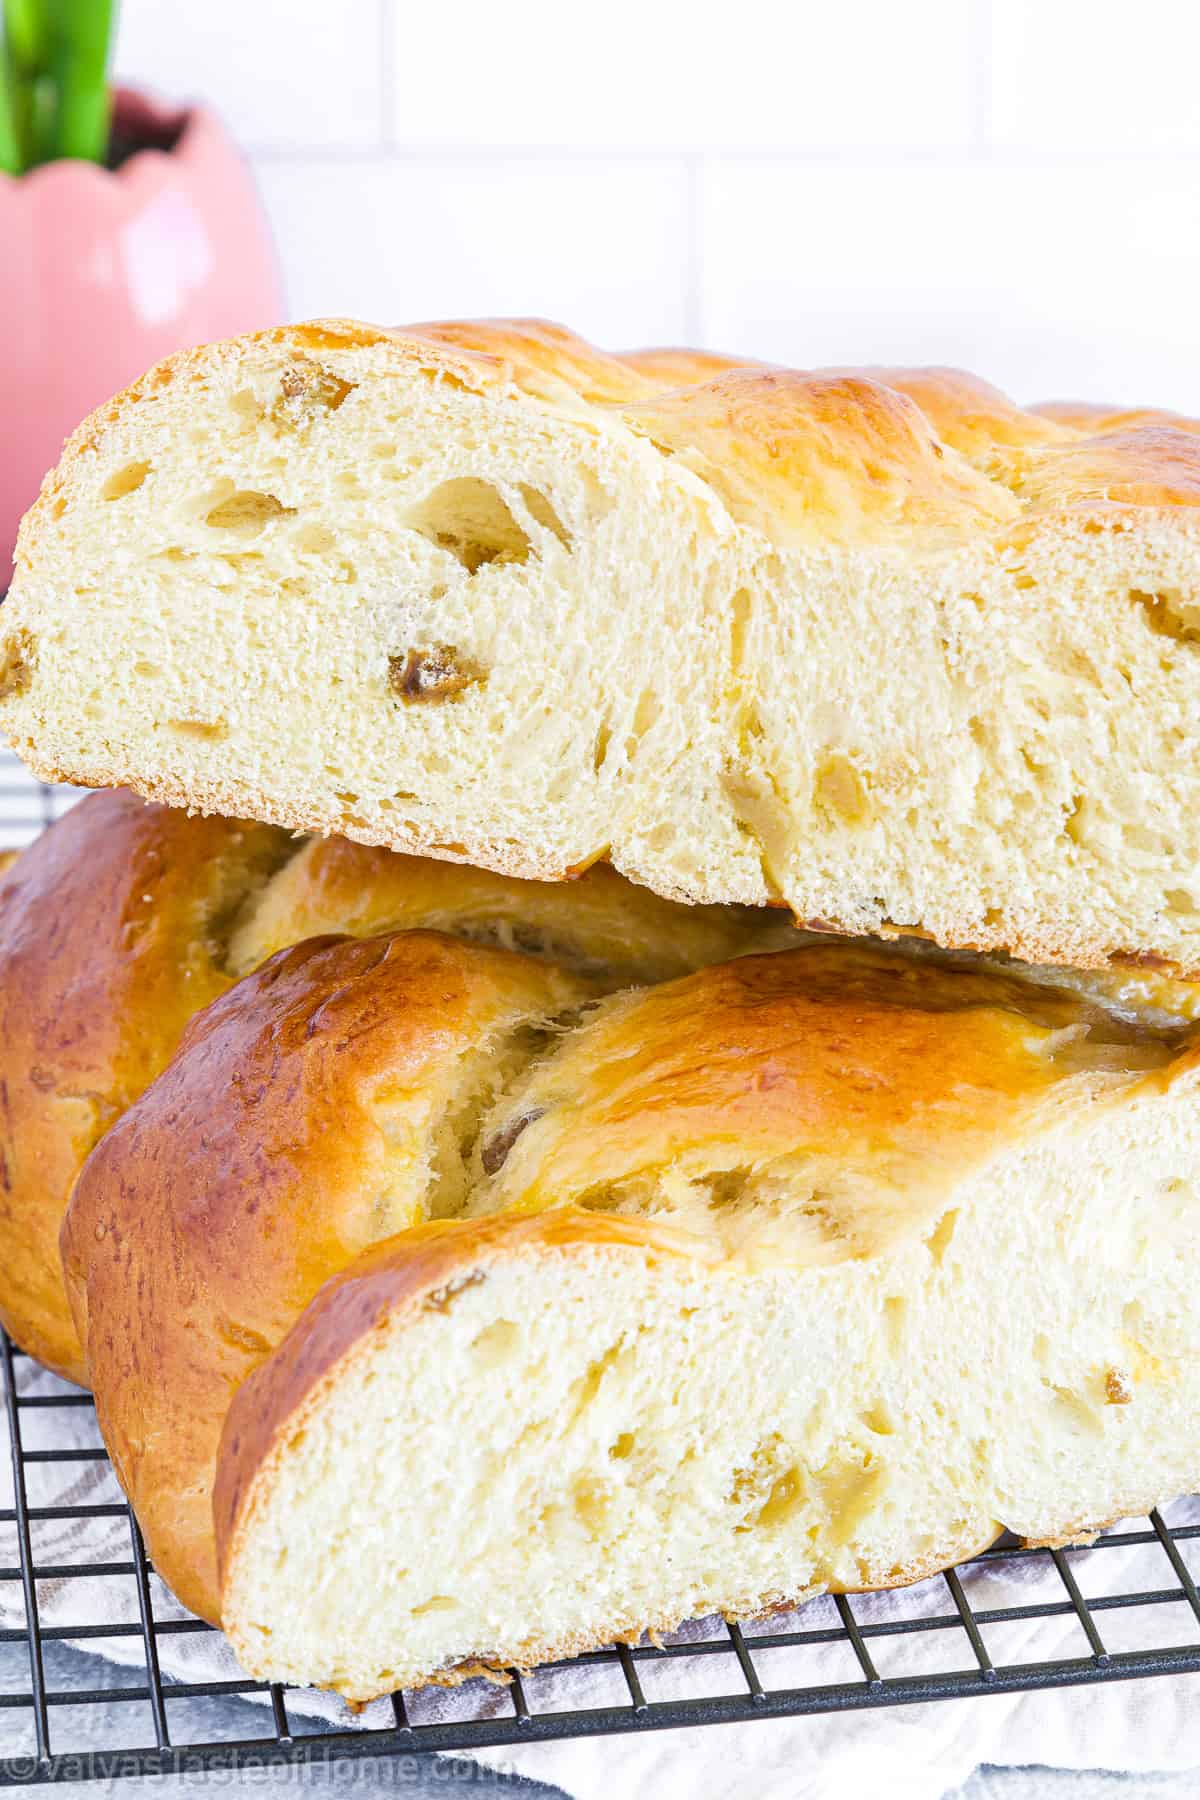
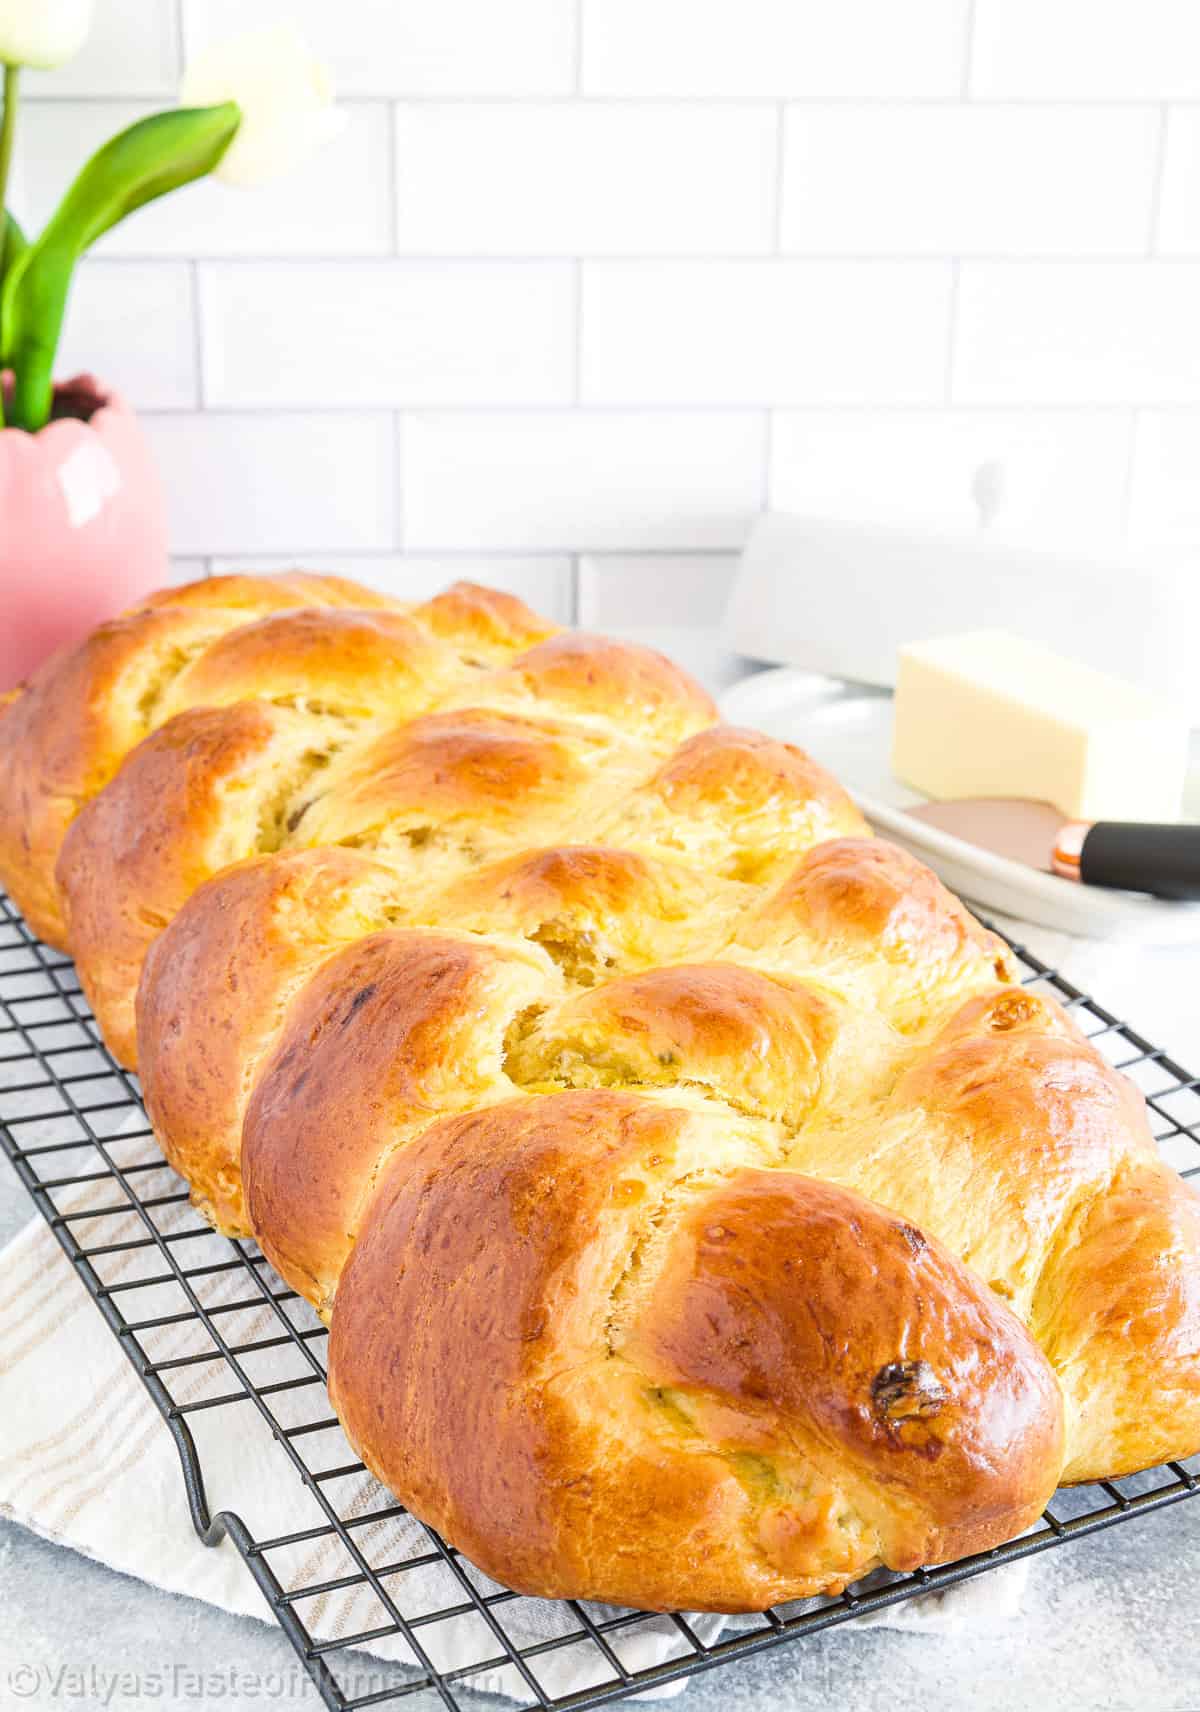
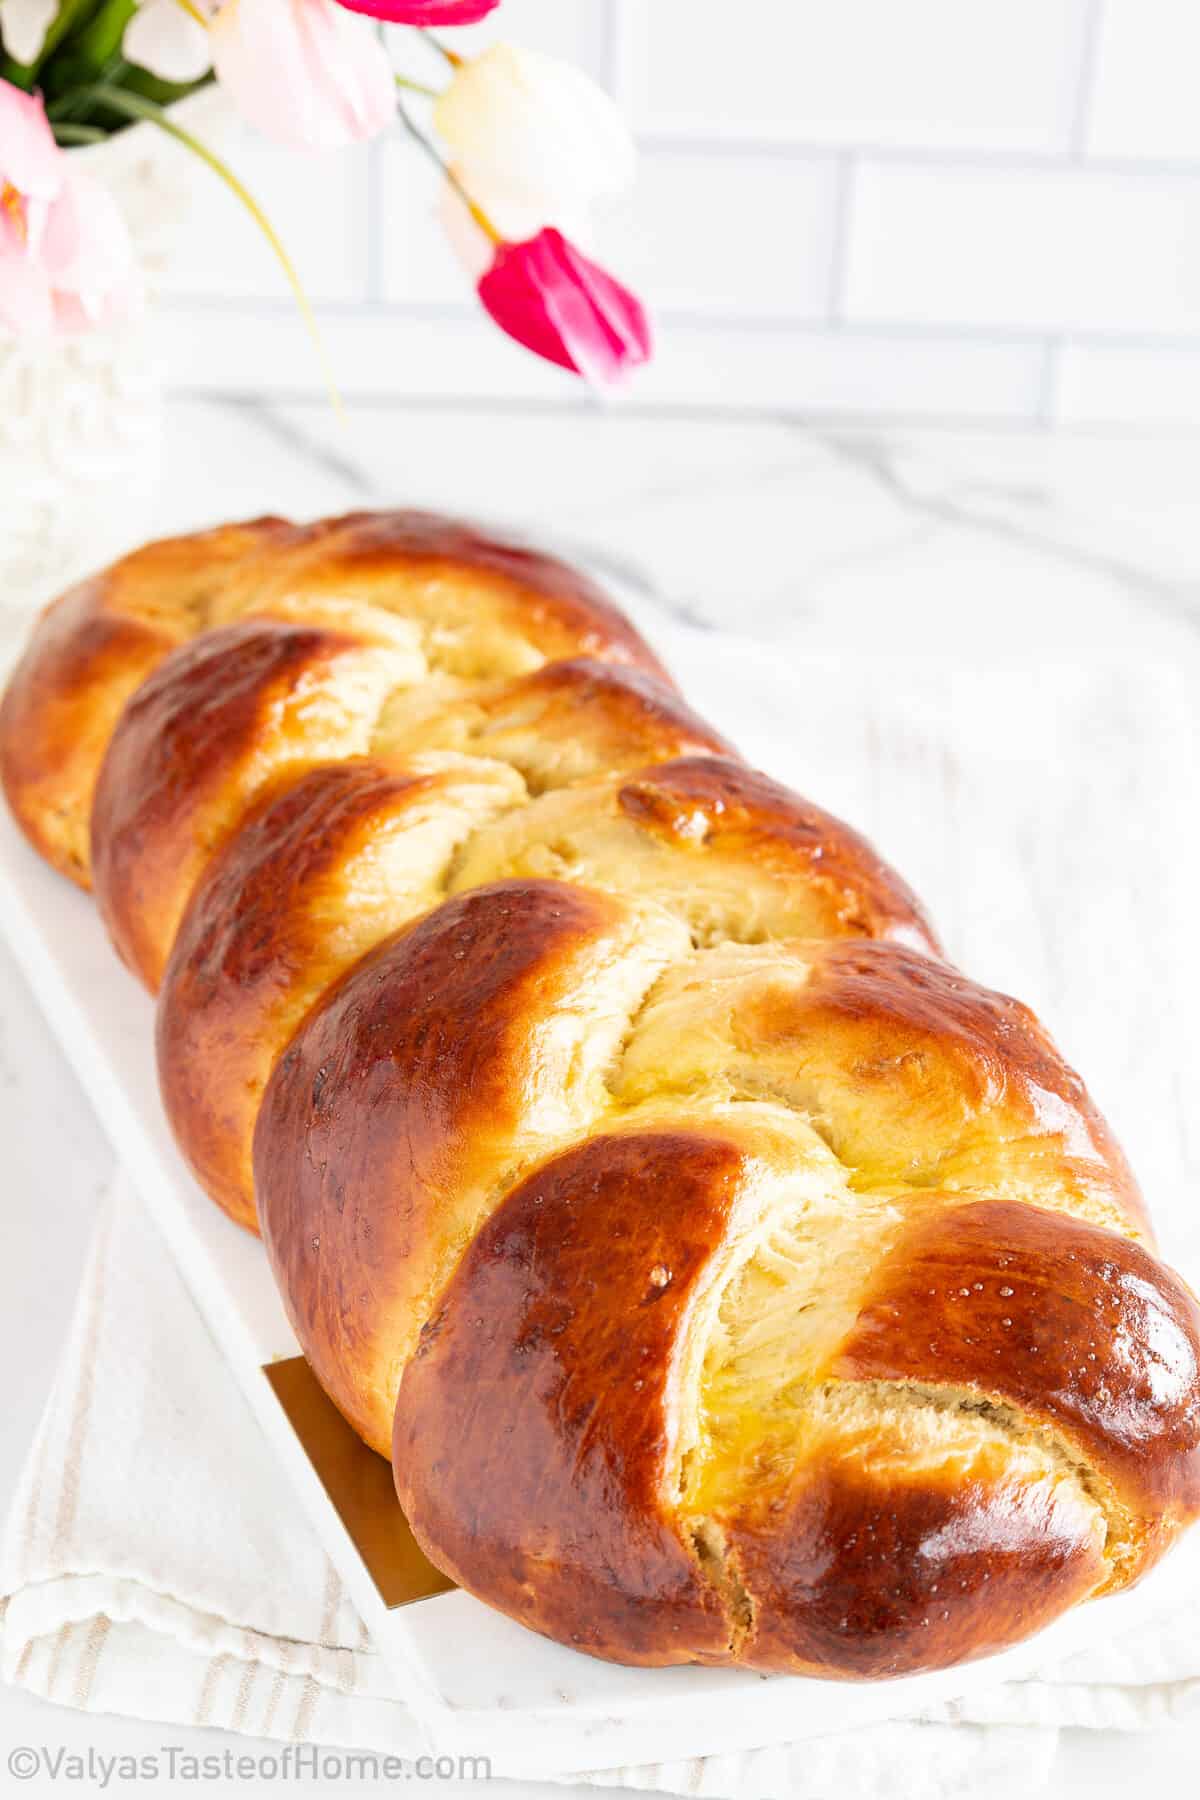
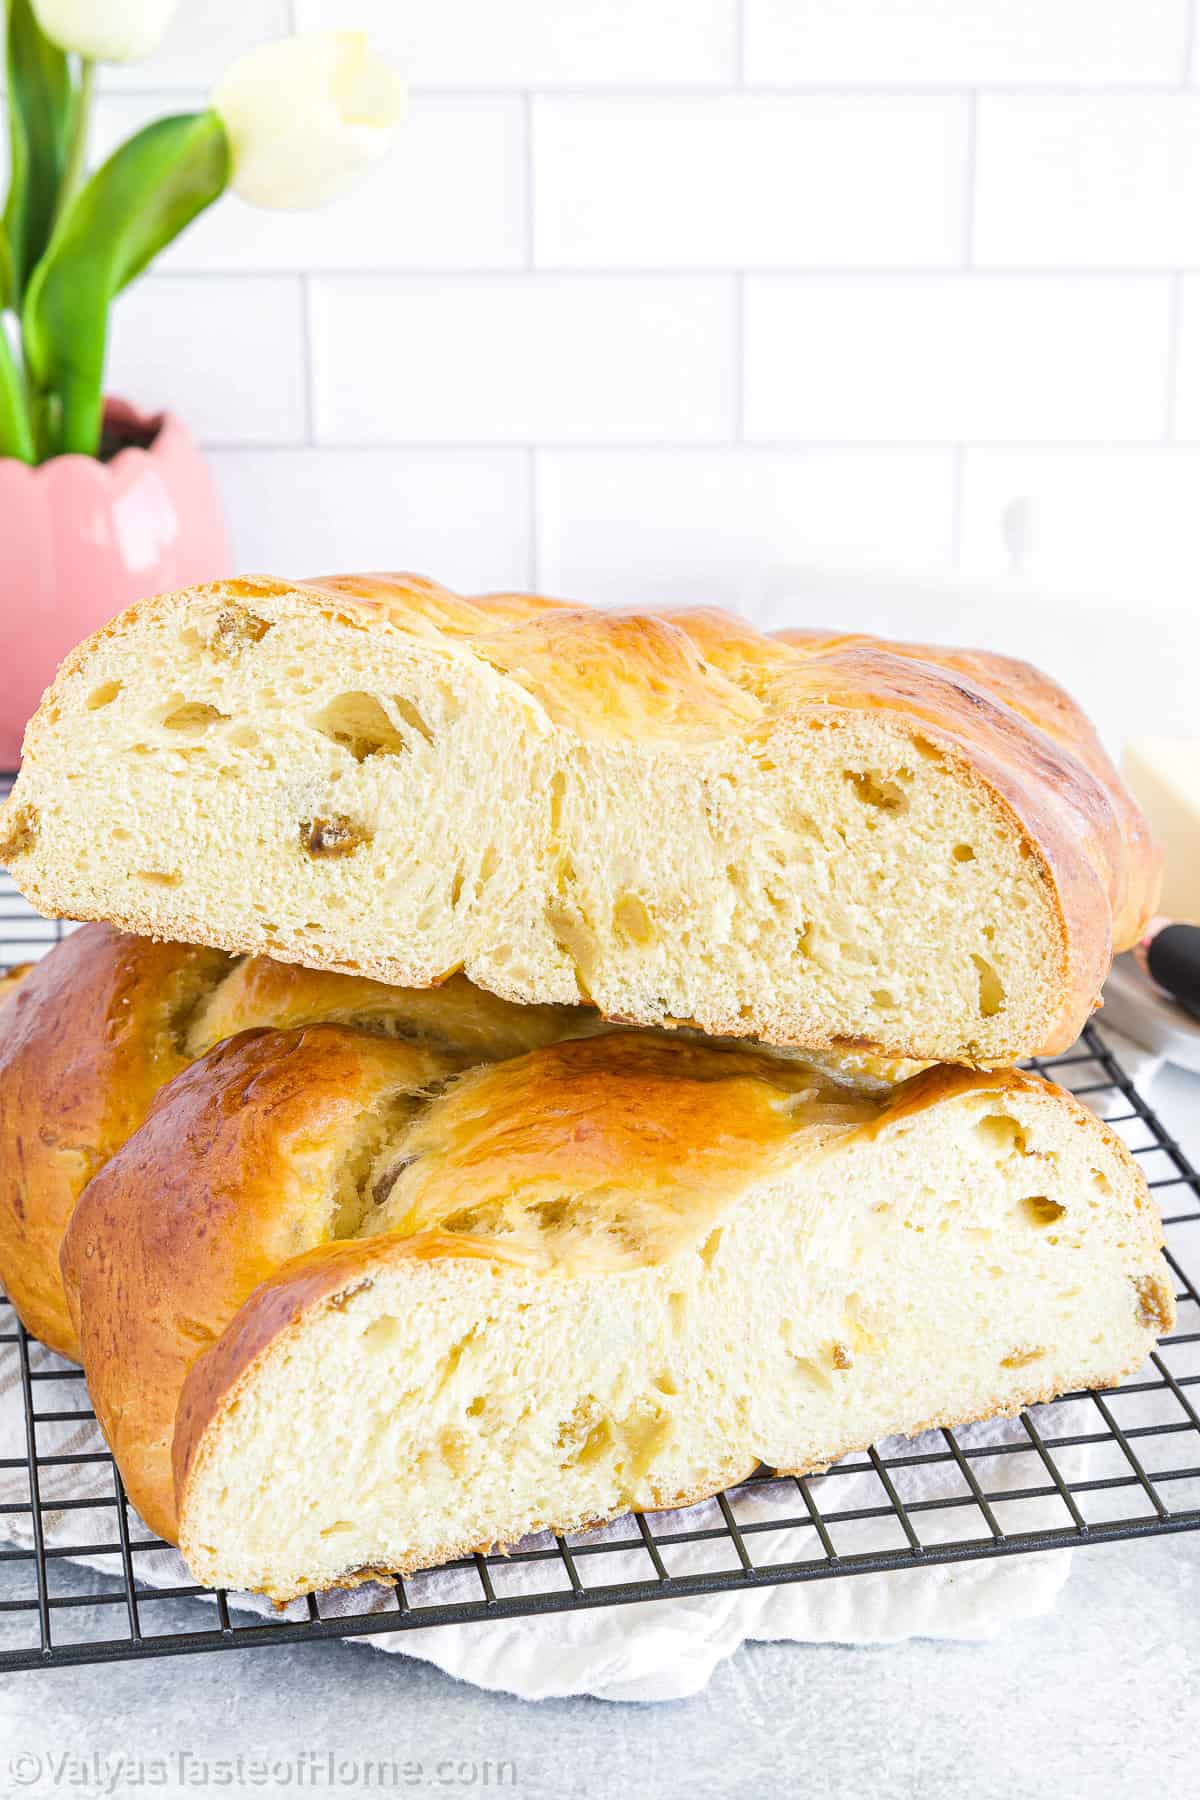
It’s beautifully golden brown on the outside with a slightly crispy crust and a soft, moist, and sweet inside. The bread has a beautiful texture that’s unforgettable, and the raisins add a nice touch of sourness to it which adds a bit of a varied taste.
It’s essentially a yeast bread that’s made during the holidays in many European countries and many traditions accompany the use of bread for this beautiful holiday. The bread works as a perfect snack, appetizer, or side with just about any holiday dish.
What’s best is that it’s not difficult to make at all, which makes it perfect to have during the holidays when there’s so much going on! In fact, your Kitchen-Aid mixer does most of the work for you.
The yellow raisins add a beautiful touch to the flavors and add a little variation to the bread. In case you don’t like raisins, you can reduce the quantity or substitute it with some poppy seeds instead.
Why You’ll Love This Recipe
There are many reasons why this Sweet Bread Recipe is so special! Let’s check out some of the top reasons:
Flavorful: This sweet bread is incredibly flavorful yet subtle and classic in terms of taste. The simple but beautiful ingredients really shine through for the tastiest holiday bread you’ve ever had!
Easy: What’s incredible is that this Sweet Bread is super easy to make at home and my step-by-step instructions and pictures make it even easier! In fact, this is a recipe even a beginner can try!
Pantry-friendly: All you need are some simple, pantry staple ingredients to make this recipe at home. No need for any fancy bread flour or other ingredients that are difficult to come by.
Customizable: Want to customize your sweet bread? Well, you can! This recipe is super easy to customize and make your own. Read till the end of this post for some fun ideas to try when customizing it.
Key Ingredients
Making this delicious traditional Sweet Bread at home is easier than you think! All you need to make it are some readily accessible ingredients. I bet you have most of them in your pantry already! Let’s look at what these are:
For the Sweet Bread:
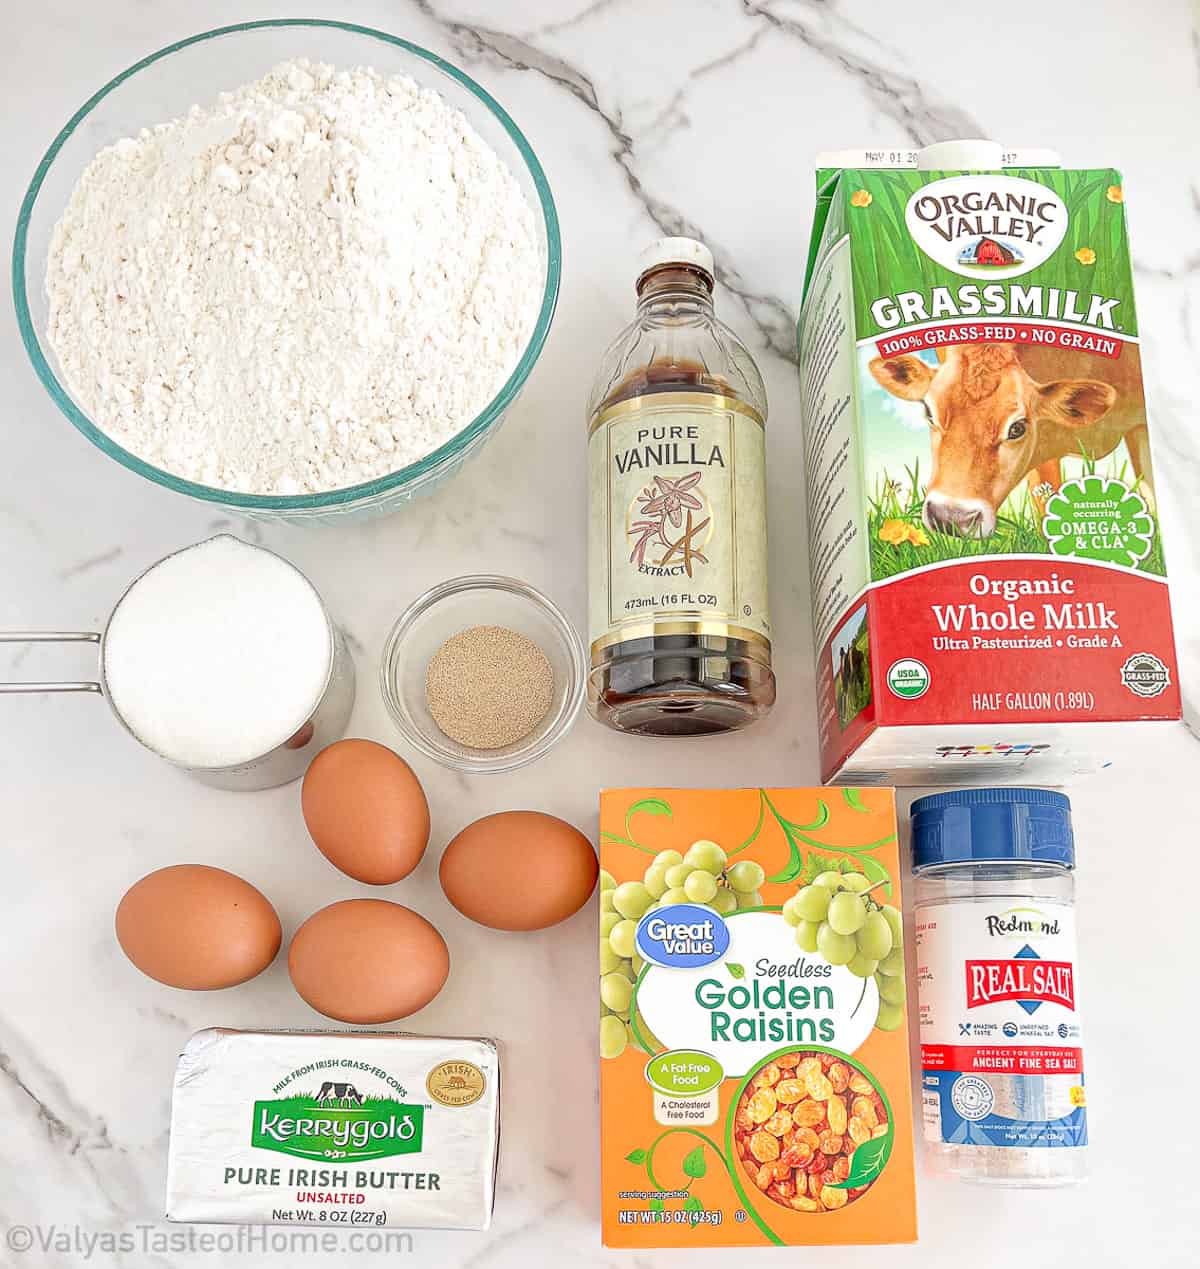
- All-purpose flour: We’ll be using regular all-purpose flour to make this bread. We’ll add the rest of the mixed ingredients as one of the last steps in this recipe.
- Yeast: You’ll need active dry yeast to make this sweet yeast bread. It’s the traditional leavening agent used to make Easter bread. We’ll use 1 tablespoon of dry yeast.
- Milk: We’ll be using warm milk as the base liquid in this recipe to activate the yeast. You’ll need 1 ½ cup of whole milk to make the bread.
- Sugar: This helps to activate the yeast as the yeast will have something to eat. It also helps to make the bread softer as some of the liquid (milk in our case) will be absorbed by it and it slows down the formation of gluten strands.
- Eggs: Eggs add an additional layer of flavor and richness to this beautiful bread.
- Unsalted butter: Butter adds a delicious texture and feel to this Easter bread. We’ll be using melted and cooled unsalted butter in this recipe. Make sure to go for unsalted butter, rather than the regular salted kind so you can control the flavor. Remember, this is a slightly sweet bread and salted butter will throw off the flavor.
- Salt: We’ll only need ½ tsp of salt to balance everything out.
- Vanilla extract: A teaspoon of vanilla extract brings out all the layers and gives a very subtle vanilla flavor to the bread.
- Raisins: We’ll be using golden (yellow) raisins for this recipe. I love raisins and I find that they add a beautiful, sour flavor to this sweet bread. In case you don’t like raisins, you can use poppy seeds instead.
For the Egg Wash:
- Egg: We’ll be using one large egg in the egg wash. It’ll add a shine to the bread and the yolk will contribute to a golden color when the bread has baked.
- Milk: We’ll also be using whole milk in the egg wash. Milk encourages browning and combined with the egg yolk, it’ll give your bread an incredible color.
- Combined, these two ingredients make the perfect egg wash for that beautiful golden brown color.
How to Make the Tastiest Sweet Bread
Making this delicious bread is easier than you think! In fact, even a beginner can bake it easily at home. Here’s what you need to do step by step to make it:
How to Prep Raisins for Sweet Bread
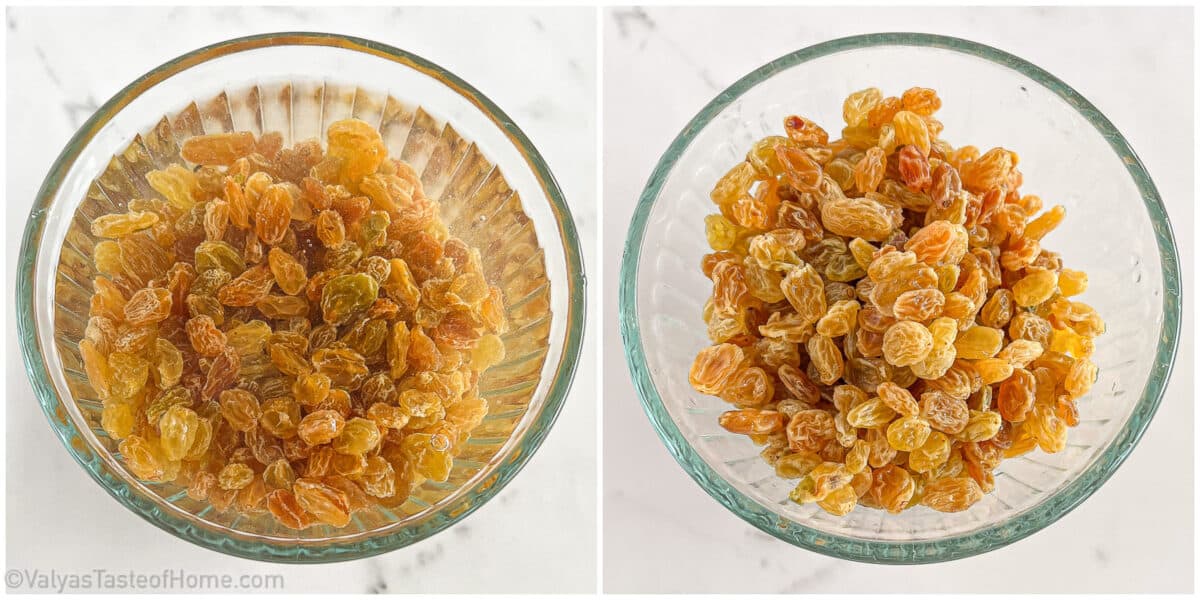
Let’s start by prepping the raisins! Place 2 cups of raisins into a small bowl. Pour boiling hot water until the water covers the raisins entirely.
Let the raisins soak for 15 minutes, then drain the water and rinse the raisins. Set the raisins aside, for now, we’ll use them in the recipe later.
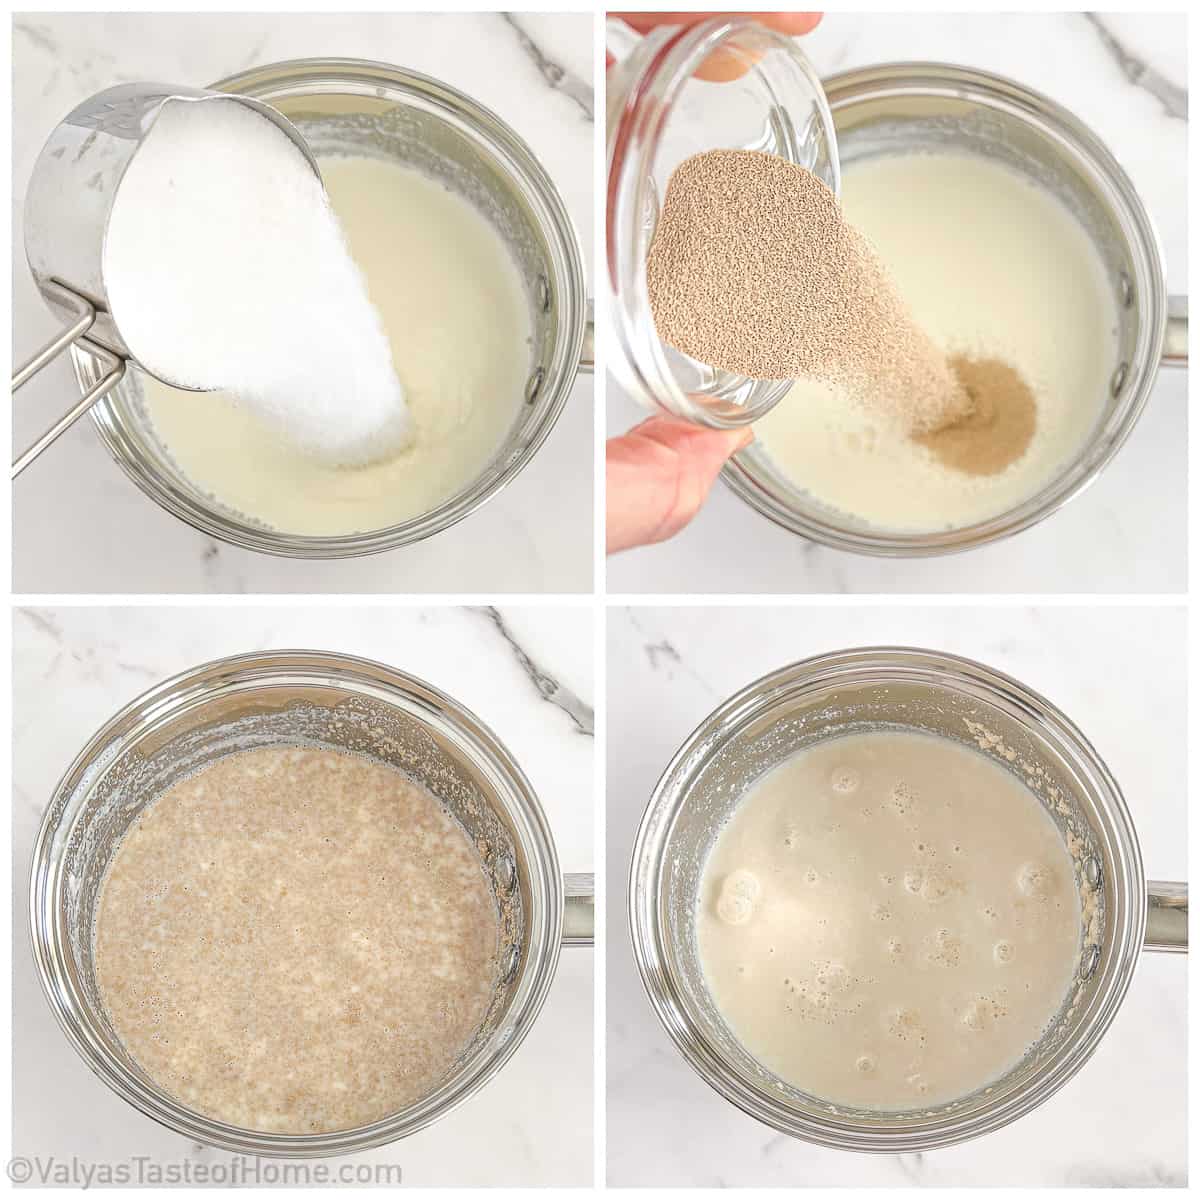
How to Activate Yeast for Sweet Bread
Time to activate the yeast! To do this, heat milk in a small saucepan over a stovetop burner on high heat for about 30 seconds or so until the milk reaches a lukewarm temperature. The milk should be barely warm at this point.
Now transfer the milk into a small bowl. Add ¼ cup of sugar to it and stir well until the sugar dissolves entirely.
Next, sprinkle the active dry yeast over this milk-sugar mixture. Stir it in and then set it aside in a warm place for 15 minutes to allow the yeast to activate.
You’ll notice bubbles forming on the top once the yeast has activated. You’ll also be able to smell the distinctive scent of yeast once it’s done.
How to Prepare the Sweet Bread Dough
Let’s prepare our delicious, sweet bread dough. Start by melting butter in a bowl in the microwave or on the stovetop. Set it aside to let it cool down.
In the large bowl of a stand mixer, beat eggs and sugar on high for 10 minutes or until it turns foamy and pale yellow in color.
Now reduce to a low speed and slowly mix in the yeast mixture.
Continue mixing on low while adding salt and vanilla extract to this combined mixture.
Next, add the melted butter that we set aside to cool. Continue mixing the mixture at a low speed.
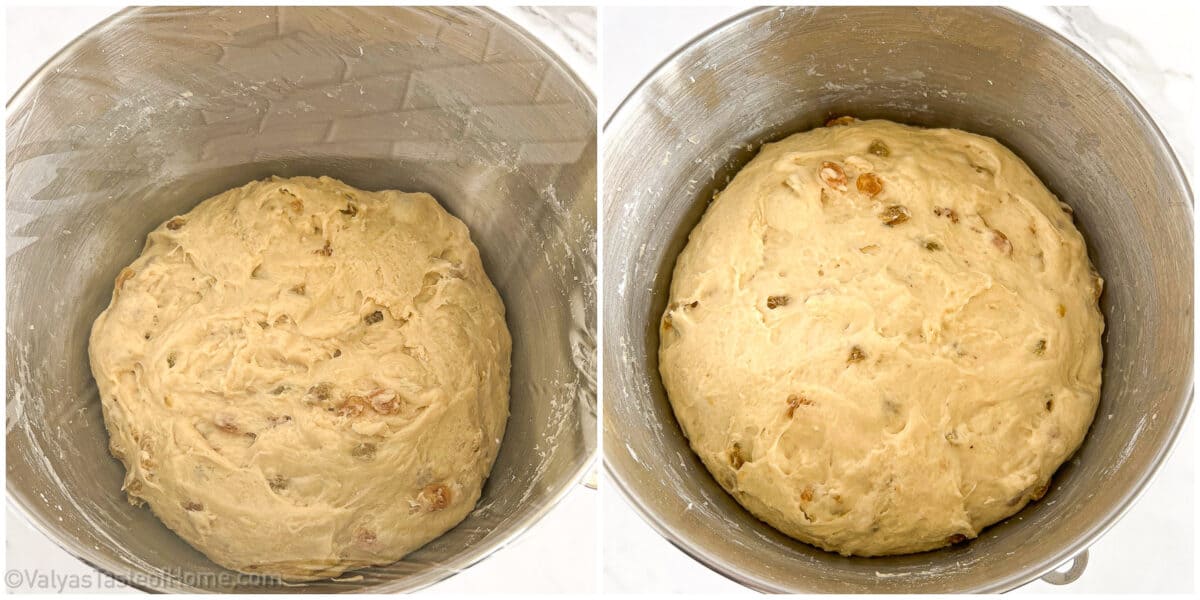
Finally, add raisins to this mixture. Now switch the dough hook attachment on your stand mixer. Add 1 cup of flour at a time until 6 cups of flour have been incorporated.
Continue mixing until the dough comes together and feels smooth and elastic, or until it stops sticking to the side of the bowl. This should take approximately 15 minutes.
NOTE: The dough has enough flour when it’s not sticking to the spatula or fingers even if it may look and feel too soft.

Let the dough rise in a warm environment for 2 hours. Cover it with a kitchen towel or plastic wrap to let it rise.
How to Shape Sweet Bread
After the dough has risen and tripled in volume, transfer it onto a floured surface. I used a large cutting board. Split the dough in half.
Take one-half of the dough and roll it into a log. Then split it into four equal pieces.
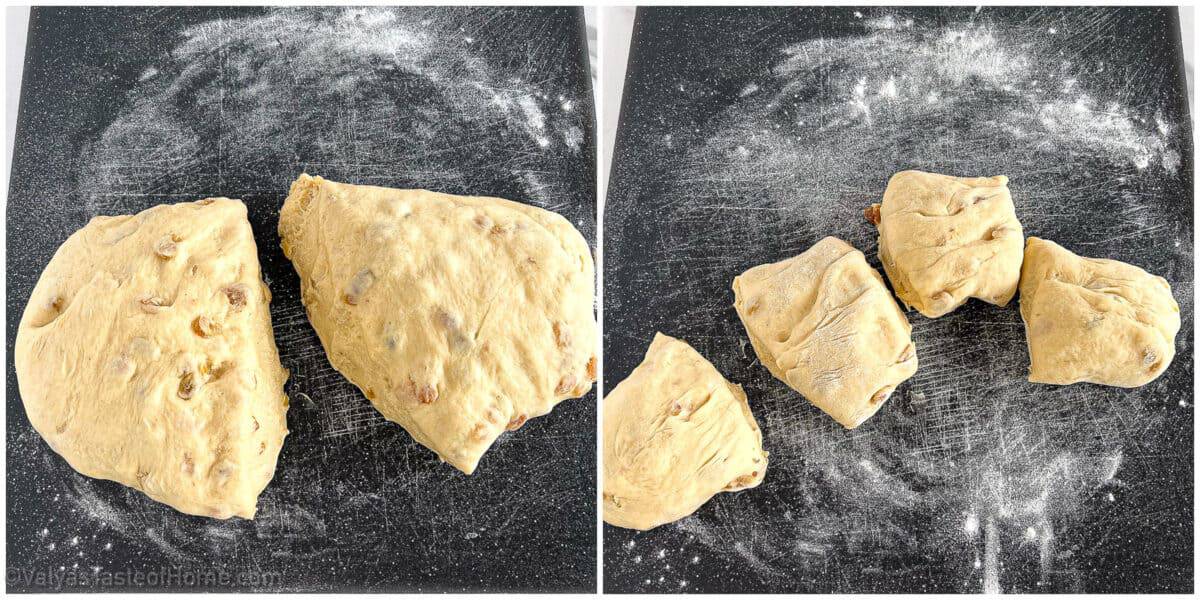
Roll each of the four smaller pieces into thin, long logs (about 1.5-foot-long and 1 inch thick).
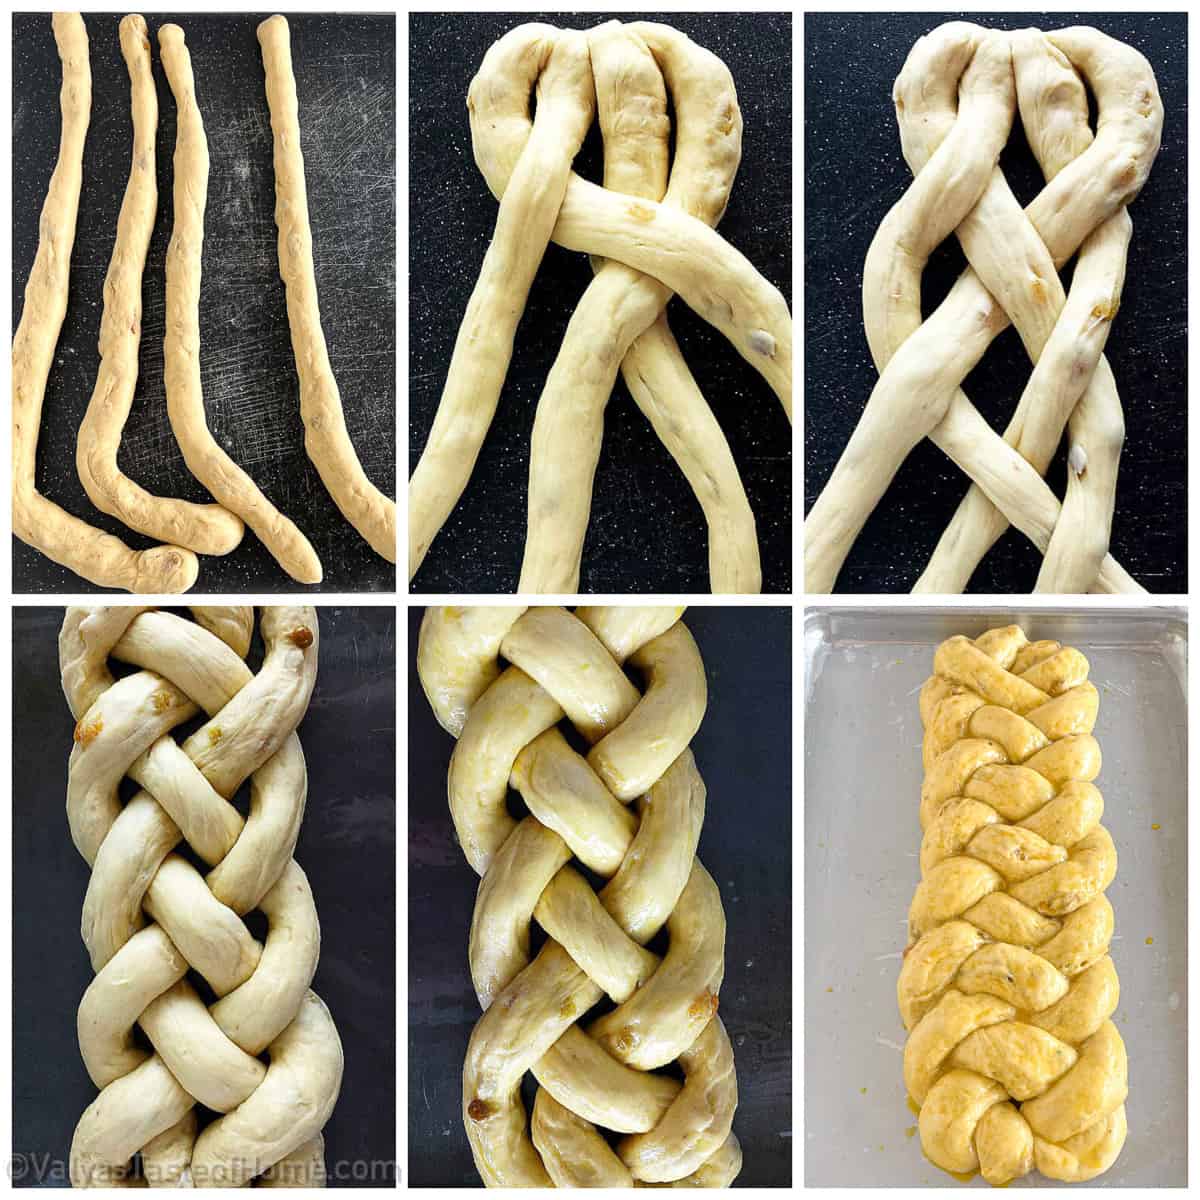
Pinch the ends of all four thin logs together to start shaping them into a braid.
Braid them into a nice and even braid as is shown in the picture (I have video instructions on my Instagram account under the Easter Bread bubble on how to make and braid this bread).
Pinch the opposite end of the braided loaf together, then place it on a greased baking sheet.
Make and Brush On the Egg Wash:
Using a hand whisk, whisk egg, and milk together until it’s well mixed.
Brush the egg wash generously over the top of the easter bread challah.
Repeat the same steps with the second half of the dough by shaping it and brushing egg wash on top of it as we did with the first piece.
Let the braided challahs rise in a warm place for another 45 minutes to an hour. It will expand nicely and close the gaps.
How to Bake Sweet Bread
Preheat the oven to 350 F. Bake each pan for 25 minutes or both pans for 30 minutes rotating them 10 minutes before the baking time ends.
Remove from the oven and let them cool for 15 minutes on a wire rack before removing them from the pan.
Quick tip: line your baking sheets with parchment paper to make things easier once the bread has baked and you’re removing it from the baking sheet. The egg wash tends to run down the loaf while baking and gets stuck to the pan pretty firmly. Parchment paper goes a long way to alleviate that headache.
For the full list of ingredients and instructions, see the recipe card below.
Recipe Tips
- This delicious Sweet bread is a yeast bread, so it’ll take some time to rise and for the yeast to work. But waiting and having patience is pretty much the only tricky part about making this bread! Everything else is incredibly easy.
- Raisins add a beautiful sour touch to this sweet bread. I’ve used golden raisins in this recipe, but you can also opt for poppy seeds if you’re not a fan of raisins.
- The dough has enough flour when it’s not sticking to the spatula or fingers even if it may look and feel too soft.
- This bread needs to proof two times: first when the dough is placed in a bowl to rest for 2 bowls in a warm spot in your kitchen. The second rise is done after the egg wash is applied to the braided, shaped bread. This is for 45 minutes to an hour only.
- To learn how to braid this bread, I have made and added video instructions on my Instagram account under the Easter Bread bubble so you can follow along easily.
- I recommend lining your baking sheets with parchment paper to make things easier once the bread has baked and you’re removing it from the baking sheet. The egg wash tends to run down the loaf while baking and gets stuck to the pan pretty firmly. Parchment paper goes a long way to alleviate that headache.
- Enjoy this bread with some hot tea or coffee, or slightly toast with it a smear of peanut butter or almond butter on top!
Substitutions and Variations
This Sweet Bread recipe is perfect as an Easter Bread or for Christmas. And if you’re looking to customize it, you definitely can! Here are some ideas to try:
Add other fruits: You can add different fruits you may like to the bread, including dried cranberries, strawberries, oranges, or even lemons.
Chocolate chips: Chocolate chips work really well with the flavors in this sweet bread, and you can easily fold them into the dough before shaping it.
Glaze: If you love glaze toppings, then you can make a delicious vanilla one and drizzle it on top of the sweet bread once it’s done baking.
How to Store Leftovers
If you have some Sweet bread leftover, you can store it in an airtight container or bag for up to 5 days. You can use the leftovers the next day to make some delicious French toast.
You can also freeze the bread in an airtight container or freezer bag for up to 2 months.
Braided Sweet Bread (with Golden Raisins)
Ingredients
For the Dough
- 1 ½ cup uke warm whole milk
- 1 tbsp. active dry yeast
- 1 ¼ cup granulated white sugar
- 4 large eggs (room temperature)
- 4 oz. unsalted butter (melted and cooled)
- ½ tsp. sea salt
- 1 tsp. vanilla extract
- 6 cups all-purpose flour
- 2 cups golden raisins
For the Egg Wash
- 1 large egg
- 1 tbsp. whole milk
Instructions
Making the Dough
- Place 2 cups of raisins into a small bowl. Pour boiling hot water until the water covers the raisins entirely. Let the raisins soak for 15 minutes, then drain the water and rinse the raisins. Set the raisins aside, for now, we’ll use them in the recipe later.
- Next, heat milk in a small saucepan over a stovetop burner on high heat for about 30 seconds or so until the milk reaches a lukewarm temperature. The milk should be barely warm at this point.
- Now transfer the milk into a small bowl. Add ¼ cup of sugar to it and stir well until the sugar dissolves entirely.
- Add yeast to milk-sugar mixture: Time to add the yeast! Sprinkle the active dry yeast over this milk-sugar mixture. Stir it in and then set it aside in a warm place for 15 minutes to allow the yeast to activate.
- You’ll notice bubbles forming on the top once the yeast has activated. You’ll also be able to smell the distinctive scent of yeast once it’s done.
- Next, melt butter in a bowl in the microwave or on the stovetop. Set it aside to let it cool down.
- In the large bowl of a stand mixer, beat eggs and sugar on high for 10 minutes or until it turns foamy and pale yellow in color.
- Now reduce to a low speed and slowly mix in the yeast mixture.
- Continue mixing on low while adding salt and vanilla exact to this combined mixture.
- Next, add the melted butter that we set aside to cool. Continue mixing the mixture on a low speed.
- Finally, add raisins to this mixture. Now switch o the dough hook attachment on your stand mixer. Add 1 cup of flour at a time until 6 cups of flour have been incorporated.
- Continue mixing until the dough comes together and feels smooth and elastic. This should take approximately 15 minutes.
Dough Proofing Time
- Let the dough rise in a warm environment for 2 hours. Cover it with a kitchen towel or plastic wrap to let it rise.
Shape the Dough
- After the dough has risen and tripled in volume, transfer it onto a floured surface. I used a large cutting board. Split the dough in half.
- Take one-half of the dough and roll it into a log. Then split it into four equal pieces.
- Roll each of the four smaller pieces into thin, long logs (about 1.5-foot-long and 1 inch thick).
- Pinch the ends of all four thin logs together to start shaping them into a braid.
- Braid them into a nice and even braid as is shown in the picture (I have video instructions on my Instagram account under the Easter Bread bubble on how to make and braid this bread).
- Pinch the opposite end of the braided loaf together, then place it on a greased baking sheet.
Make and Brush On the Egg Wash
- Using a hand whisk, whisk egg, and milk together until it’s well mixed.
- Brush the egg wash generously over the top of the easter bread challah.
- Repeat the same steps with the second half of the dough by shaping it and brushing egg wash on top of it as we did with the first piece.
- Let the braided challahs rise in a warm place for another 45 minutes to an hour. It will expand nicely and close the gaps.
Bake the Bread
- Preheat the oven to 350 F. Bake each pan for 25 minutes or both pans for 30 minutes rotating them 10 minutes before the baking time ends.
- Remove from the oven and let them cool for 15 minutes before removing them from the pan.
- Remove from the oven and let them cool for 15 minutes on a wire rack before removing them from the pan.
Notes
- I prefer to line baking pans with parchment paper for baking; it’s easier to separate the bread from the paper than the pan. After they’re finished baking, the egg glaze runs down the loaf and gets stuck to the pan pretty firmly. Parchment paper goes a long way to alleviate that headache.
- The dough has enough flour when it’s not sticking to the spatula or fingers even it may look and feel too soft.
Thank you for following me on Instagram, Facebook, and Pinterest!
This recipe was originally posted on March 15, 2015 (original picture above). I tweaked it a bit, included tips, and tricks on making the best Easter bread your family will love. This post may contain affiliate links. Read my disclosure.


Made this for the first time and and it was delicious. Made the mistake of not brushing on the egg wash before the rising so my braid just dissappered and became a loaf 😉 😉
Thank you for this easy recepie!
I’m glad you liked it! 🙂
I made this today. Only thing I’ll do different next time is use a little more salt since 1/2 tsp for 6 cups of flour is not enough.
Thank you for your feedback!
Hello! Can I make them ahead of time and freeze them once baked? Thanks!
Absolutely! I do that all the time! Make sure to cool to room temperature before freezing. Enjoy!
Can I let it do the first rising in the fridge and bake the next day?
I’ve never done it like that but don’t see why not. Let me know how it goes?
Hi Valya – I was looking for an easy Easter Raisen Bread recipe and found yours. I followed it step by step but my dough seemed to have been more soft than formed when I was ready to turn it onto the cutting board. Is that normal or do you think my liquid measurements were off. I added about 1/4 cup more flour and it’s rising now. Is this normal. Thank you!
That could be it, or eggs could be a little larger, so it’s totally normal to add as much flour as needed. I usually do this “on the eye”. As soon as the dough is not sticking to my hand or silicon spatula it’s good to go. Sound like it’s working out for you. I wish I could see the picture of your creation. Tag me on Instagram #valyastasteofhome. Happy Easter!
Can this recipe be halved in order to make one plain and one raisin loaf, or can I knead in the raisins in one of the halves after dividing? Thank you!
Yes, you can. Before adding raisins remove half of the dough from the mixer. Add raisins to the dough in the mixer bowl along with additional flour. Then remove the dough with raisins into a separate clean glass bowl cover with plastic wrap to let it rise. Transfer the dough without raisins into the mixer bowl and finish kneading adding additional flour. Cover the mixer bowl with plastic wrap and let it rise. It takes some extra steps to do this, but it’s totally possible. I hope this was helpful. Enjoy, it is one delicious bread! Happy Easter!:)
Hi recipe sounds awesome, just what I was looking for Easter. Can you make this bread in a bread machine, just for the dough making cycle? or do you not recommend it. Can’t wait to try it.
Yes, you can use the Kitchen aid mixer or bread machine (dough cycle).
YOUR RECIPE ROCKS!! Thanks for answering. Just made this with my mom, left her one loaf and took one home for me, I’m trying very hard not eat the whole loaf in one sitting. Planning on making more for Easter of course we had to make a trial batch first. Lol
I’m so happy to hear that you like it! I know what you mean by eating entire loaf at once, lol! Thank you for coming back and commenting!
Yeah…that’s Challah. Cultural appropriation at its finest I suppose.
Thank you! 🙂
I just made and was wondering the best way to store until tomorrow?
Thanks
Once cooled completely you can store it in a container with a lid (if you have a large enough container). Otherwise, you can wrap it with the plastic food wrap to prevent softness and freshness. Thank you for making my recipe! 🙂
Looks delicious! Can’t wait to make it this year. Would you recommend using regular granulated white sugar or organic sugar?
Either one will work. Happy Easter!
I just made this today for Easter and it was absolutely delicious! Thank you so much for sharing your recipe!
I’m glad you enjoyed the recipe! Thank you for an amazing review! ?
could you ad cardamen seed to this recipe? soul it hurt this lovely recipe thank you ?
Hi Shirley! You sure can if you like the spiciness in the bread. It should not change the texture of it. Enjoy! 🙂
This bread is wonderful! I agree with the person who mentioned salt- I used 1 and 1/2 tsp. Also, by the way I made it Italian with anise seed, orange and lemon peel.
5 star recipe!
Im happy to hear you loved the recipe! Thank you for an amazing review!
The instruction says 4 eggs but picture shows 5? What is the correct amount? Thank you!
Hi, Jessica. Entire recipe calls for 5 eggs. 4 eggs for the dough and 1 additional egg for brushing the braids. I hope this clarifies a little bit more.
Can you make smaller loaves . I want to give them out. Thank you Diane
Hello Diane! Absolutely! Split the dough into 3 or 4 pieces and then make braids out of each piece. Love that idea!
I made this bread twice already. You get beautiful 2 BIG Loaves. I personally like this better than the traditional kulich because it is easier to slice. Anyway, I omitted the raisins, and had to use 8 cups of flour because at 6 cups, the dough was way too wet. I used the Costco bread flour if anybody wants to know. The second time I made the bread, I decided to do half butter half margarine (recipe calls for 1 stick of butter). Let me tell you, it was soo fluffy, soft, and just delicious. Great recipe!! Thank you and Happy Easter!! Христос Воскрес!!
That’s awesome! I’m glad to hear that it turned out good for you, and thank you very much for making my recipes. I’ll be making it again for this coming up Easter, so I’ll double check on the amount of flour. Thank you for amazing review! Happy Easter to you as well!
This bread looks so good and absolutely beautiful! I just wanna eat the screen!
Thank you very much Nancy! It is truly delicious!
Bright and beautiful!
Thank you very much Annie. I love all the bright Easter/Spring colors. 🙂
Thank you so much for a beautiful step by step tutorial and a delicious recipe for sweet Easter bread. I looked for weeks and was very selective in choosing what recipe I planned on using this Easter but when I saw yours I went no further! Wonderful!! Thank you and God bless you!
Aww… How sweet! Thank you! I hope you like the bread as much as we do 🙂
Just made this bread and it is wonderful!!! Have tried several recipes trying to replicate my grandmas Easter bread I remember as a kid and this it!! Easy directions to follow and absolutely delicious! Thank you!
That’s awesome! I’m so happy to hear that! I’m glad the instructions were easy to follow. We are making this bread tomorrow. Thank you very much for your feedback, you can share a picture with me if don’t mind. Thank you Andrea 🙂
I’d be happy to share a photo- let me know what would be a good email to send it to. Thanks!
You can share it on Facebook or Intagram, hash tag it #valyastasteofhome. You may send it to me by mail as well [email protected]
I LOVE Easter raisin bread! Never tried making it myself though…. Thanks for sharing this recipe.
Homemade is the best. Enjoy! 🙂
I love Easter too Valya. I know without Christmas we wouldn’t have Easter, but Easter is by far, the most important. I also love that we set aside this time of year to prepare for the celebration and to meditate on what Jesus did for us. He gave everything so that we could have everything that matters. Your bread looks fantastic and would be a lovely part of any celebration!
I totally agree with you Chris. Thank you for your comment and have a blessed Easter 🙂
Looks gorgeous Valya! Love Easter bread and make it in a very similar way 🙂 Pinned:)
Thank you for pinning Mira, it is always appreciated 🙂
I was wondering if you could help rise the bread in a oven that is preheated at 110 degrees and then turn off oven then put dough in oven to help it rise I always have a problem of getting dough to rise
Hi Cathy! That is totally ok. I actually do that a lot. I would recommend not going over 100F though. Try to stay within 100F. I hope this helps. Thank you for asking!
OMG this reminds me of my mom! Thanks for sharing this! God bless you!
You are very welcome! You too! 😉
Very gorgeous and tasty looking bread! Thank you for the recipe, I am looking forward to making this.
Thank you Tanya! Let me know how it turns out for you.
This bread is absolutely gorgeous! I love the addition of raisins. So perfect for Easter!
Thank you Gayle. It’s very tasty too. 🙂
This is a work of art! Love the golden raisins and alll your step by step photos 🙂
Thank you so much! 🙂
I love Easter bread! You make the recipe look so simple 🙂
Thank you Katy 😉
Can I make this without the raisins?
Absolutely! You don’t have to add anything. I love adding things for extra flavor. Thanks Jennifer! 🙂
Ok great!
I know it might be a stupid question but with baking and moisture sometimes you never know. Thank you for a fast reply And the wonderful recipe! 🙂
You are very welcome! 🙂
Thank you soo much for sharing I really enjoy eating this Easter bread and I did not have a recipe and now I do may GOD BLESS YOU !!:)) amen and Easter is soo important to us Belivers because our SAVIOR JESUS CHRIST conquered death has Victory over sin and can give us strenght and victory to over come the world and be Holy and Godly children !!:))May the LORD Bless your family !!:))
You are very welcome Svetlana! I think you will enjoy it as much as we all do! Gods Blessings to you too! Have a blessed Easter! 🙂
Yes you can make it without the raisens. You just don’t put them in, case closed. The bread just tastes like flavored bread. My grandma, would make an extra batch of ” Easter bread” and turn the dough into la little girl for me and a little boy for my brother. My brother and I looked forward to those Bread dolls every Easter morning with breakfast baked ham.
This looks absolutely beautiful and delicious! Thanks for sharing this gorgeous sweetness! Have a very happy spring!!
Thank you Nina! Same to you! 🙂
My mom made Easter Bread every year. It’s also an Italian custom. But instead of the vanilla flavoring, she always used Anise flavor. It was very good a
Perhaps because it was our custom..