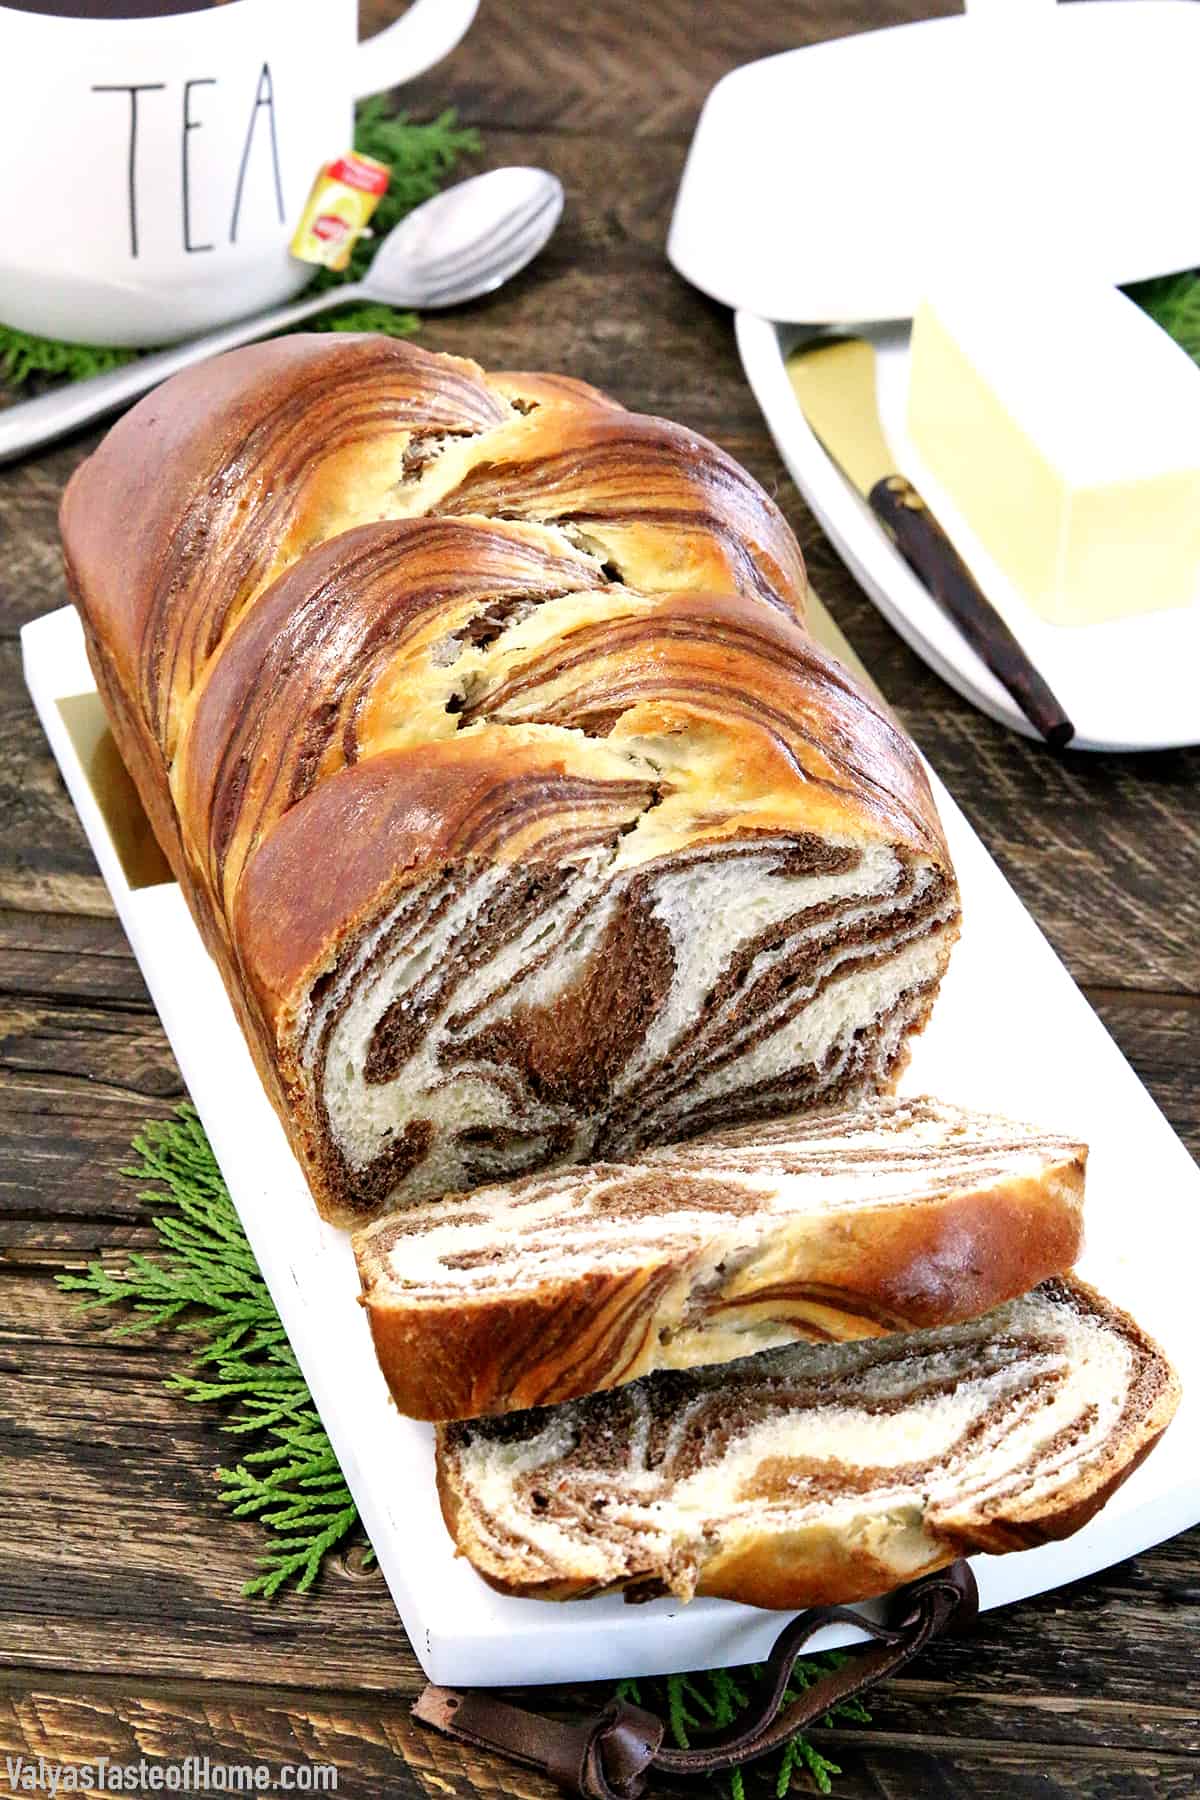
Soft and Fluffy Sweet Marbled Bread Recipe (Easy to Make!)
This Sweet Marbled Bread recipe gives you incredibly soft and fluffy bread that’s lightly sweetened and tastes absolutely incredible.
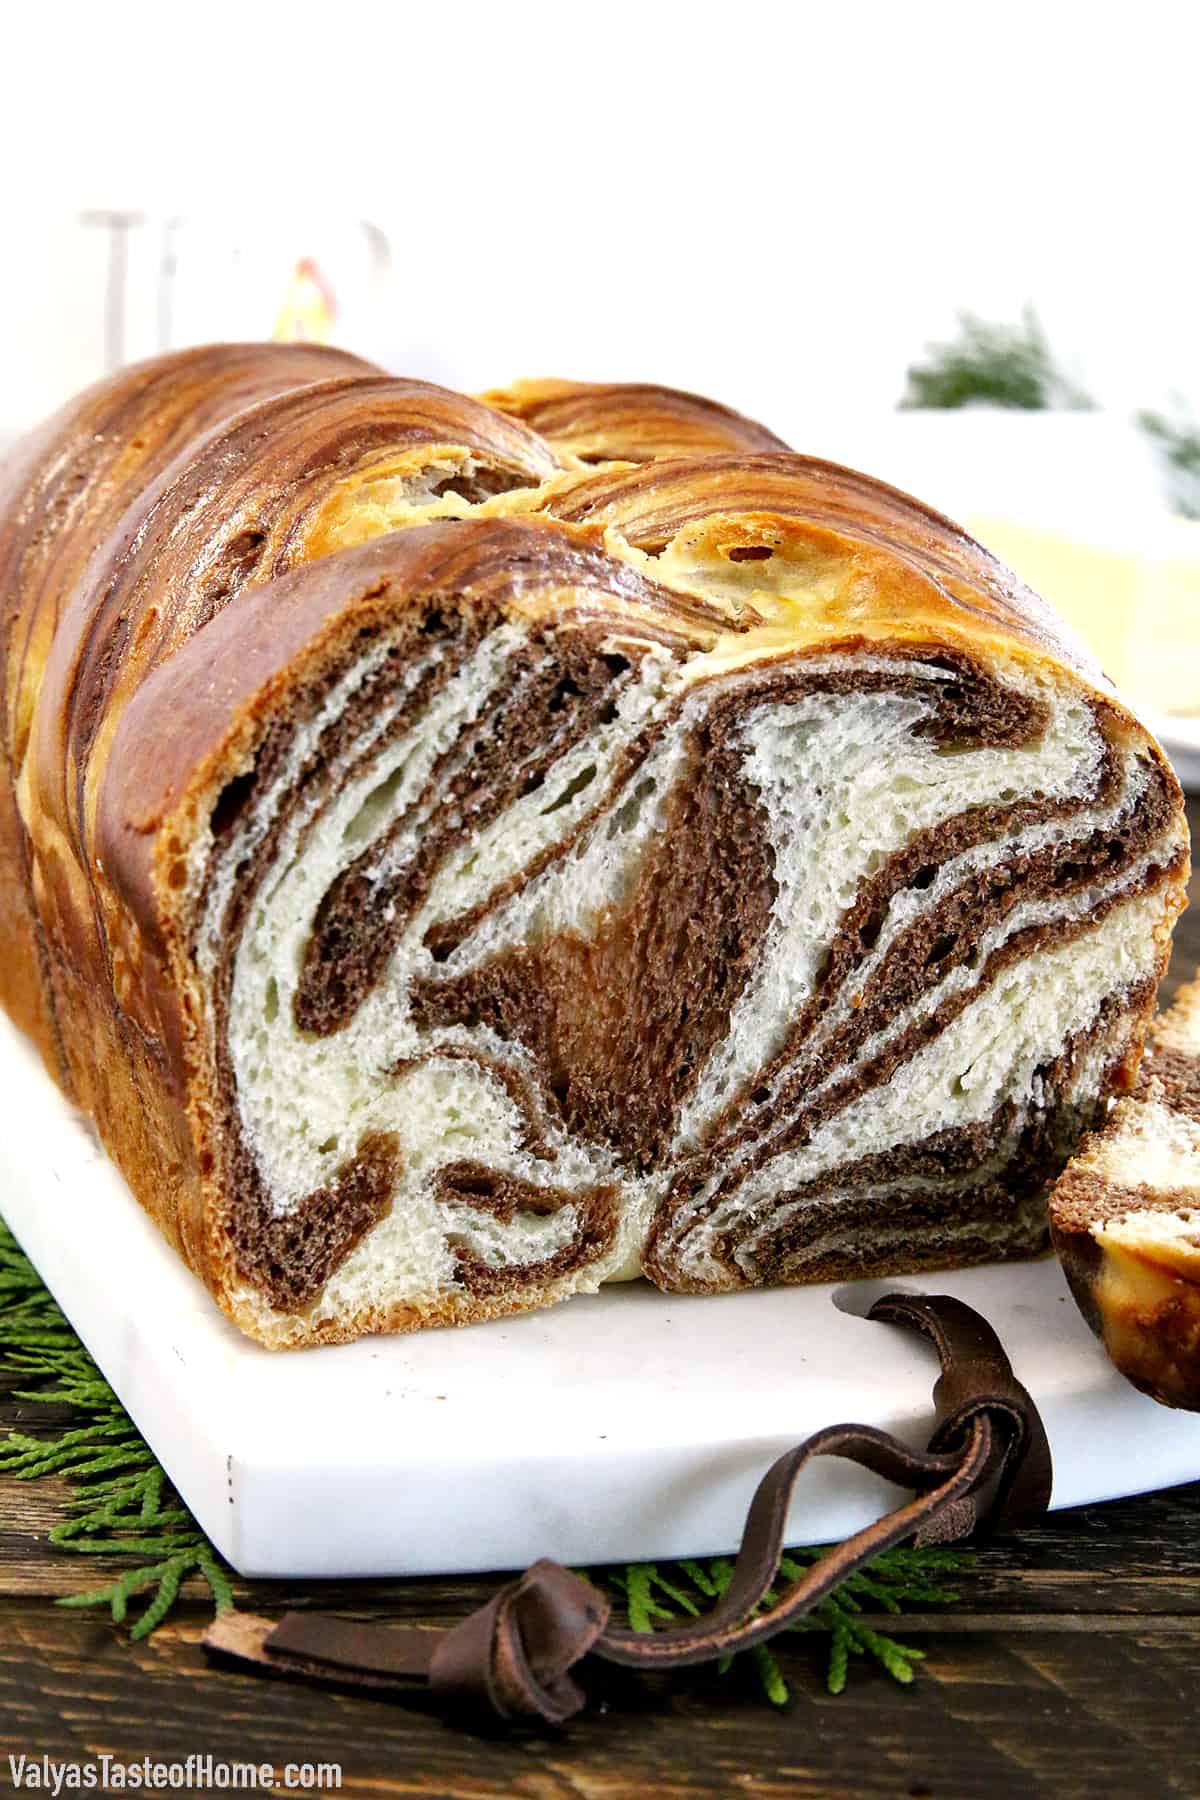
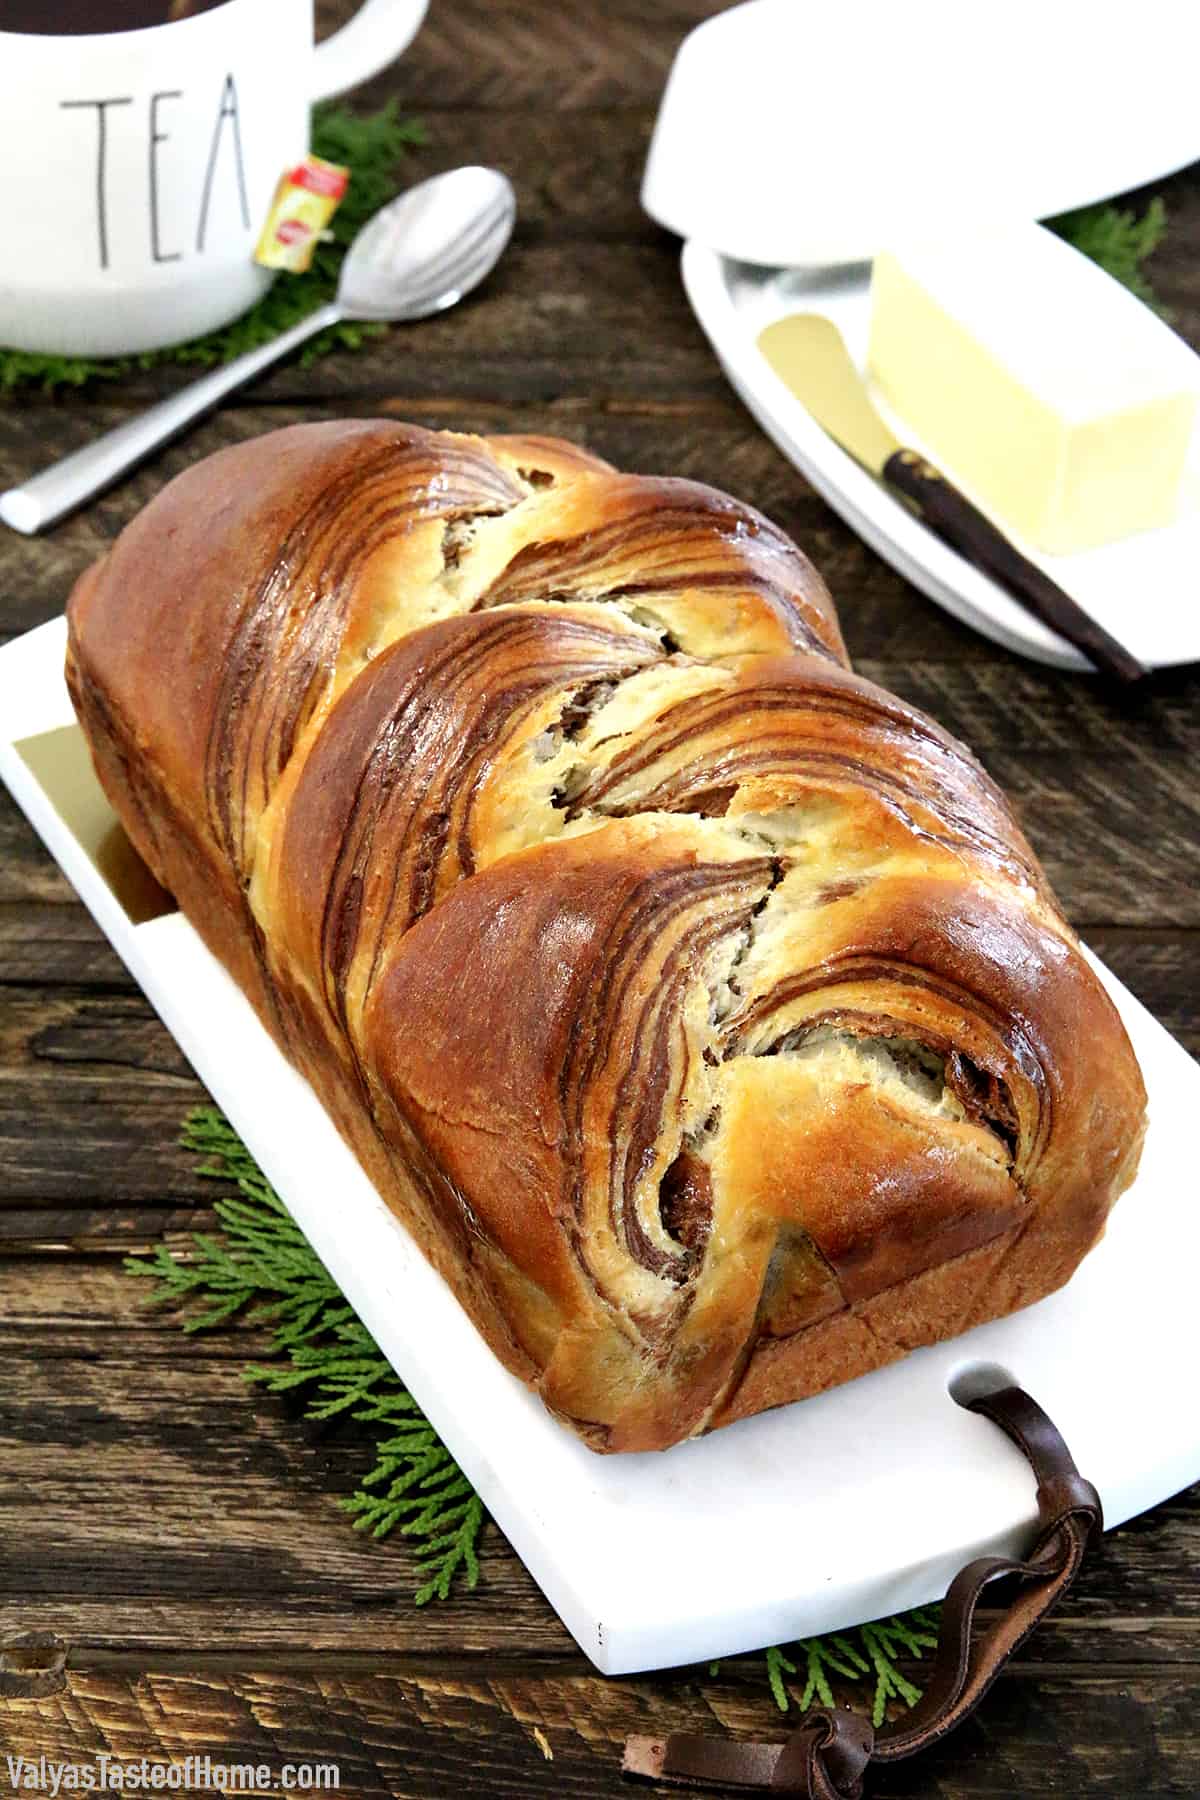
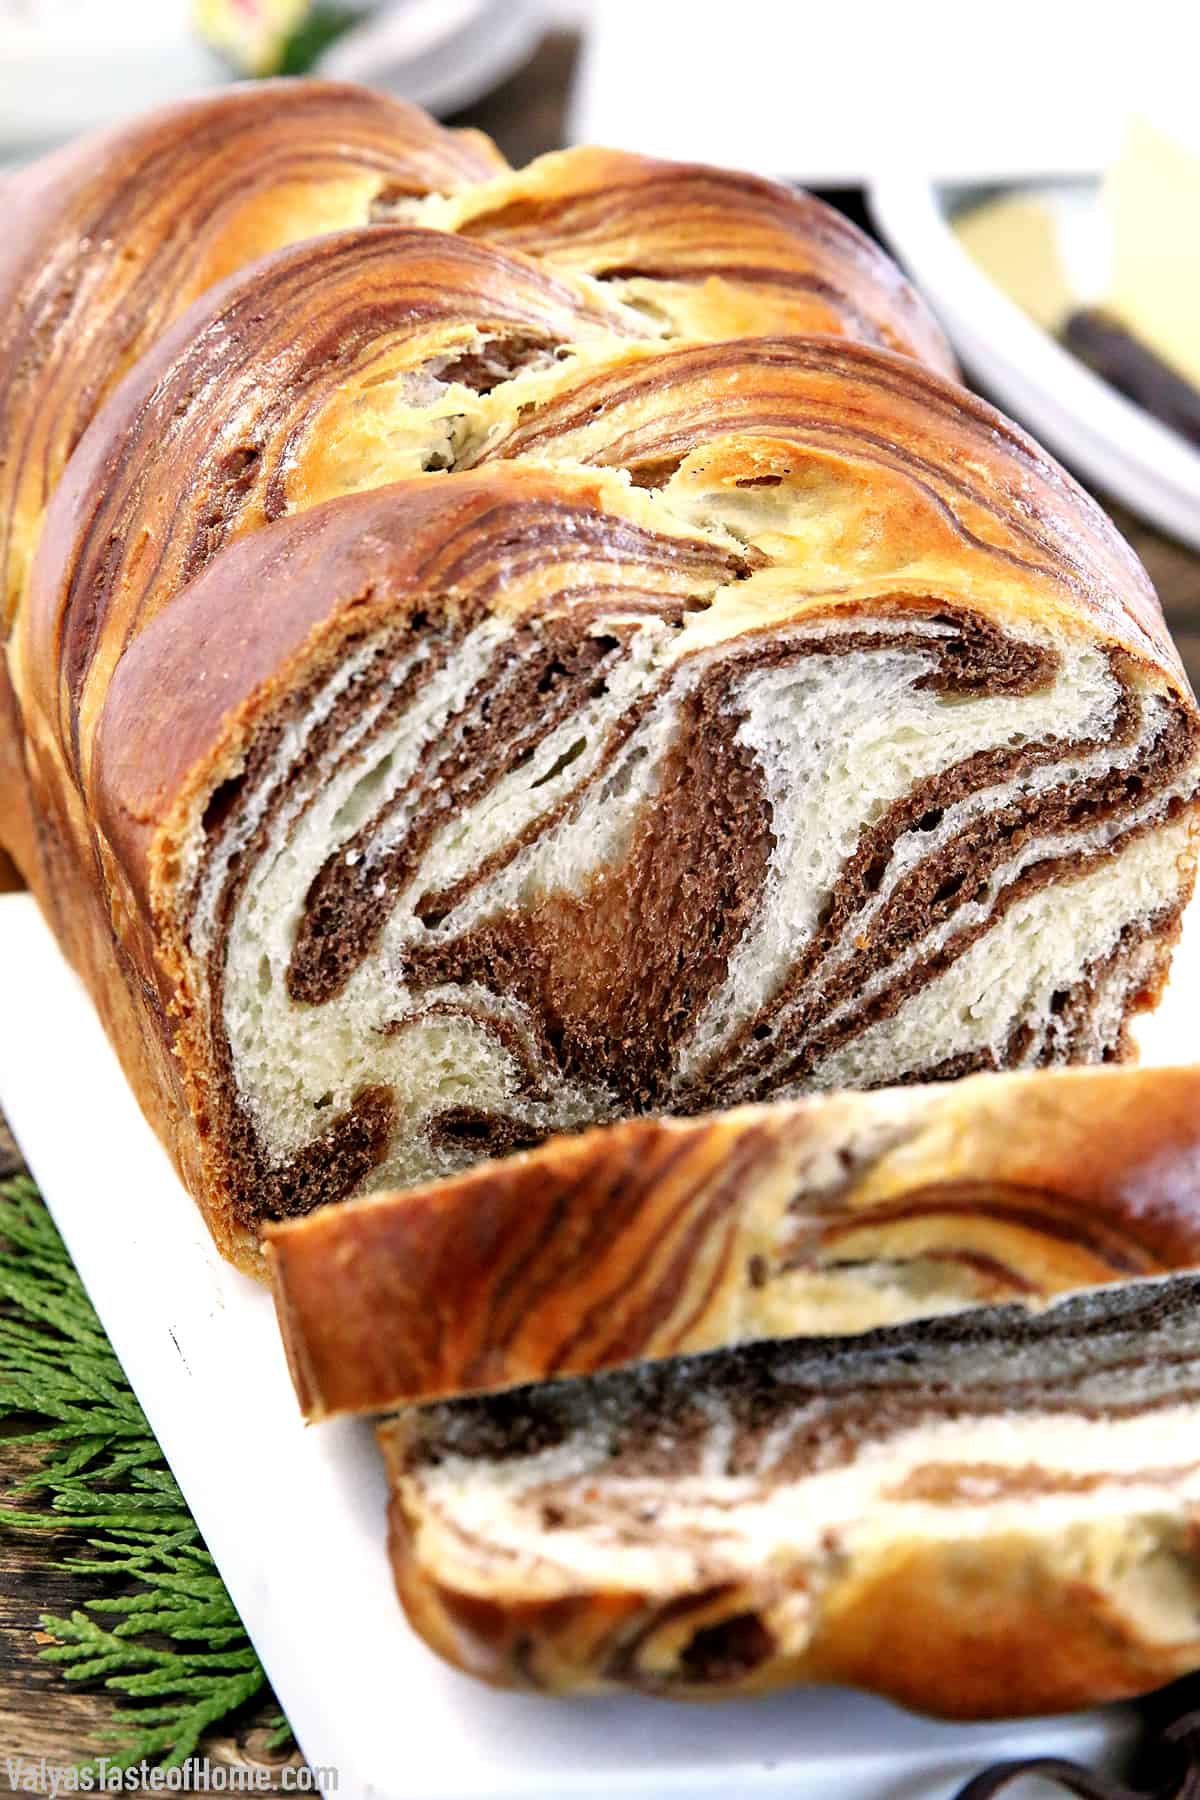
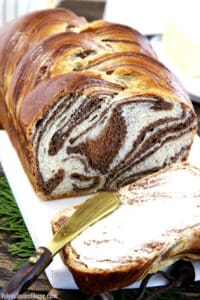
But the thing that steals the show when it comes to this bread is the beautiful vanilla and chocolate swirls that give it a beautiful, marbled effect! Even though this bread is incredibly easy to make, no one will be able to guess that!
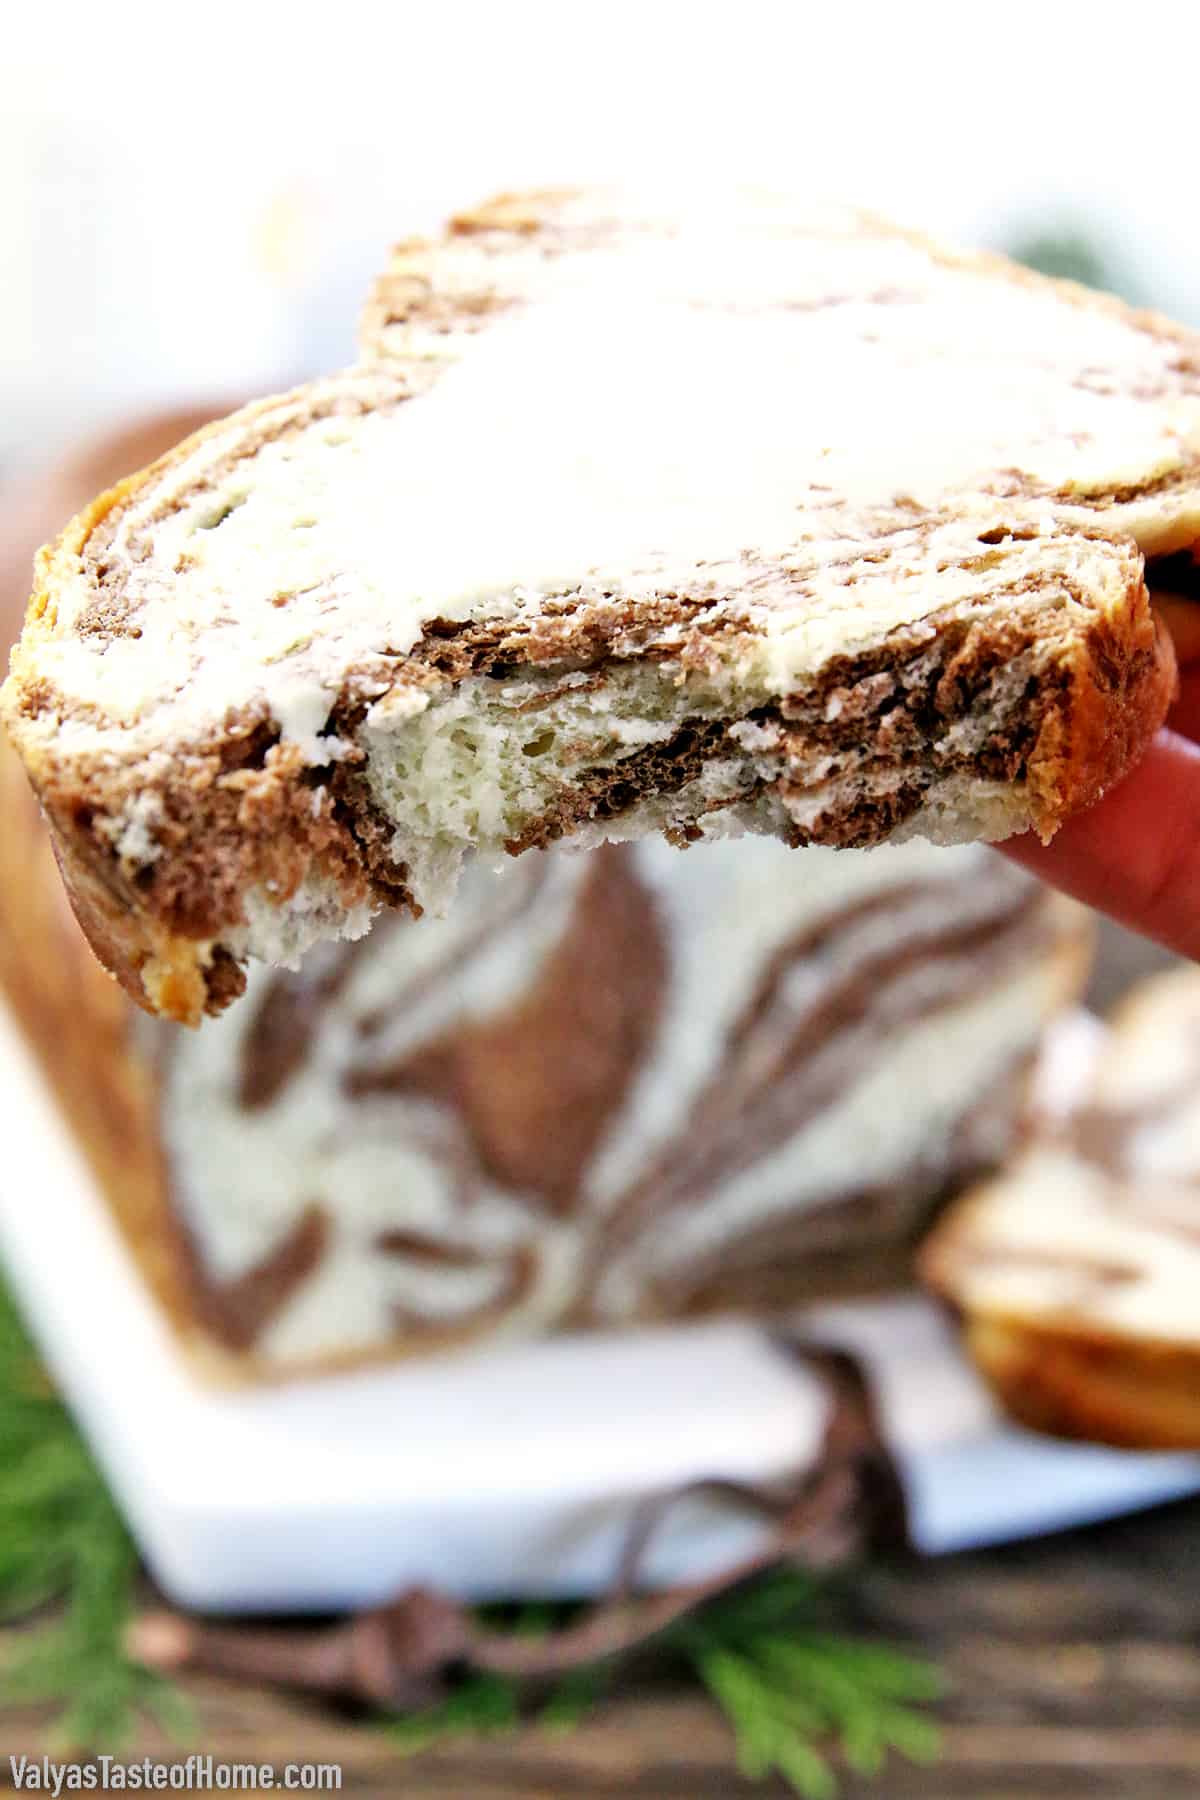
You’ll notice a thin layer of delicious cinnamon-chocolate dough weaved with white vanilla dough to give you the most eye-catchy marbled effect. I’ve never met someone that saw this bread and didn’t comment on how beautiful it looks!
It’s delicious right out of the oven and tastes beautiful with some butter spread and a cup of tea or coffee. You can have it as a snack or serve it for brunch. Regardless of when you choose to have it, be ready to fall in love with this Marbled Sweet Bread recipe.
This bread is really similar to Braided Easter Bread that we enjoy a lot in my household, but this one adds a new flavor twist to it!
What is Sweet Bread?
If you don’t know what Sweet Bread is or have never had it before in your life, you’re in for a treat! Sweet Bread is a soft, lightly sweetened enriched bread loaf that may be eaten plain or with butter.
It’s a delicious bread that’s also versatile! You can use some leftover Sweet Bread to make French toast or even use it in a French toast casserole.
This bread has delicious, clean flavors and is not overly sweet. The light sweetness that shines through really enhances the bread and makes it a treat by itself.
As soon as you’ll have a bite of this Sweet Bread, you’ll know that it’s special and not like any other ordinary bread.
What is Sweet Marbled Bread?
We all know that Sweet Bread is truly delicious, but there’s nothing better than having a Sweet Marbled Bread! Sweet Marbled Bread is taking the delicate sweetness of the sweet bread and taking it to the next level!
Sweet Marbled Bread is a sweet bread that is made up of two separate doughs: a regular, classic sweet bread dough and a chocolate-cinnamon bread dough. Weaving the two doughs together creates a Sweet Marbled bread that has an effect that looks like marble!
It’s an incredibly easy and fun way to create a beautiful bread that is loved by kids and adults alike. The great thing about this bread is that no two pieces of bread will look like and the bread itself looks really elegant. It’s perfect to serve at dinner parties, or even on special occasions!
You’re absolutely going to love making this Sweet Marbled Bread and since it’s a Sweet Bread at its core, it has a lightly sweet flavor and is incredibly soft.
What Does Sweet Marbled Bread Taste Like?
Sweet Marbled Bread tastes lightly sweet and you’ll be able to taste two different flavor profiles in each bite! It’s honestly an experience in itself, and I haven’t met anyone who tried it and didn’t fall in love with it instantly.
The two different flavors are thanks to the marbled effect in the bread that not only allows you to taste the classic Sweet Bread flavor but also the chocolate-cinnamon flavored one.
It almost tastes like a marble loaf cake but has a more bread-like texture. Trust me, you’re going to absolutely love it!
Do I Have to Make Two Separate Doughs from Scratch For This Sweet Marbled Bread?
No, you don’t! And that’s why this Sweet Marbled Bread recipe is so unique and special! With only two extra steps, you can have two delicious doughs that will then be weaved together to give you the most delicious Sweet Marbled Bread you’ve ever had!
You’ll start off activating yeast and mixing the dough for just Sweet Bread. Once most of the mixing is done, you’ll split the dough into two which is step one of the two-step process to get two separate doughs.
Continue kneading the first of the split doughs until it’s done. This one will be your plain, classic Sweet Bread layer.
Now it’s time for step two. You’re going to take the remaining dough and add cacao and cinnamon powder to it and knead it all together. This will give you the delicious, chocolate-cinnamon flavored sweet bread dough that we will later braid into the original, classic sweet bread dough.
In just two simple steps you have two different doughs, one with a classic sweet bread flavor and the other a spin of the classic sweet bread that has a chocolate-cinnamon flavor to it.
How to Get the Marbled Bread Swirl Effect?
Just like it’s incredibly easy to get two separate doughs to make the chocolate marble bread, in the same way, it’s also really easy to get the marbled swirl effect in your bread.
It can all be done in four easy steps. First, you’ll roll out the original sweet bread dough into a rectangle with a ¼” thickness. Repeat the process for the chocolate-cinnamon dough as well.
Next, place the rolled-out chocolate batter dough on top of the original dough and fold it into vertical four-folds. Then fold this long strip on itself and you’ll end up with two layers of bread dough that are folded together and is 1” thick.
What’s best is that it doesn’t need to be perfect, because it’s going to turn out amazing anyway, thanks to the yeast that’ll expand the bread.
The third step is to cut the bread into three even strips without cutting it all the way through. This will allow the bread to not unravel entirely.
Now the last step would be to simply braid the bread together and you’ll end up with a beautiful, braided bread that has a Marbled Bread swirls effect in it that will shine through once it’s baked and sliced.
What You Need to Make Sweet Marble Bread at Home
You need only pantry-staple ingredients to make this beautiful and impressive Sweet Marbled Bread at home. Let’s look at what each of these are:
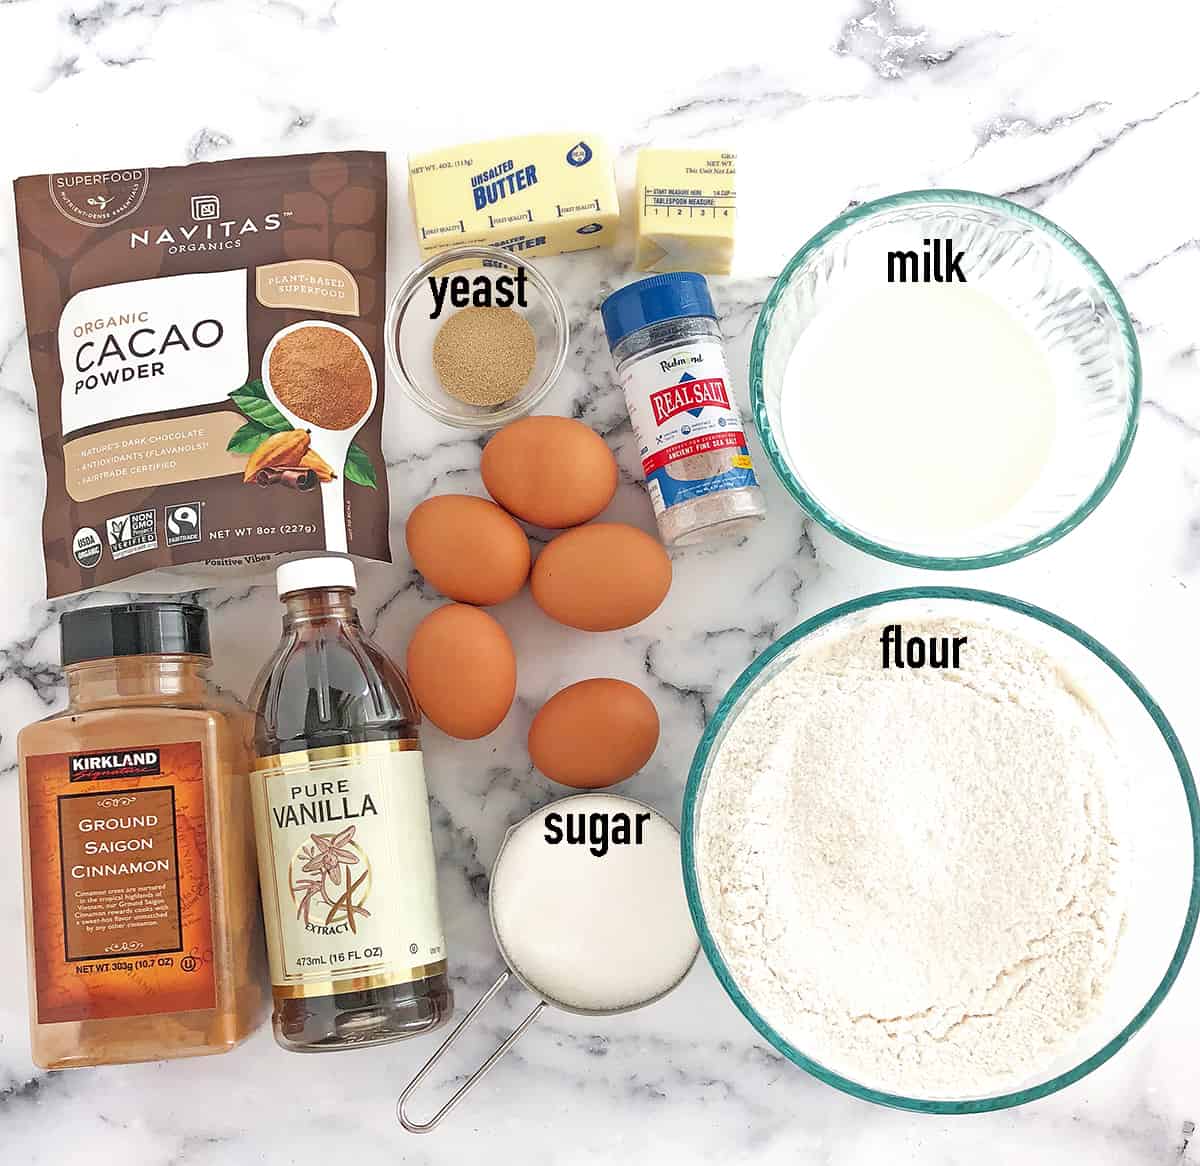
Sweet Marble Bread Ingredients:
- Milk: I recommend using whole milk instead of skimmed or low-fat milk to get the most beautiful and soft bread. Using milk instead of water as the liquid to activate the yeast will give you a rich and soft bread. We will use lightly warm milk to make sure that the bread rises and proofs properly.
- Sugar: I prefer using organic sugar, but you can use regular, white granulated sugar as well. Sugar is what makes this bread lightly sweet. My recipe calls for ¼ cup that’ll give you lightly sweet bread, but you can adjust the amount of sugar according to your preferences.
- Yeast: We’ll be using active dry yeast as the main leavening agent in our bread. Yeast is what makes this bread, a bread. It’ll help the bread rise properly and give it a longer life.
- Eggs: We’ll be using 5 large eggs in the recipe. Make sure that the eggs are at room temperature. I prefer using free-range eggs, but you can also buy regular, store-bought ones.
- Sea salt: This is my all-time favorite salt. Adding salt to the bread helps enhance the overall flavor and balances everything.
- Vanilla extract: Adding two teaspoons of vanilla extract to the bread takes it to the next level and enhances the flavor of the overall sweet bread, making it truly taste like a treat!
- All-purpose flour: All you need is all-purpose flour to make this Sweet Marbled Bread. No need for special bread flour.
- Butter: We’ll be using unsalted butter in this recipe, that’ll help us adjust the flavors ourselves. But in case you only have salted butter at hand, you can use that too. If you do, don’t add the salt to the recipe and simply skip it. The butter needs to be softened to room temperature.
Chocolate-Dough Ingredients:
- Cacao (or cocoa) powder: I prefer using cacao powder instead of cocoa powder, but you can use whichever one you have on hand. The reason why I prefer cacao powder over cocoa is that cacao is less processed and usually does not have added sugar while cocoa is highly processed and usually always has added sugars. If you do use cocoa, go for unsweetened cocoa powder.
- Ground cinnamon: Adding a little cinnamon powder to the bread will enhance the chocolate flavor.
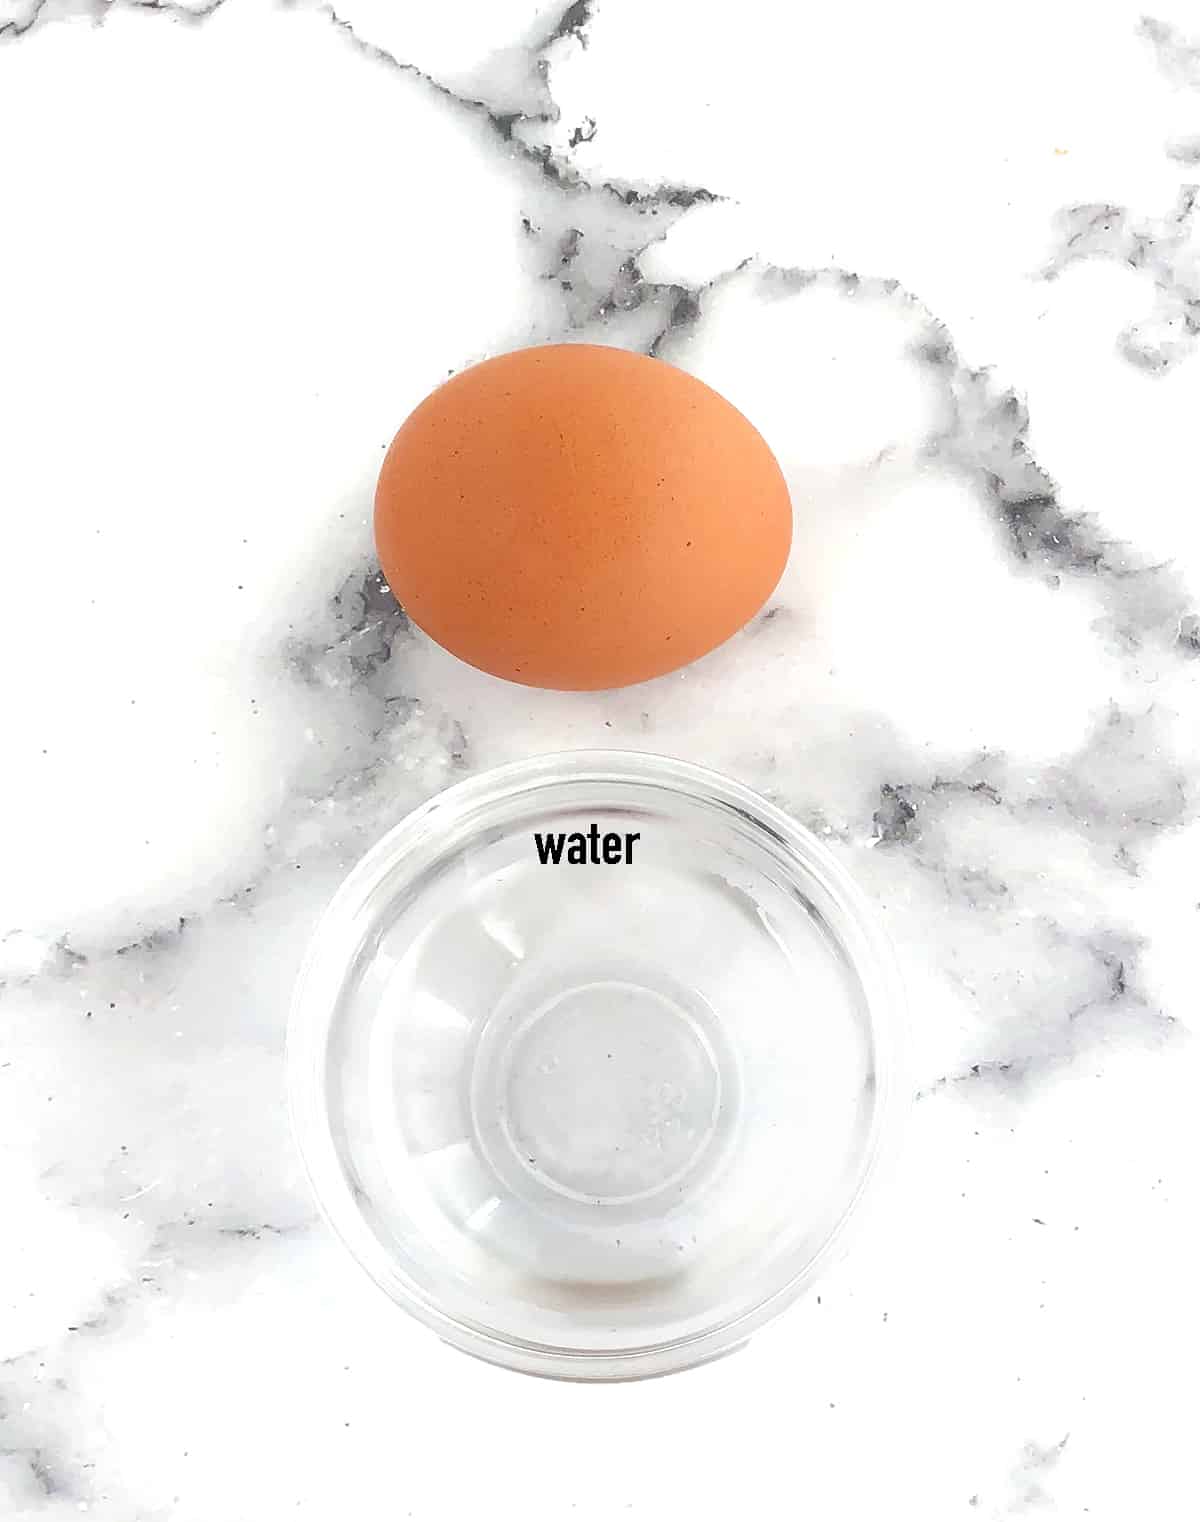
Egg Wash Ingredients:
- Egg: You’ll need one large egg in the egg wash. Eggs a shine to the bread and the yolk will help give the bread a beautiful golden brown color when it is baked.
- Water: Water helps to thin out your egg walk so it goes on smoothly.
How to Make Sweet Marbled Bread at Home (Step-by-Step)
Making Sweet Marbled Bread is an easy process. To make it even easier for you, I’ve included step-by-step instructions along with pictures. Let’s see how to make it:
Making the Dough:
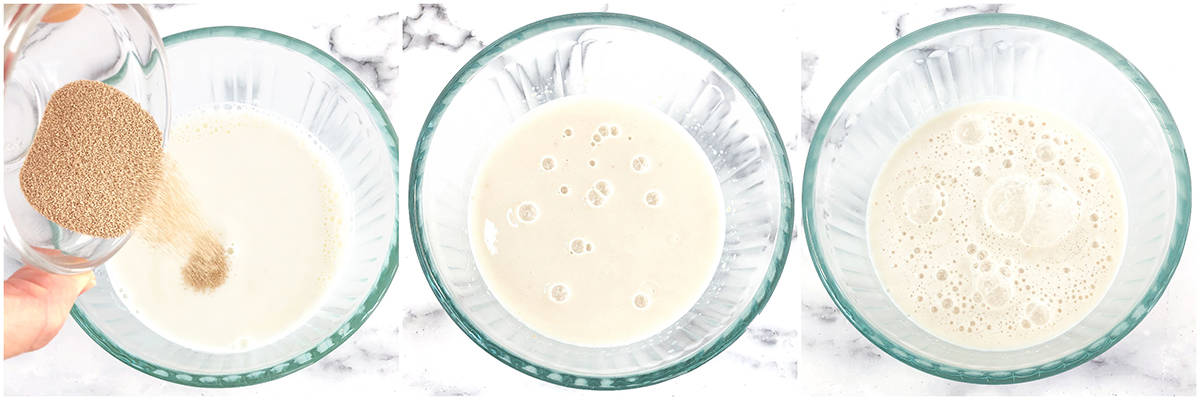
We’ll start by activating the yeast. In a bowl, combine lukewarm milk, ¼ cup of sugar (reserve ¾ cup of sugar for later), and yeast. Making sure that the milk is slightly warm will ensure that the yeast activates properly.
Stir it together until the sugar and yeast dissolve. Place it in a warm place and let the yeast activate.
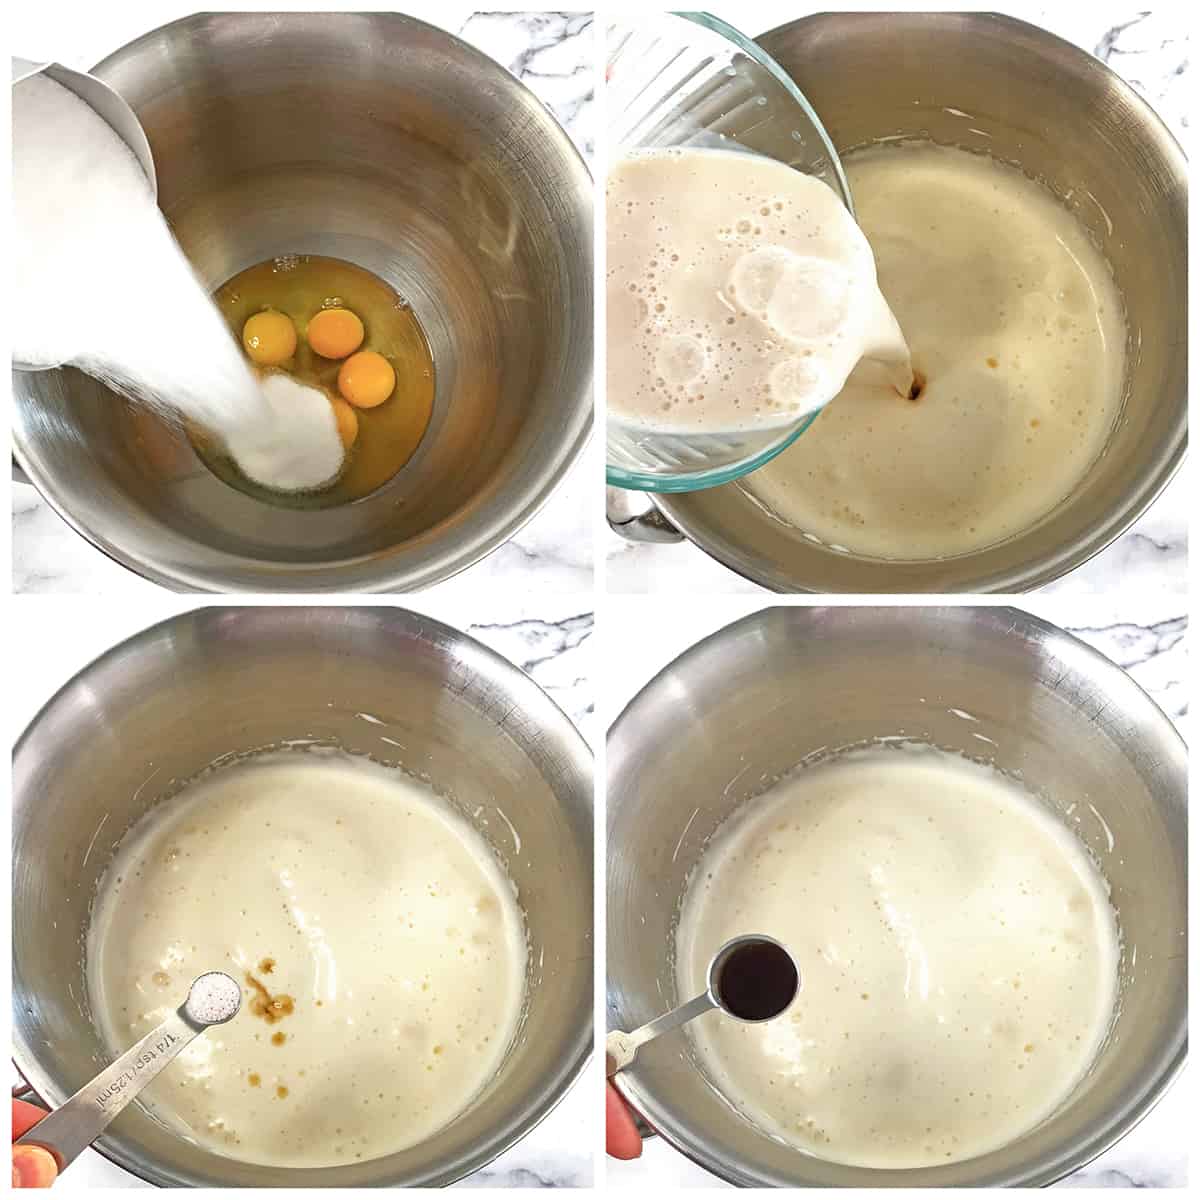
Next, beat eggs and the remaining ¾ cup of sugar together on high speed for 5 minutes.
Now reduce the mixer speed to low and add the yeast mixture to it, along with sea salt and vanilla extract.
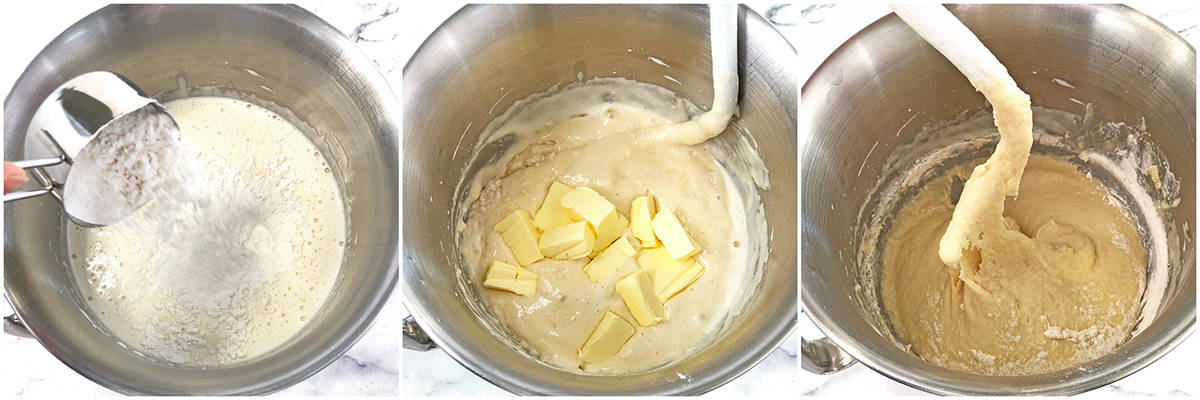
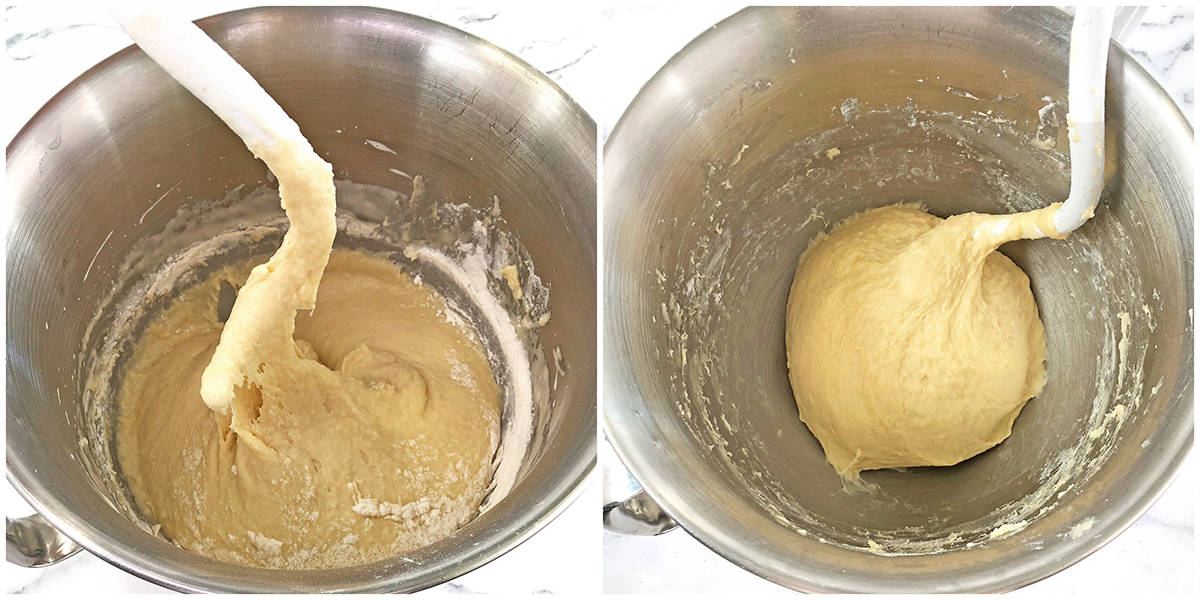
Next, switch to the dough hook attachment. Stir in sifted flour, adding ½ cup at a time, for a total of four cups. Then mix in the softened butter.
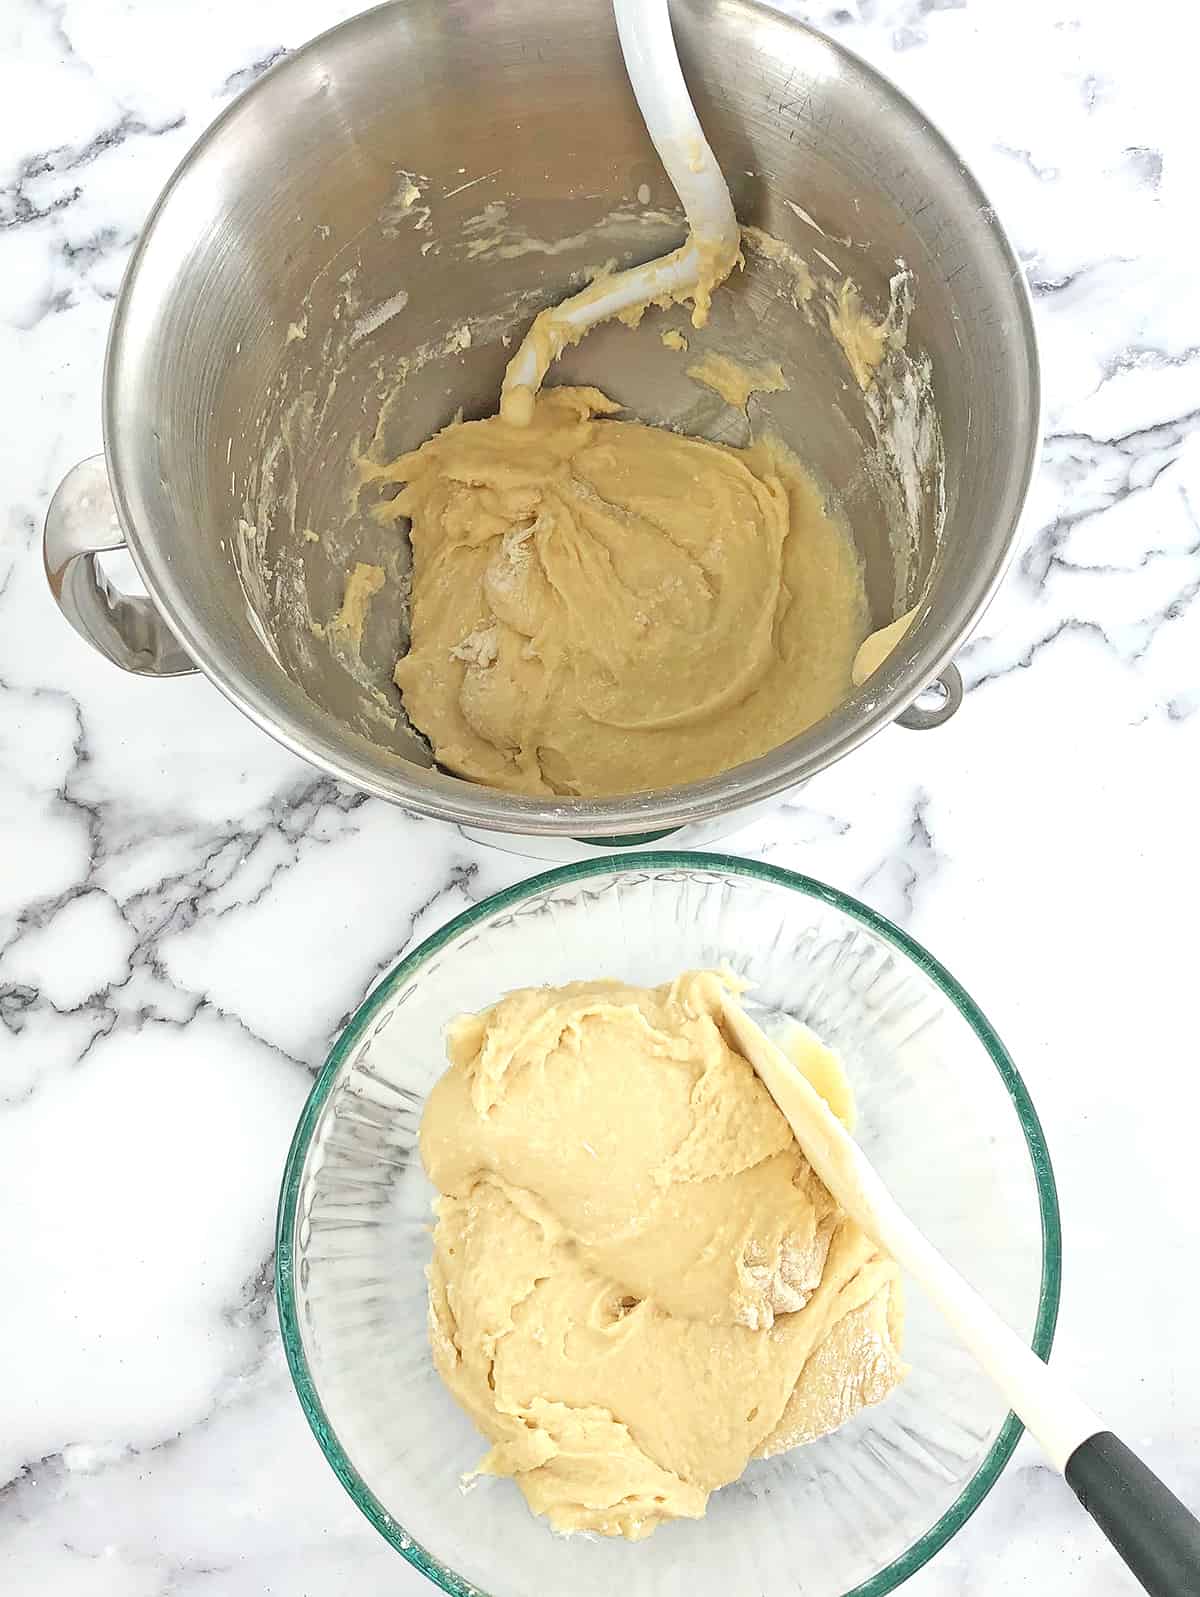
As soon as the butter is mixed in, it’s time to divide the dough in two. You’ll notice that the dough is not entirely done yet and it will still be pretty sticky at this point. That is absolutely okay, we will finish kneading it in a bit.
Dividing the Dough:
Using a silicone spatula, split the dough into equal pieces and transfer half of the dough into a medium bowl. Set it aside. We will be adding cacao and ground cinnamon to it later after we finish mixing the white dough first.
Attach the bowl back to the stand mixer. Now mix in more flour by adding ½ cup at a time, for 1 ½ cups in total. The dough should be soft and stretchy, and it should not stick to the spatula.
Transfer the white well-kneaded dough into a second large bowl greased with olive oil. Cover the bowl with plastic food wrap and place it in a warm area to rise.
Now it’s time to transfer the dough that you set aside back into the mixer bowl. Next, add ¼ cup cacao (or cocoa powder) and ¼ tsp of ground cinnamon.
Mix everything in, by adding ½ cup of flour at a time, for a total of one cup of additional flour. Keep mixing until the dough stops sticking to the side of the bowl. The dough should be stretchy and should not stick to the bowl or spatula.
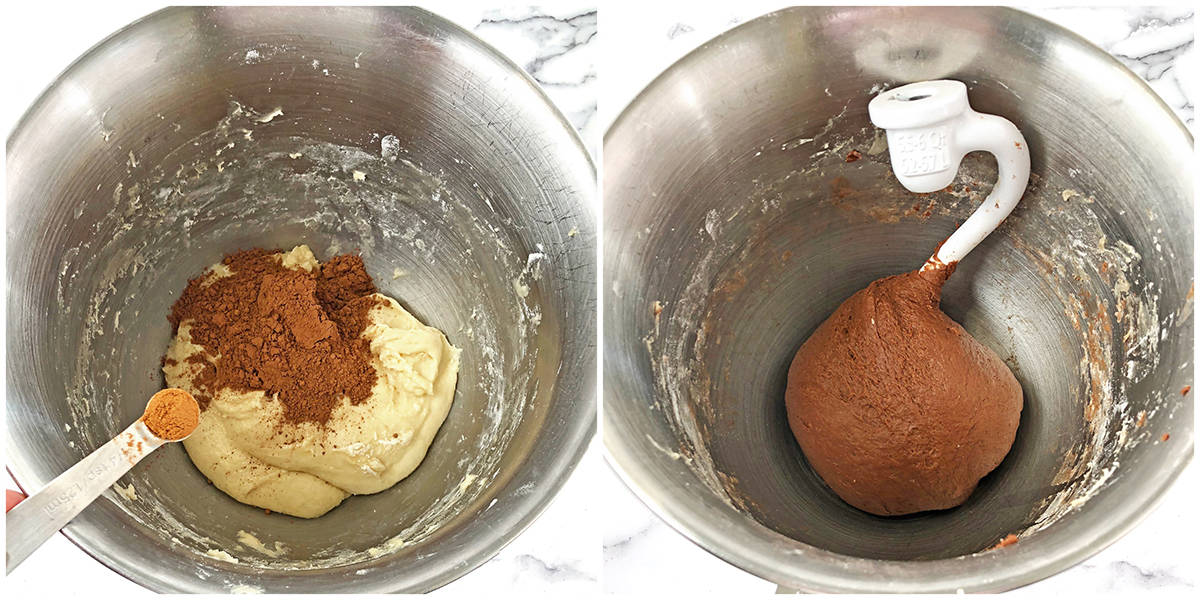
Transfer the chocolate dough back into another glass bowl greased with olive oil. Place the chocolate dough next to the white dough and allow it to rise for about an hour to an hour and a half.

Adding the Egg Wash:
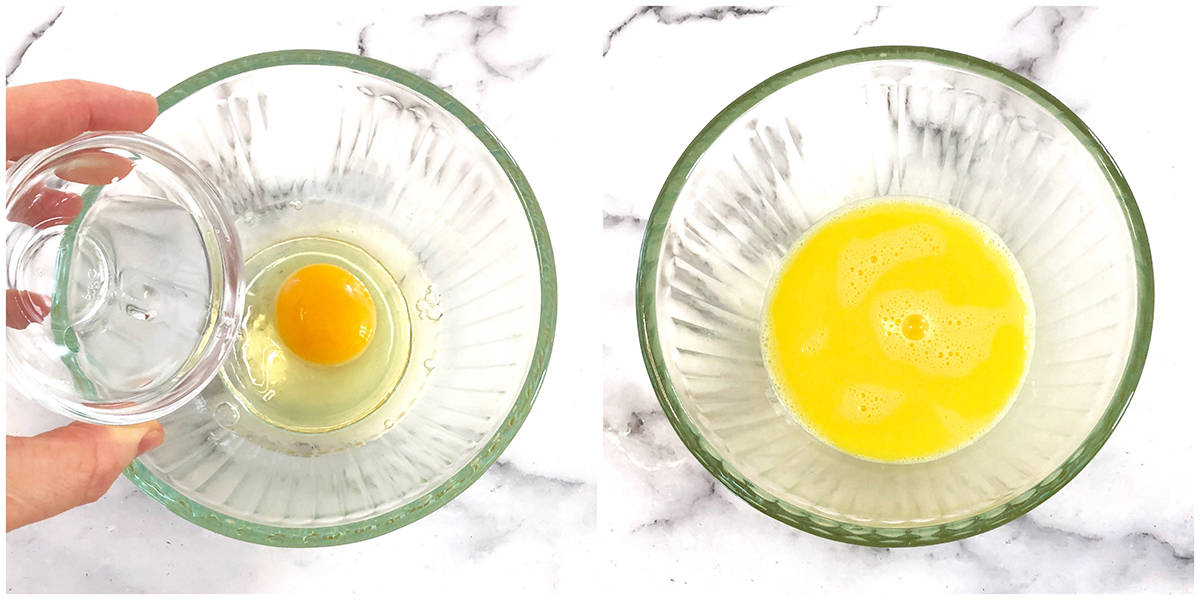
Towards the end of the rising time, make the eggs wash. Beat an egg with water until well combined and set aside until ready for use.
Braiding the Sweet Bread:
Work with one color of dough at a time. Move the white dough onto a floured surface.
Knead the dough into a ball and split the white dough in half. Keep in mind that this recipe makes 2 loaves of marbled bread.
Place the second half of the white dough back into the glass bowl and cover it again with plastic wrap to prevent it from drying out.
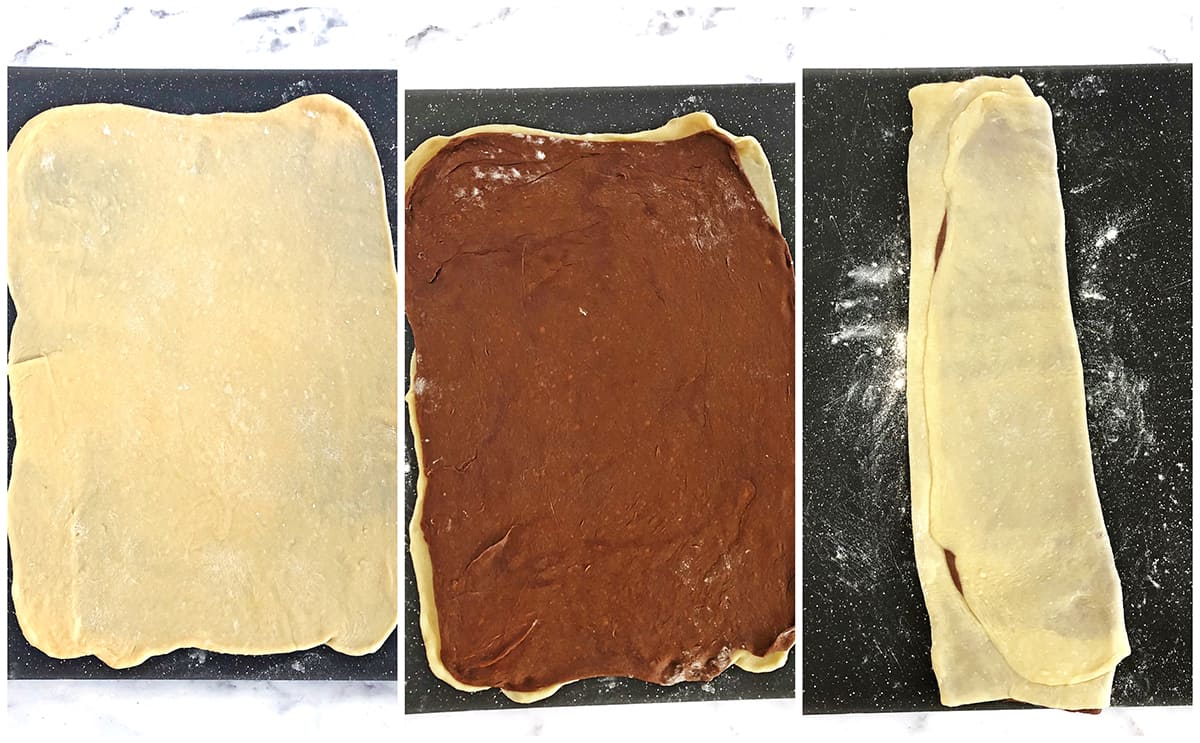
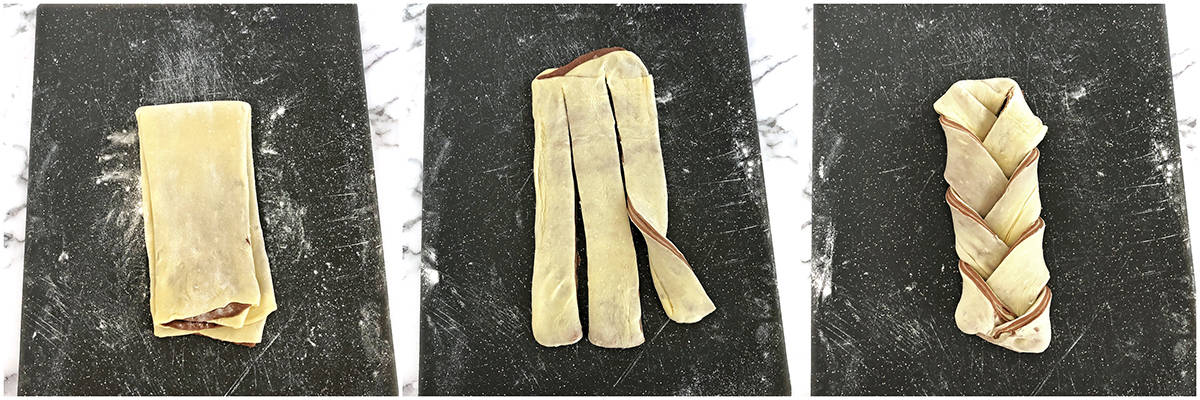
Roll the dough out into a large rectangle, about ¼” in thickness. Repeat the same steps with the chocolate dough as with the white. Roll it out into about the same size rectangle, ¼” in thickness.
Now place the chocolate dough on top of the white one. The chocolate dough will want to shrink, so you can just pinch the edges together sporadically, in multiple places. They do not have to be perfectly aligned as you will be rolling the dough out again.
Fold the dough into vertical four folds and roll the dough out again to about ½” in thickness.
As mentioned earlier, it doesn’t have to be exact or perfect. That’s the beauty of working with yeast dough, it will expand in size anyway to give you a beautiful, marbled effect.
Now fold that large strip of dough in half and roll it out again to about 1″ in thickness throughout the entire rectangle.
Make 3 even cuts in the dough without cutting all the way through to make 3 strips for the dough to be braided.
Finally, braid the marbled dough strips and tuck in the edge under the loaf. While braiding, you may turn the strips to reveal the marbled cut sides even more, if you want to.
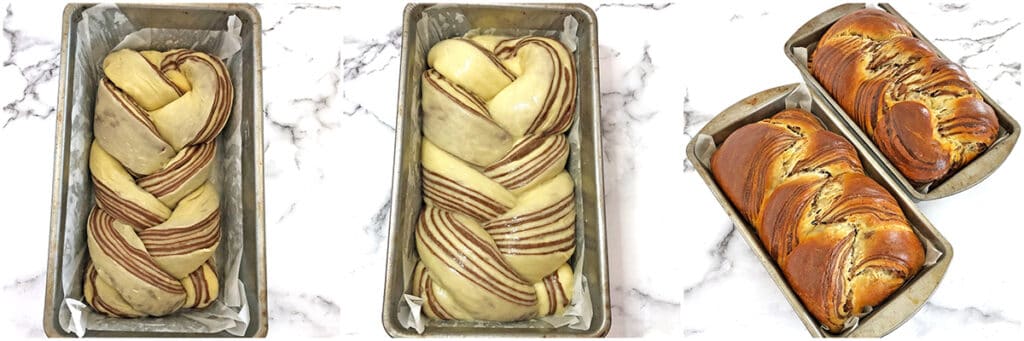
Now, place the marbled braid into a bread pan or baking sheet greased with butter and lined with parchment paper. Tuck in both ends underneath the braid to make sure it doesn’t unravel while baking.
Place the dough into a warm place to proof for 45 minutes. Repeat the same instructions with the second half of the dough for your second loaf of Sweet Marbled Bread.
Baking the Sweet Marbled Bread:
Start by preheating the oven to 350F (180C) 30 minutes into the final proofing time.
Place the bread in a prepared pan. Then, right before placing the bread in the oven to bake, brush both loaves of bread dough with the egg wash multiple times using a pastry brush.
Bake the bread in the preheated oven at 350F (180C) for 40 to 45 minutes. Insert a long wooden toothpick into the center of the bread to check if the bread is done. If it comes out clean, then the bread is done baking.
Remove from the oven and let the bread cool in the baking pans for about 15 minutes before transferring them onto a wire rack to cool completely.
Serve bread warm with some butter, a hot cup of tea, or a latte. It’s truly a treat that’s unforgettable after you taste it the first time!
Recipe Variation Ideas for Sweet Bread (Marbled Loaf Bread)
This delicious marble bread is absolutely perfect as is, but if you’re looking to change it up a bit, try these ideas:
Chocolate Ganache: Consider adding a chocolate ganache on top of the delicious sweet bread to turn it into an even sweeter treat! To do this, melt chocolate chips with butter in a heat-proof bowl in the microwave and keep stirring every 15-20 seconds till it’s completely smooth. Then glaze over cooled sweet bread.
Icing: You can even add some icing and frosting the way we do in Cinnamon Rolls! Check out my recipe for cinnamon rolls for the perfect way to make some delicious frosting.
How to Store Leftover Sweet Marble Bread?
You can store your leftover Sweet Marbled Bread in an airtight container at room temperature for up to five days. To refrigerate, store it in an airtight container for up to 1 week.
This bread also freezes beautifully with little to no loss in quality or texture. To thaw, leave on the counter until completely thawed or microwave in 30-second intervals until it’s soft and no longer frozen.
However, the freezer air may cause freezer burn and impart freezer-aroma to the flavor of the bread. To prevent this from happening, wrap each load or individual bread slices tightly in two layers of plastic wrap before placing it in a large resealable freezer bag.
Freezer burn usually happens when the bread isn’t wrapped properly. This results in moisture loss and thousands of ice crystals form when you freeze the bread. This loss of water molecules causes dehydration, making the frozen food dry and tough. So, make sure to wrap it tightly twice with plastic wrap to avoid this issue.
More Sweet Bread Recipes You’ll Love
- Sweet Buns with Fresh Cherry Filling (Piroshki)
- Sweet Farmers Cheese and Strawberry Braid
- Easy Poppy Seed Roll Recipe
- Pumpkin Pull-Apart Bread with Pecans and Caramel
- Sweet Swirl Apple Buns
Check out all bread recipes.
Soft and Fluffy Sweet Marbled Bread Recipe (Easy to Make!)
Ingredients
Sweet Marbled Bread Ingredients
- 1 cup – lukewarm organic whole milk
- ¼ cup – sugar
- 2 tsp. – dry active yeast
- 5 large – eggs (I used home-raised room temperature eggs)
- ¾ cup – sugar
- ¼ tsp. – sea salt
- 2 tsp. – pure vanilla extract
- 6 ½ cups – organic all-purpose flour
- 6 oz. – unsalted butter softened to room temperature
- ¼ cup – organic cacao (or cocoa) powder
- ¼ tsp. – ground cinnamon
Sweet Marbled Bread Egg Wash Ingredients
- 2 tbsp. – water
- 1 large – egg
Instructions
Making the Dough:
- We’ll start by activating the yeast. In a bowl, combine lukewarm milk, ¼ cup of sugar (reserve ¾ cup of sugar for later), and yeast. Making sure that the milk is slightly warm will ensure that the yeast activates properly.
- Stir it together until the sugar and yeast dissolve. Place it in a warm place and let the yeast activate.
- Next, beat eggs and the remaining ¾ cup of sugar together on high speed for 5 minutes.
- Now reduce the mixer speed to low and add the yeast mixture to it, along with sea salt and vanilla extract.
- Next, switch to the dough hook attachment. Stir in sifted flour, adding ½ cup at a time, for a total of four cups. Then mix in the softened butter.
- As soon as the butter is mixed in, it’s time to divide the dough in two. You’ll notice that the dough is not entirely done yet and it will still be pretty sticky at this point. That is absolutely okay, we will finish kneading it in a bit.
Dividing the Dough:
- Using a silicone spatula, split the dough into equal pieces and transfer half of the dough into a medium bowl. Set it aside. We will be adding cacao and ground cinnamon to it later after we finish mixing the white dough first.
- Attach the bowl back to the stand mixer. Now mix in more flour by adding ½ cup at a time, for 1 ½ cups in total. The dough should be soft and stretchy, and it should not stick to the spatula.
- Transfer the white well-kneaded dough into a second large bowl greased with olive oil. Cover the bowl with plastic food wrap and place it in a warm area to rise.
- Now it’s time to transfer the dough that you set aside back into the mixer bowl. Next, add ¼ cup cacao (or cocoa powder) and ¼ tsp of ground cinnamon.
- Mix everything in, by adding ½ cup of flour at a time, for a total of one cup of additional flour. Keep mixing until the dough stops sticking to the side of the bowl. The dough should be stretchy and should not stick to the bowl or spatula.
- Transfer the chocolate dough back into another glass bowl greased with olive oil. Place the chocolate dough next to the white dough and allow it to rise for about an hour to an hour and a half.
Adding the Egg Wash:
- Towards the end of the rising time, make the eggs wash. Beat an egg with water until well combined and set aside until ready for use.
Braiding the Sweet Bread:
- Work with one color of dough at a time. Move the white dough onto a floured surface.
- Knead the dough into a ball and split the white dough in half. Keep in mind that this recipe makes 2 loaves of marbled bread.
- Place the second half of the white dough back into the glass bowl and cover it again with plastic wrap to prevent it from drying out.
- Roll the dough out into a large rectangle, about ¼” in thickness. Repeat the same steps with the chocolate dough as with the white. Roll it out into about the same size rectangle, ¼” in thickness.
- Now place the chocolate dough on top of the white one. The chocolate dough will want to shrink, so you can just pinch the edges together sporadically, in multiple places. They do not have to be perfectly aligned as you will be rolling the dough out again.
- Fold the dough into vertical four folds and roll the dough out again to about ½” in thickness.
- As mentioned earlier, it doesn’t have to be exact or perfect. That’s the beauty of working with yeast dough, it will expand in size anyway to give you a beautiful, marbled effect.
- Now fold that large strip of dough in half and roll it out again to about 1″ in thickness throughout the entire rectangle.
- Make 3 even cuts in the dough without cutting all the way through to make 3 strips for the dough to be braided.
- Finally, braid the marbled dough strips and tuck in the edge under the loaf. While braiding, you may turn the strips to reveal the marbled cut sides even more, if you want to.
- Now, place the marbled braid into a bread pan or baking sheet greased with butter and lined with parchment paper. Tuck in both ends underneath the braid to make sure it doesn’t unravel while baking.
- Place the dough into a warm place to proof for 45 minutes. Repeat the same instructions with the second half of the dough for your second loaf of Sweet Marbled Bread.
Baking the Sweet Marbled Bread:
- Start by preheating the oven to 350F (180C) 30 minutes into the final proofing time.
- Right before placing the bread in the oven to bake, brush both loaves of bread dough with the egg wash multiple times using a pastry brush.
- Bake the bread in the preheated oven at 350F (180C) for 40 to 45 minutes. Insert a long wooden toothpick into the center of the bread to check if the bread is done. If it comes out clean, then the bread is done baking.
- Remove from the oven and let the bread cool in the baking pans for about 15 minutes before transferring them onto a cooling rack to cool completely.
Notes
Thank you for following me on Instagram, Facebook, and Pinterest!


I am making this the day before and gifting it to someone… would it be good cold or should they reheat it, and if so, how? Thank you!
You do not need to reheat the whole loaf. I like to reheat a single slice of bread in toaster oven before consuming. I hope this helps.
I can’t wait to try out! 😃 But can I skip the cinnamon? Cos I do not like the taste cinnamon.
Sure you may. Enjoy!
I’d never made marbled bread until now and while the recipe was a bit involved (took me all morning into the late afternoon), it was explained very well and the bread turned out perfect!! The loaves were a huge hit, gone in 24 hours. Will definitely be making these again! Thank you for posting!
This bread is always a hit at my house as well. I am so happy to hear the bread turned out perfect for you. I really appreciate your feedback and thank you for the five-star review! 🙂
Wow! Sooo beautiful! I wanna try! 😋👍
Thank you for the kind words! Let me know how it goes if you ever get to make the recipe.