Oreo Truffles (Festive Peppermint Oreo Cookie Balls!)
Oreo Truffles (aka Oreo Balls!) are absolutely delicious and incredibly easy to make! They’re made with cream cheese and crushed Oreos and then coated with melted chocolate for the perfect combination. I’ve also given them a slight peppermint touch with candy canes and extract to make them the tastiest truffles you’ve ever had!

All you need are a few simple, pantry-staple ingredients to whip these right up. I highly recommend making them for Christmas because they’re absolute crowd-pleasers and adults and kids both absolutely love them!
What I absolutely love is how fun they are to make as well! They’re perfect for kids to get involved in or to make with your family for Christmas or any other special occasion. Plus, they’re incredibly customizable and I’ve included a bunch of times for you to check out in this post.
Want to learn how to make these Oreo Truffles? Then keep on reading!
What are Oreo Truffles?
Oreo truffles are an Oreo lover’s dream come true! They’re the Oreo versions of chocolate truffles that we have all come to love!
If you don’t know what chocolate truffles are, let me explain! They’re a delicious bite-sized chocolate dessert that’s made using chocolate and cream, and traditionally also coated in some cocoa powder.
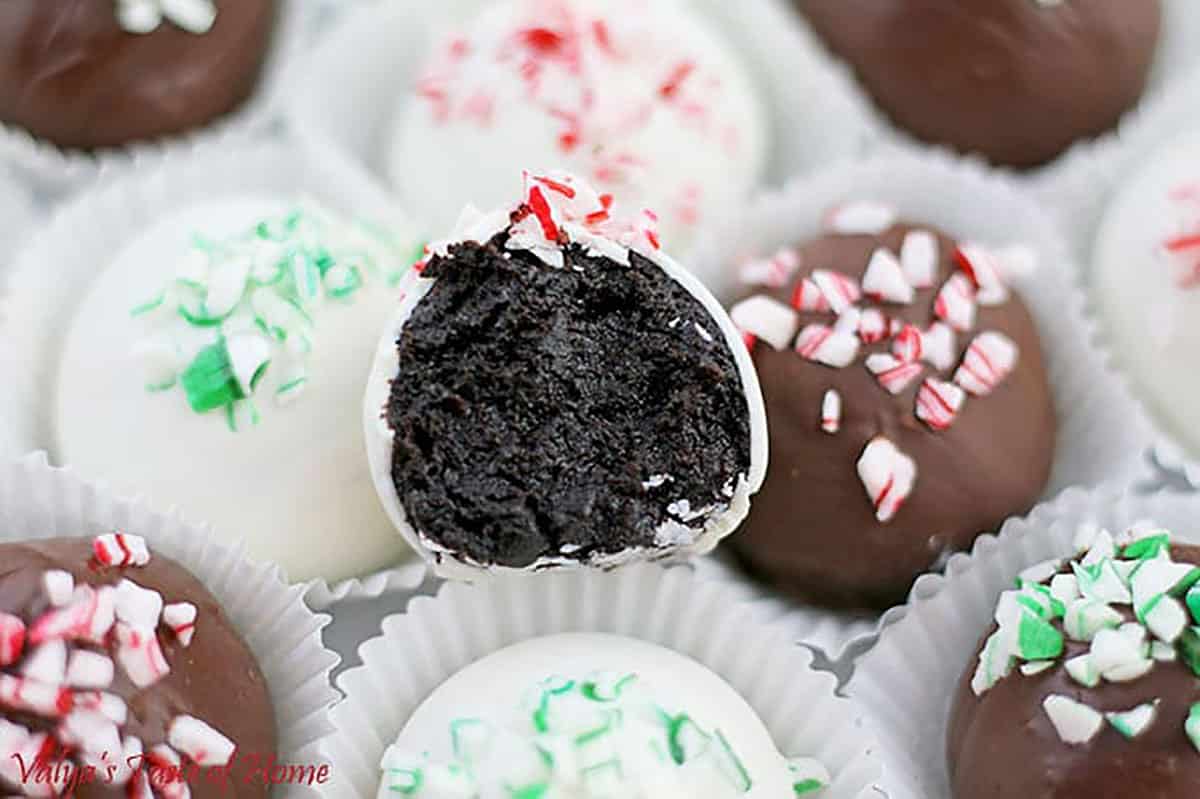
These Oreo truffles are that and more! They’re delicious truffles made with cream cheese and crushed Oreos then dipped in melted chocolate. Not only do they look absolutely stunning, but they taste even better!
These are the perfect treats to make for the holidays, especially Christmas, and just about any special occasion you can think of! In fact, you don’t even need a special occasion, just make them whenever you want and enjoy these bite-sized treats!
Why You’ll Love This Recipe
The best thing about this recipe is just how simple they are to make yet how incredible they taste and look! This is an incredibly special recipe that my daughters introduced me to, and since then I have adapted and perfected it even more.
They’re complete crowd-pleasers and are the first to disappear from the table every single time I’ve made them. They also look absolutely incredible and can stand their own on a beautiful holiday table spread.
What’s best is that they’re also versatile and customizable, meaning you can use your own favorite candy or cookies to coat them or even in the truffle mixture itself. I’ve included many variation ideas down below that I highly recommend you check out!
Trust me, when you make this recipe once, you’re going to absolutely fall in love with it!

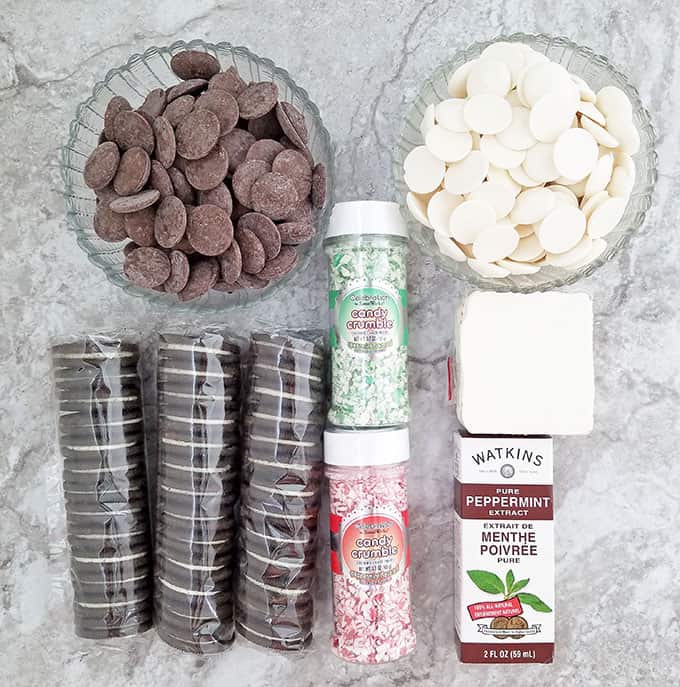
What You Need to Make Oreo Truffles at Home
All you need are some simple, pantry staple ingredients to make these delicious Oreo Truffles at home. Here’s what you’ll need:
- Cream cheese: First of all, you’ll need some softened cream cheese which is the base of your delicious truffles. It’ll add a delicious flavor and creaminess to your truffles, and that’s exactly what we need!
- Peppermint extract: We’ll also be adding a few drops of peppermint extract that will really elevate the flavor of your truffles and take them to the next level.
- Oreo cookies: Of course, we need some Oreos for this delicious Oreo Truffles recipe. We’ll be crushing the Oreos to mix them in with our cream cheese for the perfect flavored truffles.
- Chocolate discs: You’ll also need some chocolate discs that we’ll melt and coat our delicious truffles with. I’ve used white chocolate discs and also dark chocolate discs to have two different combinations for our truffles and options for you! You can also use semisweet chocolate chips.
- Candy canes: We’ll also be using some candy canes that we’ll crush and sprinkle on top of our delicious Oreo truffles for the perfect holiday combination and the perfect peppermint touch on top!
For a full list of ingredients and quantities, please check the recipe card at the end of this post.
How to Make Oreo Truffles
Making these delicious truffles is easier than you think. Here’s what you need to do to make them at home:
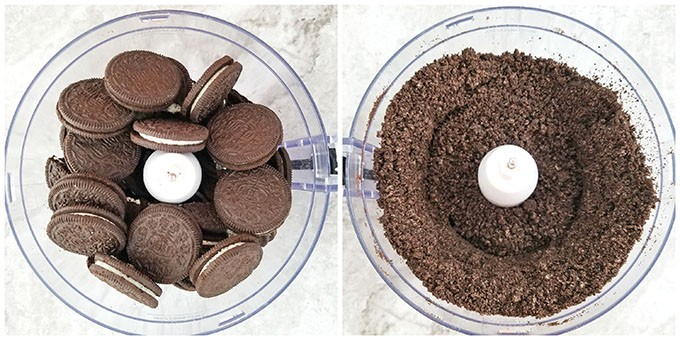
How to Make Oreos Mixture for Oreo Truffles
Start by crushing Oreo cookies (including the cream) in a food processor for 2 minutes. Pulse the Oreos until they all turned into a fine crumb. Set aside until ready for use.
Another way to crush them is to use a rolling pin to finely crush them in a large resealable bag.
Next, beat cream cheese on high, and add peppermint extract to it. Scrape the sides of the bowl (to incorporate all cream cheese) and beat again for a minute or two until the cream is fluffy.
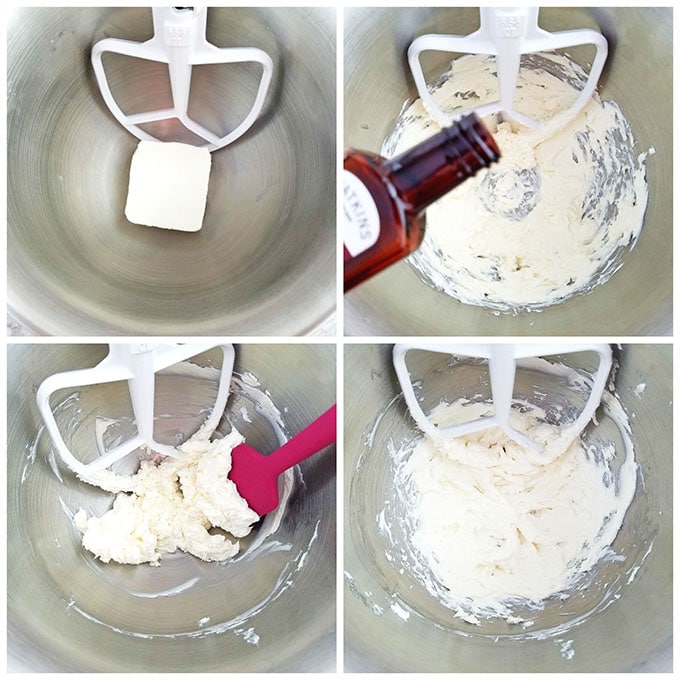
Time to add in our Oreos! Mix in crushed Oreos on the lowest speed for a minute or until the cream cheese and crushed cookies are well combined.
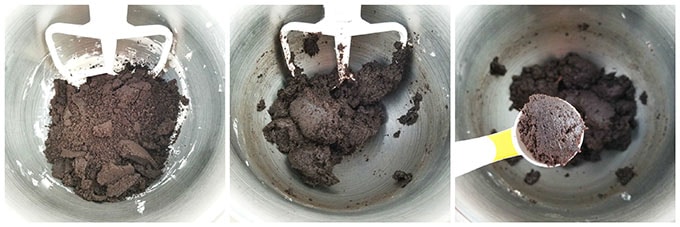
How to Shape Oreo Balls for Oreo Truffles
Using a tablespoon measuring spoon or cookie scoop, scoop some Oreo mixture and shape it into 1-inch balls. Repeat until all the Oreo mixture is used.
Place Oreo spheres into the fridge for 15 minutes to chill.
Tip: Just the outer part of the sphere should be cold, so when dipped, the chocolate sets quickly.

How to Coat Oreo Truffles with Melted Chocolate
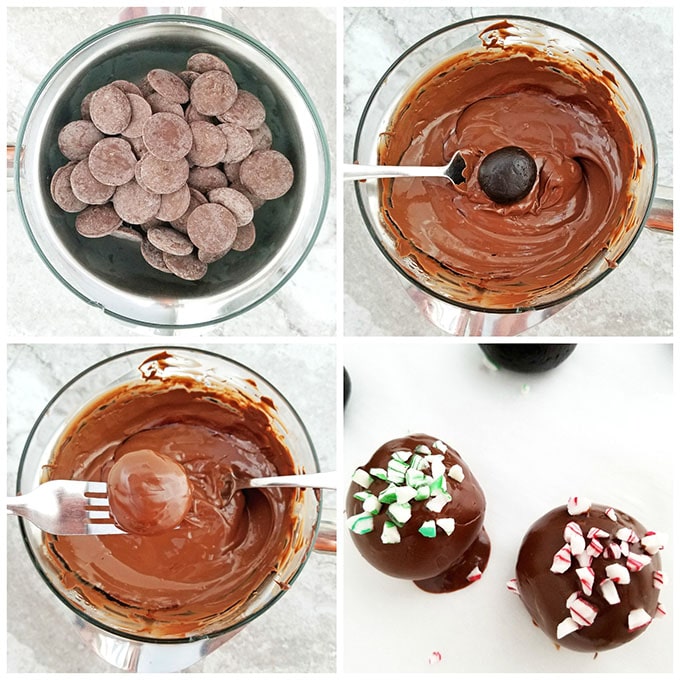
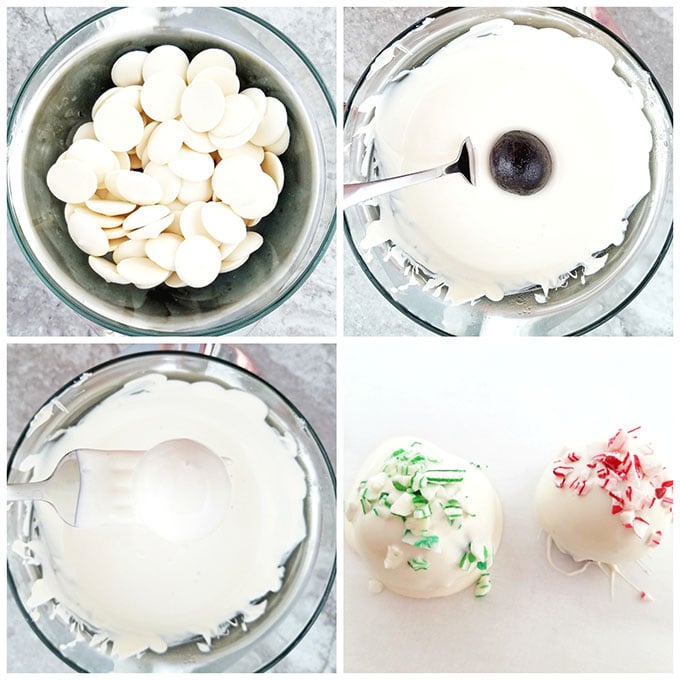
While the first half of the Oreo cookie balls are in the freezer, prep the chocolate dip. Melt chocolate disks in a glass bowl over a pot of boiling water. You can also pop it in the microwave for 10 seconds at a time till it’s completely melted.
Take the Oreo cookie balls out of the fridge and dip one sphere at a time into the chocolate using a fork.
Tip: Keep the bowl with melted chocolate over the steaming pot the entire time while keeping the water simmering on low to prevent the chocolate from thickening. Too much thickening of the chocolate will result in lumps on truffles, instead of the round and smooth look you want.
Place the dipped truffles onto a lined cookie sheet and sprinkle crushed peppermint candy cane (or any other decoration you like) on top of the spheres immediately so it sticks to the wet chocolate.
Keep in mind that once the chocolate begins to set, the sprinkles will not stick.
Repeat the same steps with the second half of the batch, using white chocolate, as with dark chocolate.
Let truffles cool completely before you begin the trimming process.
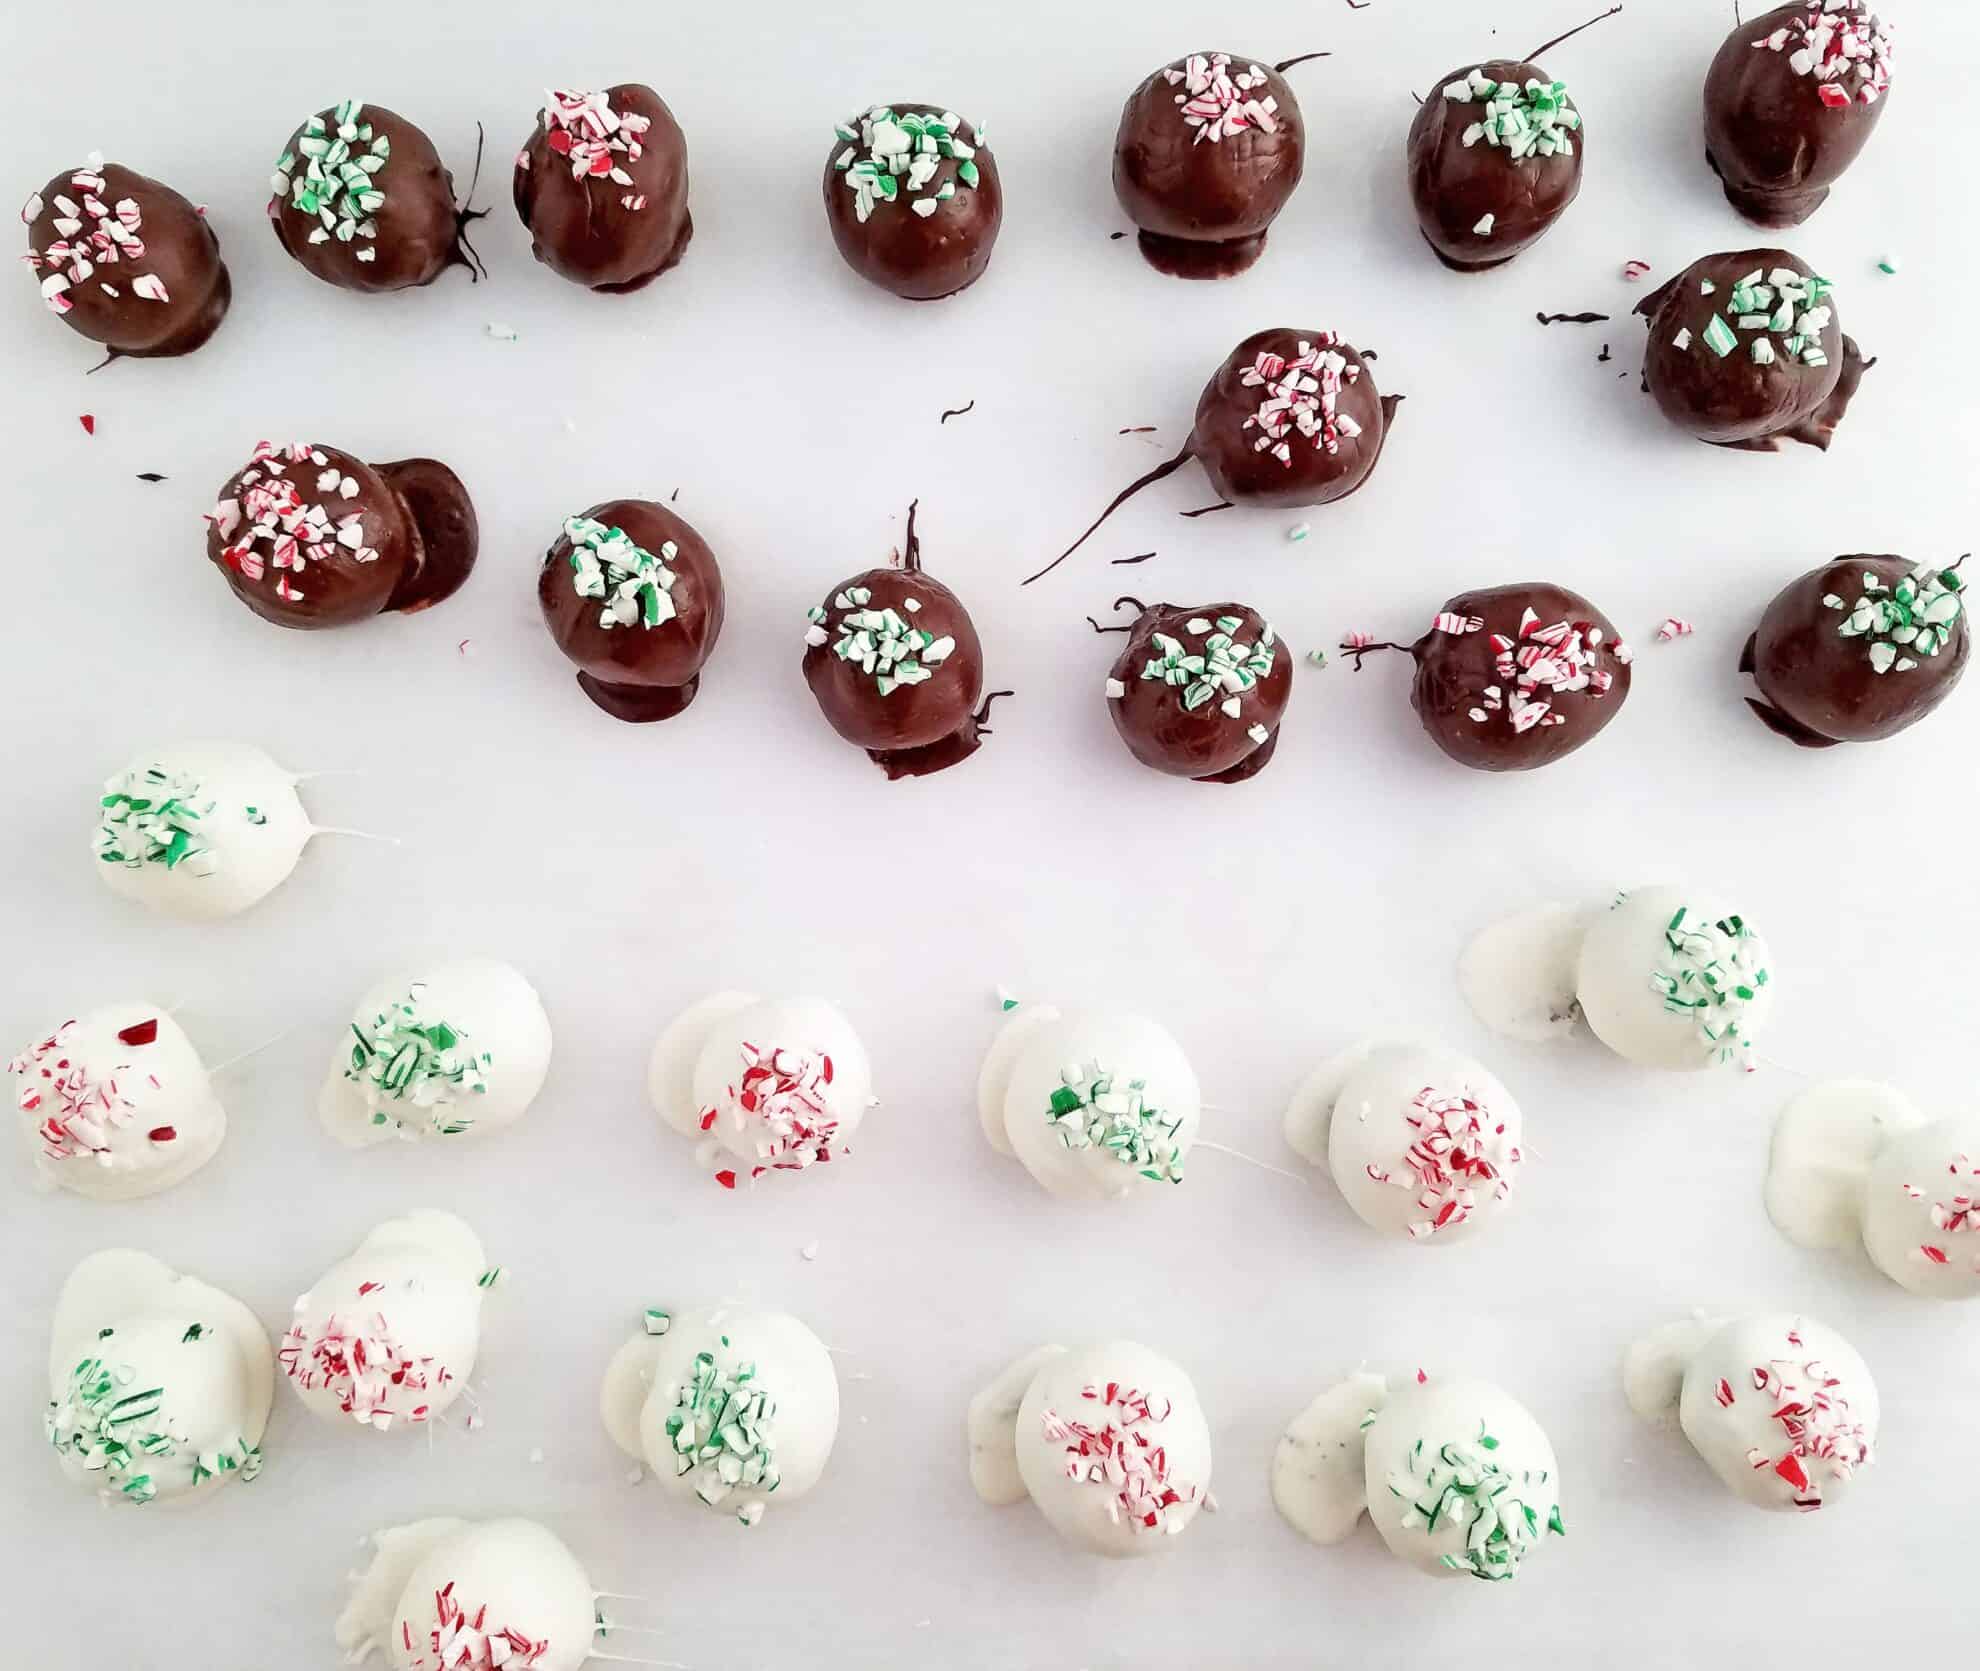
Trim off excess chocolate around the base of the truffles with a thin, sharp knife. Then carefully twist and lift them up off the parchment paper.
When not dry enough and truffles are stuck to the parchment paper, sometimes a chunk may break off from the bottom. That’s not very pretty, so give them ample time to set before peeling off the paper.
Place truffles into mini paper cupcake liners and let them chill in the refrigerator until ready to serve. If you like the inside of the truffles softer, take them out of the fridge 30 minutes before serving.
Your delicious Oreo Truffles are ready to be served!

Recipe Variation Ideas for Oreo Truffles
These Oreo Truffles are absolutely perfect as is, but if you’re looking to customize it according to your flavor, then here are some ideas you can try out:
- Coatings: You can add just about any candy coating on top, including almond bark, melting wafers, candy melts, candiquik, or any other ones you love best.
- Toppings: If you want to add any other toppings to it, you absolutely can! Some great ideas include cookie crumbs, chopped nuts, and mini M&Ms! But feel free to add whichever ones you like, just crush them up and you’re good.
- Decorations: You can also decorate it with a drizzle of caramel sauce, chocolate sauce, or anything you like for an extra festive feel! Feel free to sprinkle some edible sparkles as well if you like.
How to Store Leftover
You can store any leftovers you may have in the refrigerator in an airtight container for up to two weeks. Plus, you can even freeze them for up to 3 months!
All you need to do is pop them on a baking sheet and place them in the freezer for 3 hours to flash freeze them, then place them in Ziploc bags and store them in a freezer-safe container in the freezer.
Whenever you want to have them, simply let them thaw in the fridge overnight.


Oreo Truffles (Festive Peppermint Oreo Cookie Balls!)
Ingredients
- 8 oz. softened cream cheese
- 4 drops peppermint extract
- 3 packs (39 Oreo cookies)
- 1 cup white chocolate discs
- 1 cup dark chocolate discs
- Crushed peppermint candy canes for decorations
Instructions
How to Make Oreos Mixture for Oreo Truffles
- Start by crushing Oreo cookies (including the cream) in a food processor for 2 minutes. Pulse the Oreos until they all turned into a fine crumb. Set aside until ready for use.
- Another way to crush them is to use a rolling pin to finely crush them in a large resealable bag.
- Next, beat cream cheese on high, and add peppermint extract to it. Scrape the sides of the bowl (to incorporate all cream cheese) and beat again for a minute or two until the cream is fluffy.
- Time to add in our Oreos! Mix in crushed Oreos on the lowest speed for a minute or until the cream cheese and crushed cookies are well combined.
How to Shape Oreo Balls for Oreo Truffles
- Using a tablespoon measuring spoon or cookie scoop, scoop some Oreo mixture and shape it into 1-inch balls. Repeat until all the Oreo mixture is used.
- Place Oreo spheres into the fridge for 15 minutes.
- Tip: Just the outer part of the sphere should be cold, so when dipped, the chocolate sets quickly.
How to Coat Oreo Truffles with Melted Chocolate
- While the first half of the Oreo cookie balls are in the freezer, prep the chocolate dip. Melt chocolate disks in a glass bowl over a pot of boiling water. You can also pop it in the microwave for 10 seconds at a time till it’s completely melted.
- Take the Oreo cookie balls out of the fridge and dip one sphere at a time into the chocolate using a fork.
- Tip: Keep the bowl with melted chocolate over the steaming pot the entire time while keeping the water simmering on low to prevent the chocolate from thickening. Too much thickening of the chocolate will result in lumps on truffles, instead of the round and smooth look you want.
- Place the dipped truffles onto a lined cookie sheet and sprinkle crushed peppermint candy cane (or any other decoration you like) on top of the spheres immediately so it sticks to the wet chocolate.
- Keep in mind that once the chocolate begins to set, the sprinkles will not stick.
- Repeat the same steps with the second half of the batch, using white chocolate, as with dark chocolate.
- Let truffles cool completely before you begin the trimming process.
Notes
Thank you for following me on Instagram, Facebook, and Pinterest!
This recipe was originally posted on December 15, 2016 (original picture below), and updated for a better user experience. The post may contain affiliate links. Read my disclosure.


Hello, I’m planning my Christmas party and was wondering if you can make these ahead of time and freeze them?
You can freeze them plain, but if you’re planning to sprinkle them with crushed candy canes, then they’ll melt. You can make them 3 – 4 days ahead of time and keep them in the cool dry place uncovered.
Mmmm… I made these and they were heavenly scrumptious! I would recommend this recipe to anyone. So simple and good. Thank you so much for sharing! 🙂 Merry Christmas to you and your fam!
Thank you! Merry Christmas to you too! 🙂
These are so beautiful! I’m sure they taste really good!
Thank you! They do taste delish!