
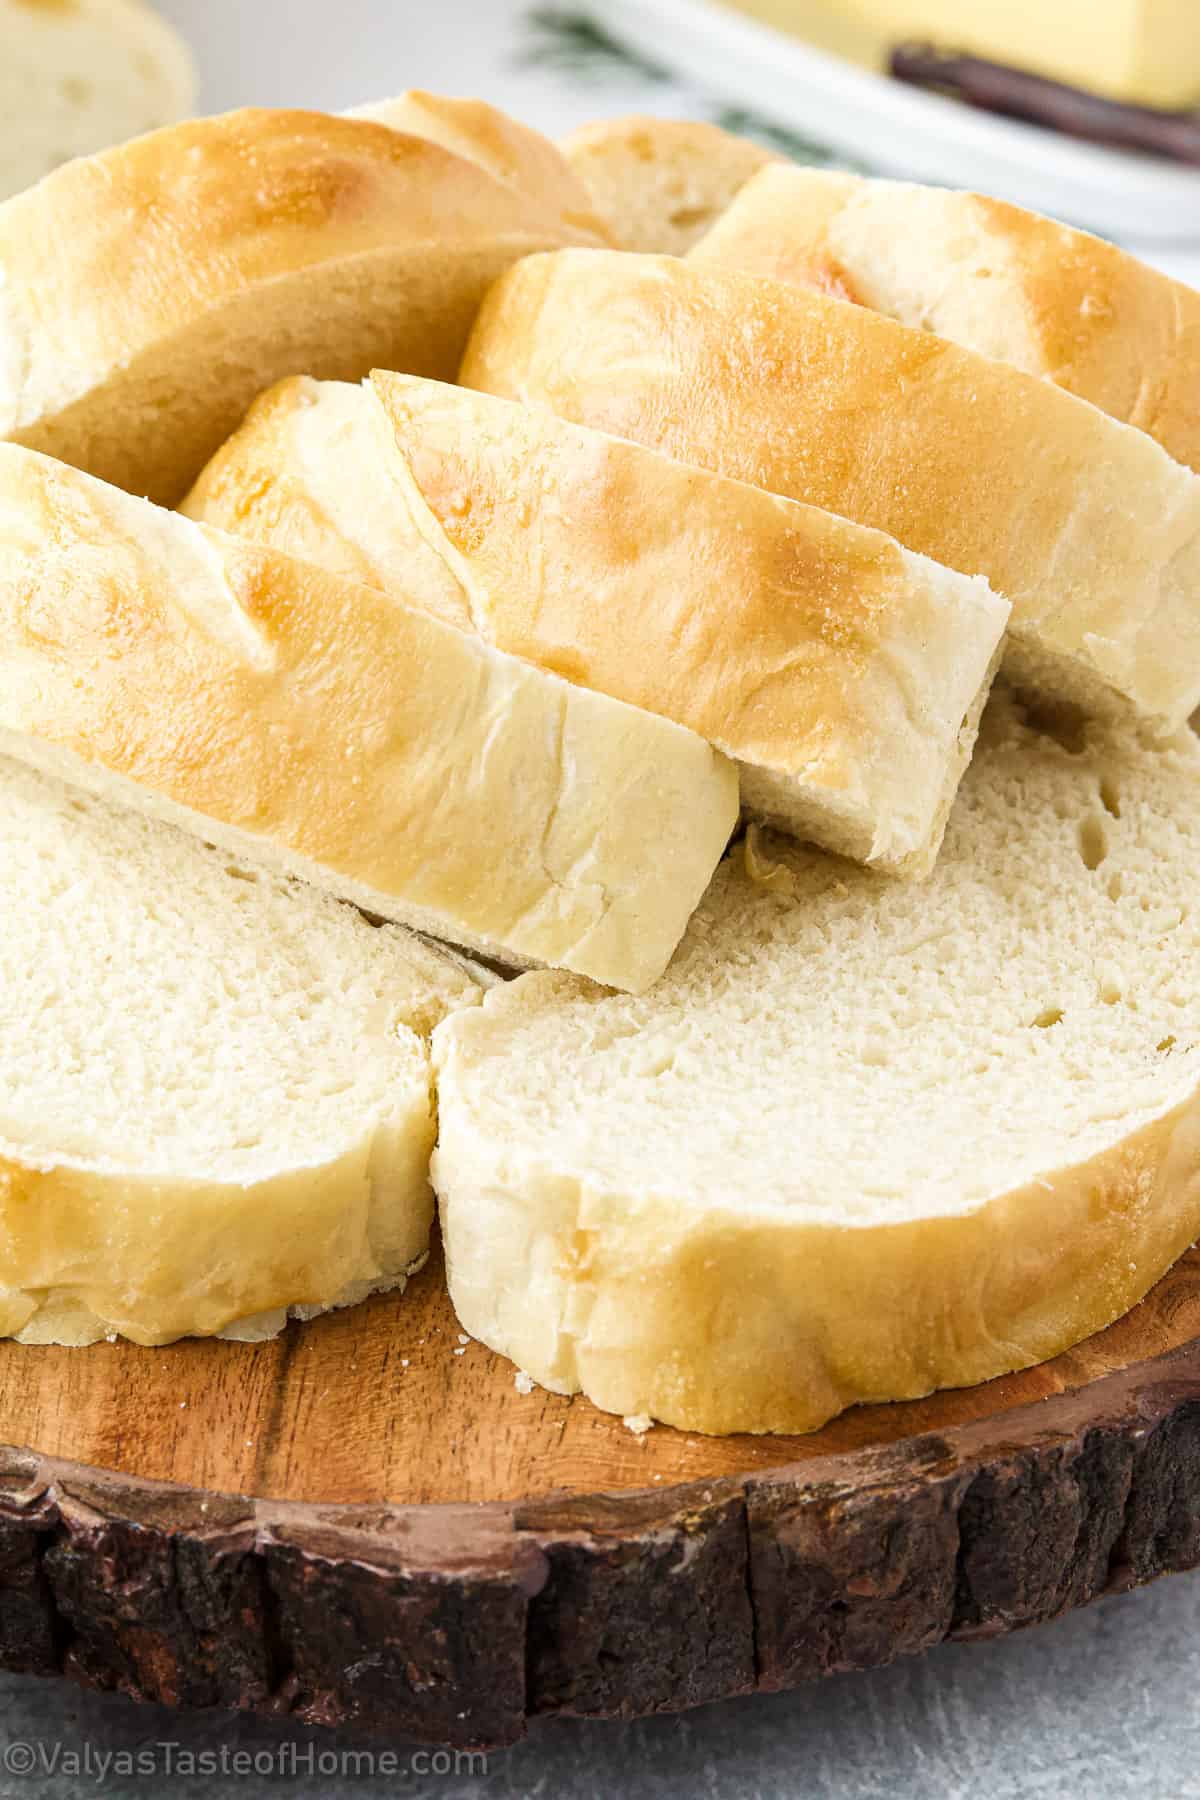
If you’ve been looking for the perfect French Bread Recipe, then this is the one for you! It’ll give you homemade French bread that’s perfectly golden and crispy on the outside, and soft and chewy on the inside.

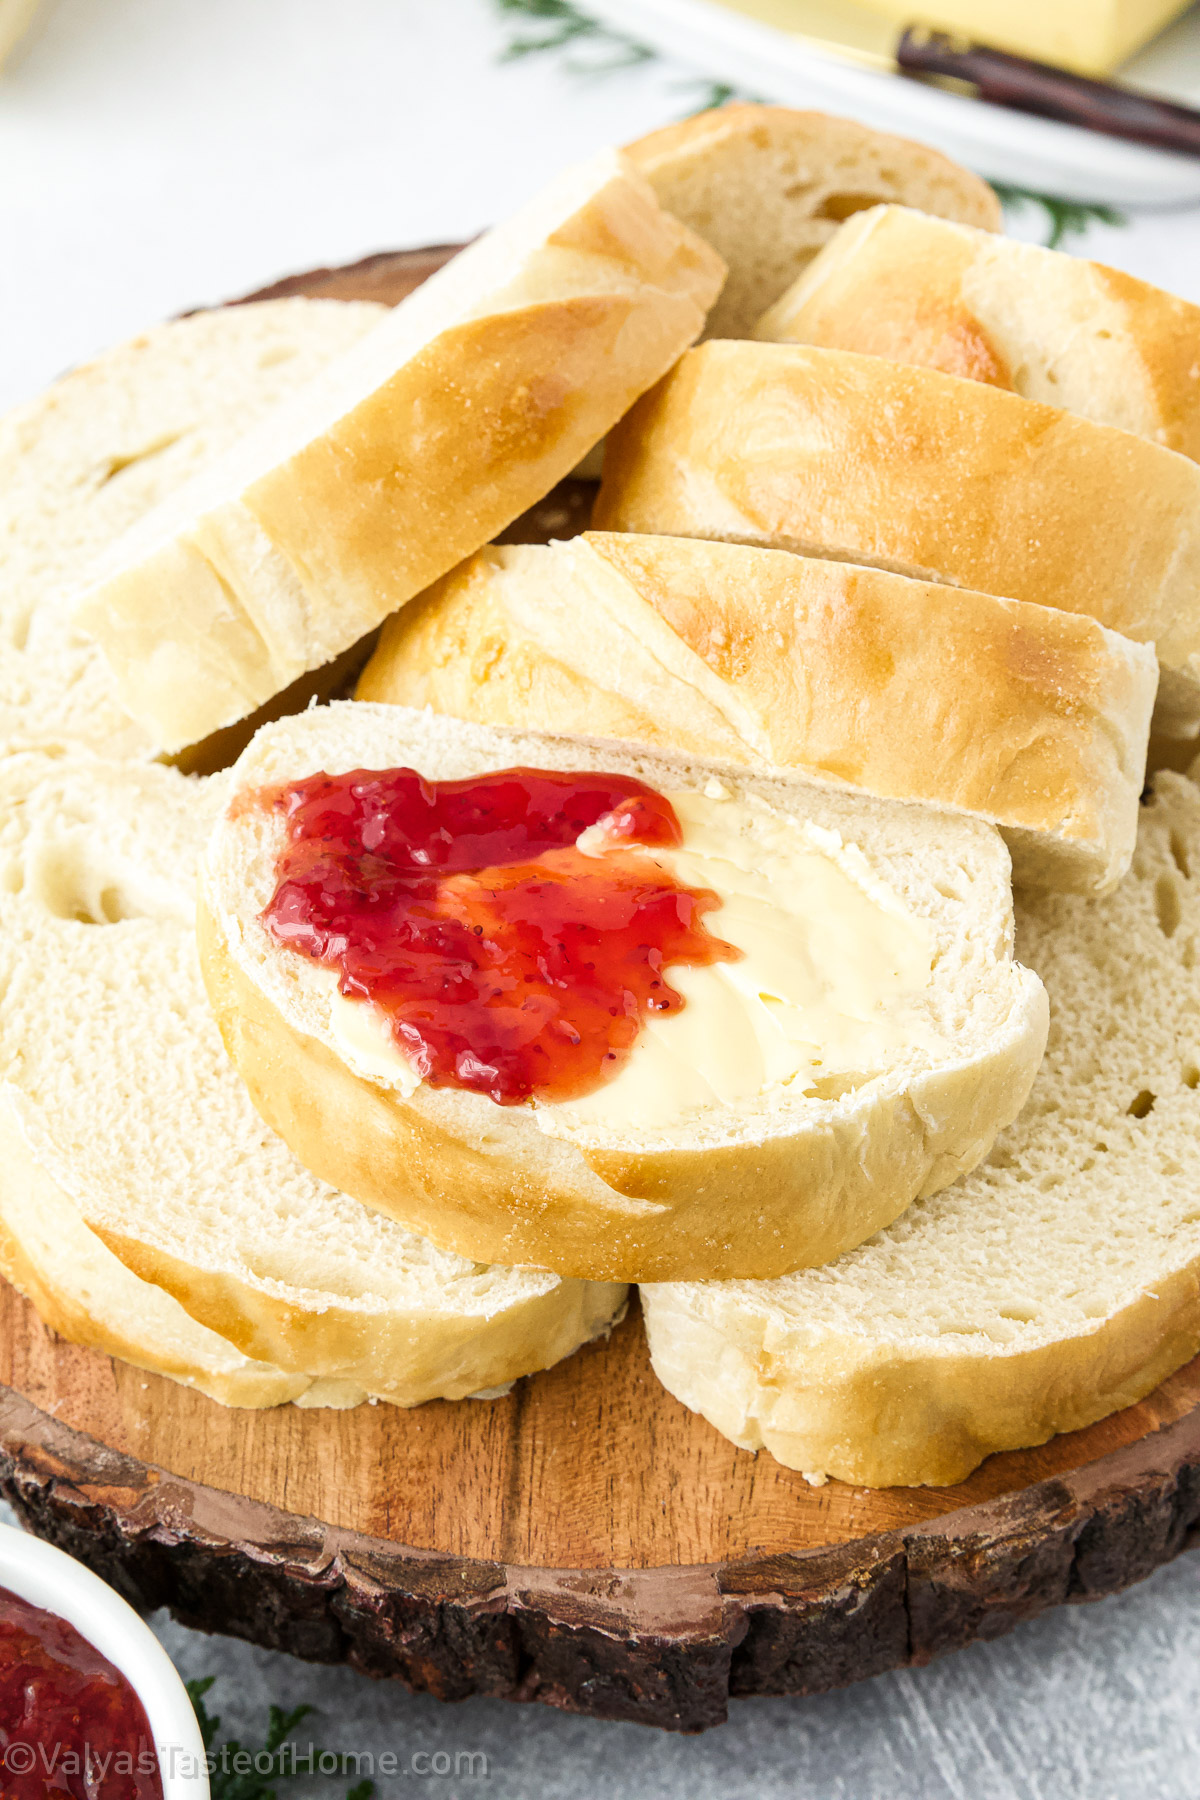
There’s nothing better than homemade bread, and this French bread recipe is the perfect one! It goes great with some homemade chicken noodle soup, or with some softened or melted butter and jam on top!
You can even use this bread to make some delicious French toast at home, bruschetta, or turn it into garlic bread! I also love making some canapes at home using this, like in my toasted cheesy garlic canapes.
Even if you’ve never made bread at home, this recipe is going to be perfect for you to try. It’s incredibly easy, and if you have a bread machine it’s absolutely effortless making this French Bread recipe.
It’s a recipe that I’ve been making for years now, and it’s proven to be one of the best ones I’ve ever tried. The bread tastes so good and fresh, and just flies out of the breadbasket at my house! This French bread recipe is a total winner for busy moms.
Want to learn how to make this delicious French Bread Recipe at home? Then keep on reading!
Table of Contents
- What is French Bread?
- What Makes This French Bread Recipe Special?
- What You Need to Make This French Bread Recipe at Home
- How to Make Homemade French Bread (Step-by-Step)
- Recipe Variation Ideas for French Bread
- How to Store Leftover French Bread
- More Bread Recipes You'll Love
- Recipe Card
- Easiest Homemade French Bread Recipe (Perfect Every Time)
- Comments
What is French Bread?
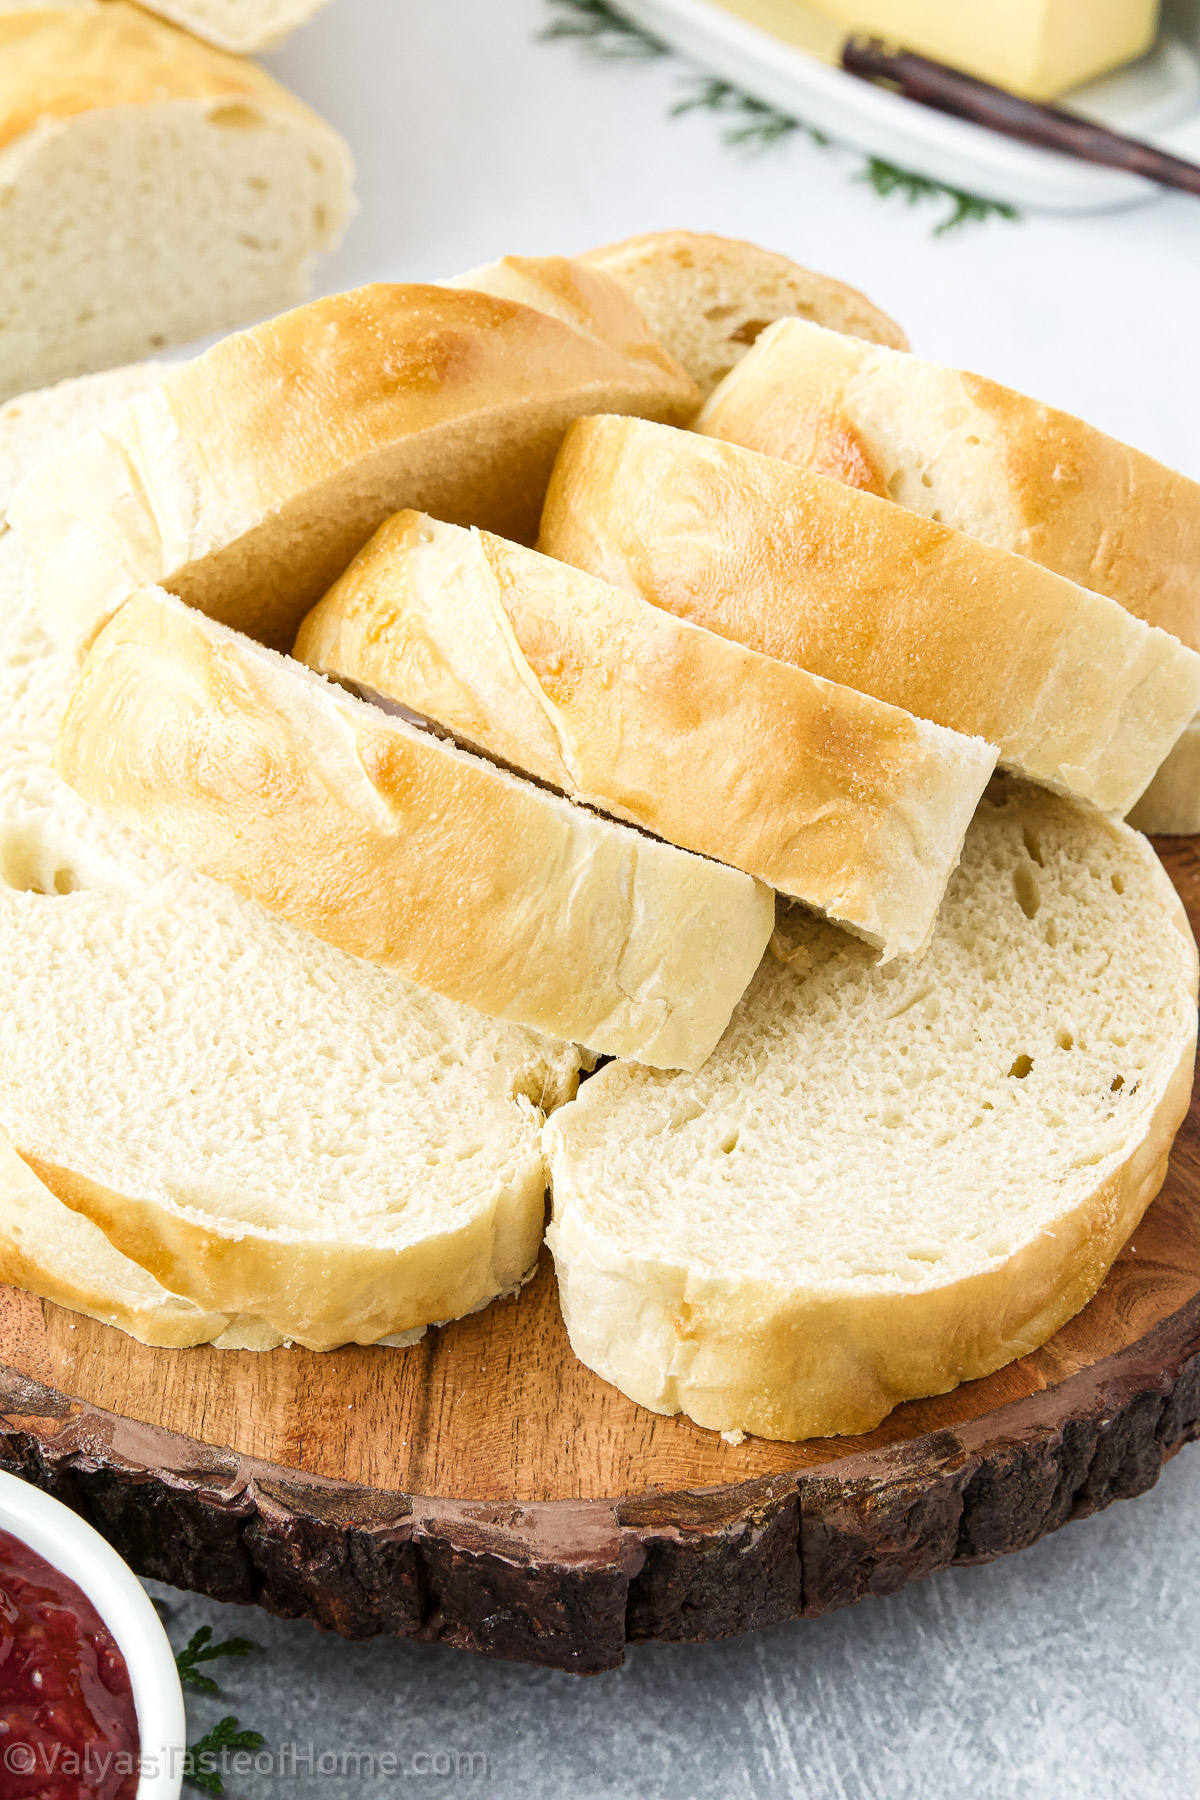
French bread is the delicious white loaf of crisp bread that we’ve all come to love. It’s, by far, one of the most versatile bread you can make and goes with just about everything!
It’s perfect with some homemade soup on the side! We particularly love it with some homemade Chicken Noodle Soup at my house, especially during the cooler months. You can also make some incredible canapes out of it, like my toasted cheesy garlic canapes recipe.
Regardless of how you choose to have your delicious French bread, it’s one of the tastiest bread out there and an incredibly versatile one to fit every occasion! My recipe is super easy, and you don’t even need a French bread pan for it! Read on to learn what else makes this recipe special.
What Makes This French Bread Recipe Special?
This Homemade French Bread is an all-time family favorite at my house, no matter how you slice it! And when things are either homemade or made with homegrown ingredients, it’s bound to be a winner.
I’ve been making this tasty bread for many years now and it’s proven to be one of the best. It's super simple, doesn’t take too long, and just flies out of the breadbasket! A total winner for busy moms, if you ask me!
It's easy to remember the yumminess of restaurant bread at some of our favorite places. But to have a truly top-notch experience of common food, you may want to try homemade. And that starts with a good bread recipe.
You might want to have a bread maker to assist you in some of the laborious tasks, such as kneading. If you don't already use one, I highly recommend owning this helpful little appliance.
This bread is very tasty and has very few ingredients, especially compared to the crazy, out-there ingredients in store-bought bread. Which is essentially a lump of chemicals with a small addition of flour. This bread is super delicious and fresh and stays tasty for days.
The crunchy crust and slightly chewy center make this bread irresistible, you must make yourself stop eating it. We almost never buy bread from the store since switching to homemade bread, which cannot compare in taste, freshness, and health-wise.
When I make this bread, I often find my kids with a chunk of bread in hand, just snacking away. They love this bread even plain and say that our mom makes the best bread ever. Now that you know my picky little eaters' opinion, try it out for yourself!
What You Need to Make This French Bread Recipe at Home
This French Bread recipe only calls for basic ingredients I’m sure you have in your pantry already. Let’s take a closer look at what these are:
- Flour: First of all, we need some flour. And don’t worry, you don’t need any fancy bread flour for this recipe. All you need is some simple and basic all-purpose flour to do the trick! We’ll need 4 cups of flour for this recipe.
- Yeast: You’ll also need some active dry yeast to allow the bread to rise quickly and leaven perfectly.
- Salt: To add the perfect flavor to the bread, we’ll also be using some sea salt or kosher salt.
- Butter: You’ll also need some softened unsalted butter to add richness to your bread, and it’ll also impart a beautiful flavor to it.
- Water: To get the right consistency of dough, and to activate the yeast in, you’ll need some warm water or room temperature water for this recipe.
- Milk: We’ll also be using some room temperature whole milk to get a rich yet light dough that tastes incredible.
- Sugar: To activate the yeast and give it something to feed, we’ll also need some white granulated sugar. This is optional though.
- Egg: We’ll also need one large egg at room temperature which we will use to make an egg wash for our delicious French bread.

How to Make Homemade French Bread (Step-by-Step)
Making this delicious easy Homemade French Bread Recipe at home is super easy and perfect for even beginners to try!
The following instructions are how to make it in a bread machine, but you can read the variation below to learn how to adapt it to hand kneading or a stand mixer.
So, let’s learn how to make this bread recipe step by step:
How to Make French Bread Dough
Into the bread maker pan add all the ingredients: flour, yeast, sea salt, softened butter, and room temperature water and milk.
Next, lock the pan in its bread maker and press the dough cycle for the dough to form. It usually takes 30 minutes of kneading and one hour of rising.
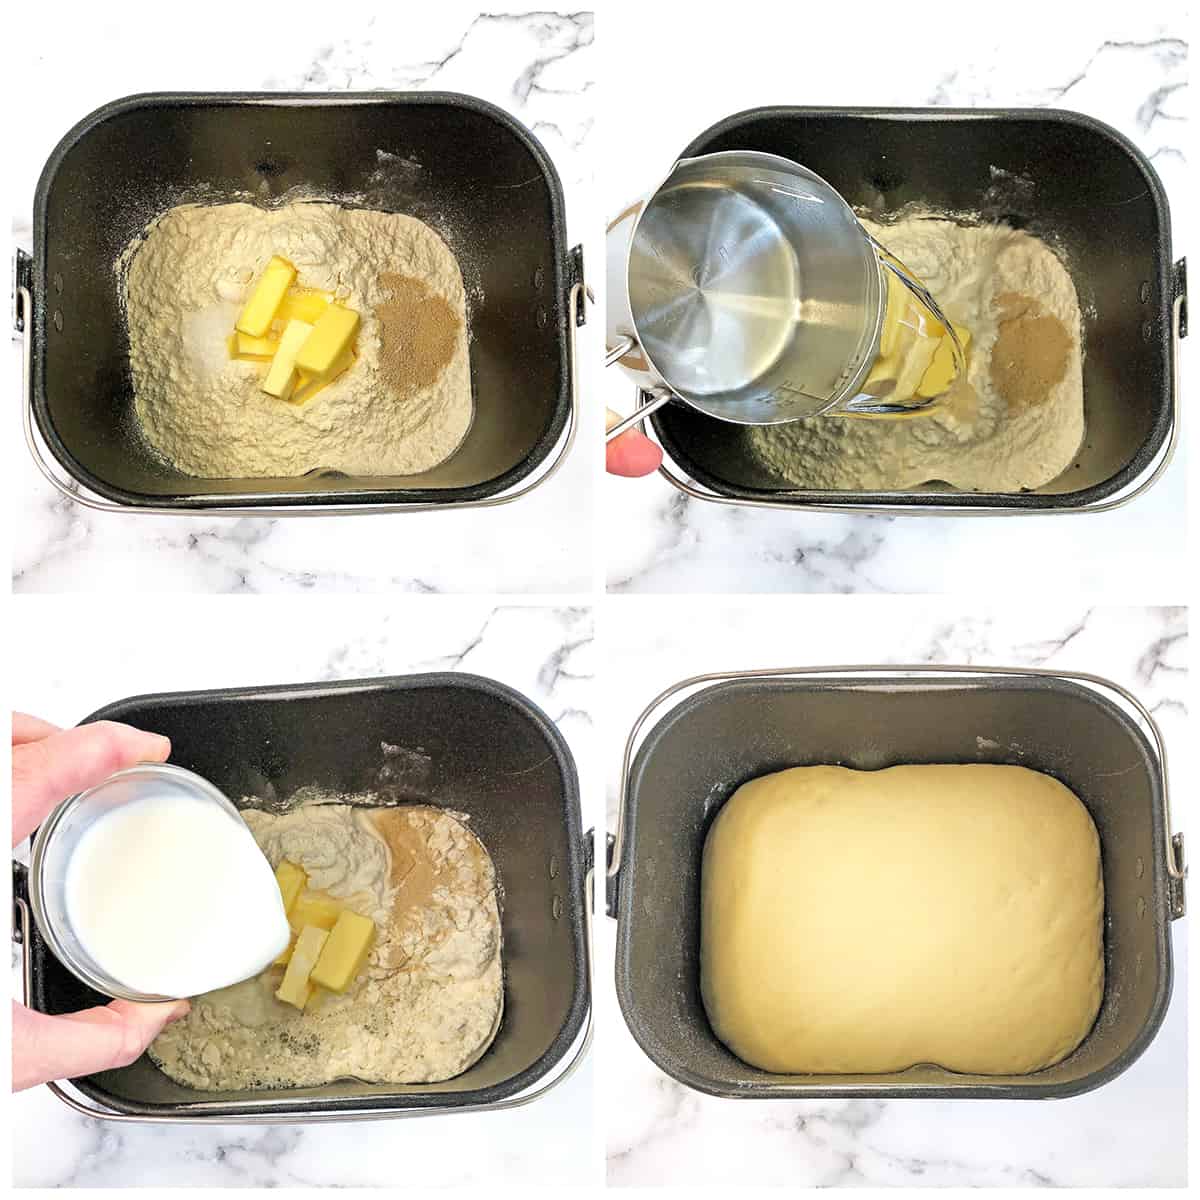
After the dough cycle is done, transfer the dough onto a lightly floured surface, I use a large cutting board here.
How to Shape French Bread
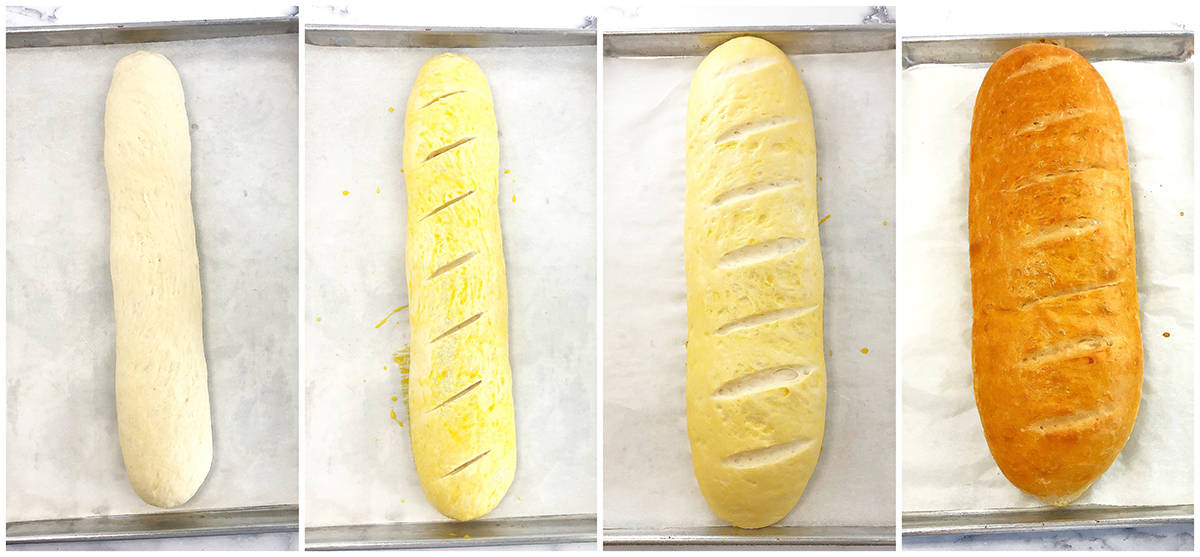
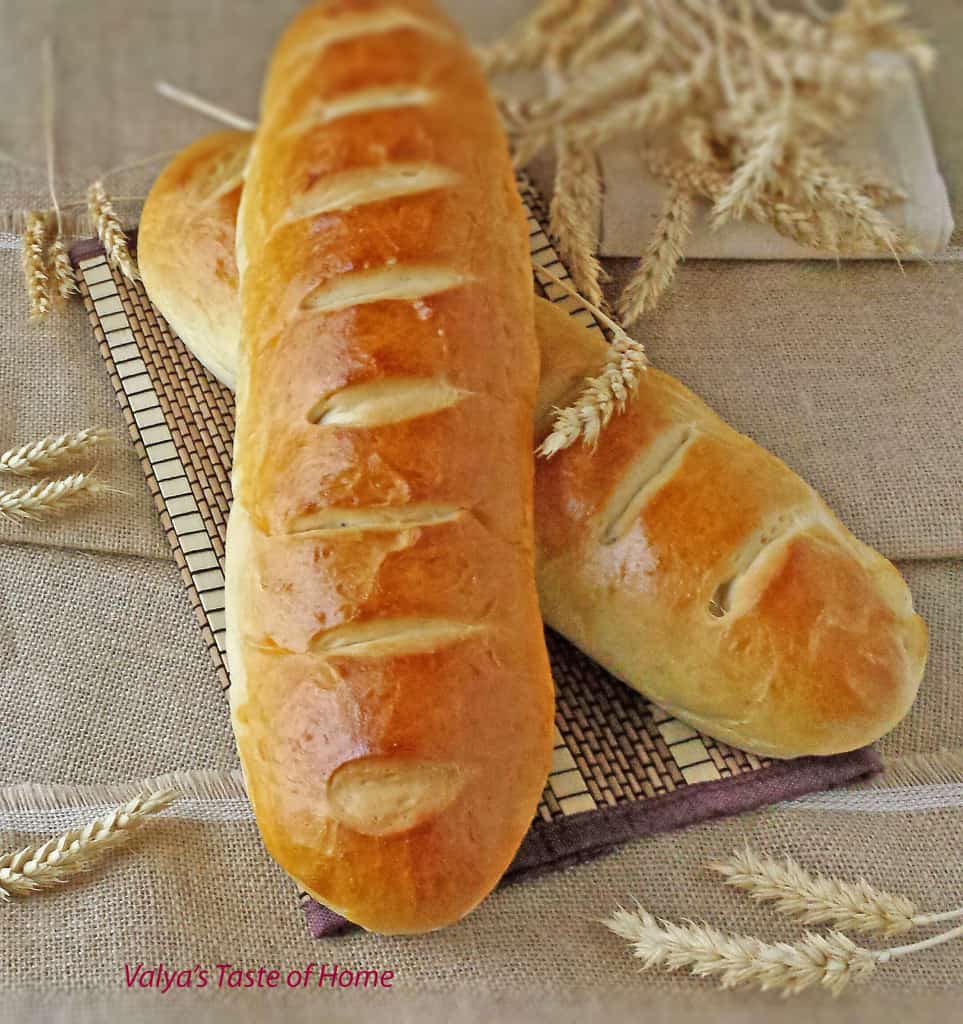
Split the dough into two pieces that’ll look like a rectangle each and then roll up both chunks into two spheres.
Shape them into long French bread loaves, while pressing out any air bubbles or seams with the heels of your hand. Pinch the edge to seal properly.
You can, alternatively, make one large French bread loaf (like shown in the picture below) out of it instead of two smaller ones. The baking and rising time will remain the same.
Place them on a baking sheet that’s greased or lined with parchment paper. Make sure to place it with the seam side down. Next, brush the loaves with an egg wash.
Use a sharp knife or razor blade to make diagonal slashes on it top of each loaf and then allow it to proof for 30 minutes,
How to Bake French bread
After about 15 minutes of proofing, preheat the oven to 350F (180 C). Then bake the loaves for 20 minutes or until golden brown.
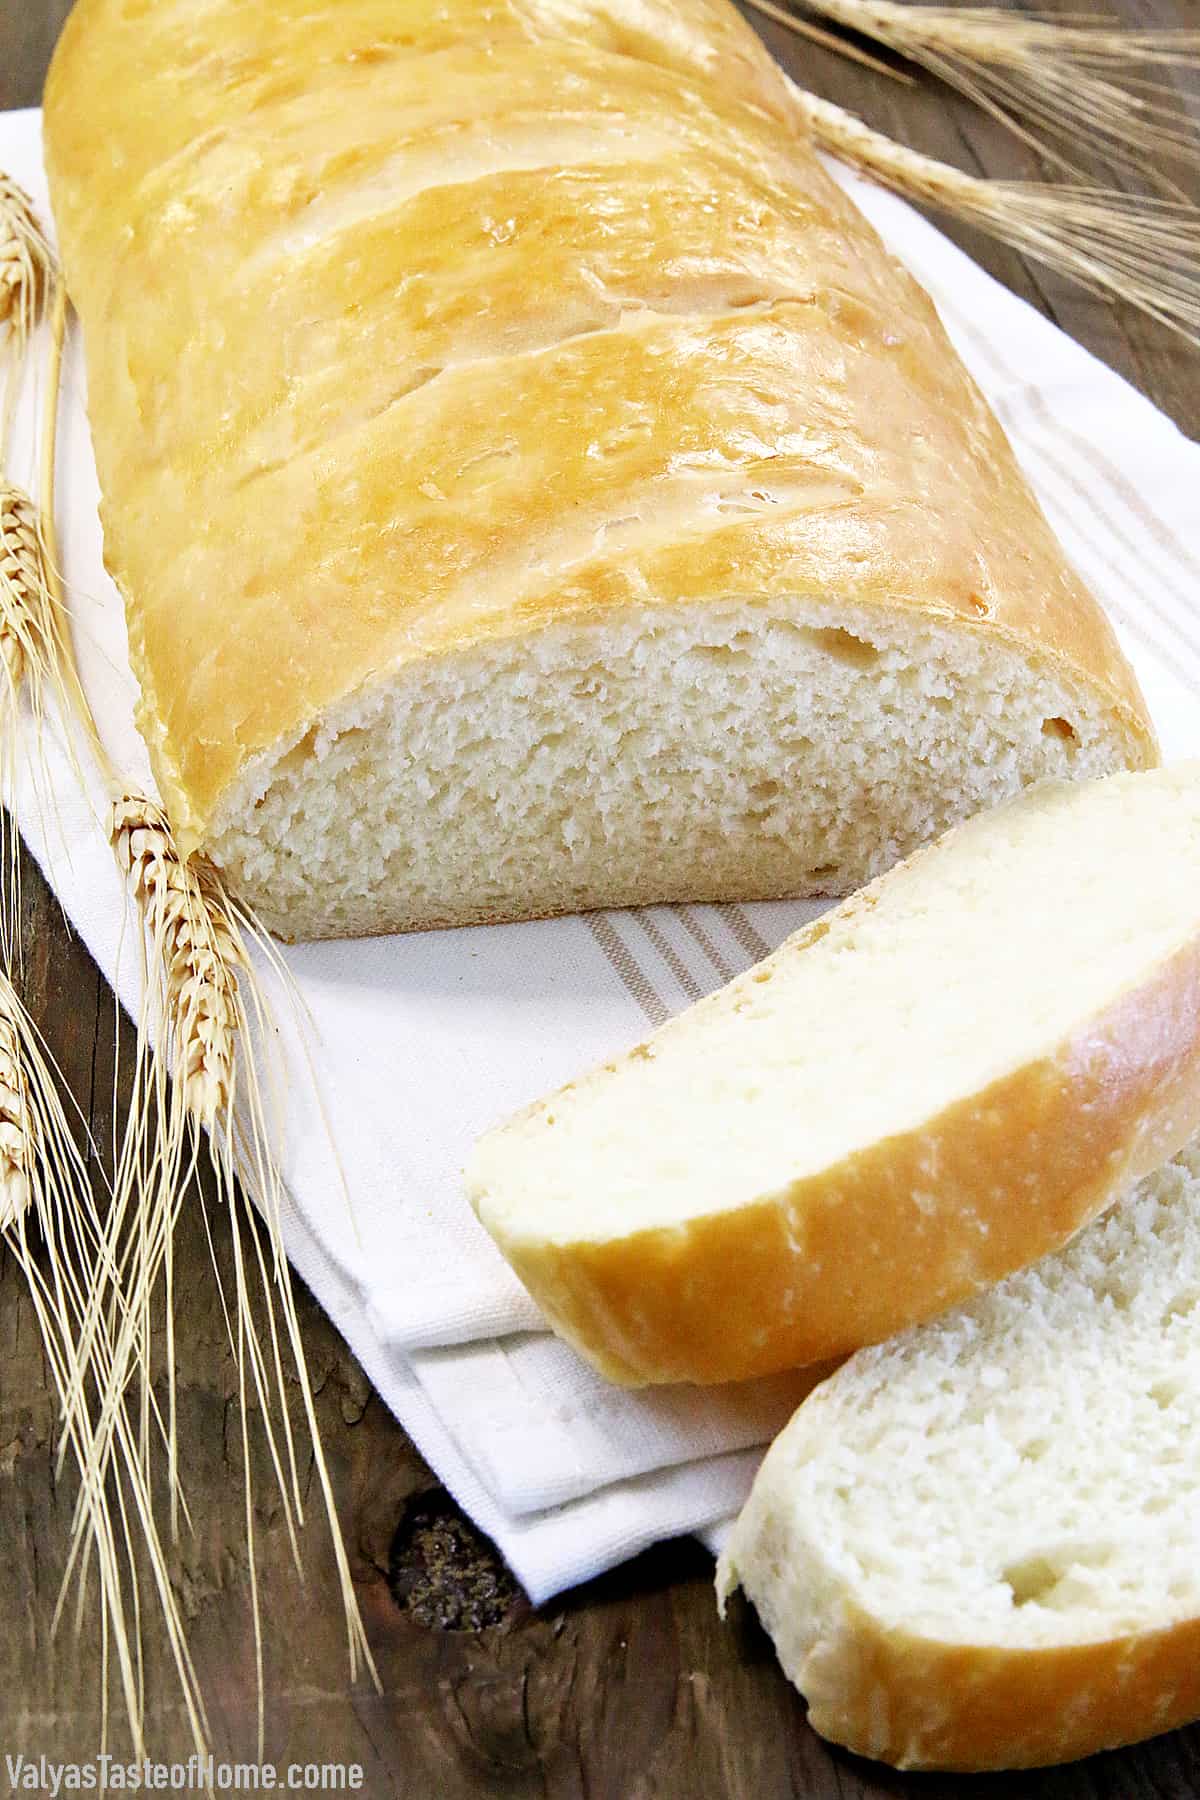
Once done, remove them from the oven and cool for 10 minutes before removing them from the baking sheet onto a wire rack. Let them cool completely before serving.
Your delicious French Bread is ready to be served!
Recipe Variation Ideas for French Bread
This recipe is absolutely perfect as it is and will give you the most delicious French bread you’ve ever had! But if you’re looking to customize it a bit, then check out these ideas:
Stand-mixer variation: You can also make this recipe in a stand mixer by letting yeast activate in warm water, milk, and sugar mixture. Then take this yeast mixture and add it to a stand mixer bowl with a dough hook attachment and add the rest of the ingredients to it (except the egg). Let it come together at medium speed, then cover the bowl with a towel and let it rise. Follow the rest of the recipe after this.
Kneading by-hand variation: You can also knead it by hand, by following the steps above to activate the yeast and then add the rest of the ingredients to the bowl and mix with a wooden spoon. Transfer it to a lightly floured surface and knead till you get a smooth ball. Place it in a greased bowl, cover it with a kitchen towel, and let it proof. Follow the rest of the recipe after this.
Garlic bread variation: If you love garlic bread, you can turn this French bread into that! Make some homemade garlic butter, slice the bread, and spread the garlic butter on it. Sprinkle some chopped fresh parsley and cheese if you like, and let it toast in the oven. Enjoy your garlic bread!
How to Store Leftover French Bread
This bread is best had when it’s fresh, but you can also store it on your kitchen counter for 2 to 3 days by covering it with plastic wrap. Alternatively, you can store it in the fridge for up to 1 week.
If you want to freeze some French bread loaves, you can do that too! Wrap it tightly with some plastic wrap and then some aluminum foil, then freeze for up to 3 months. Let it thaw at room temperature before slicing and having it.
More Bread Recipes You'll Love
- Mashed Potatoes Dinner Rolls
- Multi-Grain Honey Whole Wheat Bread
- Dutch Oven White Crusty Bread
- Amazing Breadsticks Recipe
- Homemade Rye Bread
- Garlic Dinner Rolls
Check all the bread recipes HERE.
Recipe Card
Easiest Homemade French Bread Recipe (Perfect Every Time)
Ingredients
Homemade French Bread Ingredie
- 6 cups – organic all-purpose flour
- 1 tbsp. - dry active yeast
- ¾ tbsp. – sea salt (or to taste)
- 2¼ cup – water (room temperature)
- 4 tbsp. – unsalted butter
- ⅓ cup – organic whole milk
- 1½ tsp. – organic sugar
- 1 Egg to brush the loaves (optional)
Instructions
How to Make French Bread Dough
- Into the bread maker pan add all the ingredients: flour, yeast, sea salt, softened butter, and room temperature water and milk.
- Next, lock the pan in its bread maker and press the dough cycle for the dough to form. It usually takes 30 minutes of kneading and one hour of rising.
- After the dough cycle is done, transfer the dough onto a lightly floured surface, I use a large cutting board here.
How to Shape French Bread
- Split the dough into two pieces that’ll look like a rectangle each and then roll up both chunks into two spheres.
- Shape them into long French bread loaves, while pressing out any air bubbles or seams with the heels of your hand. Pinch the edge to seal properly.
- You can, alternatively, make one large French bread loaf (like shown in the picture below) out of it instead of two smaller ones. The baking and rising time will remain the same.
- Place them on a baking sheet that’s greased or lined with parchment paper. Make sure to place it with the seam side down. Next, brush the loaves with an egg wash.
- Use a sharp knife or razor blade to make diagonal slashes on it top of each loaf and then allow it to proof for 30 minutes,
How to Bake French bread
- After about 15 minutes of proofing, preheat the oven to 350F (180 C). Then bake the loaves for 20 minutes or until golden brown.
- Once done, remove them from the oven and cool for 10 minutes before removing them from the baking sheet onto a wire rack. Let them cool completely before serving.
Notes
Thank you for following me on Instagram, Facebook, and Pinterest!
This recipe was originally posted on October 27, 2014 (original picture below), and updated for a better user experience. The post may contain affiliate links. Read my disclosure.


Nora says
How many breadsticks does this bread recipe make? Also, is the cooking method(time and temp) the same?
Thanks!
Valya of Valya's Taste of Home says
It makes 2 loaves of bread. For breadsticks, it all depends on how big or small you want them to be.
Nadia says
Hi can I replace with regular milk instead of dry ?
Valya of Valya's Taste of Home says
Yes, you sure can. I have been using 1/3 cup milk and 1 cup water proportion for a while. Thanks for asking, that's a great question.
Inna says
This bread was amazing!!
I was wondering if I use this recipe but make buns instead would I still bake it for 20 min or less?
Valya of Valya's Taste of Home says
Yes, about the same time. Bake until golden brown in color which should take about the same baking time. I hope this helps.
Inna says
I doubled the recipe and got a total of 16 buns about 6" in diameter. Baked at 18 minutes.. they were perfect! Kids enjoyed them with raspberry jam and a glass of milk ????
Valya of Valya's Taste of Home says
I’m so happy to hear that! My kids make this bread all the time. We use this recipe for pizza as well, and it’s the best! Thank you for your amazing review! 🙂
Roxanne says
I have now been making this bread a few times per week for a couple months; figured ill add my input on the "crisp crust" question someone asked earlier. On 2 separate occasions I put the bread in the oven to bake and totally forgot about it. One time it baked over 1 hour, the other time over 3 hours (whoops!) Interestingly enough, it doesnt burn! I discovered that the longer you bake, the thicker/crispier crust you end up with. The time it baked for over 3 hours it came out of the oven golden (not burnt) and when i cut it the crust was super super crispy, but the middle was still fairly soft.
So for those looking for a crispier crist, mess around with the baking time.
www.valyastasteofhome.com says
Wow ?, I have to experiment baking for 1 hour. Thanks for the tip. 🙂
Roxanne says
I have made this bread 5 times in the last 2 weeks, we LOVE it! We eat it as sandwiches, with dinner or just plain with a pat of butter. I use unsalted butter in the dough so I add an extra tsp of salt, tastes perfect for our family. Also, when baking, I form it into 3 smaller loaves. Its a little easier to store them when theyre shorter.
www.valyastasteofhome.com says
That awesome! We make this bread pretty often. I like to make Italian or plain bread crumbs out of this bread as well. Thank you for amazing five-star review! 🙂
Olya says
Do you use regular all purpose flour or Canadian all purpose flour? Thanks!
www.valyastasteofhome.com says
This is such an easy recipe, that any kind of flour works well.
Lana Mayevsky says
Today I made this bread first time and it was delicious! Keeping the recipe??. Thanks again for the best recipes!!
www.valyastasteofhome.com says
That is so sweet of you ? I'm glad you like my recipes. I use this bread dough recipe for a homemade pizzas too. Give it a try. Thank you kindly for such an amazing review!
Nat says
Five stars bread
www.valyastasteofhome.com says
Thank you! Homemade taste BEST 😉
jessica says
Valya do you know how to make bagels? Thanks
www.valyastasteofhome.com says
Yes. The recipe is very similar to the sweet bread. I will post it sometime.
A.S says
Hi Valya, Does the bread suppose to have a crisp korochka? I made it today and it tastes delicious, but usually store bought have a very crisp korochka, so I was wondering if maybe I did something wrong that it very fluffy and soft.
valya'stasteofhome.com says
Hi Dear. If you are comparing to a store bough french bread that in not that crisp. But it still turns out really pretty crispy. You need to let it cool on a wire rack so the bottom of the bread doesn't get wet. I hope that helps. 🙂
Kristina says
Do u have to use the bread maker or u can do the dough by hand ?
valya'stasteofhome.com says
I've made this bread in the kitchen aid mixer, but never done it by hand. I think if you can kneed it well, it should be fine. Let me know how it turns out for you, if you ever make it by hand. Thanks for your question.
Kristina says
Does it turn out find if I do it in the kitchen aid mixer ?? And if I do, do it in kitchen aid maker how long do I let the dough sit to rise ?;)
valya'stasteofhome.com says
Let the dough rise for at least one hour to hour and half. The bread tunes out almost the same. The only difference is the bread machine kneads the dough longer with kneading intervals while rising and the bread turns out just a little fluffier. My bread machine broke after 10 years of constant use, and I used my mixer last week to make bread, until my new bread machine arived late last week. I'm glad I got to experiment different ways of make this bread. So, yeah..., perfect timing. 🙂
plasterers bristol says
Yummy, what a great recipe. been looking for decent bread making recipe. Thanks for sharing.
Simon
valya'stasteofhome.com says
I'm glad you found a great bread recipe. We've been making this bread for over 15 years and it never gets old. Enjoy!
Tanya says
Yammm... I don't have dry milk . Is that ok if I skip that ?
valya'stasteofhome.com says
Yes. I've done it without it in the past. Bread still works out, but taste better with dry milk in it.
angel says
this looks very nice.
valya'stasteofhome.com says
Thank you!
jessica says
Valya, do you have a good recipe for a whole wheat bread? Thank you!
valya'stasteofhome.com says
I do make dark bread. And it's on my to post list. Thanks Jessica
Tatyana says
Valya, I just made this bread , bread tasted very good but unfortunately my bread came out kind of flat and I had to pull the dough out of the bread machine 15 minutes because the dough was running out of the machine .... What did I do wrong? Did something like this happened to anyone else? Thanks
valya'stasteofhome.com says
Hi Tatyana! What is the capacity of your bread maker? This is 2 lbs bread dough, so you need 2 lbs bread machine capacity. What do you mean 15 minutes? You mean before the end of the cycle? That tells me that your bread machine is not 2 lbs capacity. Its normal for the dough to rise all the way to the top of the cap. Turned out flat? That tells me that you added more water or not enough flour than recipe says, or you let it rise to long in the warm place and it lost its shape. The dough should be a little more firm that the dough for "пирожки", and should easily roll into nice rolls. No one told me of that problem and it never happened to me and I make this bread at least 3 times a week. Try it again and see how it will turn out. Let me know if you have more questions. Thank you so much for making my recipes. 🙂
Tatyana says
Valya, I have Sanyo brand machine. It said the maximum for the Dough setting is 41/2 cups of flour. I felt that my dough was too runny not spongy so maybe I will try more flour next time. Also, I have used instant dry yeast, do you think it maybe a problem? Thank you!
valya'stasteofhome.com says
Hm...sounds like you have right size. 4 cups of flour = to 2 lbs of dough. Give it another try, make sure you follow step by step recipe instructions. Practice makes it perfect. Thanks Tatyana 🙂
jessica says
When the bread machine is done with the mixing, does the dough need to be soft or kind of thickish?
valya'stasteofhome.com says
It's on the thicker side. The dough will be much softer after rising.
jessica says
Do you add 4 cups of flour at once or 3 and a half cups in the beginning and half a cup close to the end of the mixing process?
valya'stasteofhome.com says
You add all 4 cups at ones.
Vita says
Can I use butter instead of margarine?
valya'stasteofhome.com says
Hi Vita! Thanks for stopping by! I been asked that question multiple times. I'm so used to the original recipe that I didn't try changing ingredients. In fact, someone mentioned in the comments that the bread turned out to salty for them. So I made it again and I will agree it was a little to salty. I decided to try it with butter instead of margarine and reducing the salt. Today, I made this bread again and used 1 tsp. of salt and softened butter and it was great. I think it was even better than original recipe. So, I went ahead and reduced the salt amount and added softened butter in the post. Thanks so much! 🙂
Vita says
Thank you for that info! I plan on going grocery shopping tomorrow and specifically to get everything I need to make this bread! 😉 I will be trying it out with the butter and I'll let you know how it goes once I get to making it.
valya'stasteofhome.com says
You are welcome Vita! Please do let me know how it turns out and how you like it. 🙂
Vita says
Hi Valya! I made this bread yesterday using the butter instead of margarine and it turned out great! My kids kept asking for more! 😉 Thank you for sharing your recipes!
valya'stasteofhome.com says
Thank you Vita! I so glad to heat that. Now you wont have to purchase french bread. You can make your own, and feed the kids with fresh and warm right from the oven! 🙂
Natasha says
Hi Valya, I've discovered your blog through Natasha's kitchen, and I'm happy/ you have so many great recipes!!!
I've used already some of them and a lot are on my bucket list!
I want to start baking bread at home, it's intimidating a little bit for me, I didn't even have a bread machine, but a hope to get one on Black Friday;). Are you satisfied with yours? Would you recommend to buy it? If yes, please, share the brand name.
Thank you very much,
Blessings, Natasha
valya'stasteofhome.com says
I'm glad you found my blog. I hear that a lot from readers that they like my blog. I really appreciate that! Thank you so much!
I have my bread maker for a long time, about 8 years now. The brand is "Sunbeam". It's on the less expensive brands, but still works great. I don't believe in black Friday shopping sales. Most of the time I get things on good sale for less than on black Friday. But that's me. If you go into "Shop" category I have the bread maker for those who wants to purchase things I have and trust. Let me know if you have any other question. Thanks Natasha! 🙂
Mom's Dish says
This bread looks amazing. Looks a lot like the one we had in Europe.
valya'stasteofhome.com says
It sure tastes like it too! Thanks Natalya!:)
alena says
Hi Valya. Made mine yesterday tasted really salty. Maybe it's 1 tsp instead 1 tbsp? Or its the margarine I used?
valya'stasteofhome.com says
Could be. It's normal for us. I don't even taste salt. We are all different too. Maybe you need less salt. Try putting 3/4 of a tbsp. Thanks Alena 😉
GiGi Eats Celebrities says
Ugh, reminds me of my delicious childhood. I miss the days of wolfing down baugettes!
valya'stasteofhome.com says
It sure does! Thanks GiGi!
Gayle @ Pumpkin 'N Spice says
This french bread looks amazing! Definitely has the looks of bakery bread. What a fantastic idea to make a home-made version!
valya'stasteofhome.com says
It is Gayle! So much less ingredients in home made bread, compare what they put into the bread at the bakery. Thanks for your comment! 🙂
alena says
Can I use Bonnet blue margarine?
valya'stasteofhome.com says
I never used that brand of margarine(I think that all margarine brands have the same ingredients). Let me know how it turns out for you.
mira says
This bread looks great Valya! It's been a while since I've made bread at home, will try your recipe!
valya'stasteofhome.com says
Thanks Mira! Nothing beats home made bread! 🙂
tworaspberries says
yummm, this looks really great! I love homemade bread 😉
valya'stasteofhome.com says
Me too. Thanks Michele! 😉
Dannii @ Hungry Healthy Happy says
I can almost smell this through the screen. You can't beat homemade bread.
valya'stasteofhome.com says
I know! Right...? Homemade is the best!!! 🙂
Natasha says
My mouth just watered!! Yummy!! Love this bread recipe! Thanks for posting.
valya'stasteofhome.com says
This is a good stuff! Thanks Natasha! 😉