Mushroom Cookies Recipe (Cute & Realistic Design)
Mushroom cookies are a fun and creative dessert that look just like wild forest mushrooms but are actually soft, sweet, and delicious. A favorite in many traditional Eastern European kitchens, mushroom cookies are perfect for holiday baking, special occasions, or as a unique treat to impress family and friends.
Since they are very time-consuming to make, I (like most people) typically make them for major and festive occasions such as weddings or big holidays. But let me assure you, it’s truly safe to say that they are worth every minute spent making them.
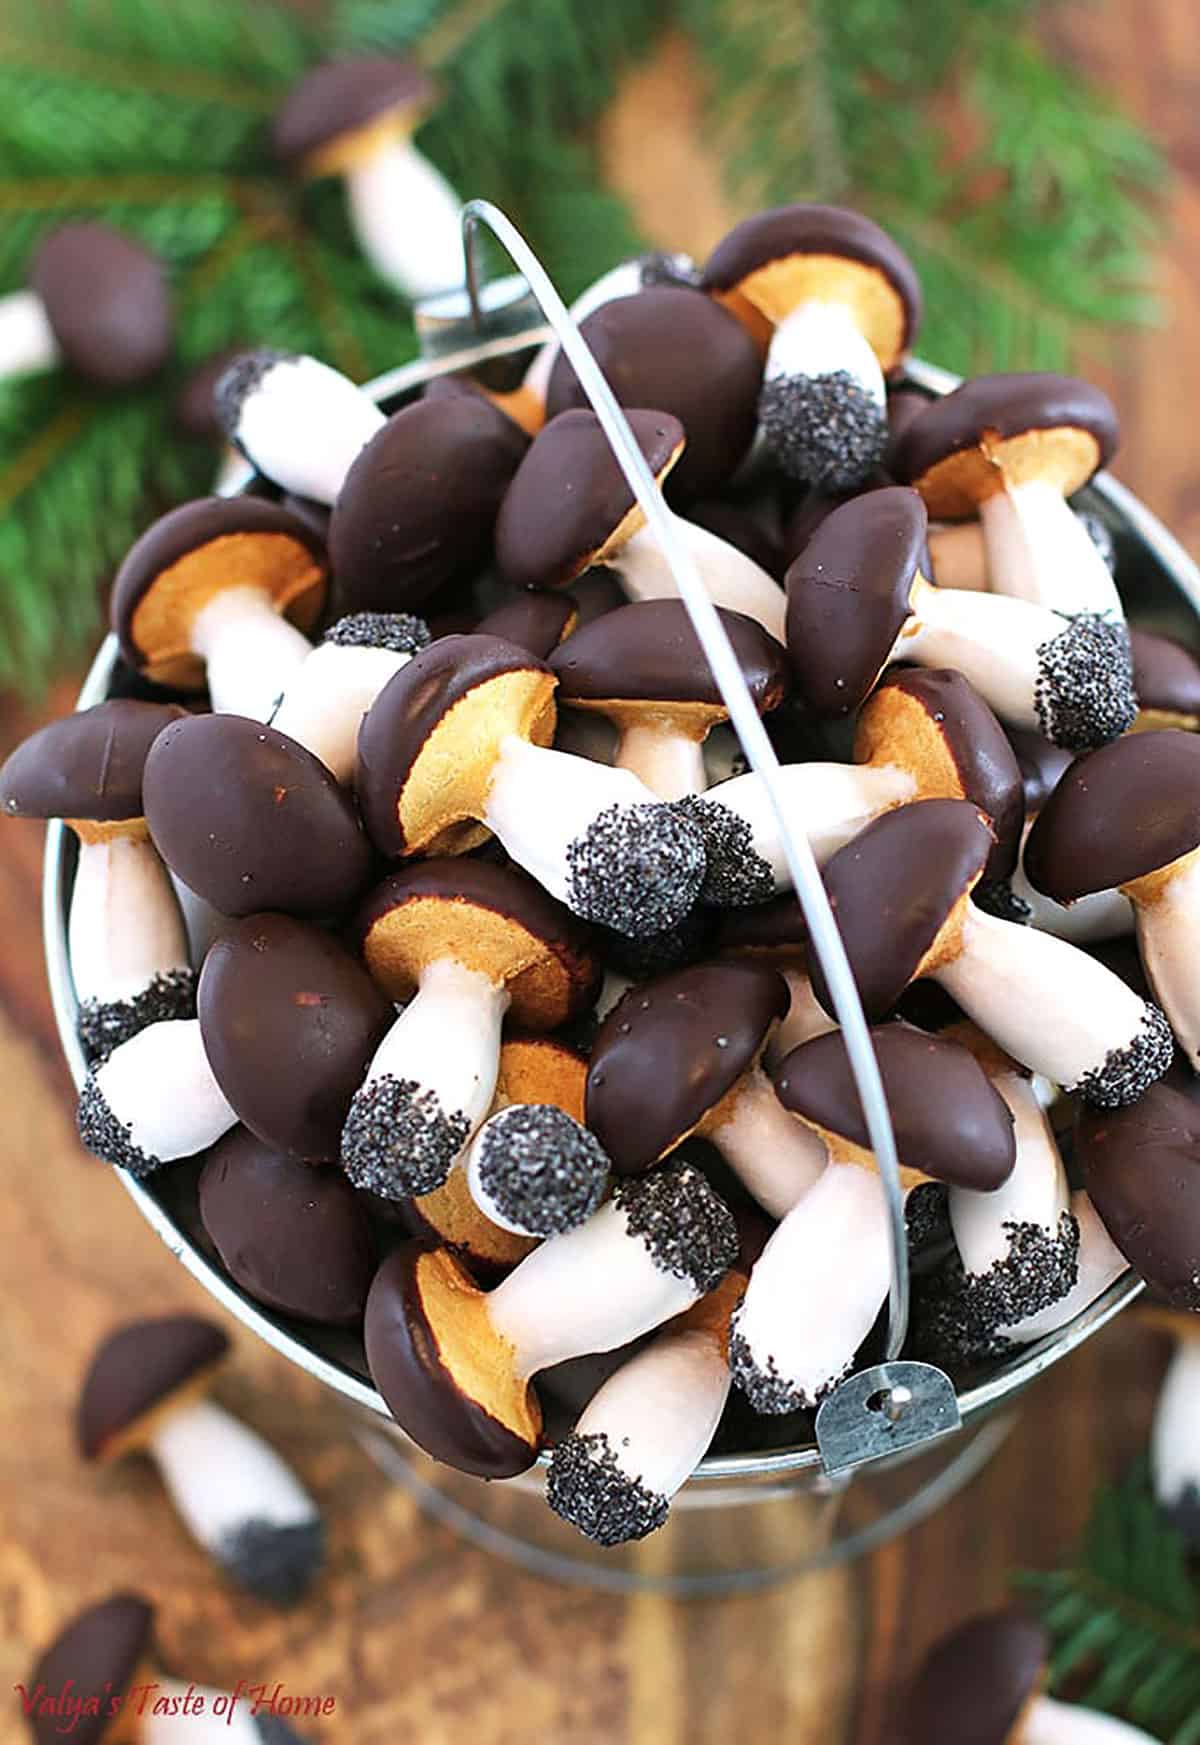
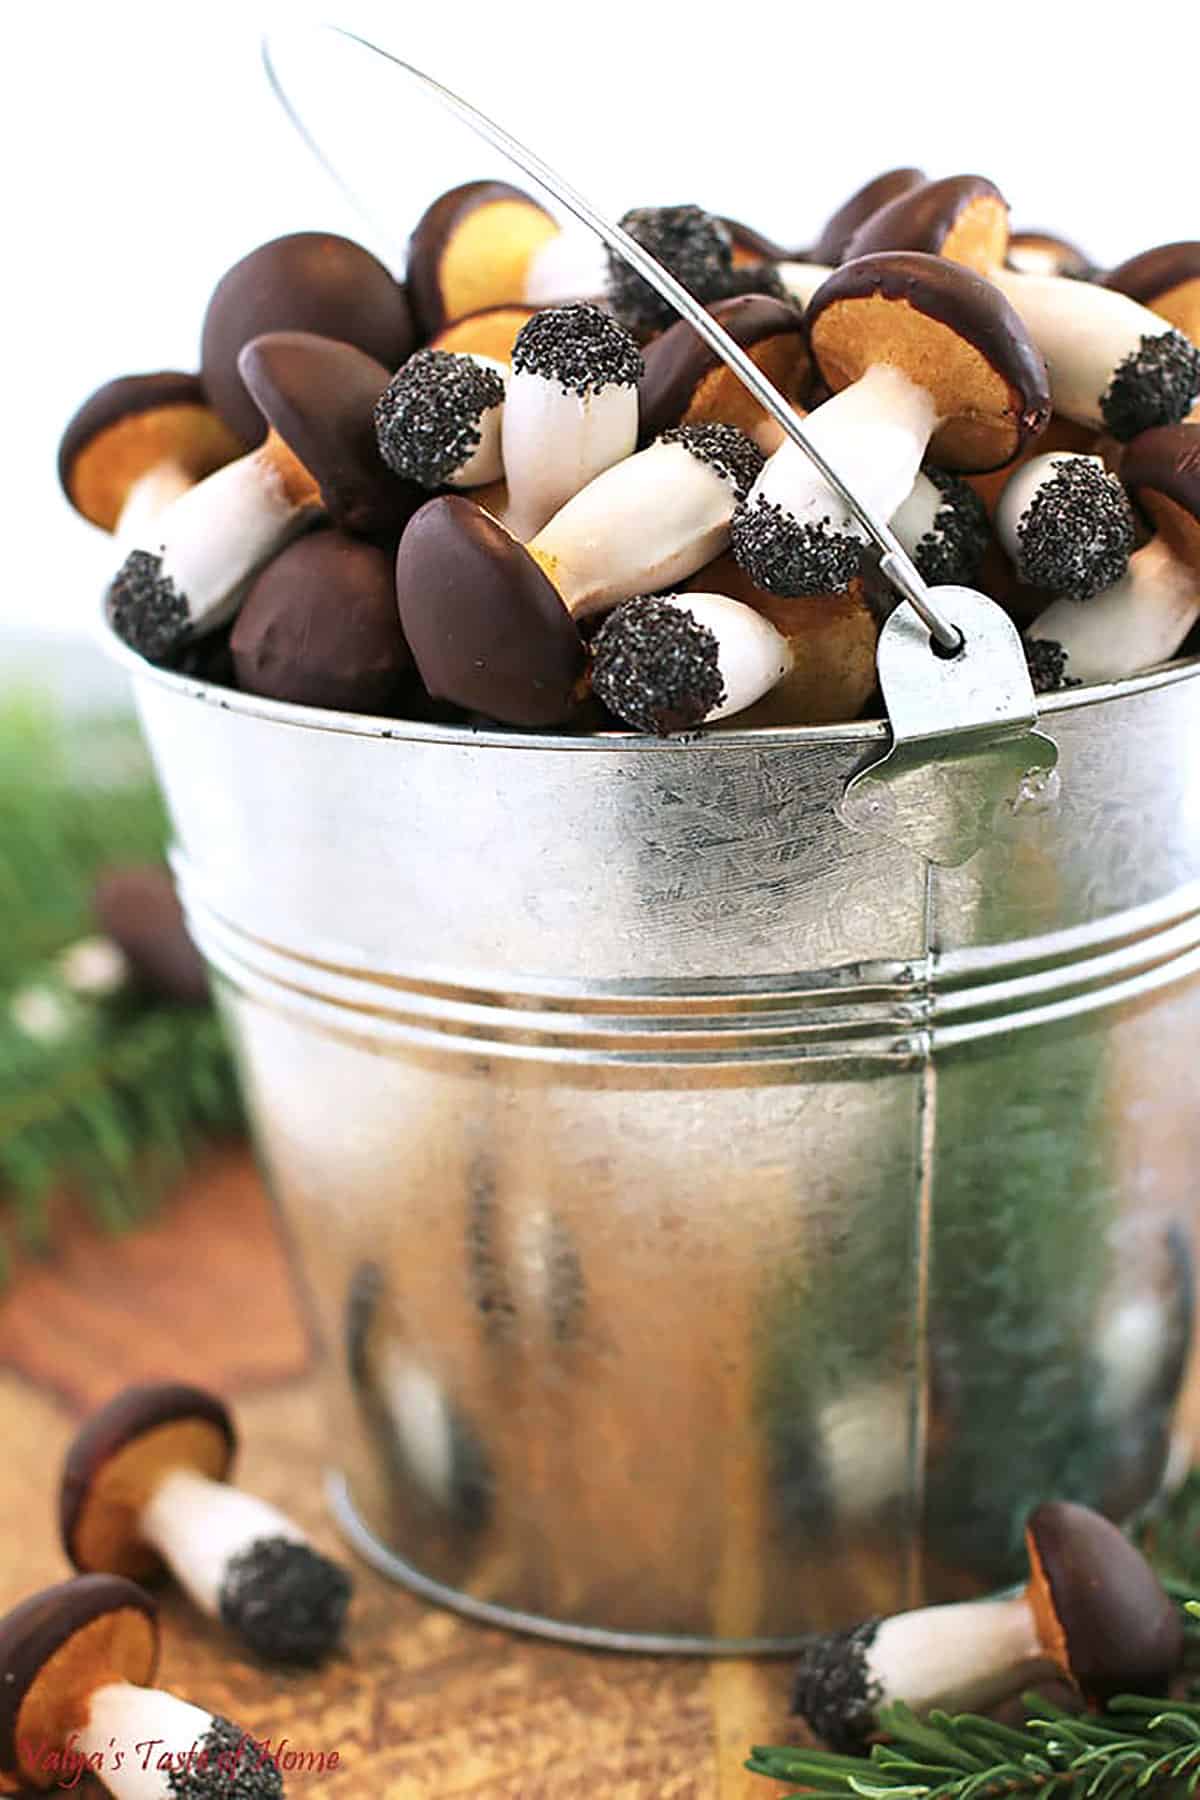
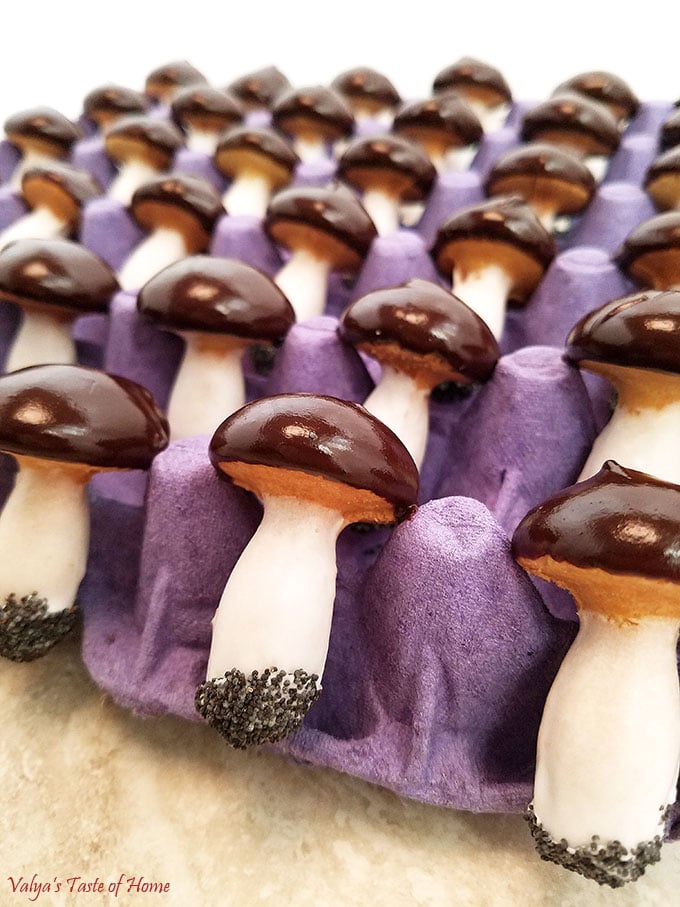
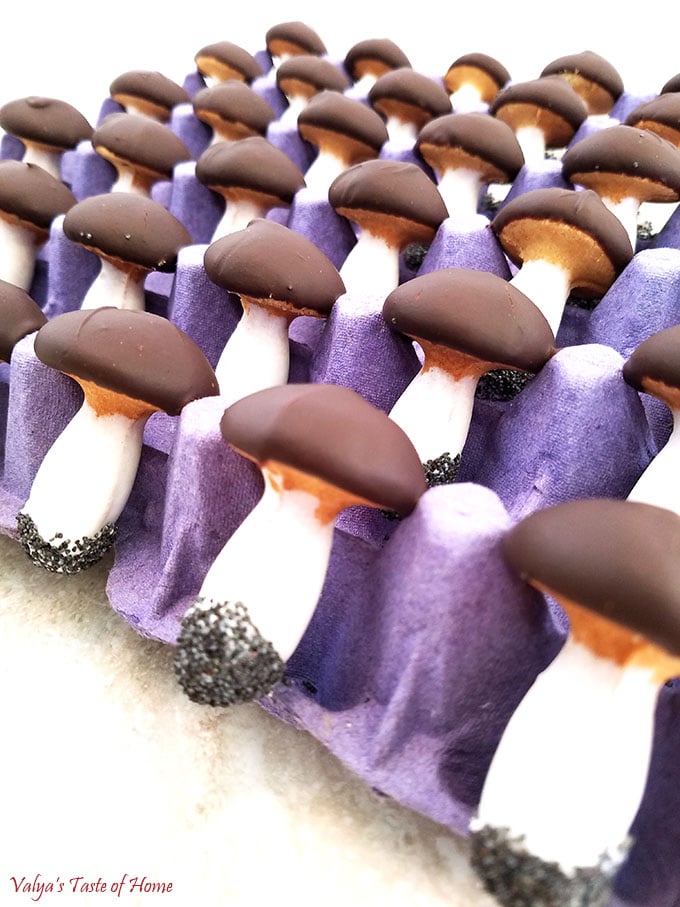
“You have to take a closer look to make sure they are edible”, is a comment I often get from people. They look very realistic with the dark chocolate ganache-covered mushroom heads, white glaze-dipped stems, and touched-up roots with poppy seeds to represent a sandy stem. How cute is that?
But you know what? They’re actually quite simple to make once you get the hang of it and a ton of fun too! I have no doubt that you will love these little gems. Have fun making and serving them!
Why You’ll Love Mushroom Cookies
This is the most detailed and comprehensive recipe for mushroom cookies on the internet! It includes step-by-step pictures and tips to help you every step of the way and will give you perfect-looking, stunning mushroom cookies every single time.
But that’s not all! This is an incredibly tasty cookie recipe and so the cookies won’t just look great, but also taste great in every bite. You can easily store them for up to one week, so they’re perfect to make ahead for any special occasion or holiday!
The details on these cookies are so incredible that most people have a hard time figuring out that they’re not actually mushrooms! It’s perfect for any themed parties or if you want to make something fun for the family.
Kids seem to love them and so do adults! I’ve included the best tips and tricks in this post to help you truly enjoy making these cookies every step of the way!
Mushroom Cookies Key Ingredients
All you need are some simple ingredients to make these delicious mushroom cookies at home. Here’s everything you’ll need:
For the Cookie Batter:
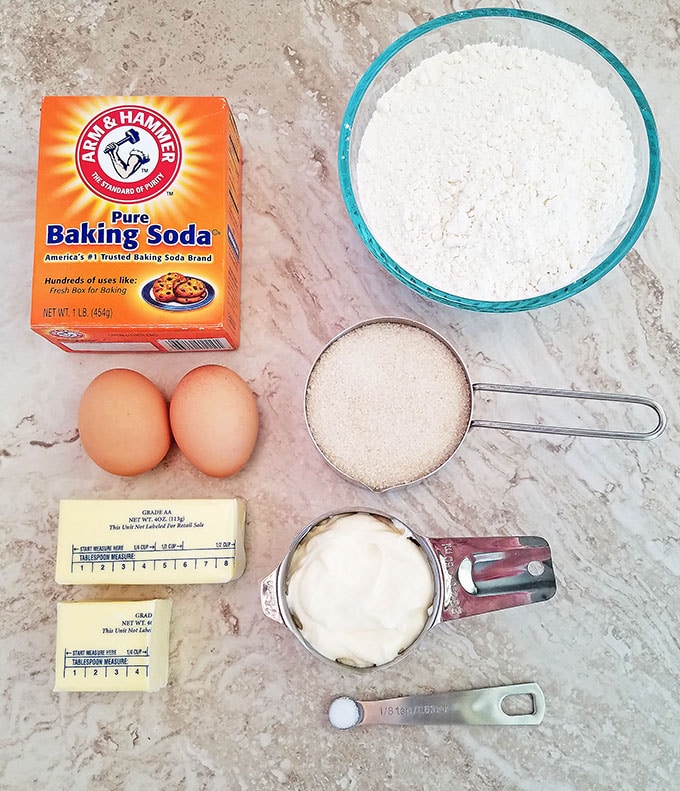
- Butter: First of all, we’ll need some good-quality, unsalted butter that’s softened at room temperature. This will make the cookies crisp yet crumbly, and absolutely delicious in terms of taste.
- Sugar: To get the right level of sweetness, we’ll also need some regular white granulated sugar for these cookies.
- Mayonnaise: While adding mayonnaise might seem odd in cookie dough, this is my secret ingredient! Since mayonnaise is made with oil and egg primarily, it adds a beautiful richness! It’ll also make your cookie batter play dough-like to easily mold into the right shape. I’ve used homemade mayonnaise for the best results.
- Eggs: Speaking of eggs, we’ll also need 2 large eggs to add moisture and get the cookies to the perfect texture so that they hold their shape once baked.
- Baking soda: To help the cookies leaven perfectly, we’ll be using some baking soda in this recipe.
- Salt: You’ll also need some salt since it truly makes everything taste better and balances out all the flavors.
- Flour: To give structure to our cookies, we’ll be using some simple all-purpose flour in this recipe.
White Glaze:
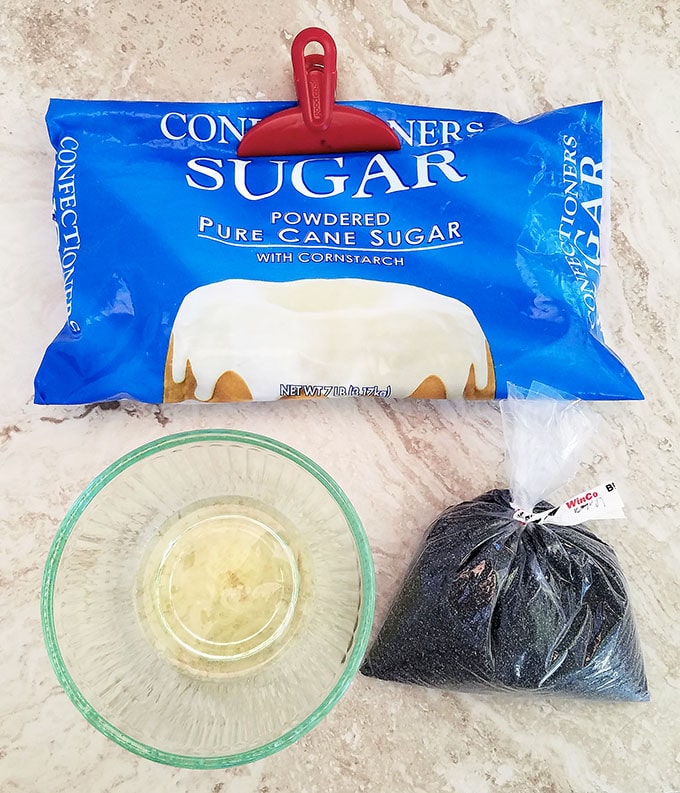
- Eggs whites: To get the perfect base for the white glaze so that it not only sets perfectly but also appears white, you’ll need egg whites from 2 large eggs.
- Confectioners’ sugar: You’ll also need some confectioners’ sugar (powdered sugar) to get the perfect sweet flavor.
- Poppy seeds: We’ll also be using some poppy seeds to decorate the bottom of the mushroom stems. This gives a sandy effect and looks better than using cocoa powder.
Chocolate Ganache:
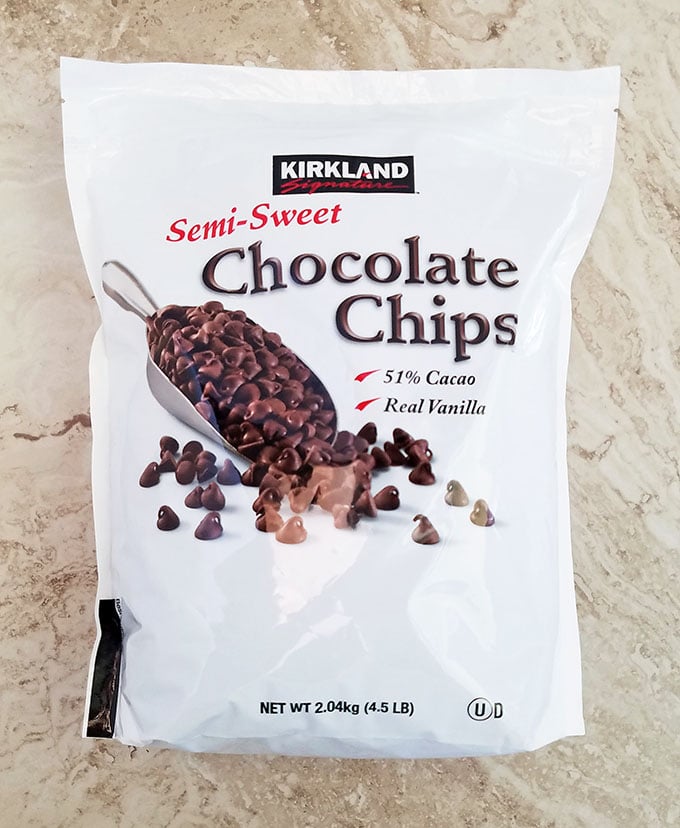
- Chocolate: For our delicious chocolate ganache, we’ll need some chocolate chips or a bar. Previously I’ve always used Hershey’s dark chocolate bar but this time I had these semi-sweet chocolate chips instead. So you can use whichever ones you can get your hands on easily.
- Milk: You’ll also need some whole milk (not pictured) to get the right consistency for the ganache. Check out my NO-FAIL chocolate ganache recipe for full details.
Items You Will Need to Make these Mushrooms
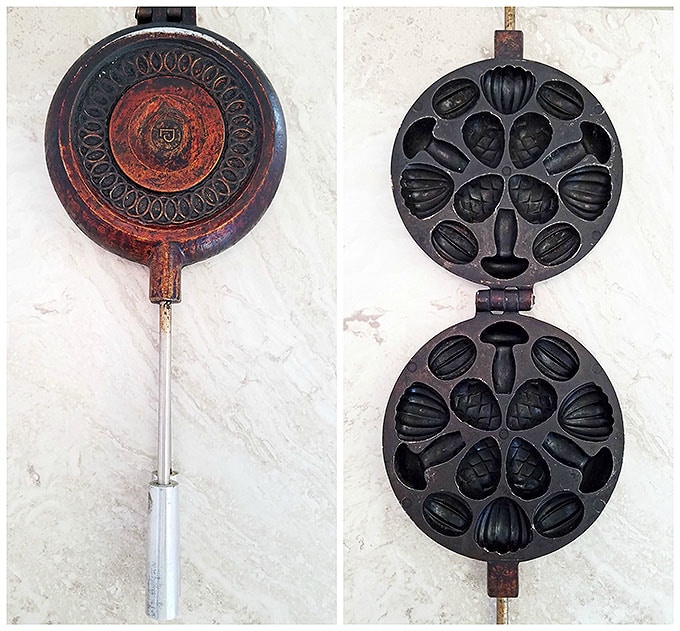
Mushroom Cookie Maker: NOTE: I’ve owned this particular mold for 15 years now. It was a gift from my aunt Luyba from Ukraine. It’s an old classical piece that I treasure. It’s heavy, durable, and made out of steel metal.
These molds are hard to find here in the USA, so the Amazon link I’m including is a similarly shaped mold that should achieve the same results. If you know anyone who lives in Europe you could ask them for a big favor and sent one over to you!
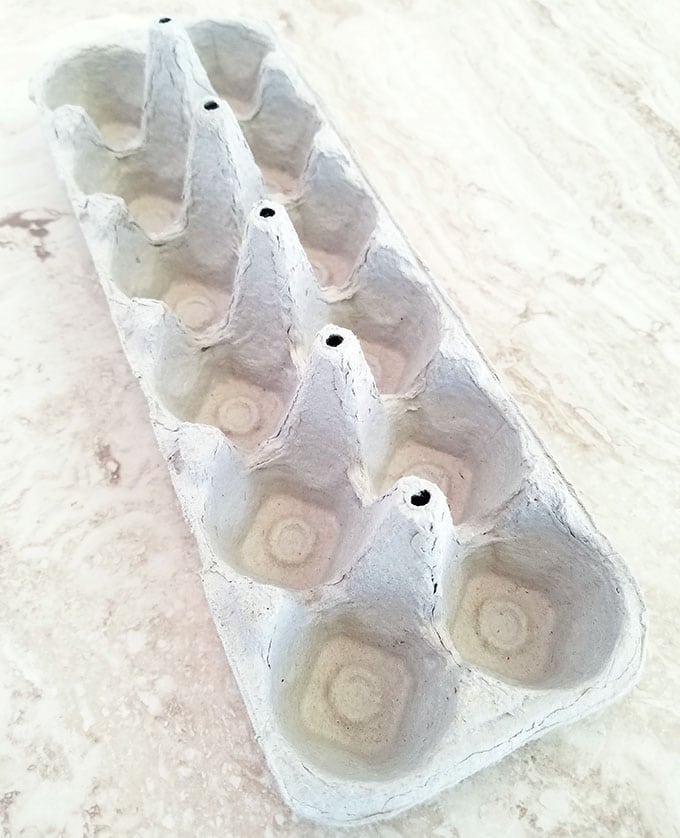
12-egg carton: You’ll also need a 12-egg carton since it’ll help you hold the mushrooms up after you’ve dipped the stems in white glaze. By using a leftover egg carton, you can have your very own cookie holder while decorating for absolutely free!
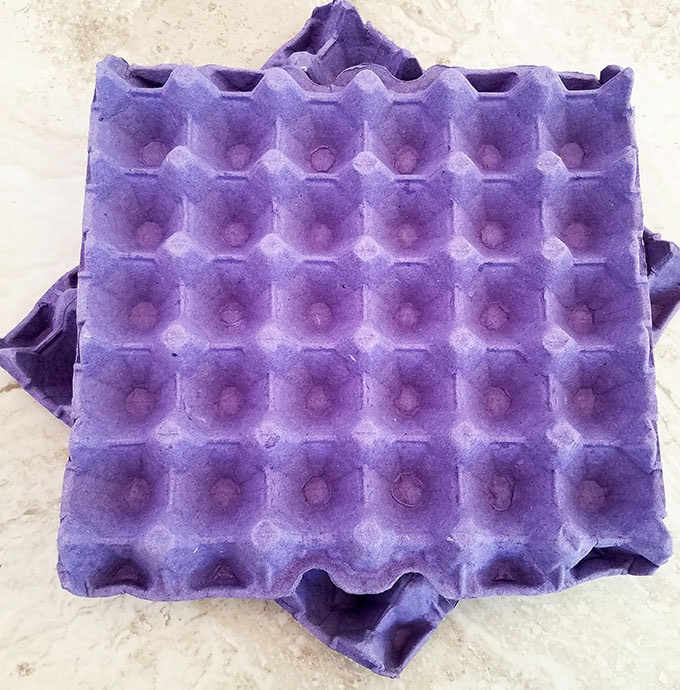
30-egg cartons: You’ll also need two 30-egg cartons for resting the mushrooms after you dip the mushroom heads in chocolate ganache. This is truly the best ‘wire rack’ since they’re upright and it won’t drip off unlike if you used a conventional wire rack or even a baking sheet.
How to Make Mushroom Cookies
Making these delicious mushroom cookies is so incredibly fun! Here’s what you need to do step by step to make them:
How to Make Mushroom Cookie Batter
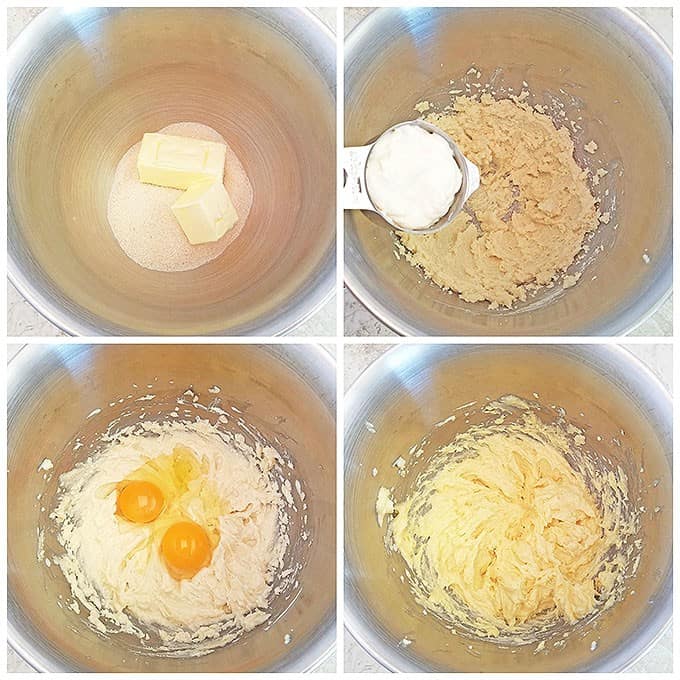
Let’s start by making the cookie batter. To do this, beat softened butter and sugar together well until creamy in a stand mixer bowl or a medium bowl using an electric mixer. Next, add mayonnaise and beat for 30 seconds.
Scrape down the sides of the stand mixer bowl with a silicone spatula to make sure the mayonnaise, butter, and sugar are well combined, and beat again for additional 30 seconds.
Then add 2 large eggs and beat the batter until fluffy about a minute or so.
Measure out the flour, baking soda, and salt. Sift the flour mixture into the batter, mayonnaise, and sugar mixture. Using a silicone spatula mix everything until well combined.
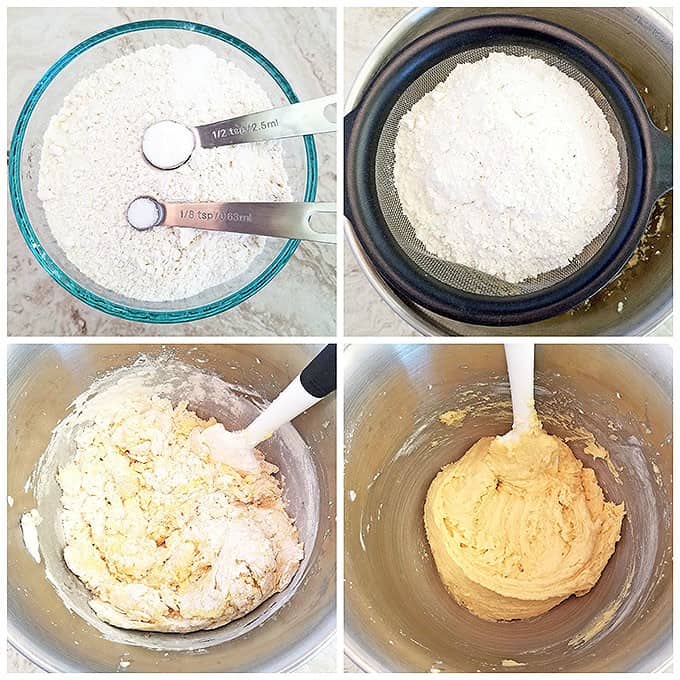
Sift an additional 2 cups of flour into the same glass bowl you used for the first half amount of flour.
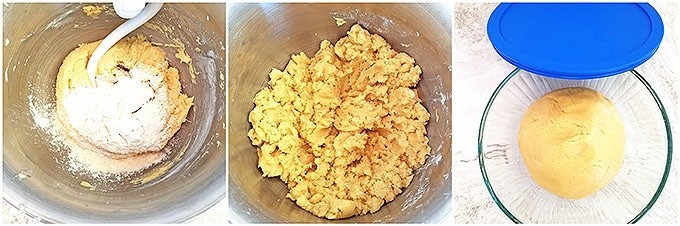
Attach the mixer bowl to the mixer and using the dough hook attachment add and mix in the rest of the flour ½ cup at a time.
The dough will be crumbly but soft at this stage, similar to play dough in texture. Knead the dough into a ball, place it into the previously floured glass bowl, and cover it with a lid or plastic wrap.
It’s important to note that the dough will dry quickly if not covered properly. Set the dough aside and make the white glaze.
How to Make White Glaze for the Mushroom Stems
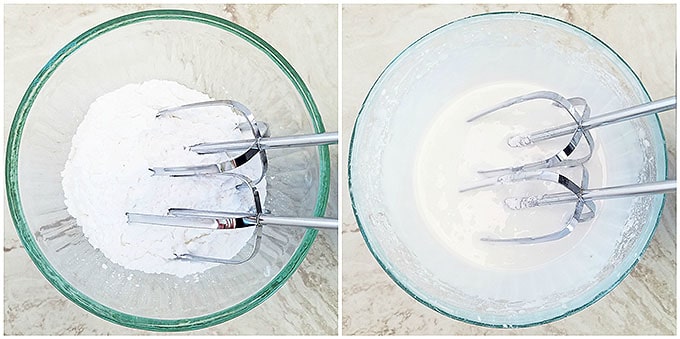
To make the white glaze, start by separating egg whites into a small glass bowl. Then add powdered sugar and mix starting at the slowest speed (if you don’t want to find yourself standing in a white cloud of powdered sugar), increasing the mixing speed gradually. Beat it for about a minute or so.
Cover the bowl with a lid and always keep it covered when not in use.
Note: Leaving it uncovered will dry out the glaze and crystalize the top of it which will look unappealing on the cookies.
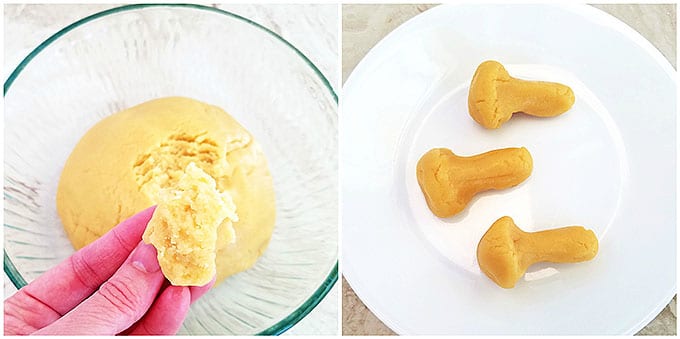
How to Pre-Shape Mushroom Cookies
Time to shape our cookies! Heat the Mushroom Cookie Maker over medium heat. While the mold is heating, reshape the dough.
Pinch off a little dough, roll into a ball (about 1″ in diameter) and reshape it into a rough mushroom form.
Note: It doesn’t have to look perfect, it will shape itself perfectly in the mold while baking.
How to Bake Mushroom Cookies
Let’s bake our cookies now! Place mushroom pre-shaped cookies into the preheated mold.
Bake for 3 minutes, then flip it over and bake for another minute or until golden brown.
Note: Baking time will vary depending on the type of metal your cookie mold is made of. If it’s made of aluminum, it will bake faster.
While this set of cookies is baking, pre-shape another set of cookies, so they are ready to be placed in the mold right after the baked ones are removed.
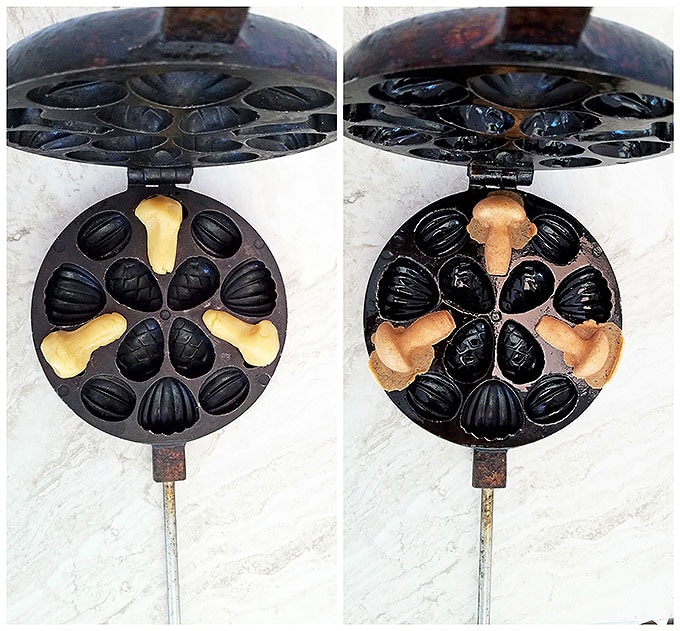
Using a regular tablespoon or a thin spatula remove baked cookies and place them on a plate to cool for about 5 minutes or until they’re warm to the touch.
While the second set of cookies is baking and the first set is cooling, pre-shape another set of mushroom cookies.
Note: I repeat the cycle of pre-shaping another set of cookies right after I place the previous set to bake.
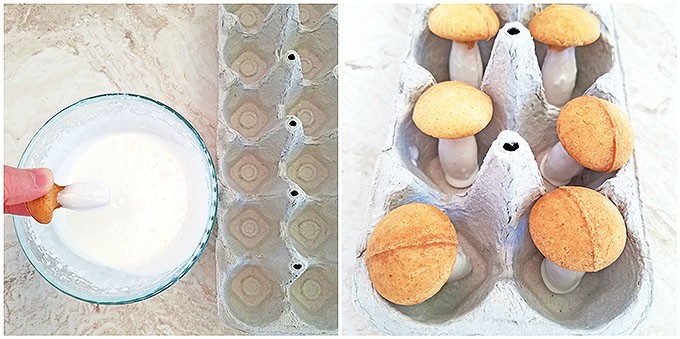
How to Glaze Mushroom Cookie Stem with White Glaze
Next, let’s add the white glaze to the mushroom cookie stems.
Hold the mushroom cookie by its head with one hand, hold and tilt the glaze bowl with the other hand and dip the entire stem into the glaze. Hold for a few seconds while the excess glaze drips off.
Place the glazed mushroom cookie in a pocket of the smaller egg carton for the stem to dry out while standing upright.
While this set of mushroom stems is drying, keep going with the smooth process of preshaping and baking till you’ve used up all the cookie batter.
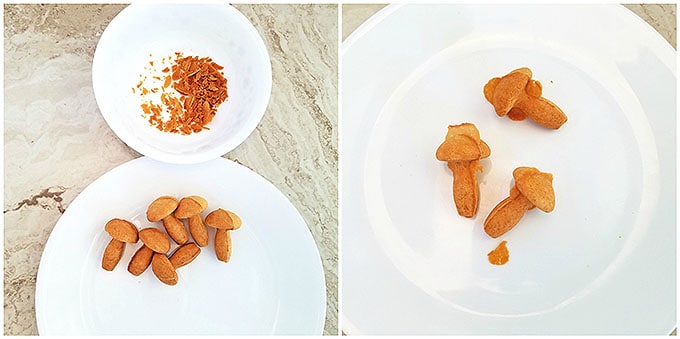
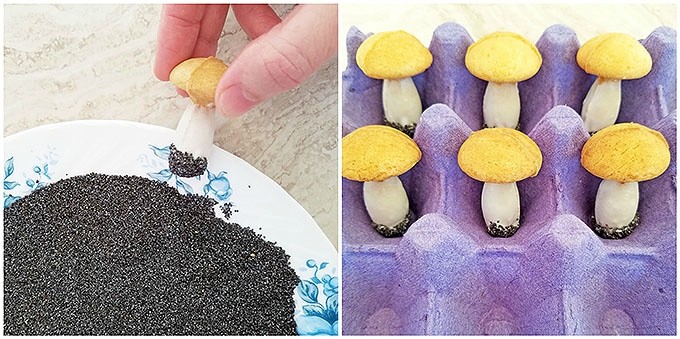
How to Add Sand-looking Decor to Mushroom Cookie Stem
Most of the stem glaze will dry out except for the bottom. So, now it’s time to add some beauty to the mushroom. Hold it by its head and dip the stem into poppy seed, about ¼ in, and roll on the side of the plate to pack them tightly.
Tip: I like to use a large plate with a raised edge so I can press down poppy seeds to create a nicely rounded base. Then place the mushroom cookies into individual pockets of a purple egg carton.
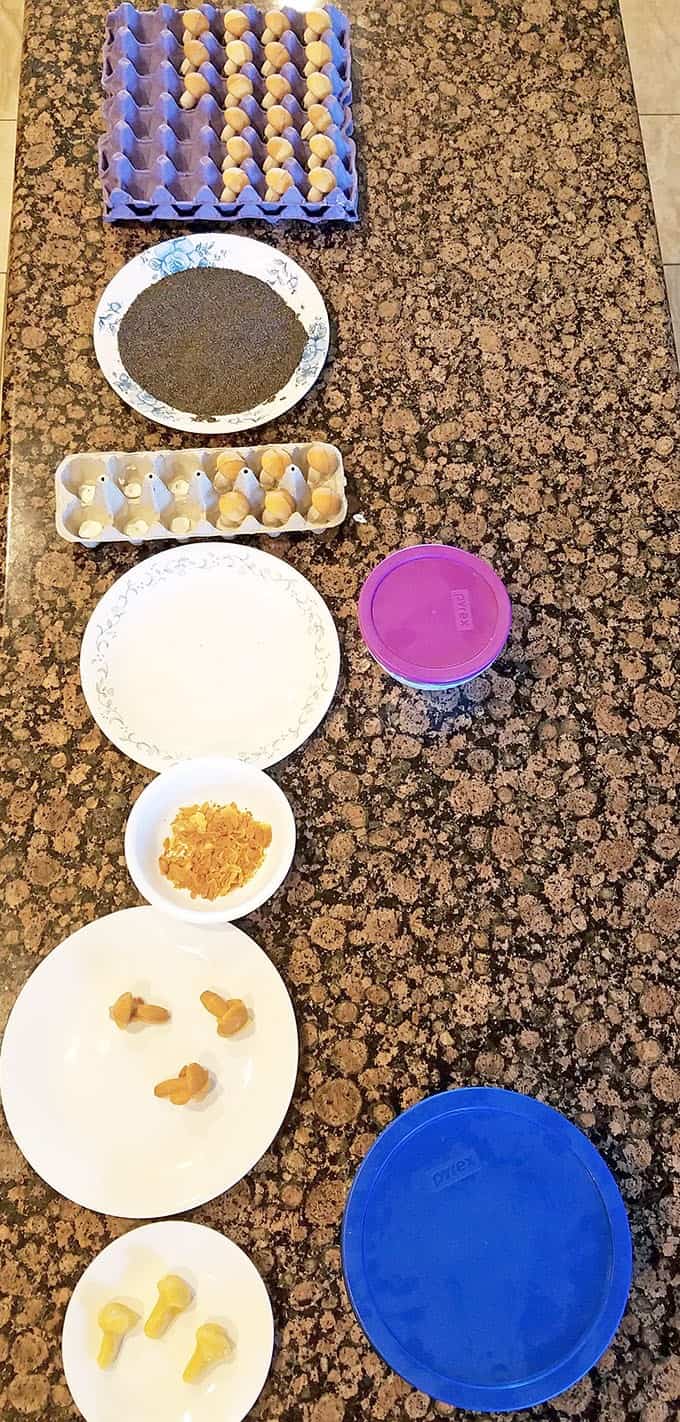
How to Maintain a Smooth Cookie-Making Workflow
Maintain a smooth workflow by placing everything in order of operation. That way it’s easier to keep track of and control the process. You won’t need to use a timer to time each step but will be able to tell if the cookie is ready for the next step just by looking at and touching them.
This way, you should be able to tell which set needs glazing, dipping, removal of baked cookies from the mold, etc. Once you get the hang of it, you will feel like a pro, I promise! The picture below shows the organization setup I use.
Bake, dip in glaze and poppy seeds all of the mushroom cookies and allow the stems to dry out completely before proceeding to the step of dipping the mushroom heads into chocolate ganache.
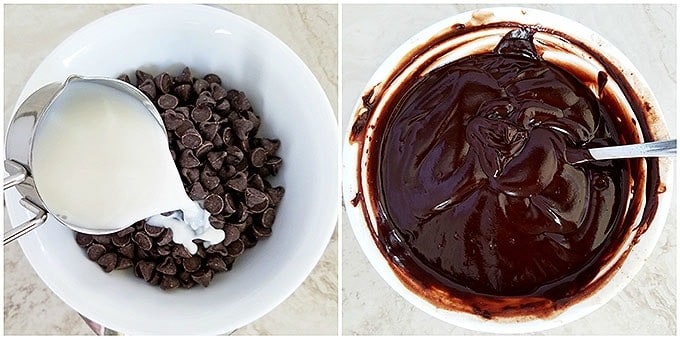
How to Make Chocolate Ganache
Let’s make our delicious chocolate ganache. To do this, add dark chocolate chips into a bowl placed over a water bath, and then add milk and let the chocolate melt, stirring from time to time with a spoon or hand whisk.
Once the water boils reduce the heat and let the chocolate melt and mix with milk completely.
Tip: Before I always used a Hershey’s Dark Chocolate bar to make the ganache but didn’t have any this time so I used chocolate chips and must say that I like how the ganache turns out made with the bar.
Check out the Simple Chocolate Ganache Recipe. I’ve modified this recipe for the mushroom cookies ganache and don’t add that extra 2 tbsp. of milk at the end. This is because the ganache should be thicker for dipping cookies.
Let the ganache cool a bit before moving on to the dipping step.
How to Decorate Mushroom Heads with Chocolate Ganache
Once the mushroom stems have dried completely, it is safe enough to hold the mushroom by the stem (without messing up your work) and dip the heads into the chocolate.
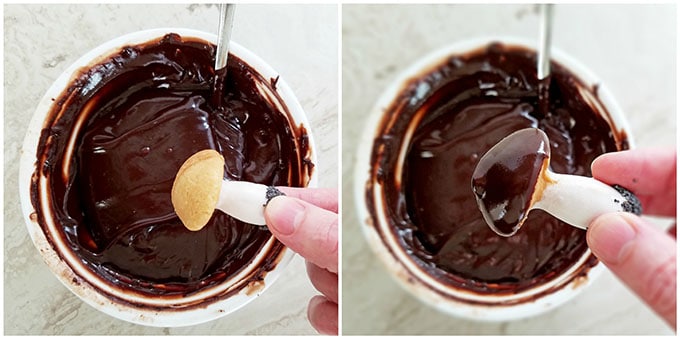
Hang the mushroom cookies in between the egg pocket peaks so that the lowest possible point of the mushroom head rests against the peaks.
This way, the chocolate will have minimal contact with the carton and keep its beautiful shape. The chocolate mushroom heads should look smooth and glossy.
Once the ganache sets completely, the gloss will look dull like in the picture below.
Be very careful when removing them from the egg cartons. Use a knife blade to separate the sides of the mushroom head from the carton to cause minimal damage to the mushroom head.
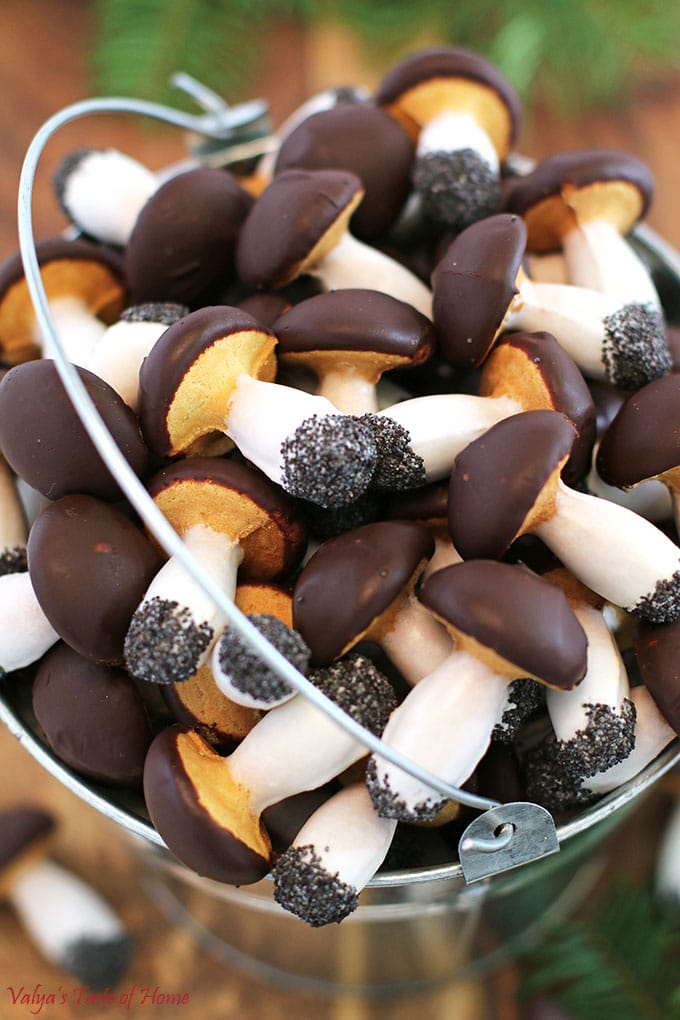
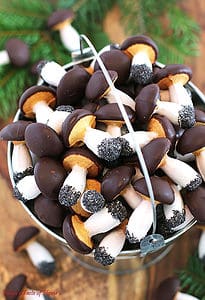
Your delicious and stunning Mushroom Cookies are ready to be served!

How to Store Leftover Mushroom Cookies
You can store the mushroom cookies in any container with a lid slightly open for up to a week.
You can technically also freeze these mushroom cookies for up to 3 months but they might stick together once you do that. The only way to prevent it is by separating them with parchment paper, but that might be tedious. However, I still wanted to add this in here, in case you would like to freeze them anyway.
Frequently Asked Questions
No, mushroom cookies don’t taste like mushrooms at all. They are buttery, slightly sweet, and often flavored with vanilla, chocolate ganache, or vanilla glaze and poppy seeds.
Absolutely! Their whimsical look and sweet flavor make them a perfect choice for edible gifts during Christmas, New Year, or any festive gathering.
No food coloring is needed – chocolate ganache naturally creates the mushroom-like appearance on the caps.
More Recipes You’ll Enjoy
- Pom-Pom Cookies Recipe
- Meat Grinder Cookie Recipe
- Easy Homemade Sugar cookie Dough
- Hedgehog Cookies
- Peppermint Glazed Cookies
- Dark Chocolate Cranberry and Pecan Biscotti
- Christmas Spritz Cookies
- Mint Candy Cane Cookies
Check out all desert recipes HERE.
Mushroom Cookies Recipe (Cute & Realistic Design)
Ingredients
What you'll need to Make Mushroom Cookie Batter
- 12 tbsp. unsalted butter (softened)
- 1 cup sugar (I used organic sugar)
- ⅔ cup mayonnaise (I use homemade mayonnaise)
- 2 large eggs
- ½ tsp. baking soda
- ⅛ tsp. sea salt
- 4 ½ cups organic all-purpose flour
What you'll need to Make White Glaze for the Mushroom Cookie Stem
- 2 egg whites room temperature (from 2 large eggs)
- 2 cup confectioners sugar
- 1 cup poppy seeds( for decorating the bottom of the mushroom stem)
What you'll need to Make Chocolate Ganache for Dipping the Mushroom Cookie Head
- 1 ½ cups chocolate chips
- 10 tbsp. organic whole milk
Items You Will Need to Make these Mushrooms
- 1 dozen size egg carton (for holding mushrooms after white glaze stem dipping)
- 2 egg trays (30 egg size – for resting mushrooms in after the chocolate ganache mushroom head dipping)
Instructions
How to Make Mushroom Cookie Batter
- Let’s start by making the cookie batter. To do this, beat softened butter and sugar together well until creamy in a stand mixer bowl or a medium bowl using an electric mixer. Next, add mayonnaise and beat for 30 seconds.
- Scrape down the sides of the stand mixer bowl with a silicone spatula to make sure the mayonnaise, butter, and sugar are well combined, and beat again for additional 30 seconds.
- Then add 2 large eggs and beat the batter until fluffy about a minute or so.
- Measure out the flour, baking soda, and salt. Sift the flour mixture into the batter, mayonnaise, and sugar mixture. Using a silicone spatula mix everything until well combined.
- Sift an additional 2 cups of flour into the same glass bowl you used for the first half amount of flour.
- Attach the mixer bowl to the mixer and using the dough hook attachment add and mix in the rest of the flour ½ cup at a time.
- The dough will be crumbly but soft at this stage, similar to play dough in texture. Knead the dough into a ball, place it into the previously floured glass bowl, and cover it with a lid or plastic wrap.
- It’s important to note that the dough will dry quickly if not covered properly. Set the dough aside and make the white glaze.
How to Make White Glaze for the Mushroom Stems
- To make the white glaze, start by separating egg whites into a small glass bowl. Then add powdered sugar and mix starting at the slowest speed (if you don’t want to find yourself standing in a white cloud of powdered sugar), increasing the mixing speed gradually. Beat it for about a minute or so.
- Cover the bowl with a lid and always keep it covered when not in use.
- Note: Leaving it uncovered will dry out the glaze and crystalize the top of it which will look unappealing on the cookies.
How to Pre-Shape Mushroom Cookies
- Time to shape our cookies! Heat the Mushroom Cookie Maker over medium heat. While the mold is heating, reshape the dough.
- Pinch off a little dough, roll into a ball (about 1″ in diameter) and reshape it into a rough mushroom form.
- Note: It doesn’t have to look perfect, it will shape itself perfectly in the mold while baking.
How to Bake Mushroom Cookies
- Let’s bake our cookies now! Place mushroom pre-shaped cookies into the preheated mold.
- Bake for 3 minutes, then flip it over and bake for another minute or until golden brown.
- Note: Baking time will vary depending on the type of metal your cookie mold is made of. If it’s made of aluminum, it will bake faster.
- While this set of cookies is baking, pre-shape another set of cookies, so they are ready to be placed in the mold right after the baked ones are removed.
- Using a regular tablespoon or a thin spatula remove baked cookies and place them on a plate to cool for about 5 minutes or until they’re warm to the touch.
- While the second set of cookies is baking and the first set is cooling, pre-shape another set of mushroom cookies.
- Note: I repeat the cycle of pre-shaping another set of cookies right after I place the previous set to bake.
How to Glaze Mushroom Cookie Stem with White Glaze
- Next, let’s add the white glaze to the mushroom cookie stems.
- Hold the mushroom cookie by its head with one hand, hold and tilt the glaze bowl with the other hand and dip the entire stem into the glaze. Hold for a few seconds while the excess glaze drips off.
- Place the glazed mushroom cookie in a pocket of the smaller egg carton for the stem to dry out while standing upright.
- While this set of mushroom stems is drying, keep going with the smooth process of preshaping and baking till you’ve used up all the cookie batter.
How to Add Sand-looking Decor to Mushroom Cookie Stem
- Most of the stem glaze will dry out except for the bottom. So, now it’s time to add some beauty to the mushroom. Hold it by its head and dip the stem into poppy seed, about ¼ in, and roll on the side of the plate to pack them tightly.
- Tip: I like to use a large plate with a raised edge so I can press down poppy seeds to create a nicely rounded base. Then place the mushroom cookies into individual pockets of a purple egg carton.
How to Maintain a Smooth Cookie-Making Workflow
- Maintain a smooth workflow by placing everything in order of operation. That way it’s easier to keep track of and control the process. You won’t need to use a timer to time each step but will be able to tell if the cookie is ready for the next step just by looking at and touching them.
- This way, you should be able to tell which set needs glazing, dipping, removal of baked cookies from the mold, etc. Once you get the hang of it, you will feel like a pro, I promise! The picture below shows the organization setup I use.
- Bake, dip in glaze and poppy seeds all of the mushroom cookies and allow the stems to dry out completely before proceeding to the step of dipping the mushroom heads into chocolate ganache.
How to Make Chocolate Ganache
- Let’s make our delicious chocolate ganache. To do this, add dark chocolate chips into a bowl placed over a water bath, and then add milk and let the chocolate melt, stirring from time to time with a spoon or hand whisk.
- Once the water boils reduce the heat and let the chocolate melt and mix with milk completely.
- Tip: Before I always used a Hershey’s Dark Chocolate bar to make the ganache but didn’t have any this time so I used chocolate chips and must say that I like how the ganache turns out made with the bar.
- Check out the Simple Chocolate Ganache Recipe. I’ve modified this recipe for the mushroom cookies ganache and don’t add that extra 2 tbsp. of milk at the end. This is because the ganache should be thicker for dipping cookies.
- Let the ganache cool a bit before moving on to the dipping step.
How to Decorate Mushroom Heads with Chocolate Ganache
- Once the mushroom stems have dried completely, it is safe enough to hold the mushroom by the stem (without messing up your work) and dip the heads into the chocolate.
- Hang the mushroom cookies in between the egg pocket peaks so that the lowest possible point of the mushroom head rests against the peaks.
- This way, the chocolate will have minimal contact with the carton and keep its beautiful shape. The chocolate mushroom heads should look smooth and glossy.
- Once the ganache sets completely, the gloss will look dull like in the picture below.
- Be very careful when removing them from the egg cartons. Use a knife blade to separate the sides of the mushroom head from the carton to cause minimal damage to the mushroom head.
How well do the cookies travel? Would they be okay to ship short distances? I’d love to send some to distant family and friends!
They will travel ok if they are packaged well and not exposed to heat, so the chocolate doesn’t melt. I’d love to see your creation on social media as well. Thank you for such a great question!
Hi! You mention about freezing the cookies. I’m assuming they would be frozen before adding the glazes/decorations? Was thinking of making them for a charity Christmas sale and was wondering if I could make a bigger batch in advance and freeze them…
That is correct. You cannot freeze glazed cookies since it will not hold it’s beauty after thawing. Thanks for asking!
Hi, I am looking for a mold. I would like to know what is the size of your mushroom mold from the bottom to the top cap?
The mold itself is 6″ in diameter with an additional 8″ long handle.
Hi there. I made these last year, and they turned out beautiful, althought A little dry. I think I made a mistake using the recipe. Can you please tell me if it’s 4 1/2 cups flower total? I’m assuming the flower should be divided, and added in two seperate additions. On step three when it says to to sift 2 cups of flower it is unclear if it’s the 2nd half of the total 4 1/2 cups, or if it an addional 2 cups of flower. Can you please clarify? My daughter loved making these with me last year, and we’re about to make them again.
Thanks!
Mariah
Sorry for the confusion. The recipe needs a total of 4 1/2 cups of flour. First 2 1/2 cups you add to the mixture and mix all in using a spatula. Then sift an additional 2 cups into the same bowl (you used for the first half of the flour), place the mixer dough hook attachment, and add 1/2 cup at a time that way you don’t over mix the dough if the recipe requires less flour (by that I mean – less flour do to eggs size). To simplify these steps, you may attach the mixer dough hook attachment and start adding flour 1/2 cup at a time right from the beginning. I hope this clarifies a bit more. Thank you for asking!
Valya,
Do you put any filling inside of these mushrooms?
No, not into this kind, but its an option.
These cookies are adorable. Could you please tell me how they bake? On top of the stove? Or do you put the mold in the oven? Thank you
I bake them on the stovetop. The recipe have all the instructions. Please let me know if you have more questions.
These look really beautiful. A fancier version of what my mum used to make back in Latvia when I was little. These and little nut cookies (oreshki) always were made on occasions. I think my mum still has the old mold from 40 years ago. I will try these ones one day.
Thank you Inese! Yes, walnut and mushroom cookies were both made for special occasions, which brings a lot of childhood memories every time I make them. I use the this mushroom batter to make walnut cookies as well. They are one of my favorites! Let me know how they turn out for you?
I want to know if it’s possible to freeze these once baked? If so, what’s the best way to go about this? Store in a tight closed container without decorations or decorations are ok and will be ok after I thaw them? How far in advance can I freeze these? Have a few desserts that I hope to make for a double wedding that’s coming up and was hoping to use these beauties to decorate the dessert plates with…I’ve never seen anything like this before…completely in love with your creation…a complete masterpiece ?
Hi Katya! I never got to freeze these cookies before, so I cannot tell you how well they will thaw (or if they will thaw clean at all). The stem has to be dipped into white glaze first and then into poppy seeds while still pretty warm. You can do that part and freeze and then do the chocolate part after thawing. Let me know how it works for you, I’m eager to know. I will experiment that as well. I’m so sorry I couldn’t be much help.
These are adorable!!! I made these over the weekend for a party, and they taste good too! Thank you! You have such creative ideas for baking!
Did your party has a mushroom theme? Lol. That’s, awesome! I would love to see the recipes for both recipes you made. PS. If you have Facebook, you can join my closed group where you can share pictures of the recipes you make from my blog. Thanks so much for making my recipe and sharing your experience with me.
The party was actually a woodland theme)) so mushrooms, oreshki and the like fit)) sorry, I didn’t have facebook though. Love your site, so many good recipes!
That’s a beautiful theme! Thank you, you’re so kind! 🙂
These look amazing! I’m a bit confused, should there be eggs in the cookie dough?
Thanks!
Good catch! I missed 2 eggs in the ingredients list, eventhough it was shown on the picture. It’s corrected. Thanks much! 😀
My family favorite cookies. We are making them without mold and use different recipe. I bake hats and stems separate and then assemble them. I wish I could show you pictures how they come out. Its way faster process too.
Hi dear! You can share pictures with me through social media messaging or sent an email under “Contact Us” category on the blog. Thanks 🙂
Thank you for the tasty recipe and beautiful pictures Valentina.
My pleasure, enjoy! 🙂
You can eat the screen, that’s how attractive and tempting they are! Beautiful photos and clear presentation. I will be making it for Christmas. The mold is on the way, thank for the recipe!
I know, they are truly attractive! Thank you for the kind words. 🙂
These were my favourite! My mom used to make them in winter time, and house always smelled like vanilla cookies, I remember grabbing them after a walk outside in the snow.the hot doughy vanilla mushroom cookies! Yum! Beautiful work. Thank you. Recipe saved :))
I love sweet memories like this! I know, these are everyone’s favorite. Have not met anyone who doesn’t like these little gems. Thank you for saving the recipe! 🙂
These are so adorable! Such a beautiful pictures too!
Thank you for kind words, Linda! 🙂
Wow, just wow! How cute!!! I have to make this! Thanks for the recipe Valya! ?
You are very welcome Masha! Have fun making them! 🙂
Oh, i can’t believe my eyes I’m seeing this. Such a cute cookies and what a great idea! You are so talented Valya! ?
Aww…, you’re so sweet! They are super cute, aren’t they? Thank you, Mira! 🙂
I’ve seen these at the weddings, they are so cute!!!
Maybe that was me who made them, lol. Yes, they are perfect decor for weddings dessert plate. Thanks, Nadya 🙂
This is absolutely stunning!!! The most beautiful cookies I’ve seen! They don’t even look like edible things ??
They do look pretty attractive, ha? I know, I get that impression from many people. Thank you for stopping by Brenda and commenting! 🙂