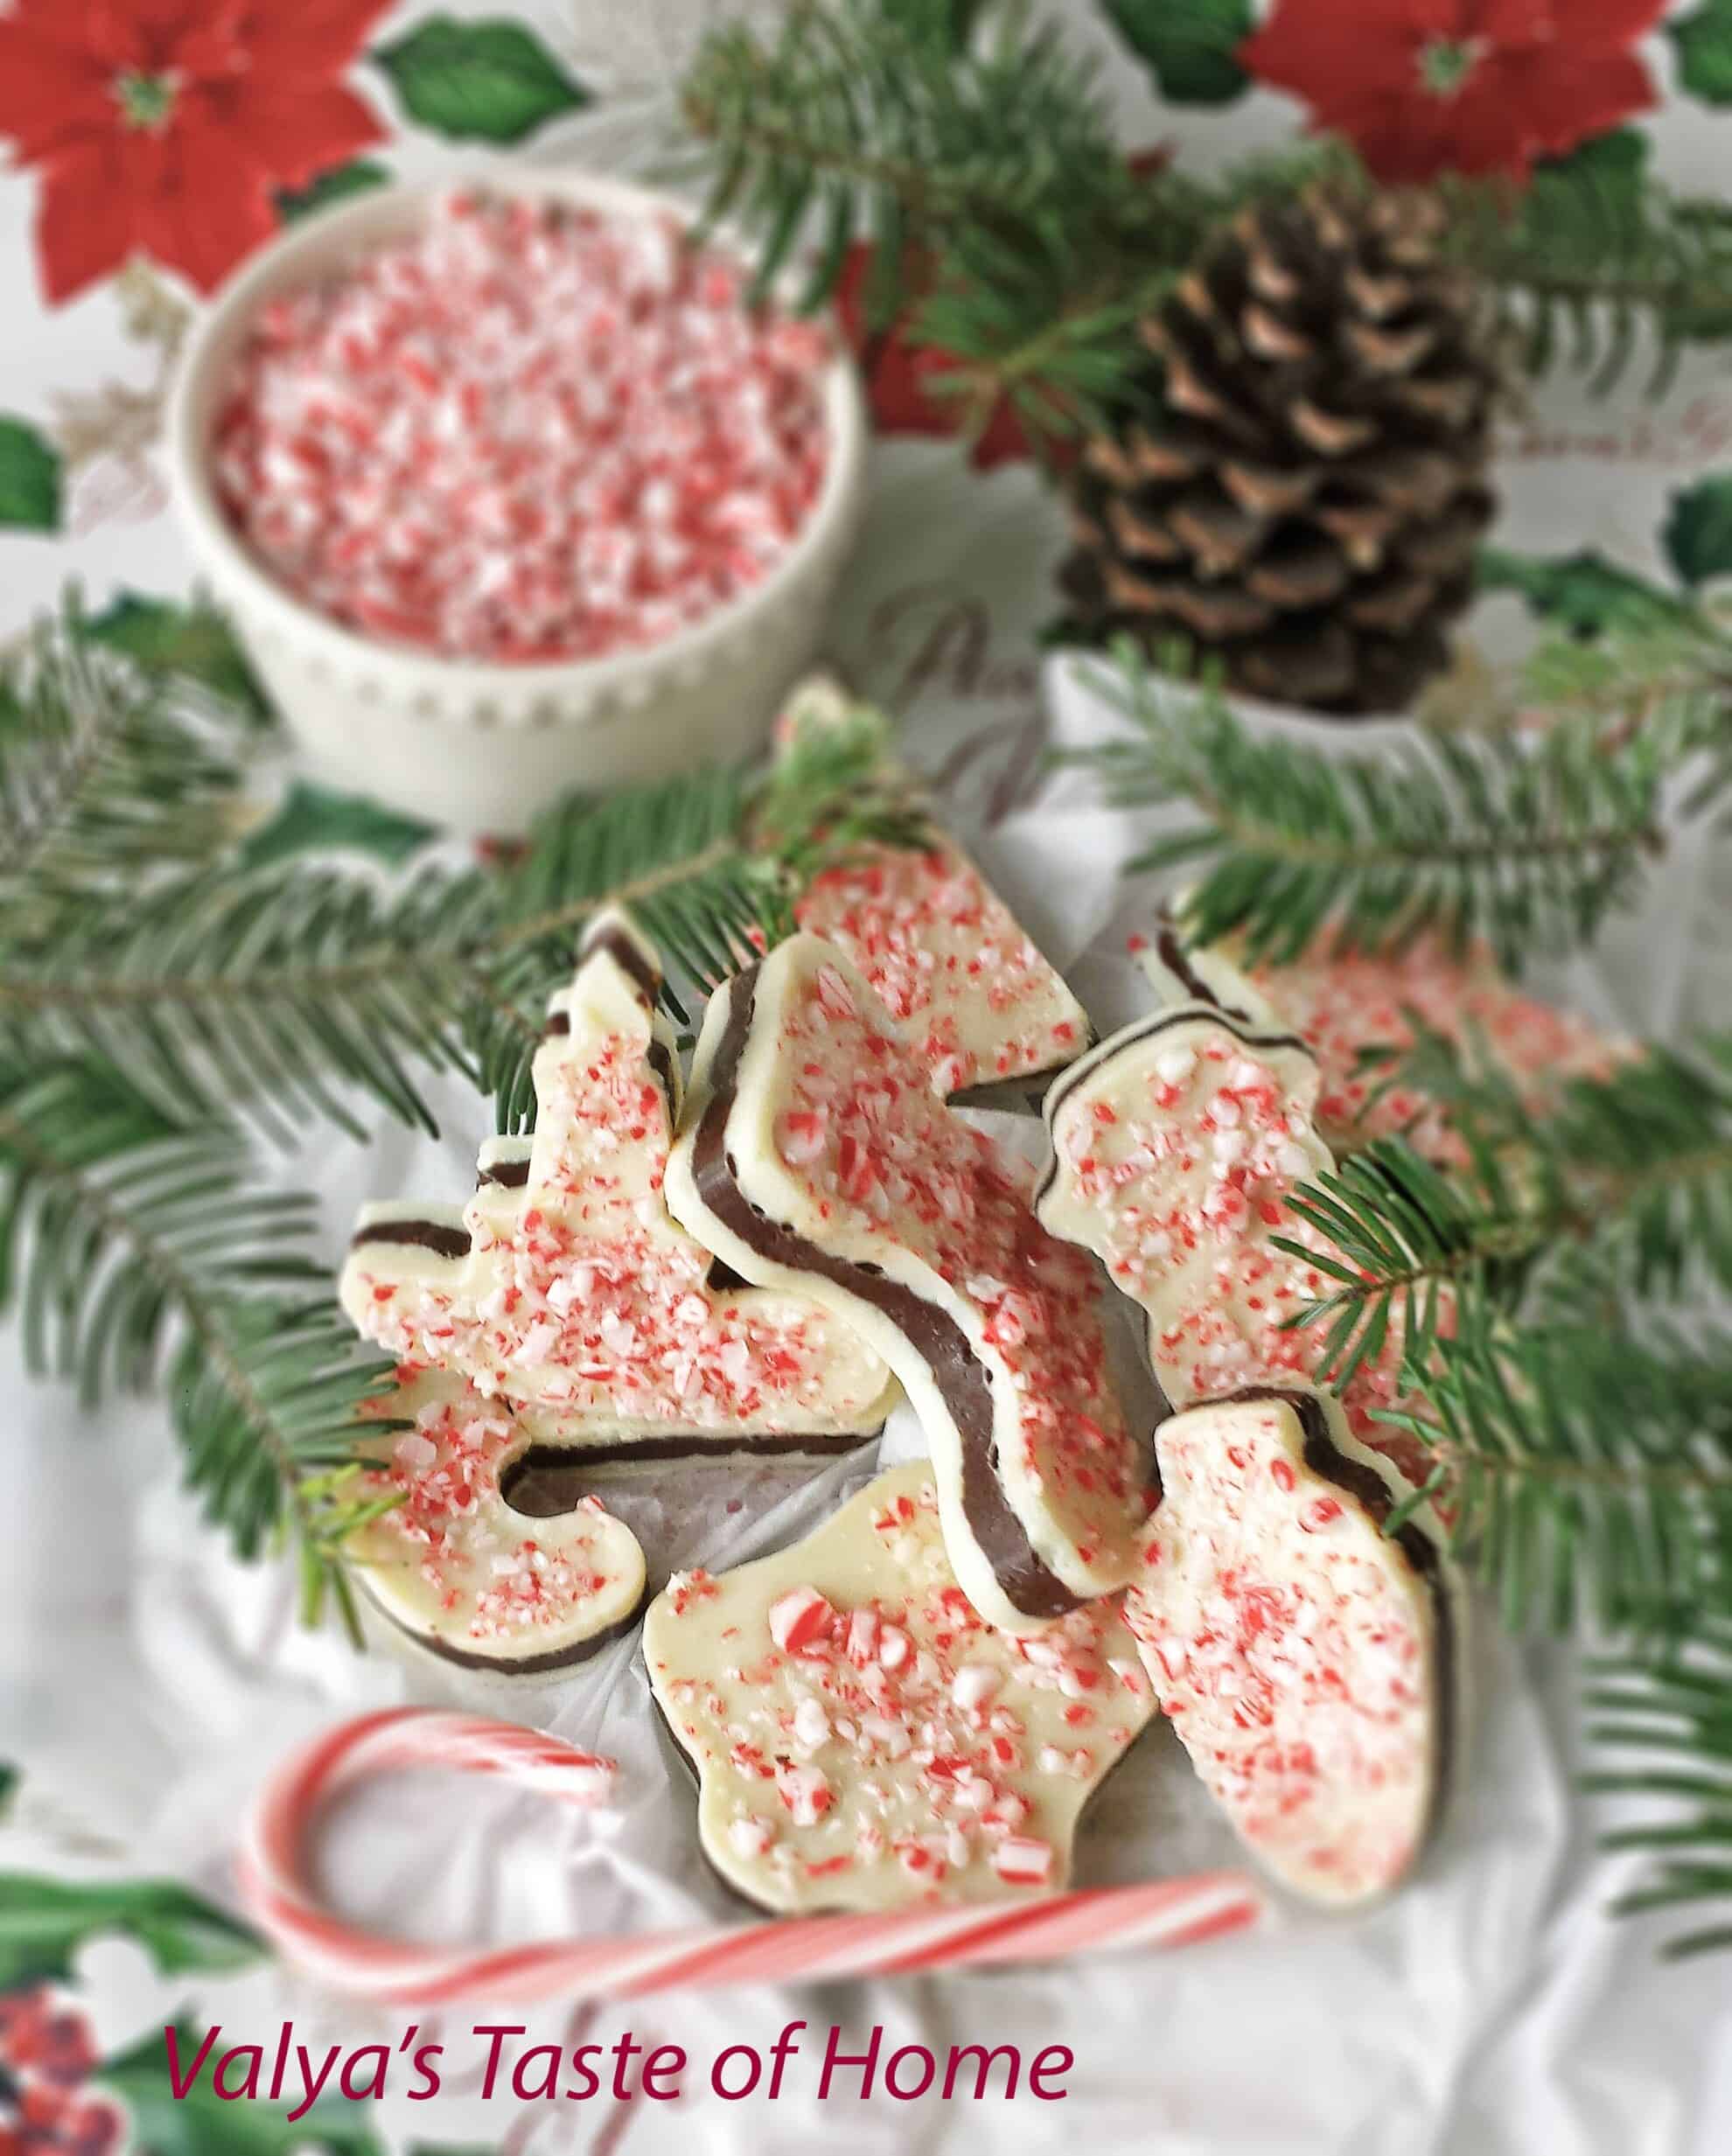
The Perfect Peppermint Cookies (Easy + Best Results)
These Peppermint Cookies are delicious, with a blend of sweet and minty flavors, all baked to the perfect chewy consistency. The peppermint extract adds a refreshing holiday twist, while the sugar gives it the perfect amount of sweetness. It’s a classic you’re going to fall in love with!
Peppermint cookies are a traditional holiday treat that is as fun to make as they are to eat. Baking these at home is a great way to get into the festive spirit. Plus, there’s something incredibly satisfying about the smell of cookies baking in the oven. They’re great with tea, milk, or, as I’ve always loved having it – with a glass of apple juice.
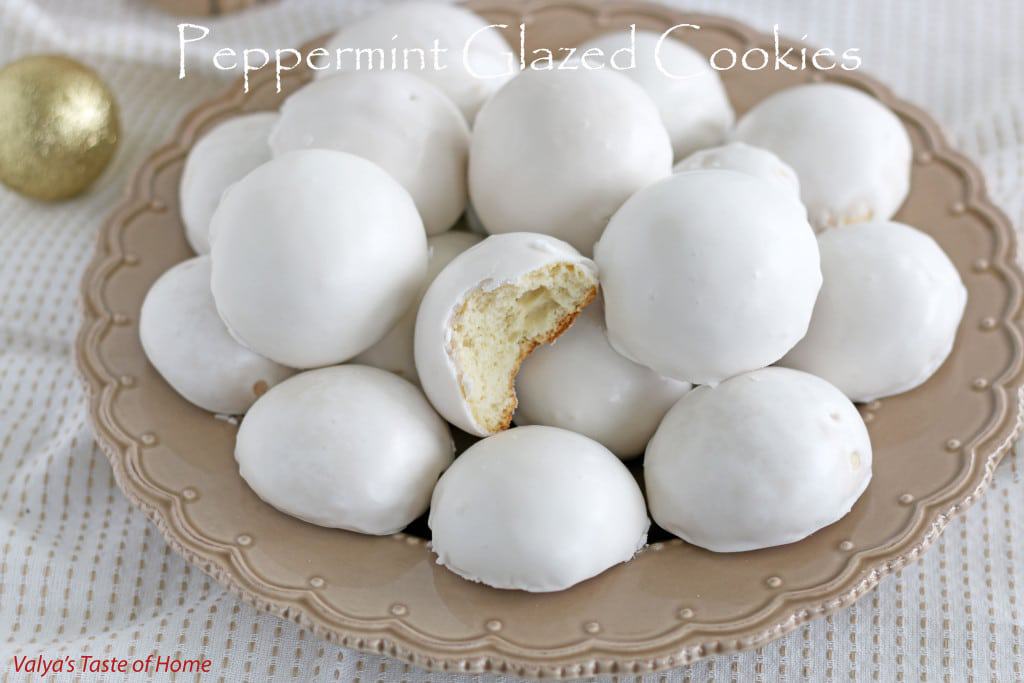
It’s a sticky cookie dough to work with, but these cookies are well worth it. They’re sweet on the inside, with a soft, minty glaze on the outside that’s incredibly delicious. I’ve made these cookies dozens and dozens of times over the years, and I’ll share my secret recipe with you along with tips and tricks to make the best peppermint cookies ever!
Want to learn how to make this peppermint cookie recipe? Then keep on reading.
What are Peppermint Cookies?
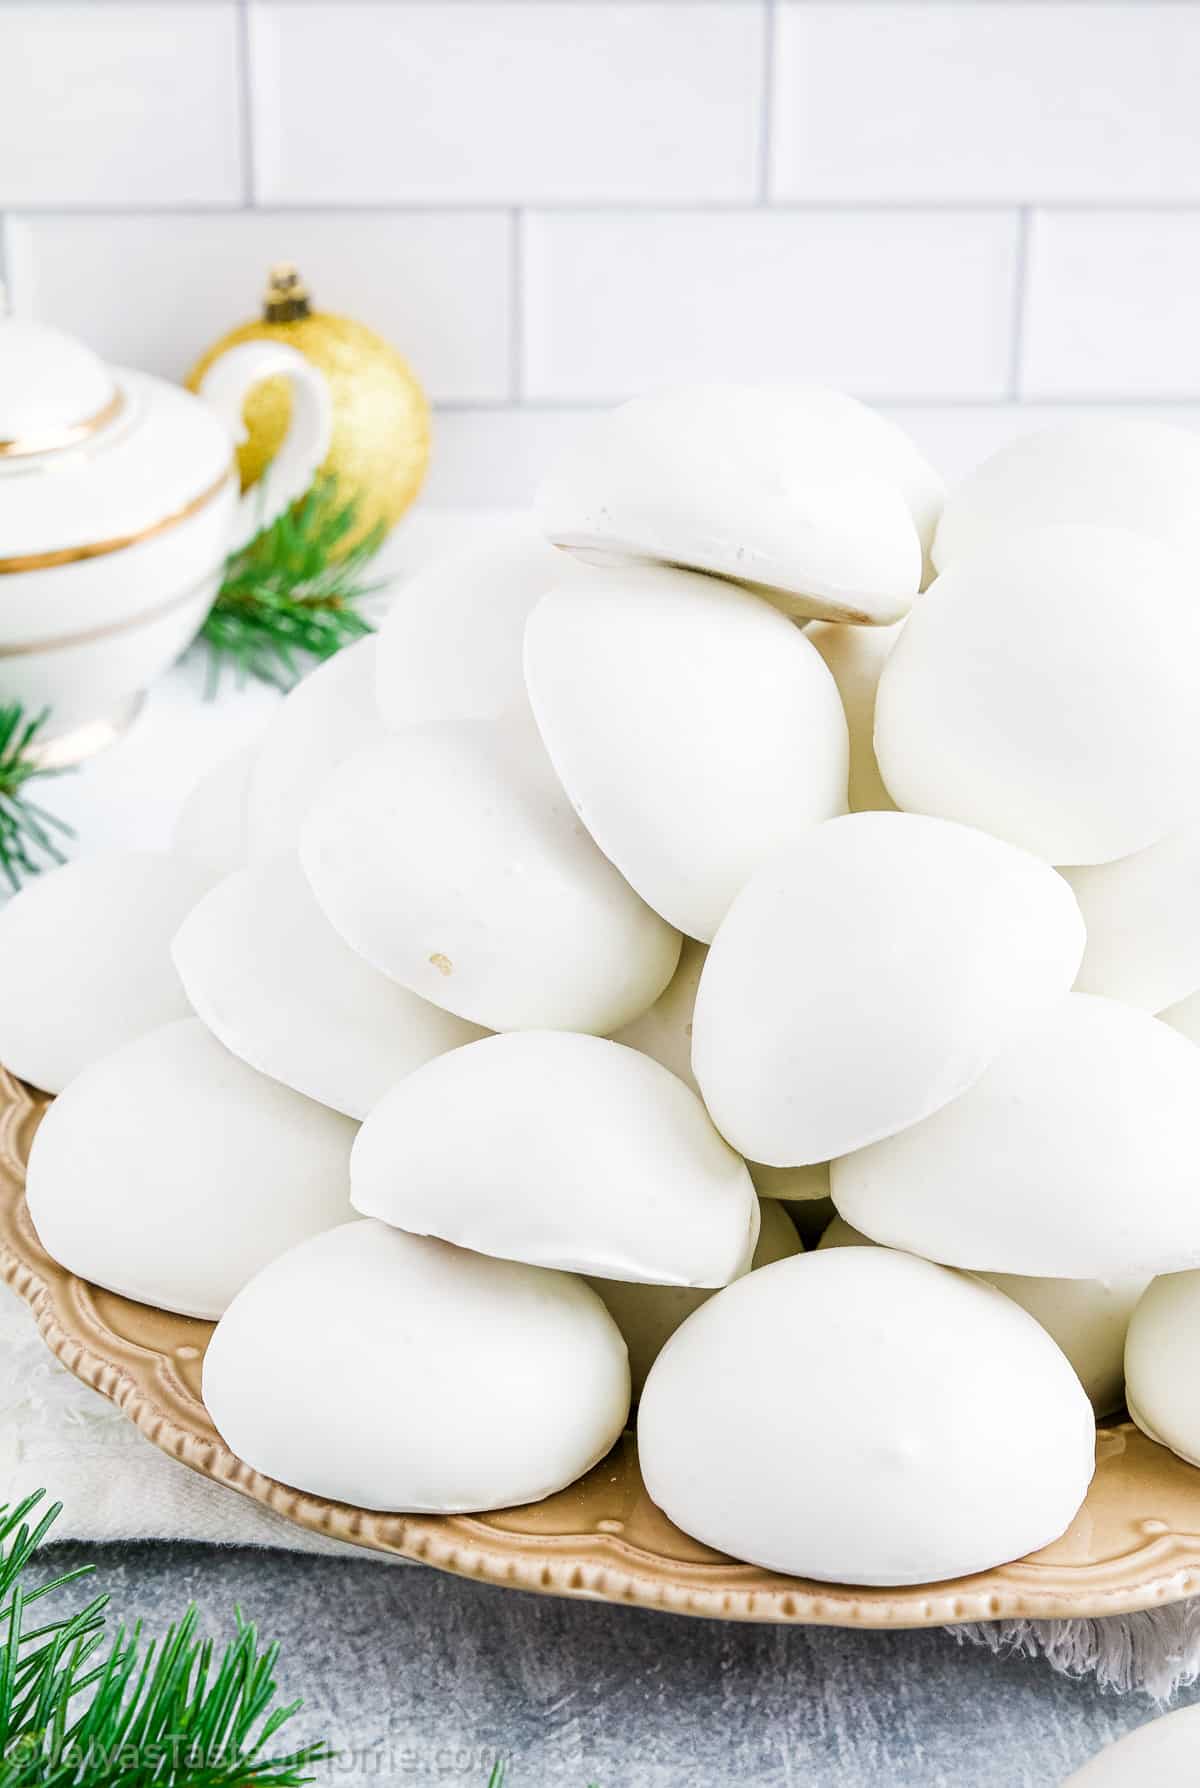
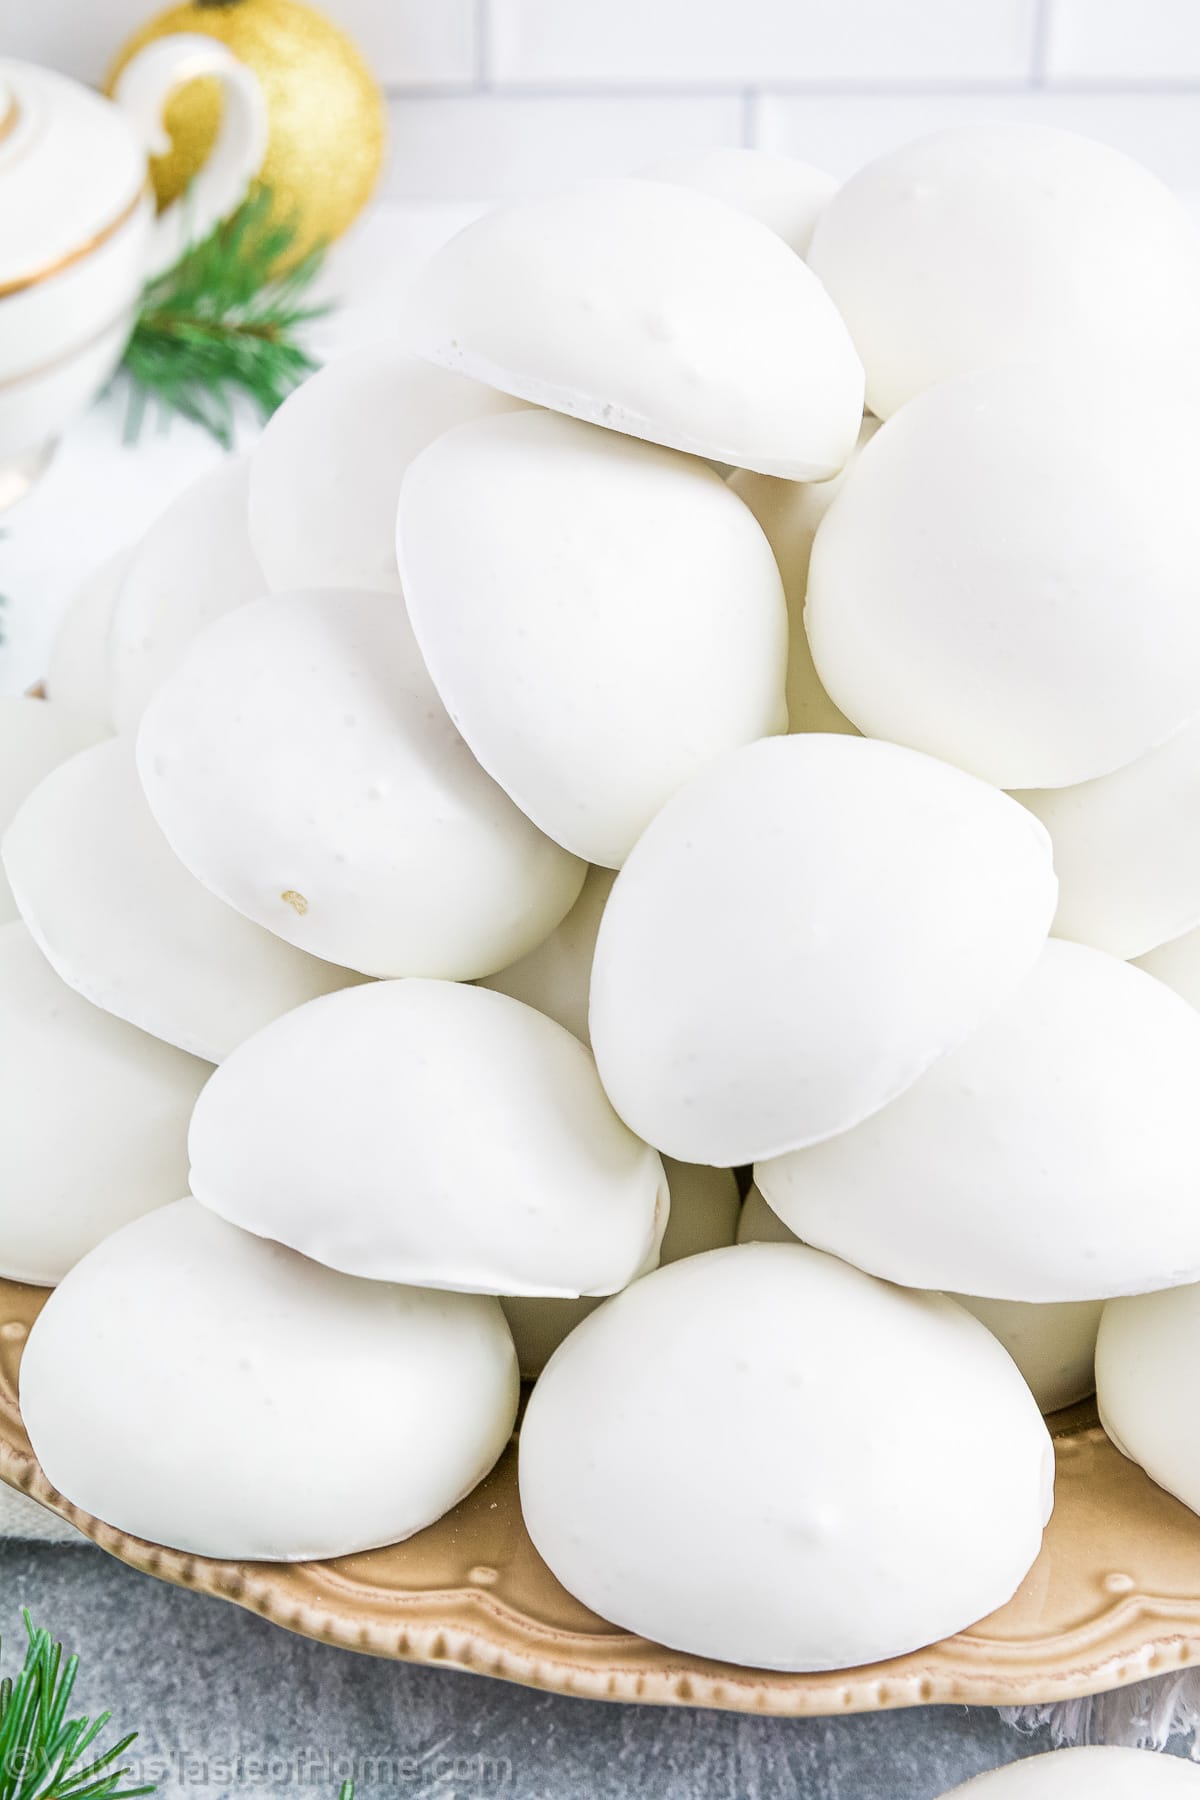
Peppermint cookies are a delicious Christmas cookie recipe that combines the classic flavors of peppermint into a chewy, delicious treat. They’re deliciously sweet on the inside, with the perfect minty glaze on the outside.
Making peppermint cookies at home is a great way to indulge in a sweet treat that’s also festive and fun. The cookies themselves are sweet and chewy, with a refreshing burst of peppermint flavor.
Not only do these cookies taste amazing, but they also fill the home with a wonderful aroma that’s sure to get everyone in the Christmas spirit. The peppermint cookies recipe is definitely a must-try for anyone who loves baking and enjoys the combination of classic cookies and peppermint.
What Makes This Peppermint Cookies Recipe Special?
- Easy to make: This peppermint cookie recipe is straightforward and simple. With clear steps for both the dough and the glaze, even a beginner in the kitchen can whip up these delicious treats without any hassle.
- Family-favorite: These cookies bring the classic peppermint flavor loved by many to life, making them a hit with both kids and adults alike. Their sweet taste and chewy texture make them a family favorite, especially during the holiday season.
- Delicious: The combination of sour cream in the dough and the peppermint extract in the glaze gives these cookies a unique taste. The vibrant peppermint flavor paired with the sweetness of the glaze makes these cookies incredibly delicious.
- Crowd pleaser: Whether you’re hosting a Christmas party or looking for a sweet treat to share, these cookies are sure to please. The festive peppermint flavor combined with the sweet glaze makes these cookies a hit at any gathering.
- Versatile: This recipe is versatile, allowing you to adjust the size of the cookies or the amount of peppermint extract to suit your preference. You can even add crushed candy canes or white chocolate chips for an extra festive touch.
What You Need to Make Peppermint Cookies at Home
All you need are some simple pantry staple ingredients to make this peppermint cookies recipe at home. Let’s look at them in more detail:
For the Dough:
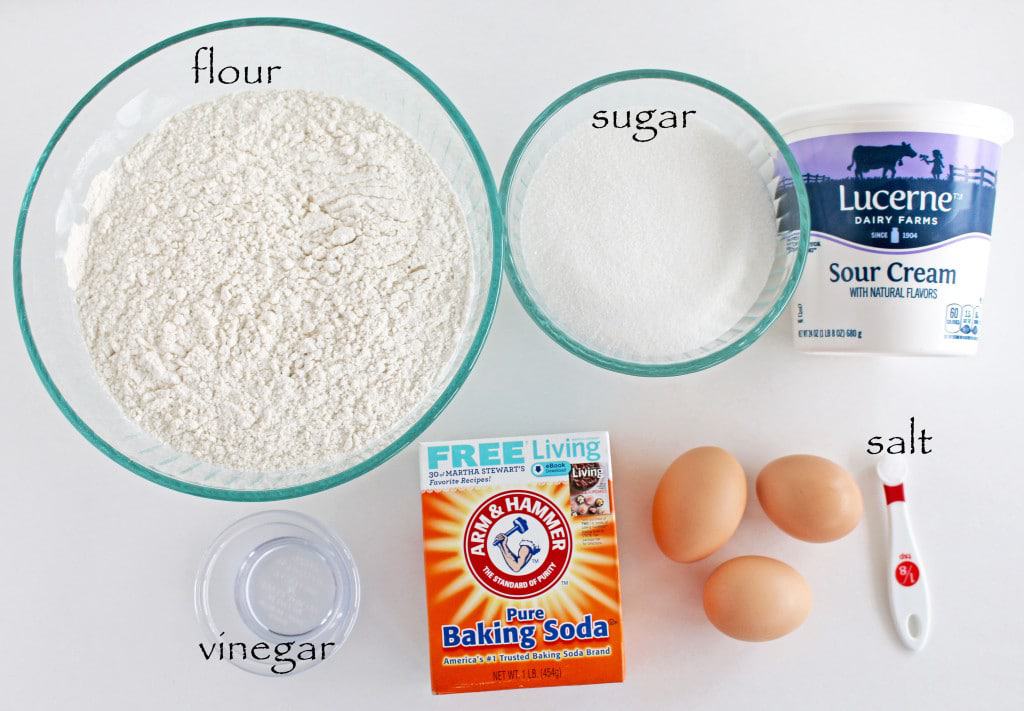
- Egg yolks: These give the cookie dough a rich and creamy texture. The yolks also help in binding the ingredients together.
- Granulated sugar: This is essential for sweetness. It also aids in creating a chewy and crisp texture in the cookies.
- Sour cream: This adds moisture and creaminess to the dough, making the cookies soft and tender.
- Salt: A pinch of salt enhances the flavors of the other ingredients.
- Baking soda: This leavening agent helps the cookies rise and become fluffy.
- Vinegar: Vinegar reacts with baking soda to create a nice rise in the cookies.
- All-purpose flour: This is the main structure of the cookies. It’s necessary for the dough and for rolling out the cookies.
For the Glaze:
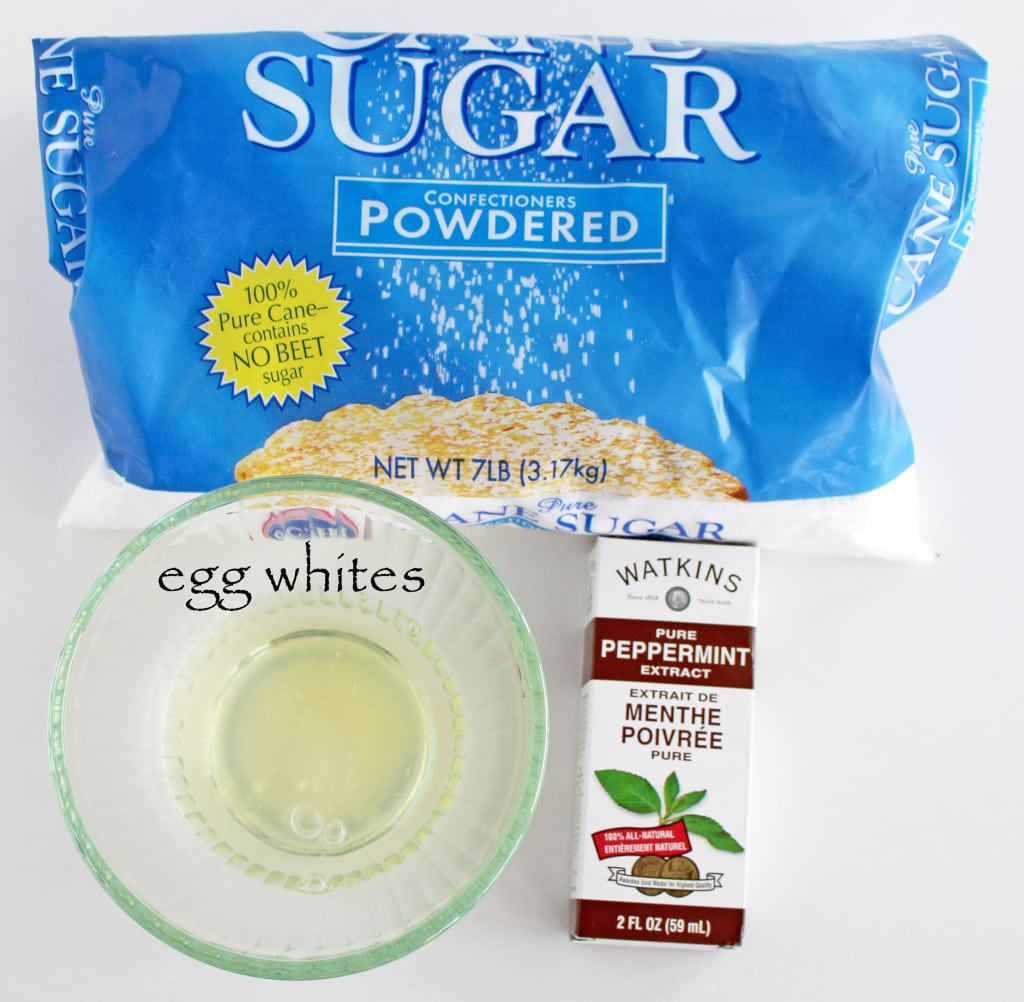
- Egg whites: These are used to create a smooth and shiny glaze for the cookies.
- Confectioner’s sugar: This sugar is fine and powdery, perfect for a smooth glaze. It also adds sweetness to the glaze.
- Peppermint extract: This is what gives the cookies their distinctive peppermint flavor. It is a strong extract, so a little goes a long way.
How to Make Peppermint Cookies (Step-by-Step)
Making these incredible peppermint cookies is easier than you think. Here’s how to make them at home step by step:
How to Prepare the Cookie Dough
We will start by separating the egg yolks from the egg whites. Set the egg whites aside on the countertop, as we will use them later to create a glaze.
In a large mixing bowl, beat the egg yolks and sugar together using a stand mixer. To guarantee a smooth mixture, add only half a cup of sugar at a time, beating well after each addition. Make sure to scrape the sides of the bowl with a spatula to incorporate all the ingredients.
Next, add a pinch of salt and some sour cream to the mixture. Beat well for a couple of minutes, scrape the sides of the bowl, and then beat for another two to three minutes
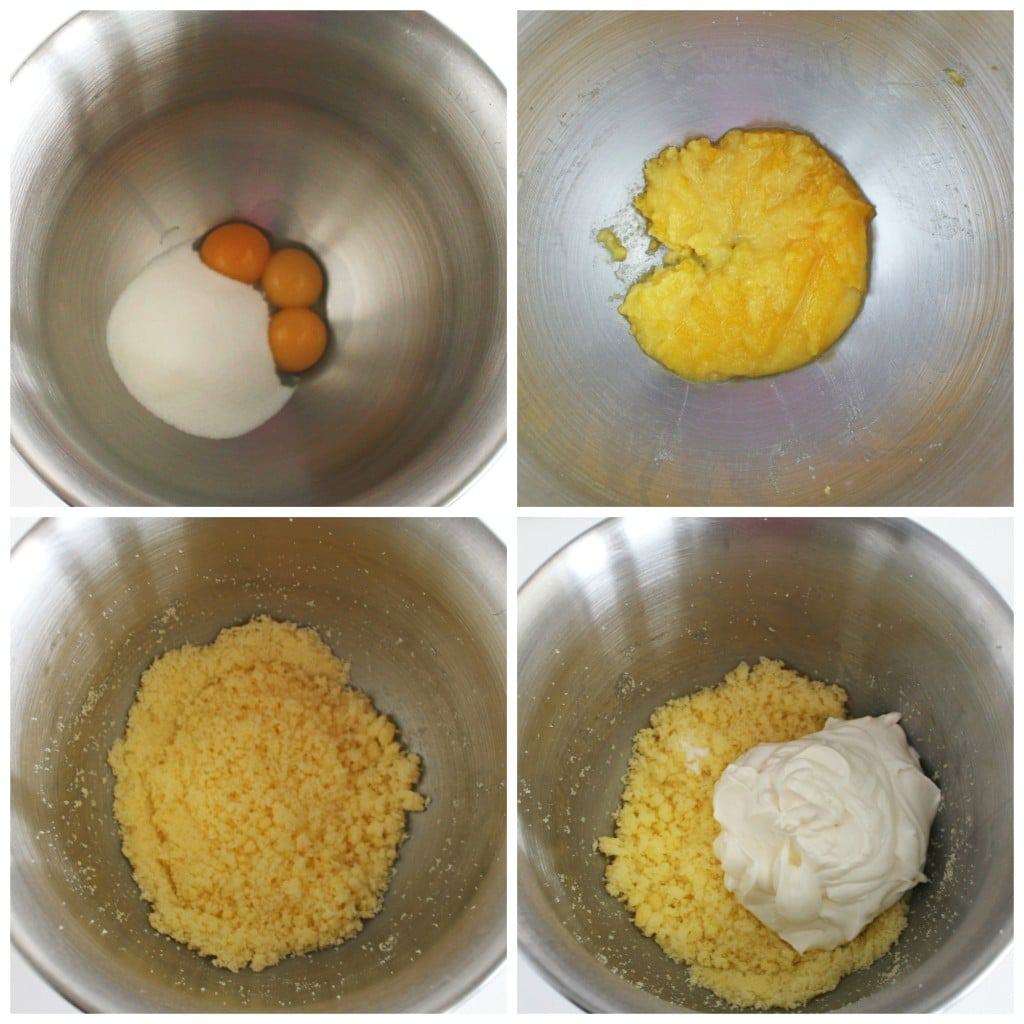
In a small bowl, activate the baking soda with a splash of vinegar, then add it to the dough and mix until combined.
Let the dough rest on the countertop for about ten to fifteen minutes to allow the baking soda and vinegar reaction to take place.
Finally, add flour in a cup at a time until it is all mixed in. Let the dough rest for 15 minutes before shaping cookies.

How to Roll and Cut the Cookies
After the dough has rested, it is time to roll it out. Sift half a cup of all-purpose flour onto a clean working surface. Using a rubber spatula, remove the dough from the mixing bowl and place it on the floured surface.
Coat the dough with the sifted flour, and roll it into a ball. Cut the dough into three equal pieces for easier rolling.
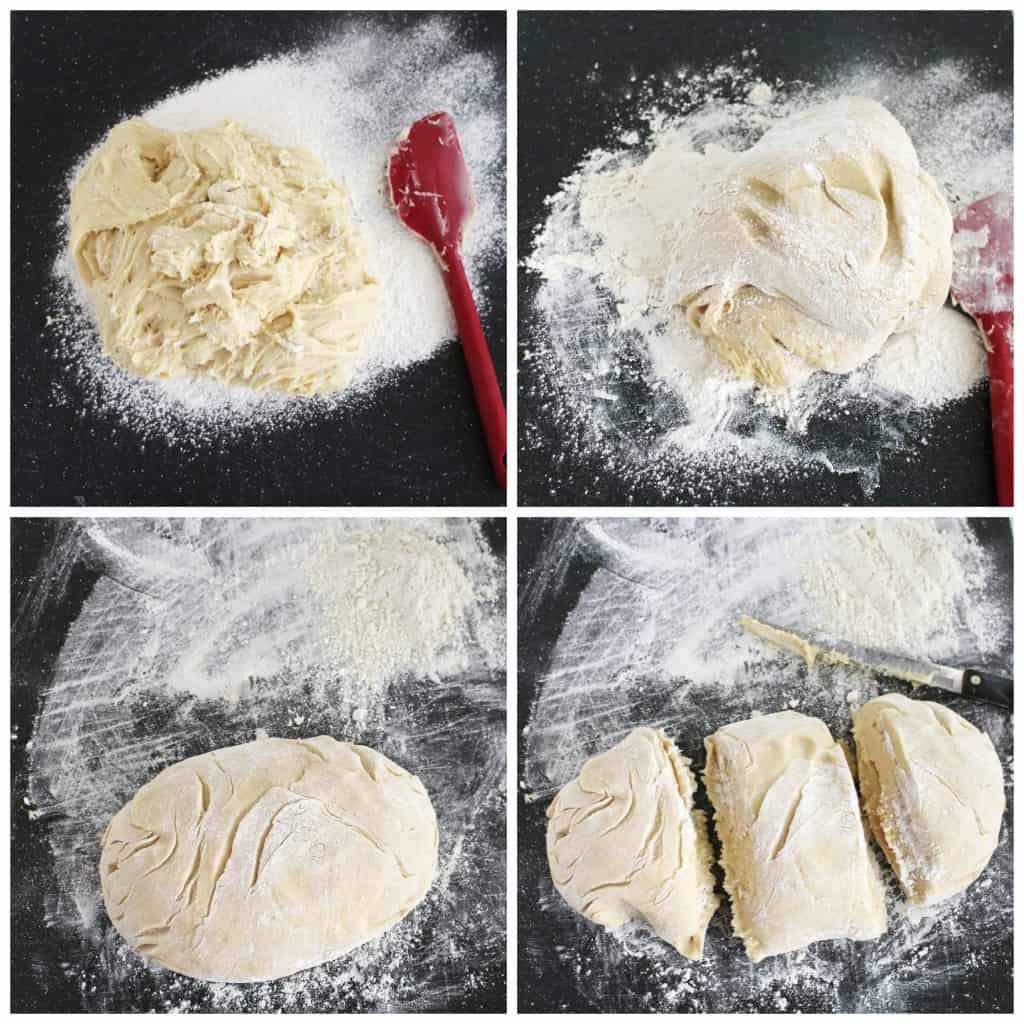
Take one piece of dough and roll it into a log about an inch and a half in thickness.
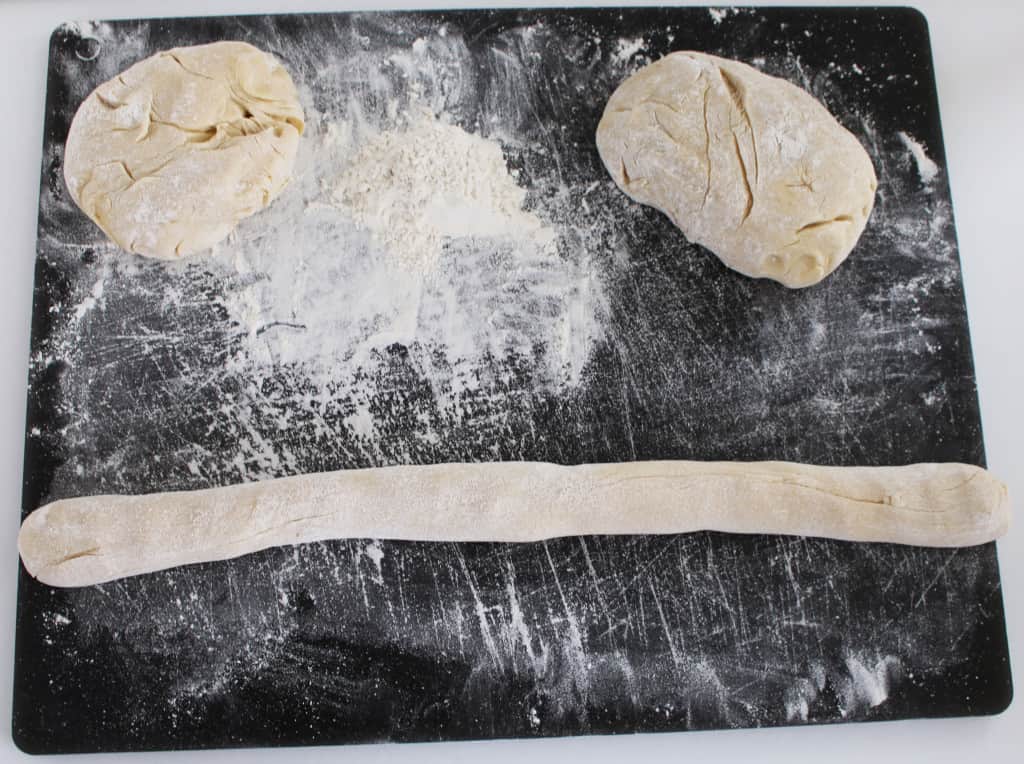
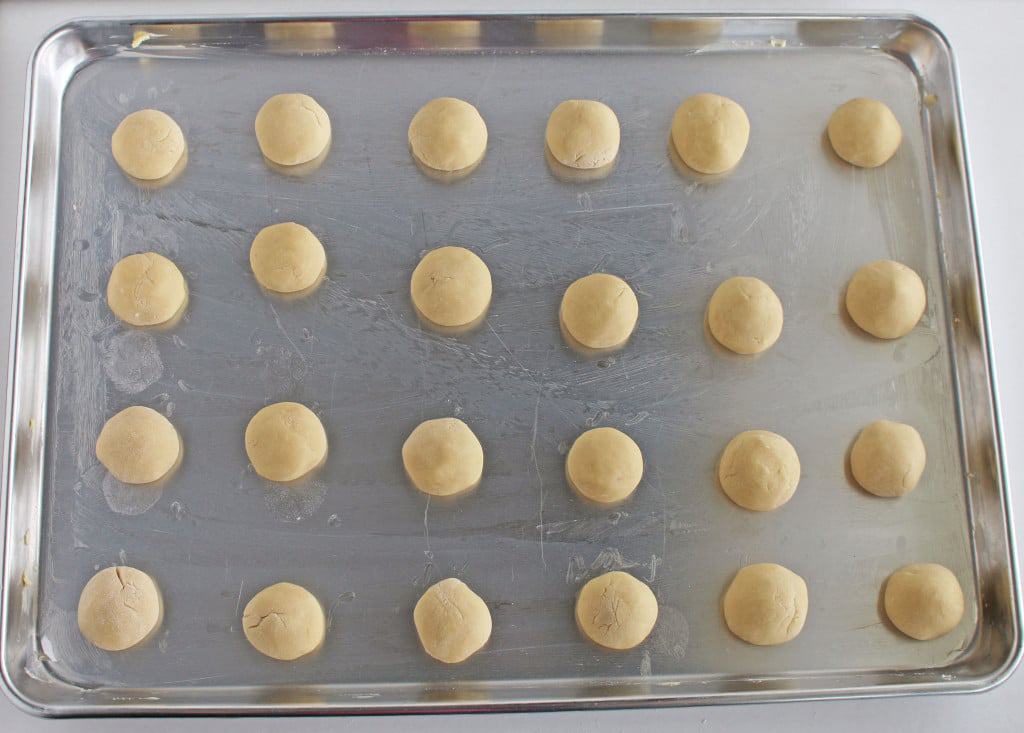
Cut the log into small cookie pieces. Dip each piece into the flour, roll it into a cookie dough ball, then dip it again into the flour if it is sticky.
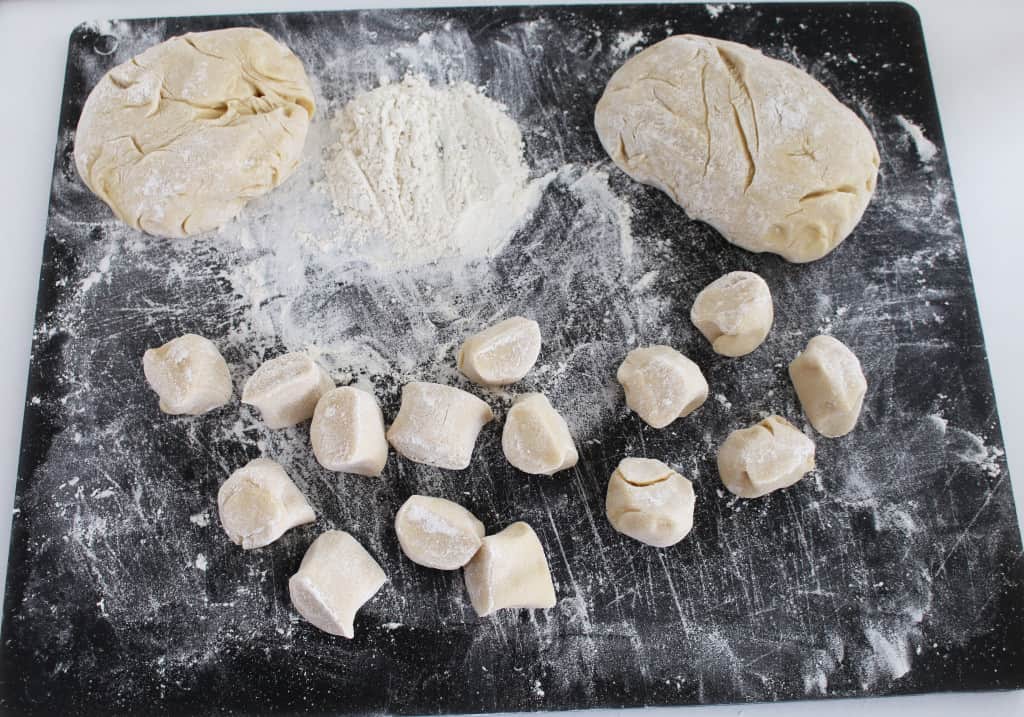
Place the rolled cookie dough balls onto a baking sheet lined with parchment paper. Repeat the process with the remaining dough.
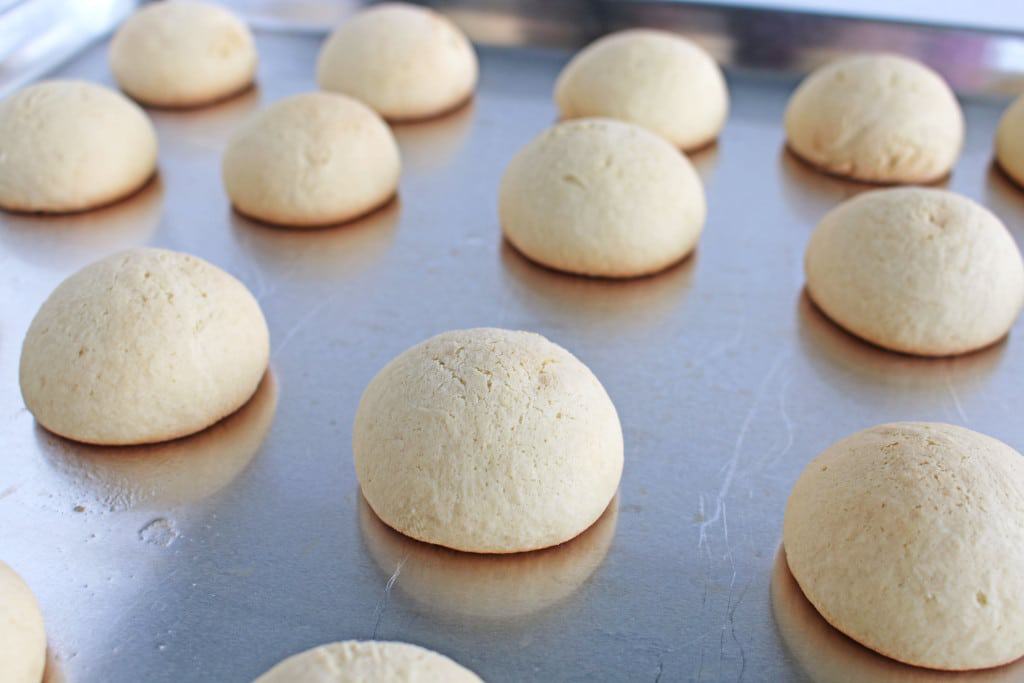
Preheat your oven to 375°F and bake the cookies for around twenty to twenty-five minutes, or until they are a light golden color. Once they’re done, remove the cookies from the oven and allow them to cool for about five minutes.
How to Make the Glaze
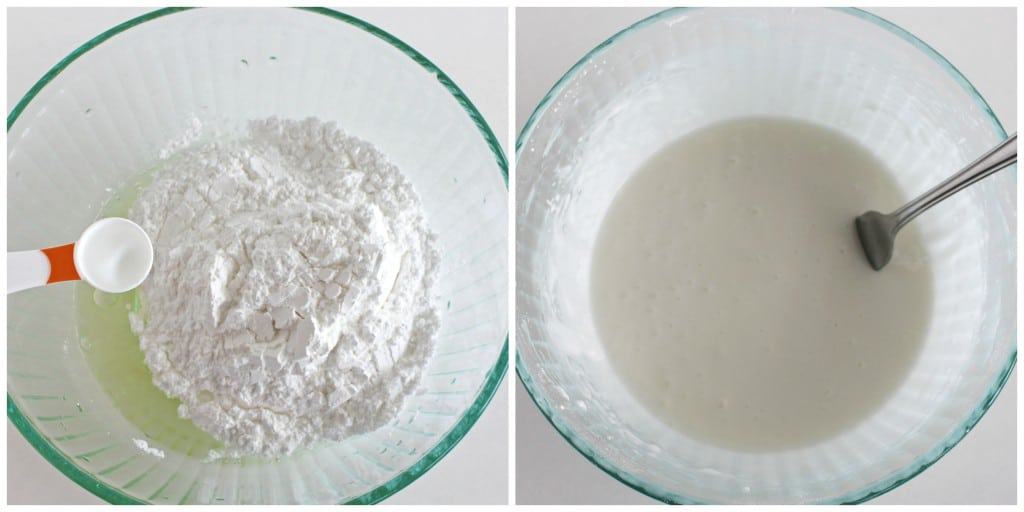
While the cookies are cooling, you can start preparing the glaze. In a bowl, combine the reserved egg whites, some powdered sugar, and a bit of peppermint extract.
Start beating the mixture at a low speed to avoid a cloud of powdered sugar, then gradually increase the speed. Beat the glaze on high for about two to three minutes, then let it rest for a few minutes to allow any air bubbles to rise to the surface.
How to Glaze the Cookies
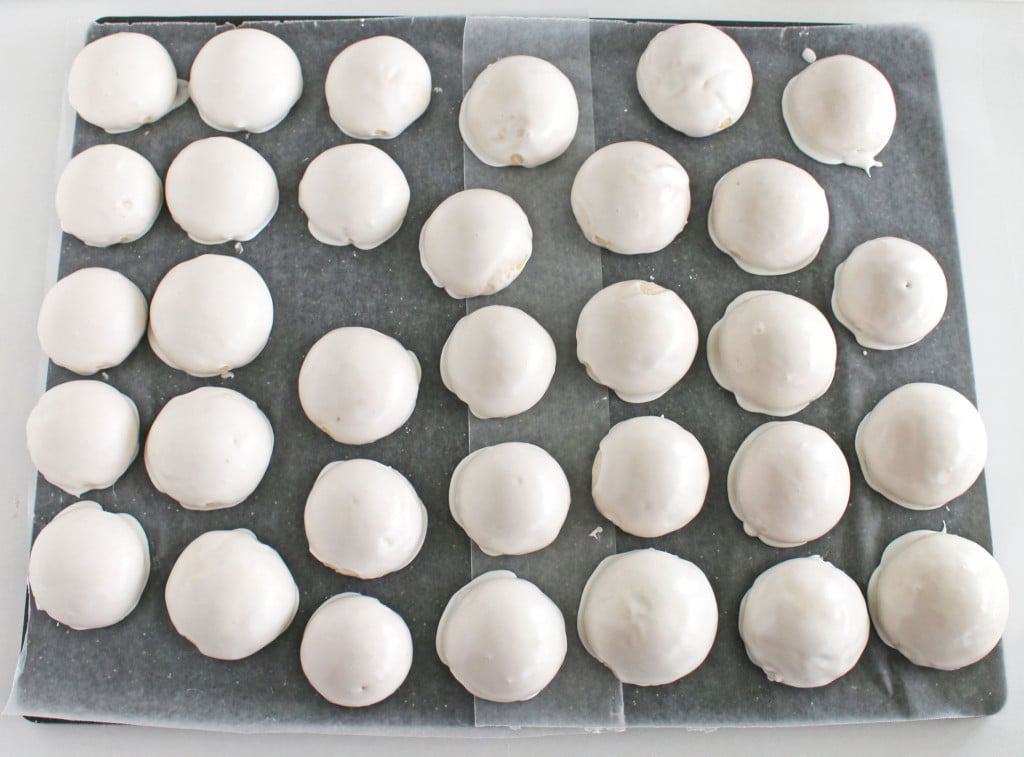
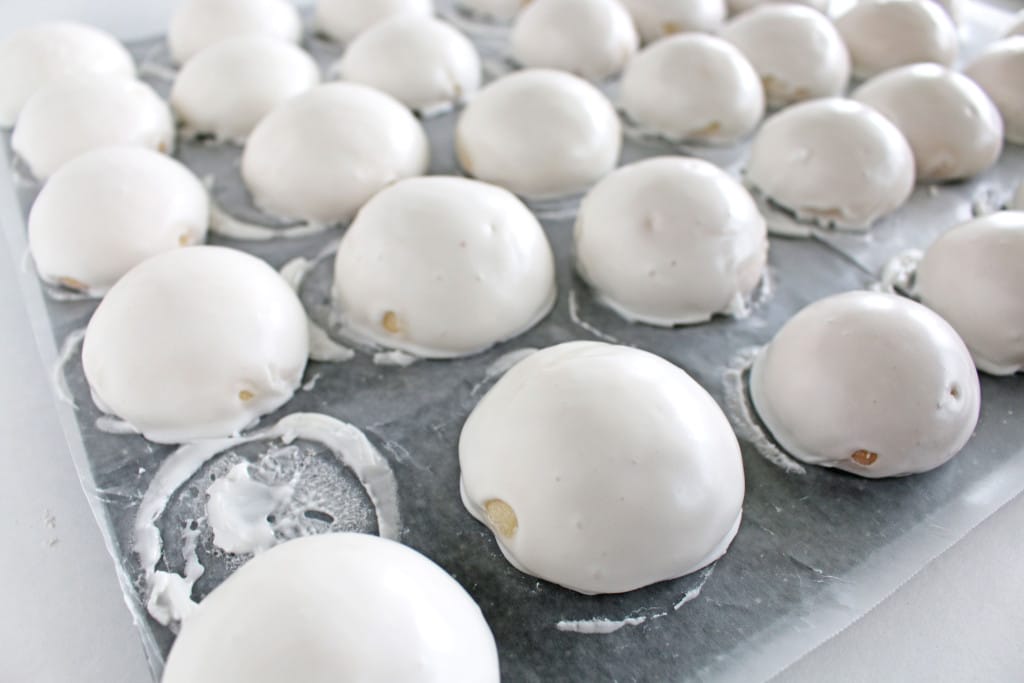
Dip the cooled cookies into the glaze, coating two to three at a time. Let the excess glaze drain off before transferring them onto a sheet of wax paper or silicon mat to dry.
Make sure to scrape off any excess glaze from the bottom of the cookie. Repeat this process with all the cookies.
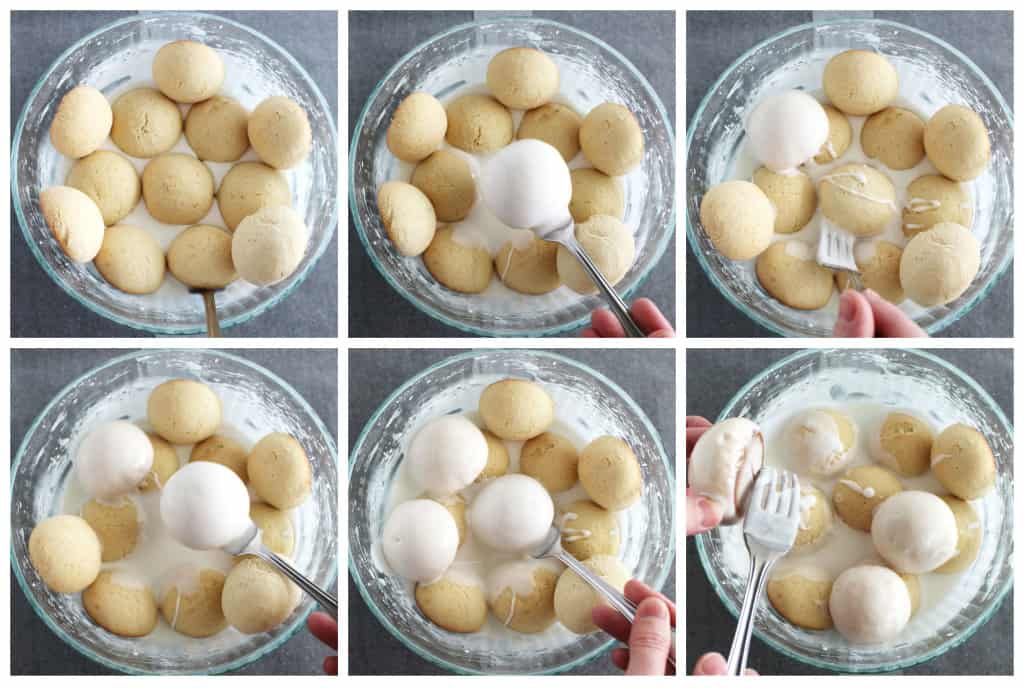
Once the glaze has dried on the top, gently shift each cookie from side to side. This will help remove any excess glaze and give your cookies a perfect shape. Enjoy your homemade peppermint cookies!
Tips for Making the Best Peppermint Cookies
- Be Patient with Your Dough: This recipe requires allowing the dough to rest for about ten minutes after adding the soda-vinegar mixture. This lets the ingredients react and gives your cookies the right texture.
- Roll Dough in Flour: To avoid a sticky situation, roll each piece of dough in flour before shaping into a ball. This will make the dough easier to handle and shape.
- Preheat Your Oven: Make sure your oven is preheated to the right temperature before you start baking. This helps guarantee that your cookies will bake evenly.
- Give Your Cookies Room: When placing your cookie dough on the baking sheet, leave about two inches of space between each piece. This allows the cookies to spread as they bake without sticking to each other.
- Glaze with Care: The glaze needs to be applied while the cookies are still warm, but not hot, to guarantee that it sets properly. If you glaze them when they’re too hot, the glaze will slide off and pool at the bottom.
- Pop Those Bubbles: After mixing your glaze, let it stand for a few minutes to allow any air bubbles to rise to the top. This will give you a smoother, more even glaze on your cookies.
- Use Wax Paper: After glazing, place your cookies on wax paper. This will catch any excess glaze and prevent your cookies from sticking to the surface as they dry.
Serving Suggestions for Peppermint Cookies
- Enjoy these peppermint cookies with a steaming mug of hot cocoa. The rich, chocolatey beverage compliments the peppermint flavor and the chewy texture of the cookies perfectly.
- For a holiday-themed dessert, serve these cookies alongside a scoop of peppermint chocolate ice cream. The combination of the cold, creamy ice cream and the warm, chewy cookies is simply irresistible.
- Add a festive twist to your Christmas cookie recipes by using these peppermint cookies as a crunchy topping for your Christmas pudding or pie. Their peppermint flavor will add a refreshing contrast to the rich, heavy dessert.
- Pair these cookies with a cup of your favorite tea for a delightful afternoon treat. Whether it is a robust black tea or a light, floral white tea, the peppermint flavor in the cookies will provide a refreshing palate cleanser.
- If you’re hosting a Christmas party, serve these cookies on a beautiful platter or holiday cookie tray with crushed candy canes for decoration. The candy canes will add an extra crunch and peppermint flavor, making the cookies even more festive and tasty.
Recipe Variation Ideas for Peppermint Cookies
This delicious peppermint cookies recipe is absolutely perfect as is, but if you’re looking to change things up, here are a few variation ideas you can try:
- Try it with crushed candy canes: For a fun, festive twist, add half a cup of crushed candy canes to the dough. This will give the cookies a delightful crunch and an extra burst of peppermint flavor. It is a great way to use up leftover candy canes from the holidays.
- Use brown sugar: If you prefer a deeper, more caramel-like flavor in your cookies, replace the granulated sugar with an equal amount of brown sugar. Brown sugar will give your cookies a chewy texture and a rich, molasses-like flavor that pairs well with the peppermint.
- Add a touch of vanilla: For a more complex flavor profile, add a teaspoon of vanilla extract to the dough. The vanilla will enhance the flavors of the peppermint and chocolate, resulting in a more flavorful cookie.
- Try it with white chocolate chips: For a sweet and creamy twist, add half a cup of white chocolate chips to the dough. The white chocolate chips will melt into the cookies as they bake, creating pockets of creamy sweetness that pair perfectly with the peppermint flavor.
Frequently Asked Questions
Yes, you can use different extracts for this recipe, but keep in mind that it would change the flavor. The peppermint extract gives the cookies their distinctive peppermint flavor, which is perfect for the holiday season.
I would not recommend skipping the chilling step in this recipe. Chilling the dough allows the butter to solidify, which prevents the cookies from spreading too much during baking.
The cookies are done when they are light golden in color. The baking time can vary depending on the size of the cookies and your oven, so it is always a good idea to keep a close eye on them.
How to Store Leftover Peppermint Cookies
Storing your leftover peppermint cookies properly is essential to maintain their delightful minty flavor and crisp texture. To store your leftover peppermint cookies in the fridge, first, let them cool down completely at room temperature.
Once cooled, place them in an airtight container, separating layers with parchment paper to prevent them from sticking together. They can be stored in the fridge for up to a week.
You can also freeze these peppermint cookies! To freeze, follow the same initial steps as fridge storage. After placing them in an airtight container, you can put them in the freezer where they’ll stay good for up to three months. To prevent freezer burn, make sure your container is sealed properly and there’s no moisture inside.
For frozen cookies, it is best to thaw them overnight in the fridge. Once thawed, follow the same reheating process as the fridge-stored cookies. If you’re in a hurry, you can also microwave them for about ten seconds, but be careful not to overdo it as they can quickly become too soft.

Similar Recipes You’ll Love
- The Best Christmas Tree Sugar Cookies (Easy Festive Recipe)
- Snowflake Cookies with Royal Icing (Easy Christmas Cookies)
- Easy Oreo Truffles (Festive Peppermint Oreo Cookie Balls!)
- Easy Cranberry Pistachio Biscotti (Festive Holiday Cookies!)
- Easy Cheesecake Cranberry Bars (Perfect for the Holidays!)
See all the cookie recipes.

The Perfect Peppermint Cookies (Easy + Best Results)
Ingredients
For the Peppermint Cookies Dough
- 3 – large egg yolks (reserve the whites for the glaze)
- 2 cups – granulated sugar
- 1 lb – sour cream
- 1/8 tsp. – salt
- 1 tsp. – baking soda (to activate baking soda)
- 2 tsp. – vinegar
- 5 ½ cups – sifted all-purpose flour + ½ cup for rolling the cookies
For the Peppermint Cookies Glaze
- 3 large egg – whites
- 4 cups – confectioners’ sugar (depends on the size of the egg whites)
- ½ tsp. – pure peppermint extract
Instructions
How to Prepare the Cookie Dough
- We will start by separating the egg yolks from the egg whites. Set the egg whites aside on the countertop, as we will use them later to create a glaze.
- In a large mixing bowl, beat the egg yolks and sugar together using a stand mixer. To guarantee a smooth mixture, add only half a cup of sugar at a time, beating well after each addition. Make sure to scrape the sides of the bowl with a spatula to incorporate all the ingredients.
- Next, add a pinch of salt and some sour cream to the mixture. Beat well for a couple of minutes, scrape the sides of the bowl, and then beat for another two to three minutes
- In a small bowl, activate the baking soda with a splash of vinegar, then add it to the dough and mix until combined.
- Let the dough rest on the countertop for about ten to fifteen minutes to allow the baking soda and vinegar reaction to take place.
- Finally, add flour in a cup at a time until it is all mixed in. Let the dough rest for 15 minutes before shaping cookies.
How to Roll and Cut the Cookies
- After the dough has rested, it is time to roll it out. Sift half a cup of all-purpose flour onto a clean working surface. Using a rubber spatula, remove the dough from the mixing bowl and place it on the floured surface.
- Coat the dough with the sifted flour, and roll it into a ball. Cut the dough into three equal pieces for easier rolling.
- Take one piece of dough and roll it into a log about an inch and a half in thickness.
- Cut the log into small cookie pieces. Dip each piece into the flour, roll it into a cookie dough ball, then dip it again into the flour if it is sticky.
- Place the rolled cookies onto a baking sheet lined with parchment paper. Repeat the process with the remaining dough.
- Preheat your oven to 375°F and bake the cookies for around twenty to twenty-five minutes, or until they are a light golden color. Once they’re done, remove the cookies from the oven and allow them to cool for about five minutes.
How to Make the Glaze
- While the cookies are cooling, you can start preparing the glaze. In a bowl, combine the reserved egg whites, some powdered sugar, and a bit of peppermint extract.
- Start beating the mixture at a low speed to avoid a cloud of powdered sugar, then gradually increase the speed. Beat the glaze on high for about two to three minutes, then let it rest for a few minutes to allow any air bubbles to rise to the surface.
How to Glaze the Cookies
- Dip the cooled cookies into the glaze, coating two to three at a time. Let the excess glaze drain off before transferring them onto a sheet of wax paper to dry.
- Make sure to scrape off any excess glaze from the bottom of the cookie. Repeat this process with all the cookies.
- Once the glaze has dried on the top, gently shift each cookie from side to side. This will help remove any excess glaze and give your cookies a perfect shape. Enjoy your homemade peppermint cookies!
Thank you for following me on Instagram, Facebook, and Pinterest!
This recipe was originally posted on January 6, 2016 (original picture below). I updated the pictures and the post for a better user experience. This post may contain affiliate links. Read my disclosure.

At what point do you add the flour in??
Hello! I got that part added. Thank you for catching it. I hope you enjoy the cookies!:)
Hi Valya,
I’ve make these cookies more than a dozen of times. They are so good, hands down my favorite cookie. I enjoy them with milk or tea. Thank you for this wonderful recipe.
Aww… that’s awesome!!! Glad to hear that you made them that many times too, thank you! And thank you very for amazing review! 🙂
These look scrumptious! I want to make them
Today and wanted to make sure that it’s
7 egg white total for the glaze right?
Hmm… the recipe says 4 egg whites total.
Lovely cookies! So pretty! I like the peppermint flavor in them:)
Thank you Ilona. Have you ever made or tried them?
Oh my I absolutely love this cookies. Yum! Thank you for sharing.
You are very welcome, enjoy! 🙂