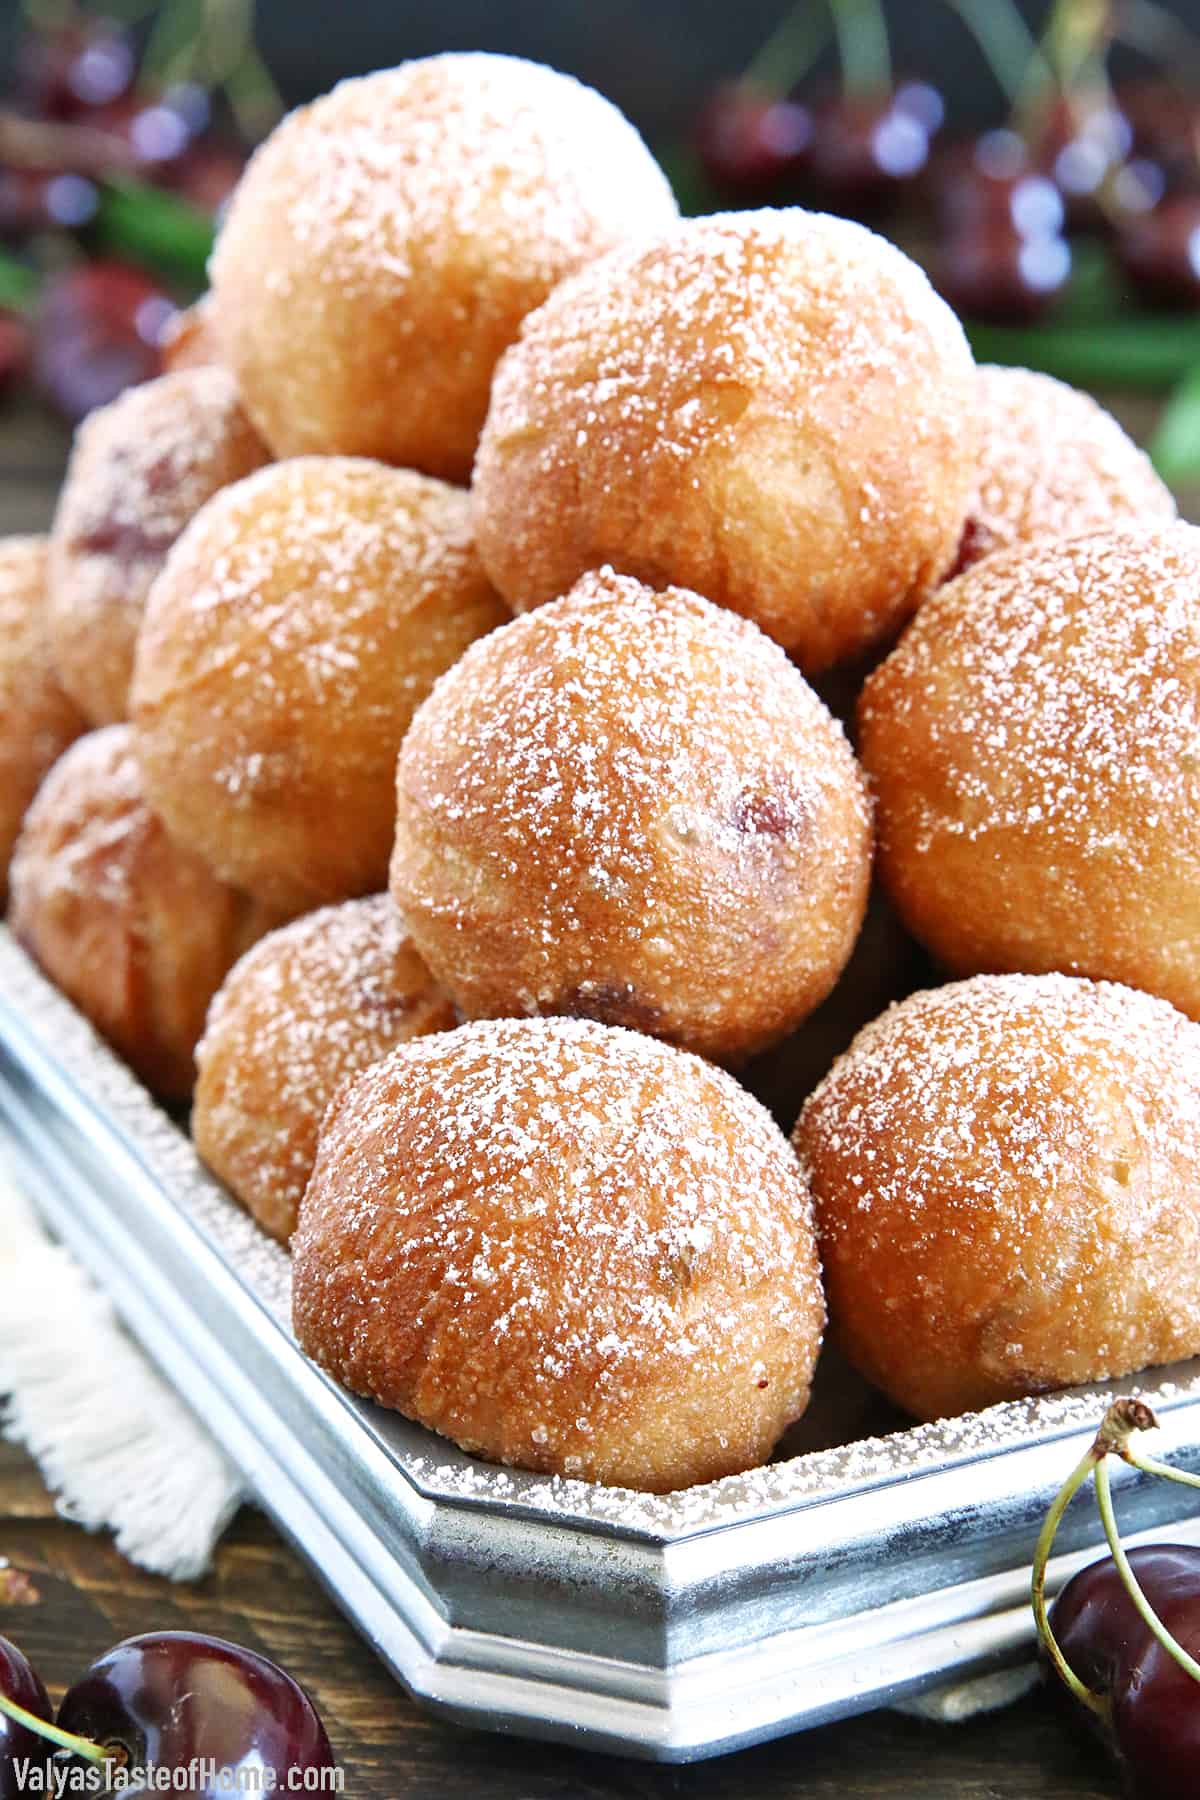
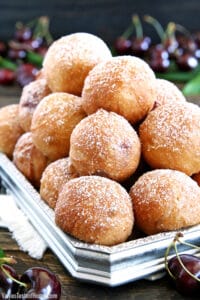
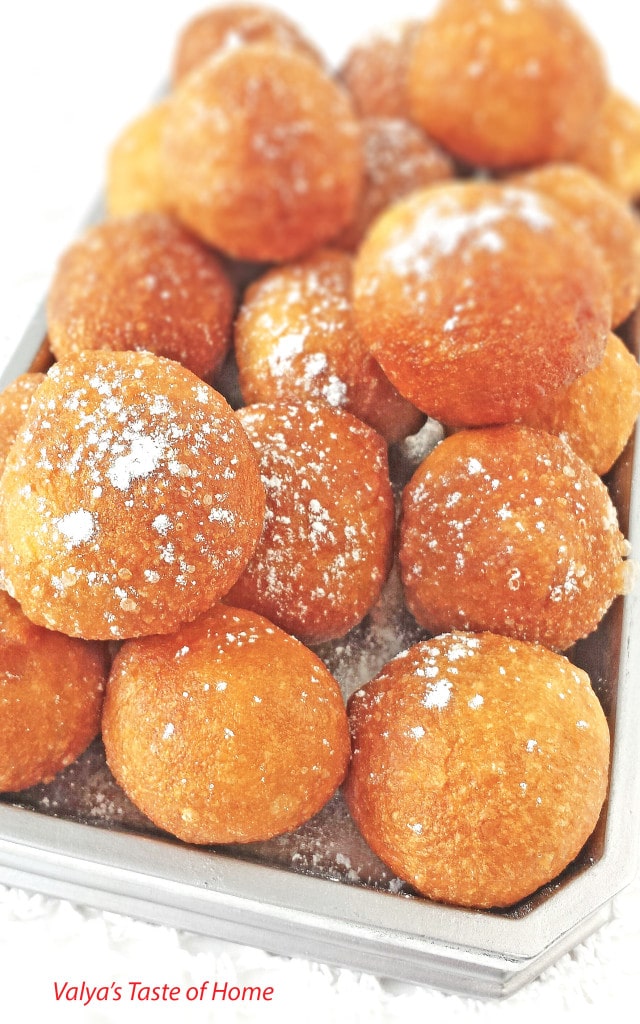
Cherry Filled Donut Holes (Easy Ponchiki Recipe!)
Ponchiki are delicious donut holes that are a beloved treat in Russia and Ukraine and are known for their soft, fluffy texture and burst of sweet cherry goodness. Made with a simple yet irresistible dough, these ponchiki are fried to golden perfection and finished with a dusting of powdered sugar.
I’m not a big fan of deep-fried food, however, there are some foods where it is the only way to go if you want to experience the true traditional treat, in all its delicious glory.
This donut holes (Ponchiki in Russian/Ukrainian) recipe is one of those and is absolutely worth it! They are very similar to the age-old, traditional Belyashi (or Pirozhki) recipe which is the savory version but just as irresistible.
This bite-size, pillow-soft, donut-like dessert is actually super easy to make. What’s best is that this recipe is made using pantry-staple ingredients that you most likely already have. There are many different variations for making ponchiki, but I think this dough goes best with some type of sweet filling.
You can also switch up the filling with pretty much any other fruit or sweet filling for these donut holes and it will still turn out great because the dough is fantastic! Another absolutely delicious variation that I love to use is homemade farmer’s cheese.
With their incredible aroma and tempting flavor, these cherry-filled delights are sure to captivate your taste buds and bring a touch of Russian and Ukrainian culinary tradition to your home. I’m sure you’re going to absolutely love it!
Want to learn how to make Ponchiki? Then keep on reading!
What is Ponchiki?
Ponchiki are donut holes that are delightful bite-sized treats that hold a special place in Russian and Ukrainian cuisine. They are essentially small, round donuts without a hole in the center. These golden-brown morsels boast a fluffy and tender interior, encased in a crisp, fried exterior.
What sets ponchiki apart is their versatility and the potential for various fillings. While this particular recipe focuses on a cherry filling, it can also be enjoyed plain or filled with other delightful surprises like sweetened condensed milk, jam, or even chocolate. The possibilities are endless, allowing for a range of flavors and textures that cater to individual preferences.
Ponchiki are often enjoyed as a special treat during festivals, holidays, or family gatherings in Ukraine. They bring a sense of nostalgia and comfort, reminding me of cherished traditions passed down through generations.
Whether served as a dessert, a sweet breakfast treat, or simply as a delightful snack, these Ukrainian donut holes are sure to captivate your hearts and taste buds. I’m sure you’re going to love it!
What Makes This Ponchiki Recipe Special?
Customizable: This ponchiki recipe can be adapted to suit just about any taste preference. Use any fruit or sweet filling you want for a whole new donut-like dessert every time!
Easy to make: These filled donut holes may look fancy, but they’re super simple to make! All you have to do is deep fry and fill some dough and you’ll be enjoying this treat in no time.
Few ingredients: One of the best parts about this recipe is that it doesn’t take any hard-to-find ingredients. You should already have most of what you need in the pantry!
What You Need to Make Ponchiki at Home
All you need are some simple, pantry staple ingredients to make these delicious Ponchiki at home. Let’s look at them in more detail:
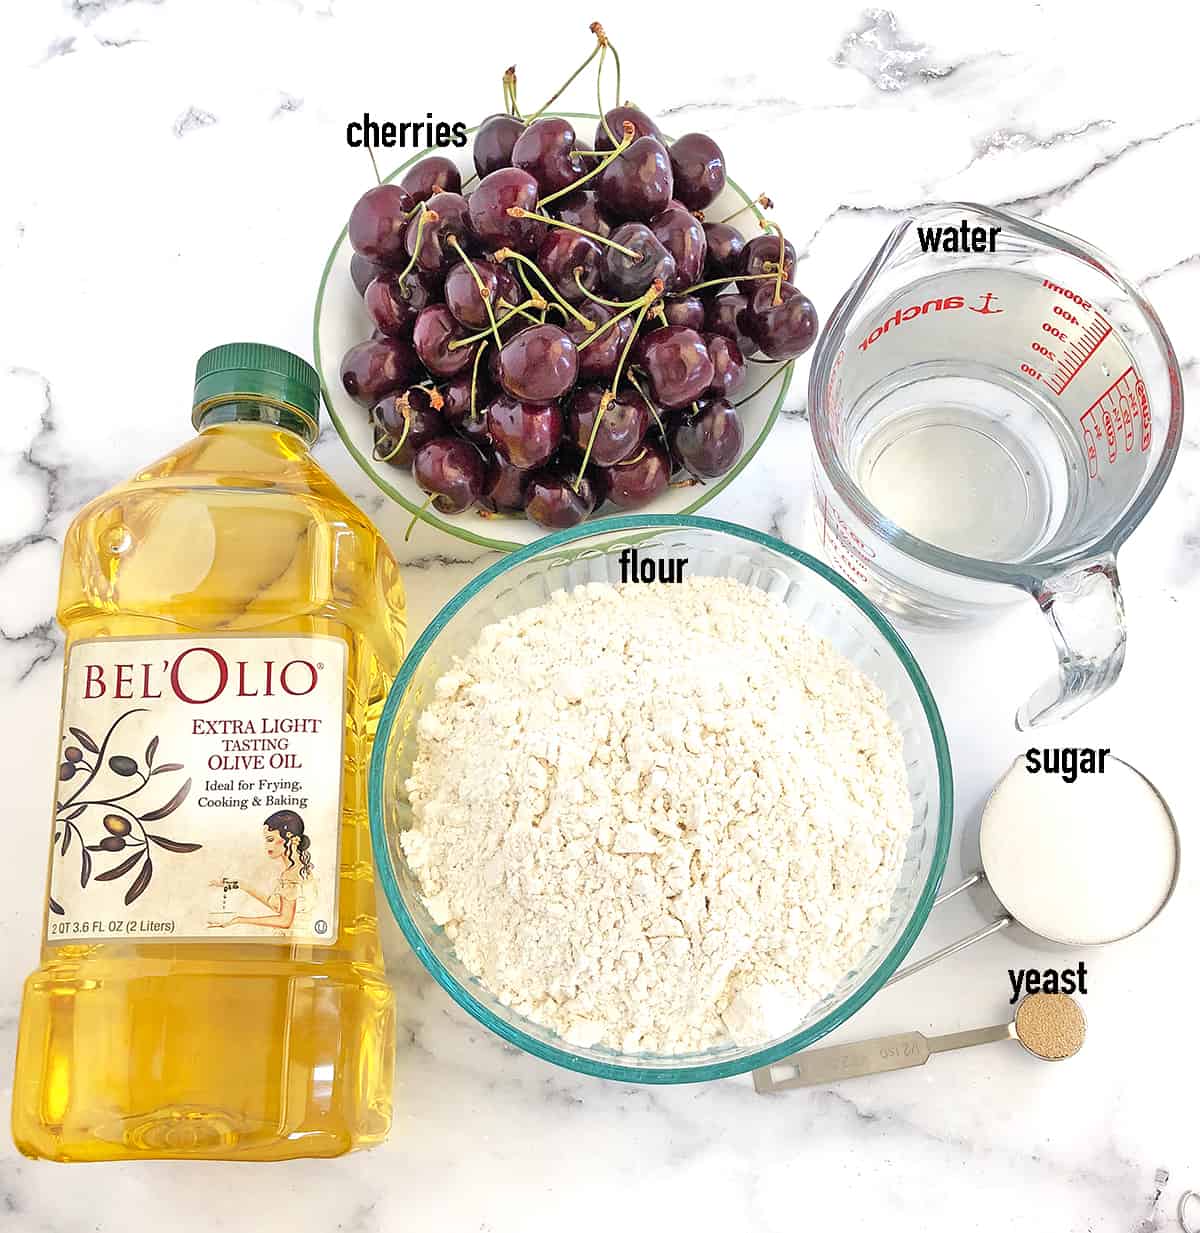
- Sugar: It wouldn’t be a delectably sweet dessert without a little sugar! It also helps tenderize the dough and adds to its texture.
- Salt: A pinch of salt will help us balance out some of the sweetness in the dessert. It also brings out the flavor of the other ingredients.
- Yeast: We’ll need some active dry yeast to make our dough rise. Just be sure the yeast isn’t too old, sometimes it can go bad and won’t work like it should!
- Oil: We’re going to need two types of oil for this dessert; extra virgin olive oil to make the dough and canola or vegetable oil for frying the dough.
- Flour: Flour will be the base of our batter. Regular all-purpose baking flour will work just fine.
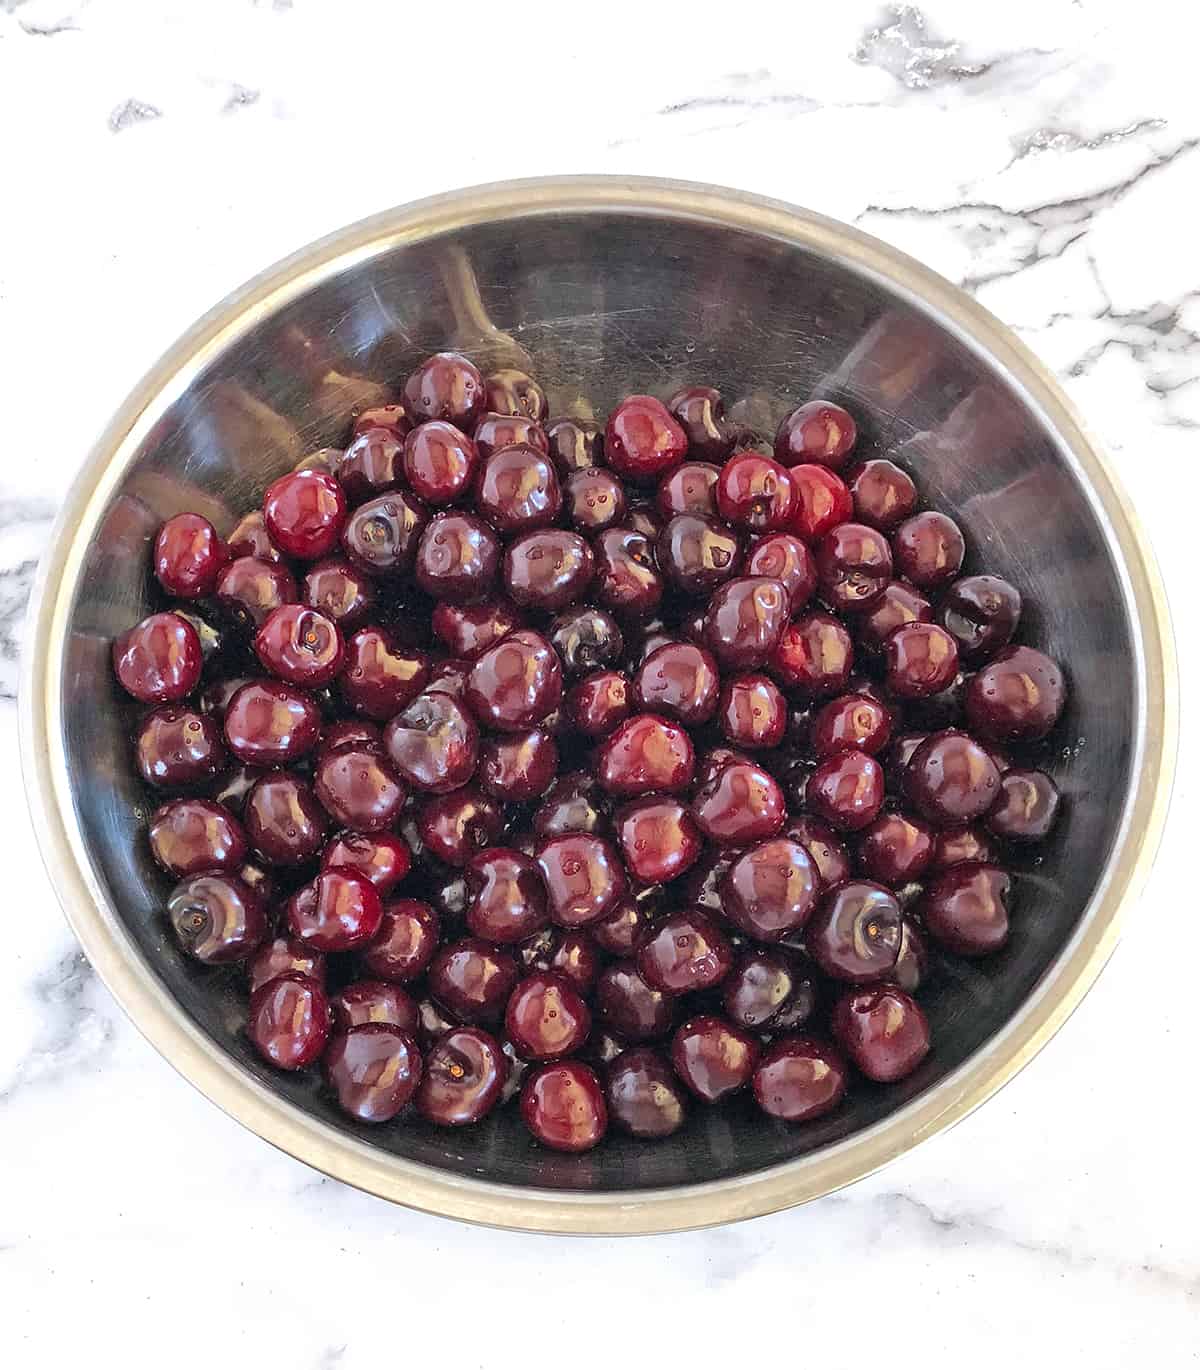
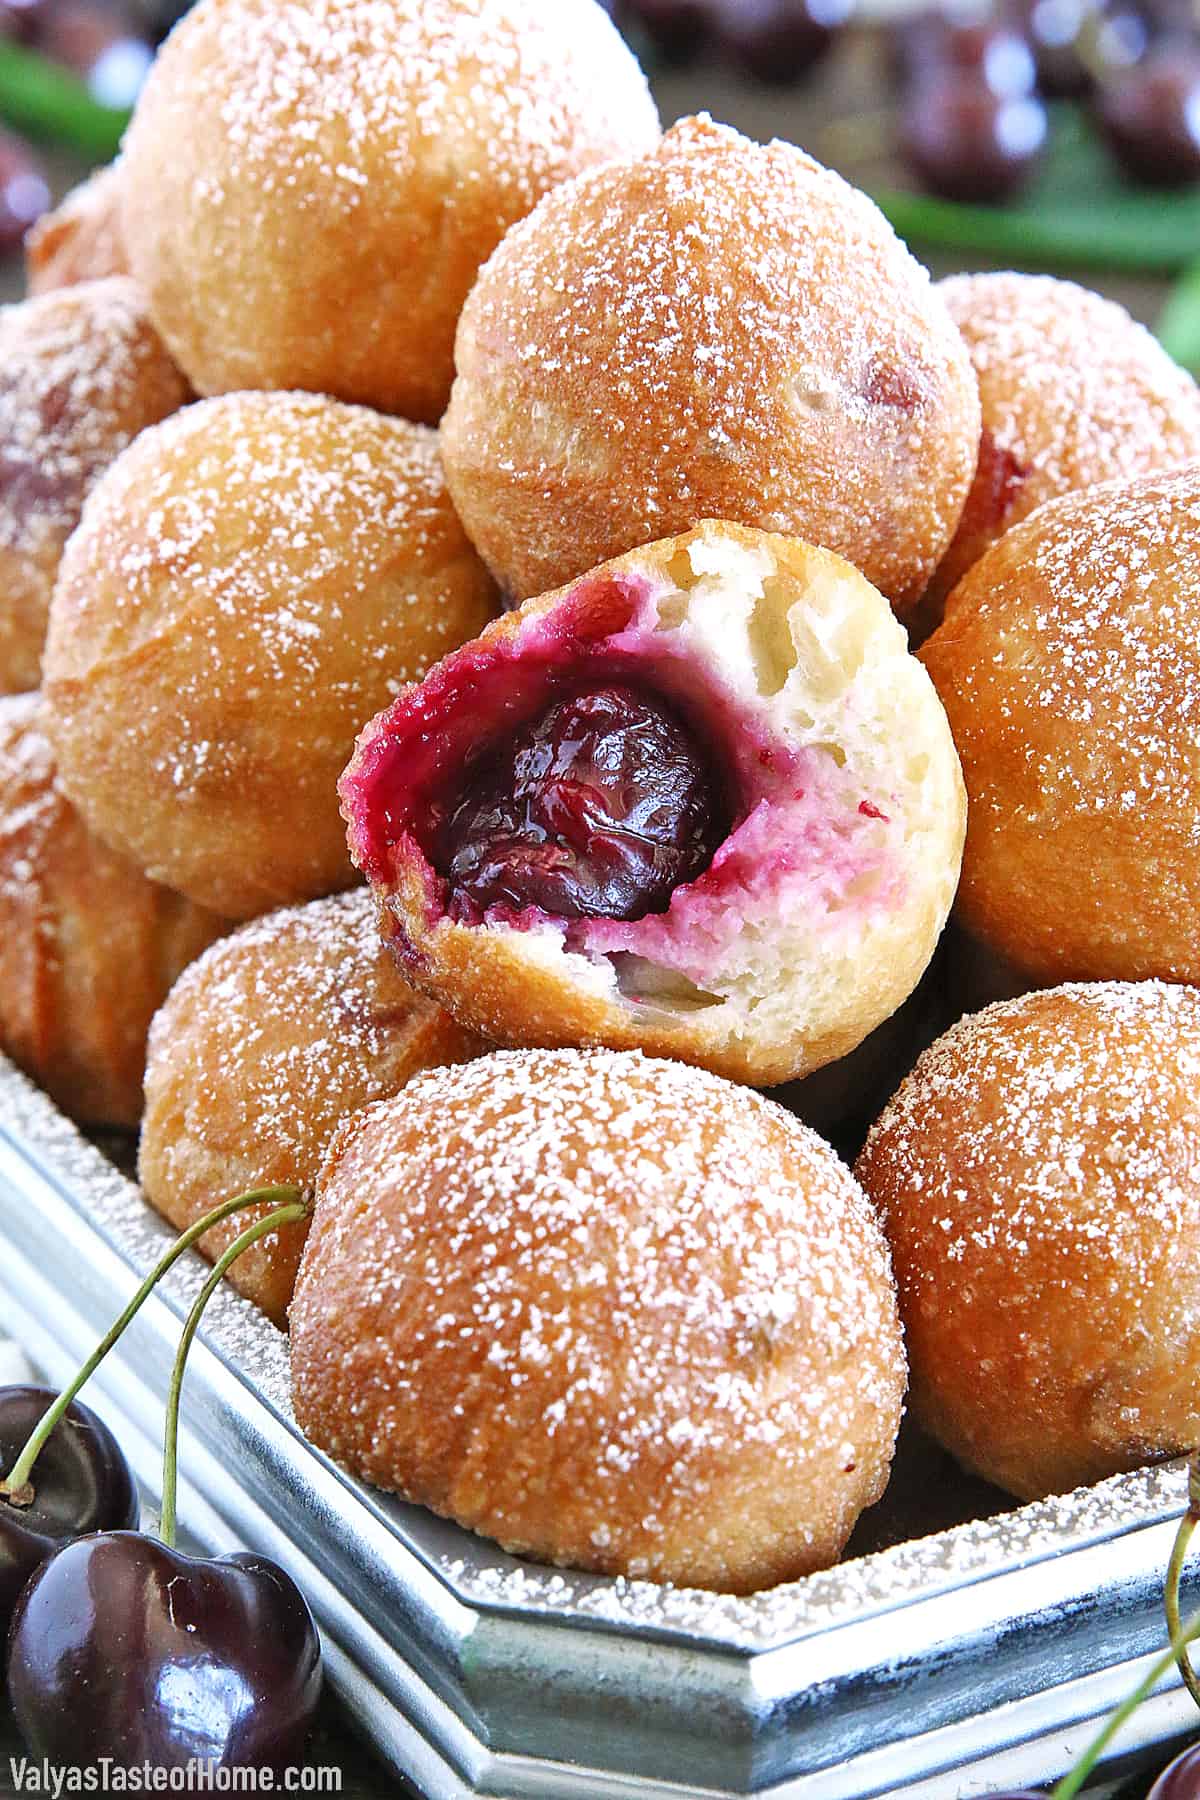
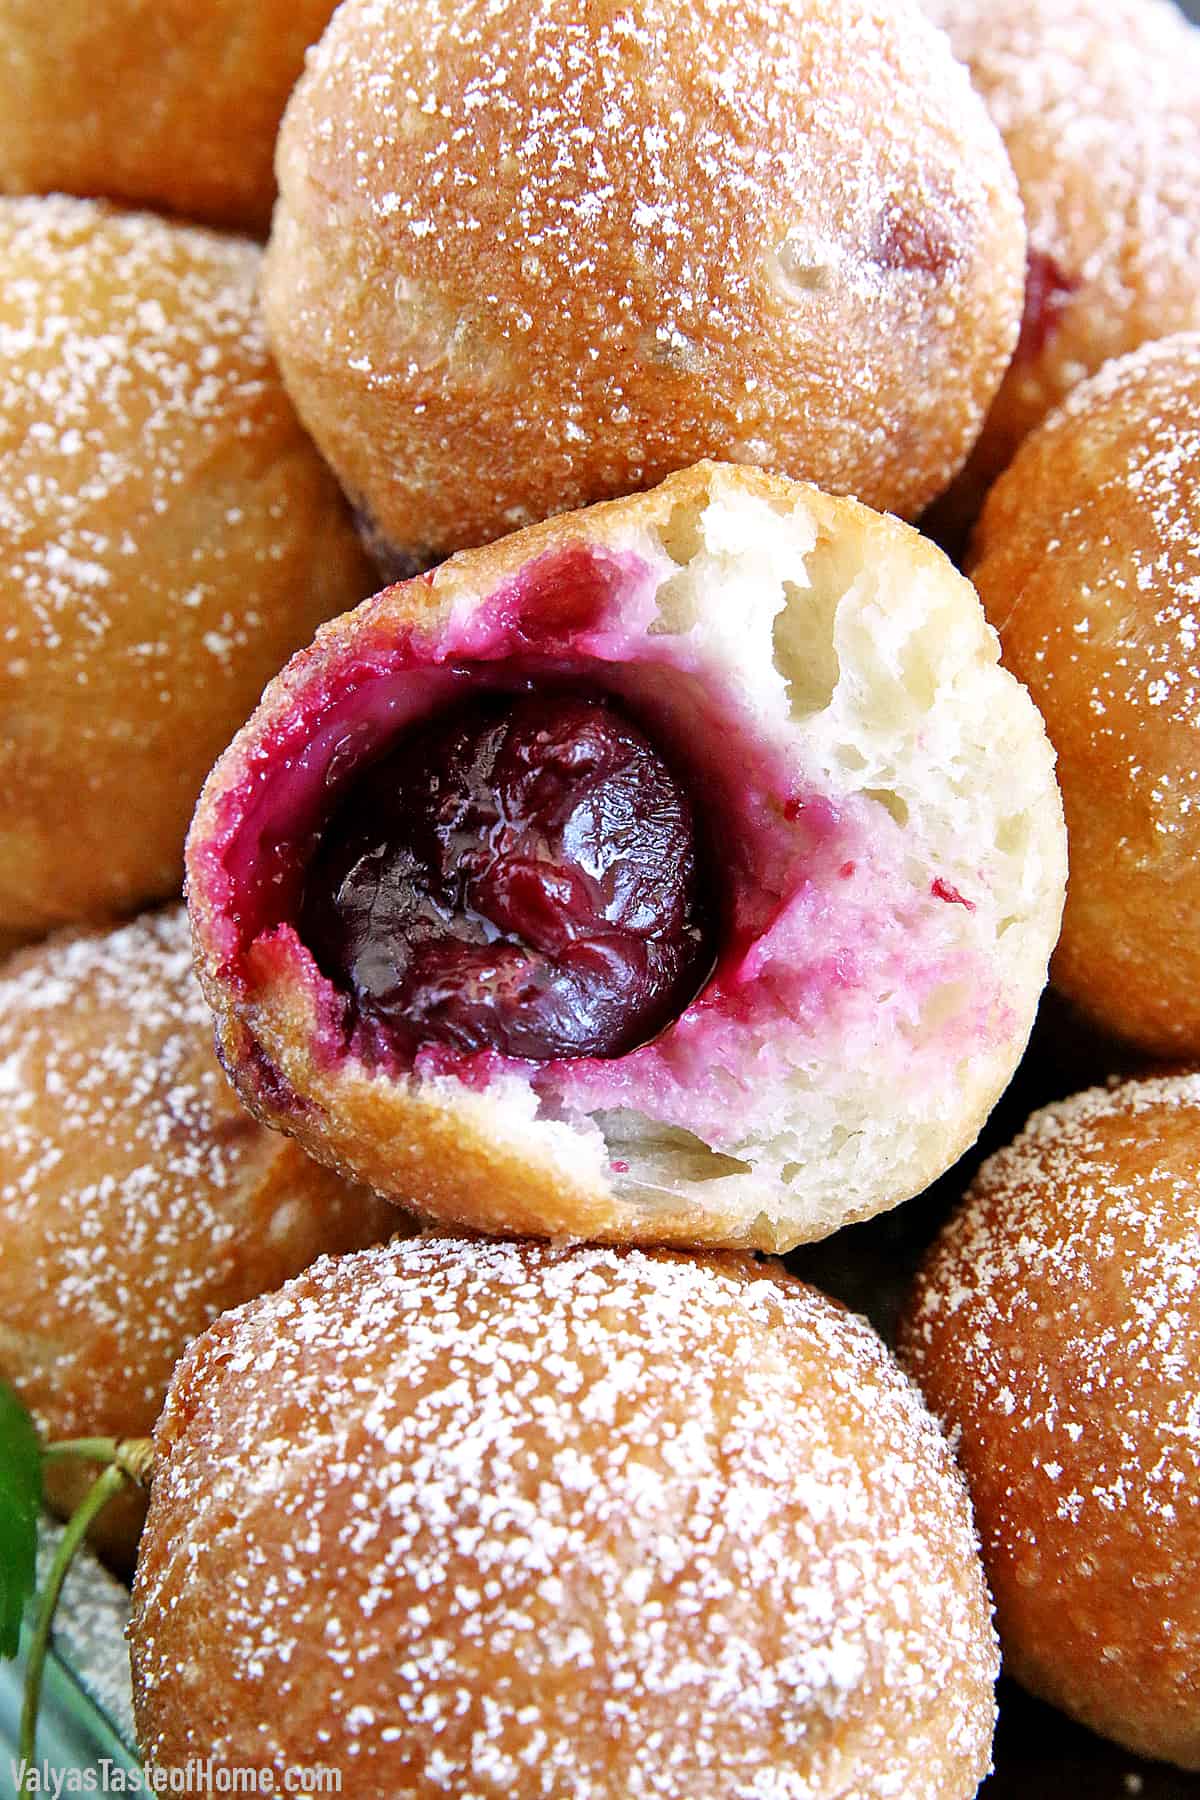
- Fresh (or frozen) cherries: For the filling, we’ll be wrapping whole cherries in the dough before deep frying. You can use fresh or frozen cherries, just make sure they don’t have pits!
How to Make Ponchiki (Step-by-Step)
Making this delicious Ponchiki is easier than you think. Here’s how to make them at home step by step:
How to Make Cherry Filled Donut Holes
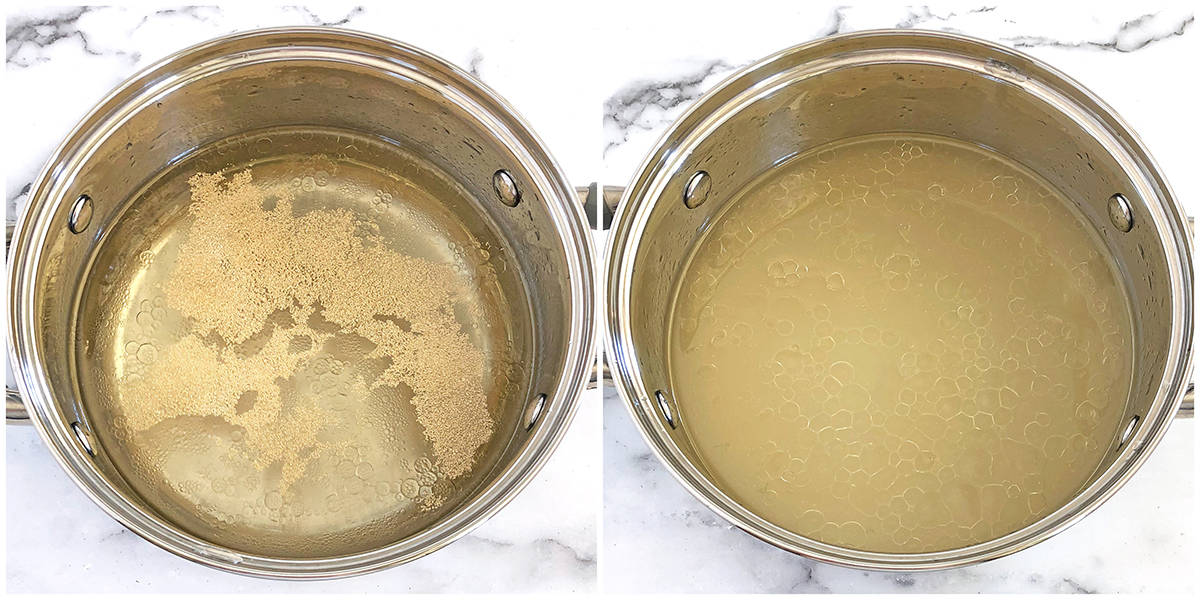
In a medium saucepan, add water, sugar, a pinch of salt, and oil.
Bring it to a boil, stirring constantly. Set aside to cool; the mixture must return to room temperature before adding yeast.

Sprinkle yeast over the mixture and whisk until it’s completely dissolved (the liquid will become tannish-gray in color).
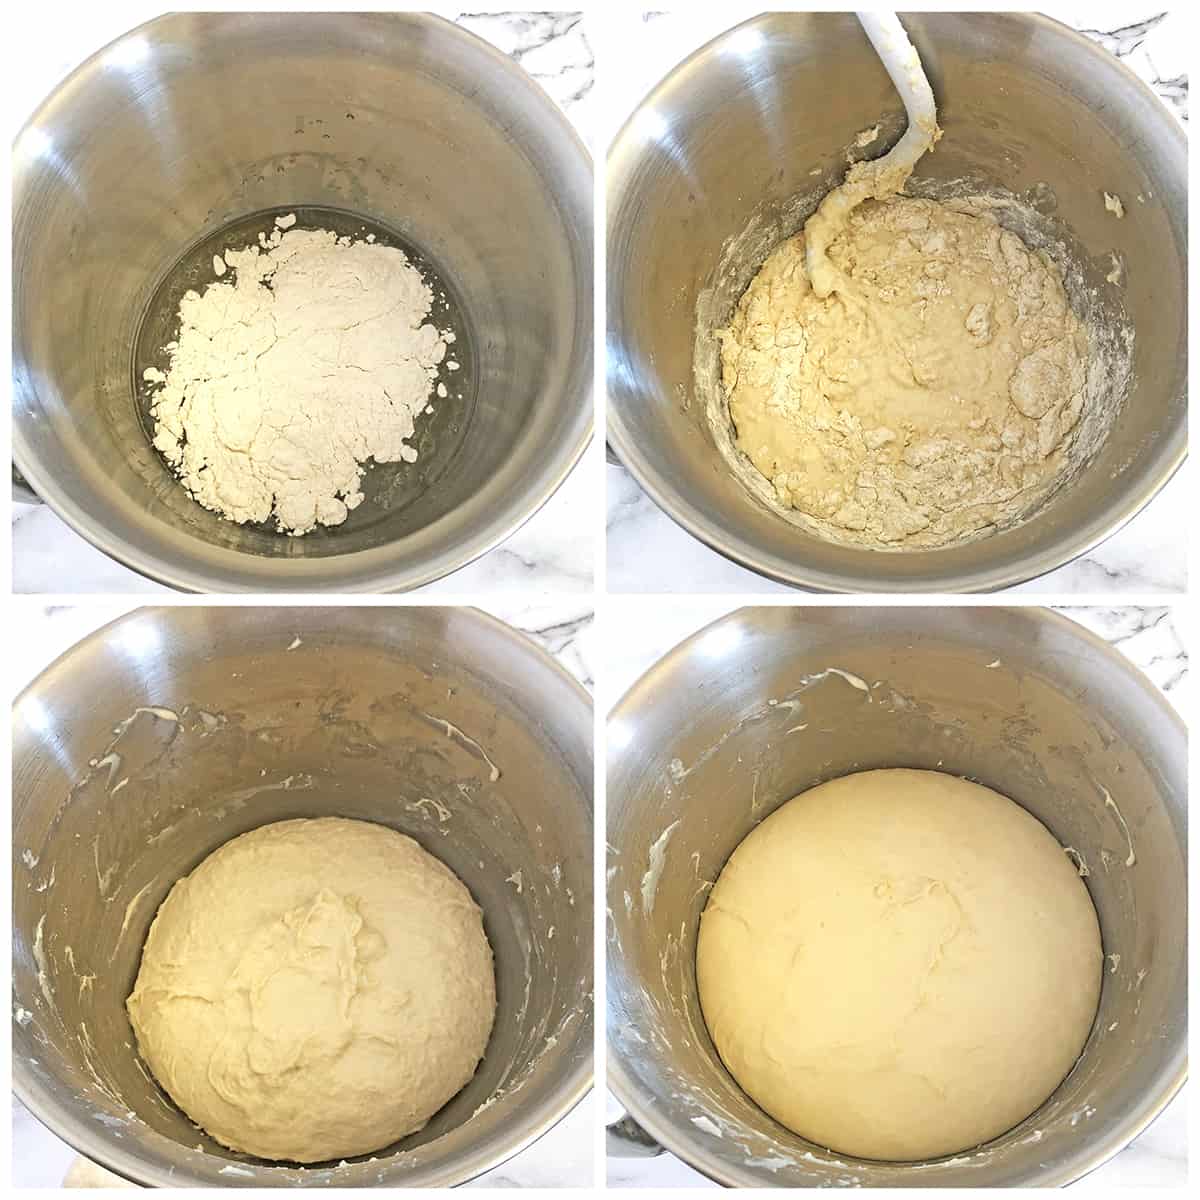
Next, pour the mixture into an electric mixer bowl or other large bowl. Sift half of the flour mixture and stir it in with a dough attachment (you may also do this with a wooden spoon if you are working by hand).
Now add the rest of the flour and let the mixer stir it into a nice and smooth consistency. It takes about 5 minutes to thoroughly mix in the rest of the flour.
Place the dough in a warm place to rise for about 2 hours or until the dough triples in size.
While the dough is rising, remove the stems and rinse the cherries well.
If you’re using frozen cherries I recommend rinsing them as well since they are usually not rinsed before freezing.
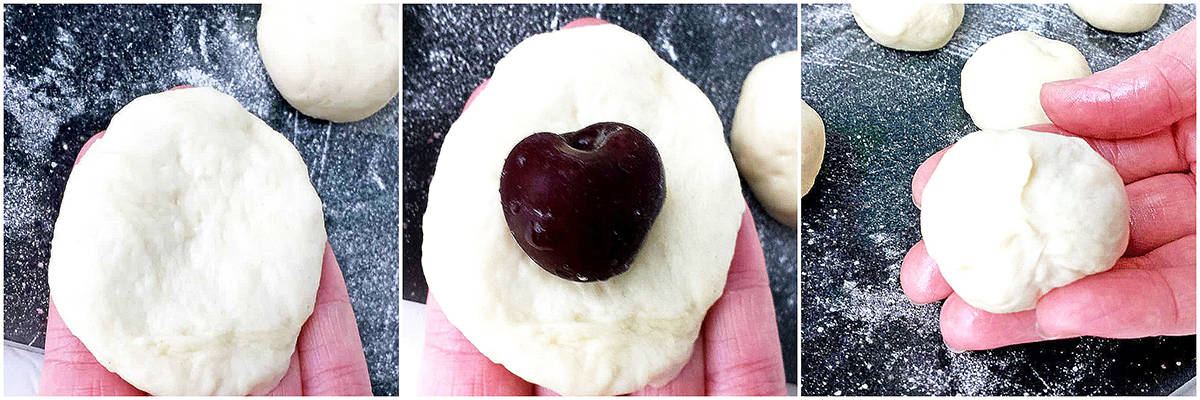
How to Shape Ponchiki
Grease your hands with a tiny bit of oil and form a piece of dough around a cherry into a nice little 1.5” ball. You can also use an ice cream scoop to form the balls. Place the ball onto a cutting board or other flour-dusted working surface.
Start by flattening the dough about half-inch think, place a cherry in the middle, fold the dough over the cherry as evenly as possible, pinch together the ends, and then roll it into a nice round shape.
Place them on a plate in line to the deep-frying pot. Personally, I like to make about 15 ponchiki at a time, then fry them. While the first batch is frying, there’s time to make another batch to fry.
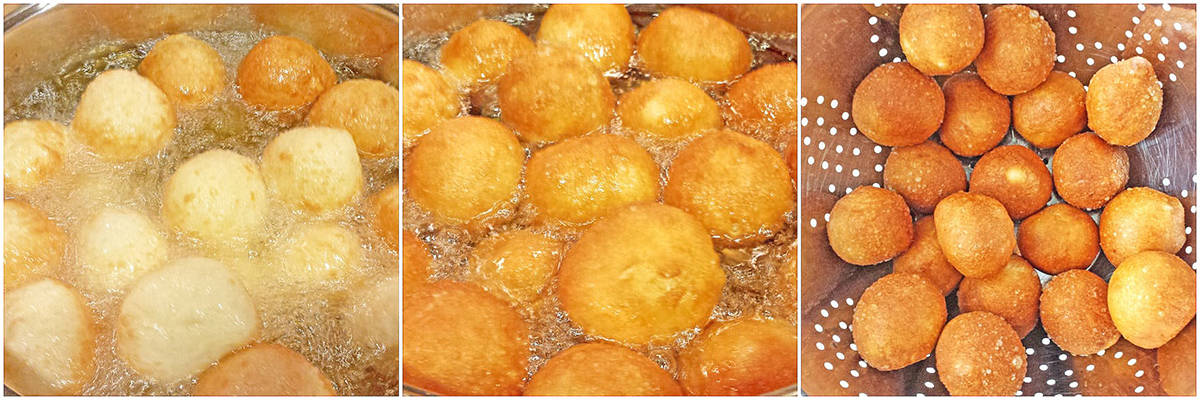
How to Deep Fry Cherry Filled Donut Holes
Heat the oil for deep frying until it reaches 350 F. Add about 15 donut holes, all in the same batch. Deep fry in the hot oil for about 2 minutes per side. Remove fried ponchiki onto a prepared cooling rack or strainer.
Heat the oil temperature for deep frying until it reaches 350 F. Add about 15 donut holes, all in the same batch. Deep fry for about 2 minutes per side. Then remove fried ponchiki onto prepared cooling rack or strainer.
Once done, allow the ponchiki cool for about 5 minutes or so.
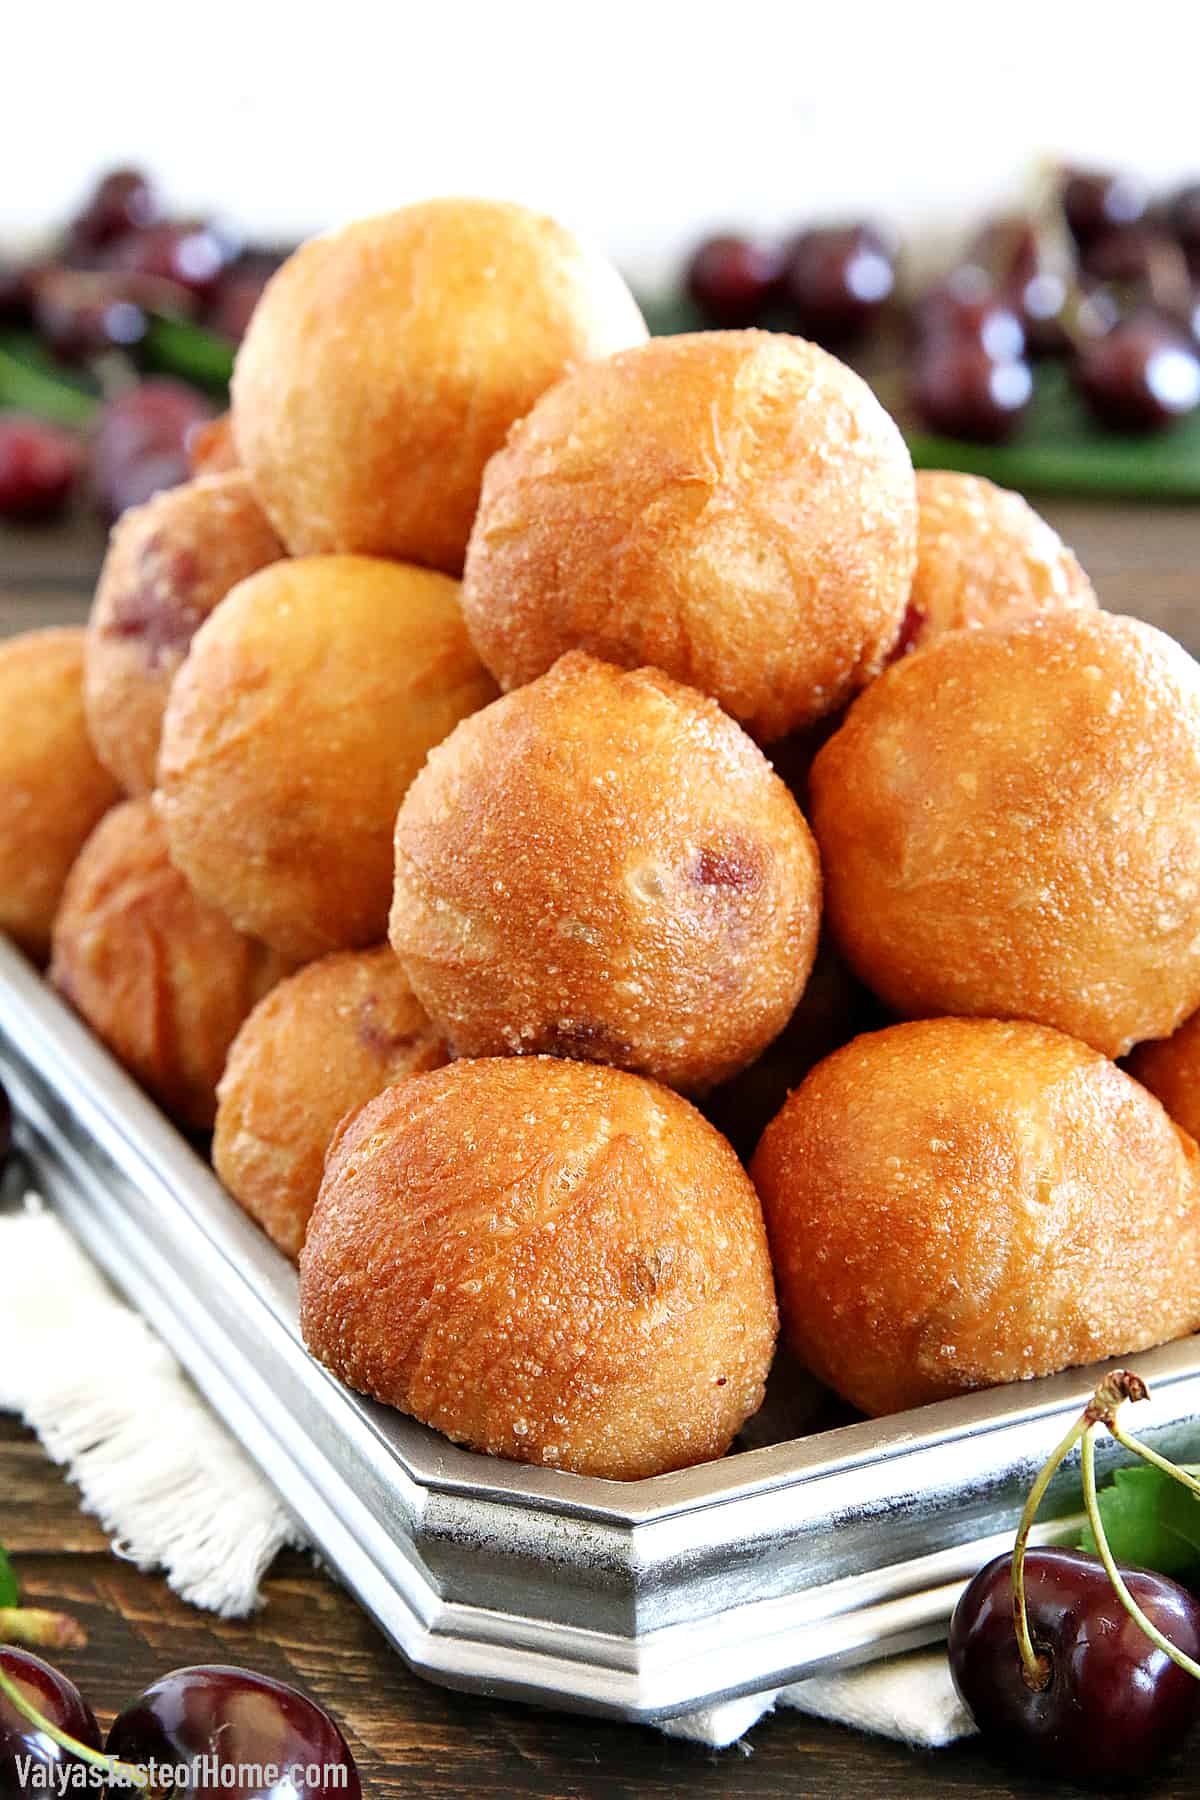
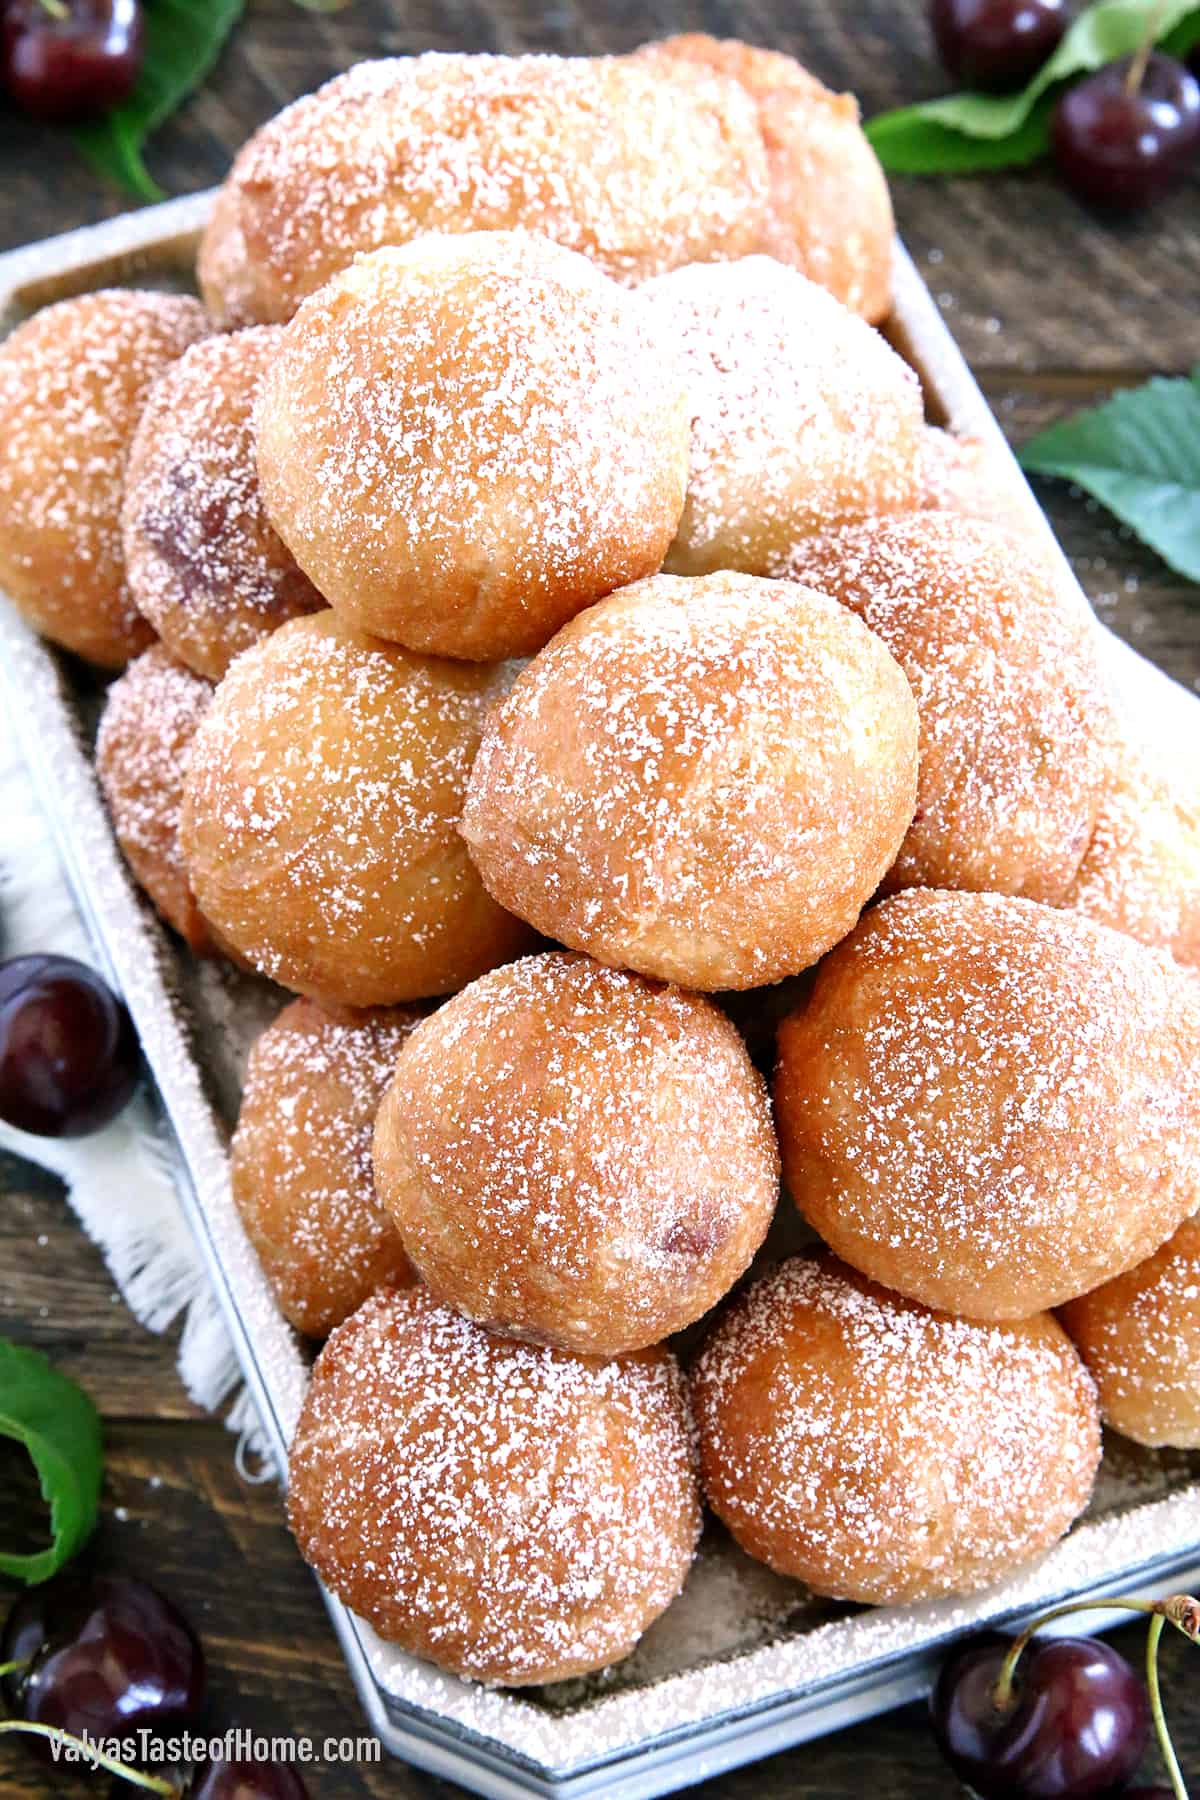
Dust them with powdered sugar.
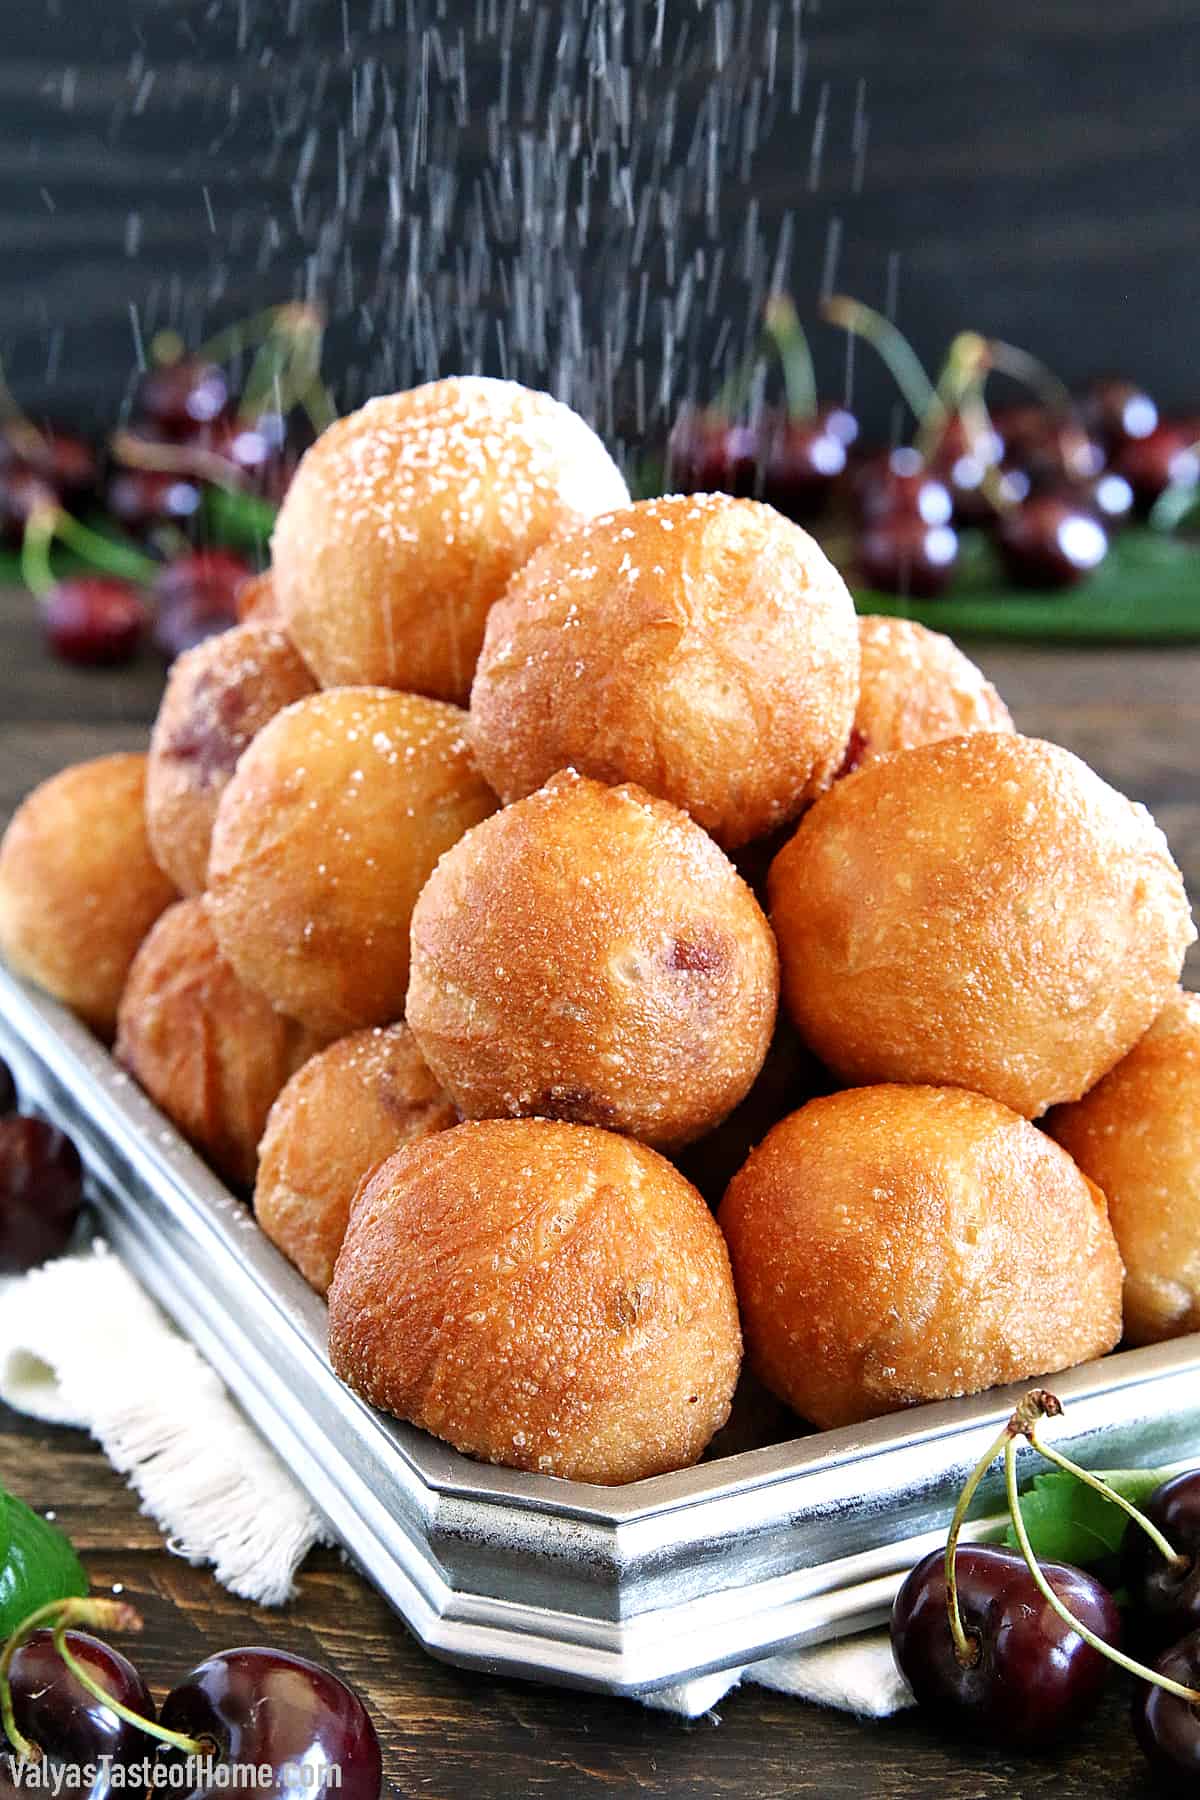
Your delicious Ponchiki is ready to be served. Enjoy them with a glass of cold milk or a delicious cup of homemade latte.
Tips for Making the Best Ponchiki Ever
Avoid overcrowding the pan: Fry the ponchiki in small batches, allowing them enough space to expand and cook evenly. Overcrowding the pan can lead to uneven cooking and lower the temperature of the oil.
Drain excess oil: After frying, place the cooked ponchiki on a paper towel-lined plate or wire rack to drain any excess oil. This helps to keep them light and less greasy.
Allow dough to rise: After kneading the dough, let it rise in a warm place until it doubles in size. This process usually takes around 1-2 hours. Cover the dough with a clean kitchen towel or plastic wrap to prevent it from drying out.
Recipe Variation Ideas for Ponchiki
These delicious Ponchiki are absolutely perfect as is, but if you’re looking to change things up here are a few variation ideas you can try:
Filling Variations:
- Farmer’s Cheese: A traditional way to do it is to fill it with farmer’s cheese. I have a great homemade farmer’s cheese recipe that goes beautifully with this recipe.
- Fruit Preserves: Instead of cherries, you can use other fruit preserves such as raspberry, strawberry, apricot, or plum. Fill the ponchiki with your favorite fruit preserves for a fruity and sweet filling.
- Custard: Make a homemade custard filling by cooking milk, sugar, and egg yolks together until thickened. Allow it to cool before piping it into the ponchiki.
- Nutella or Chocolate: Fill the ponchiki with Nutella or melted chocolate for a rich and decadent treat.
- Cream Cheese: Mix softened cream cheese with powdered sugar and vanilla extract for a creamy and tangy filling.
Toppings:
- Glaze: Instead of dusting with powdered sugar, you can make a simple glaze by mixing powdered sugar with a little milk or lemon juice. Drizzle the glaze over the ponchiki for a shiny and sweet coating.
- Cinnamon Sugar: Toss the freshly fried ponchiki in a mixture of cinnamon and sugar to add a warm and aromatic flavor.
- Chocolate Ganache: Dip the tops of the filled ponchiki into a smooth and glossy chocolate ganache for a luxurious finishing touch. I have a delicious chocolate ganache recipe that you should check out.
Flavor Enhancements:
- Citrus Zest: Add grated lemon or orange zest to the dough for a hint of citrus flavor.
- Spices: Incorporate spices such as cinnamon, nutmeg, or cardamom into the dough for an extra layer of warmth and aroma.
- Liqueur: Add a splash of your favorite liqueur, such as rum or amaretto, to the dough or filling for a subtle boozy twist.
How to Store Leftover Ponchiki
Once the ponchiki have cooled down, transfer them to an airtight container. Store at room temperature for up to two days. Reheat in the oven at 350 F for about 10 minutes, or until warmed through.
To freeze, place the ponchiki on a baking sheet and freeze for 1 hour before transferring to an airtight container. Freeze for up to 3 months. Allow them to thaw overnight in the fridge before reheating them in the oven or microwave
Similar Recipes You’ll Love
- Easy Belyashi Recipe – Pirozhki
- Sweet Buns with Fresh Cherry Filling (Piroshki)
- Sweet Farmers Cheese and Strawberry Braid
- Easy Poppy Seed Roll Recipe
- Sweet Swirl Apple Buns
See all desserts.
Cherry Filled Donut Holes (Easy Ponchiki Recipe!)
Ingredients
Ponchiki Ingredients
- 500 ml – water
- ½ cup – sugar
- Pinch of sea salt
- ½ tbsp. – active dry east
- ½ cup – extra light olive oil + 35 oz. for frying
- 5 ½ cups – all-purpose flour (I used organic flour)
- 2 lbs. – fresh cherries (or frozen)
Instructions
How to Make Cherry Filled Donut Holes
- In a medium saucepan, add water, sugar, a pinch of salt, and oil.
- Bring it to a boil, stirring constantly. Set aside to cool; the mixture must return to room temperature before adding yeast.
- Sprinkle yeast over the mixture and whisk until it’s completely dissolved (the liquid will become tannish-gray in color).
- Next, pour the mixture into an electric mixer bowl or other large bowl. Sift half of the flour mixture and stir it in with a dough attachment (you may also do this with a wooden spoon if you are working by hand).
- Now add the rest of the flour and let the mixer stir it into a nice and smooth consistency. It takes about 5 minutes to thoroughly mix in the rest of the flour.
- Place the dough in a warm place to rise for about 2 hours or until the dough triples in size.
- While the dough is rising, remove the stems and rinse the cherries well.
- If you’re using frozen cherries I recommend rinsing them as well since they are usually not rinsed before freezing.
How to Shape Ponchiki
- Grease your hands with a tiny bit of oil and form a piece of dough around a cherry into a nice little 1.5” ball. You can also use an ice cream scoop to form the balls. Place the ball onto a cutting board or other flour-dusted working surface.
- Start by flattening the dough about half-inch think, place a cherry in the middle, fold the dough over the cherry as evenly as possible, pinch together the ends, and then roll it into a nice round shape.
- Place them on a plate in line to the deep-frying pot. Personally, I like to make about 15 ponchiki at a time, then fry them. While the first batch is frying, there’s time to make another batch to fry.
How to Deep Fry Cherry Filled Donut Holes
- Heat the oil for deep frying until it reaches 350 F. Add about 15 donut holes, all in the same batch. Deep fry in the hot oil for about 2 minutes per side. Remove fried ponchiki onto a prepared cooling rack or strainer.
- Heat the oil temperature for deep frying until it reaches 350 F. Add about 15 donut holes, all in the same batch. Deep fry for about 2 minutes per side. Then remove fried ponchiki onto prepared cooling rack or strainer.
- Once done, allow the ponchiki cool for about 5 minutes or so.
- Dust them with powdered sugar.
- Your delicious Ponchiki is ready to be served. Enjoy them with a glass of cold milk or a delicious cup of homemade latte.
Thank you for following me on Instagram, Facebook, and Pinterest!
This recipe was originally posted on January 3, 2015 (original picture below), and updated for a better user experience. The post may contain affiliate links. Read my disclosure.

They definitely look wonderful. I can imagine their taste. My mother is making something similar and I always enjoy them every time she is making some.
Thank you Ella! They are very delicious. 🙂
Making this stuff tomorrow 🙂 already got the cherries for it yesterday! You made my mouth water with this post!
This stuff is so good. Worth making it. Where did you buy cherries?
I got fresh cherries at Costco 🙂
I do not have a frozen cherries; do you know if it is available at WinCo or some other store?
I think I’ve seen it at Costco. I didn’t pay much attention if the grocery store carries them since I always freeze my own. Check my post on July 18,2014 https://www.valyastasteofhome.com/freeze-cherries/
Thanks Paula! 🙂
Do you take the cherry pits out before freezing the cherries?
No. I do not. I use whole cherries, we just got used to that there is a cherry pit in each ponchik. It just gets discard after eating.
ohh my!…YUUMMMYY!!.. These heavenly goodies just remind me of my childhood!
Your blog is such a blessing to me and my family. We all love your recipes.
Keep em up! 🙂
Thanks Elina for the warm words. I’m glad to hear that you like my recipes. 🙂
Does ponchiki absorb lots of oil while frying?
Not really. Top layer a little.
I’m right there with you about frying! Not a fan either but some recipes are so worth it! These look soooo good, especially with the cherry filling!
They are just so good, and I try not to make them often because it’s so hard not to eat 5 of them at once. 😉 Thanks Katya!
looks delish, will definatley will give it a try 🙂
Thank you Alena!:)
Yum, I will have to try this!!!
Let me know what you think. Thanks Olya ! 🙂