Super Easy Farmer’s Cheese Recipe (No-Fail Results!)
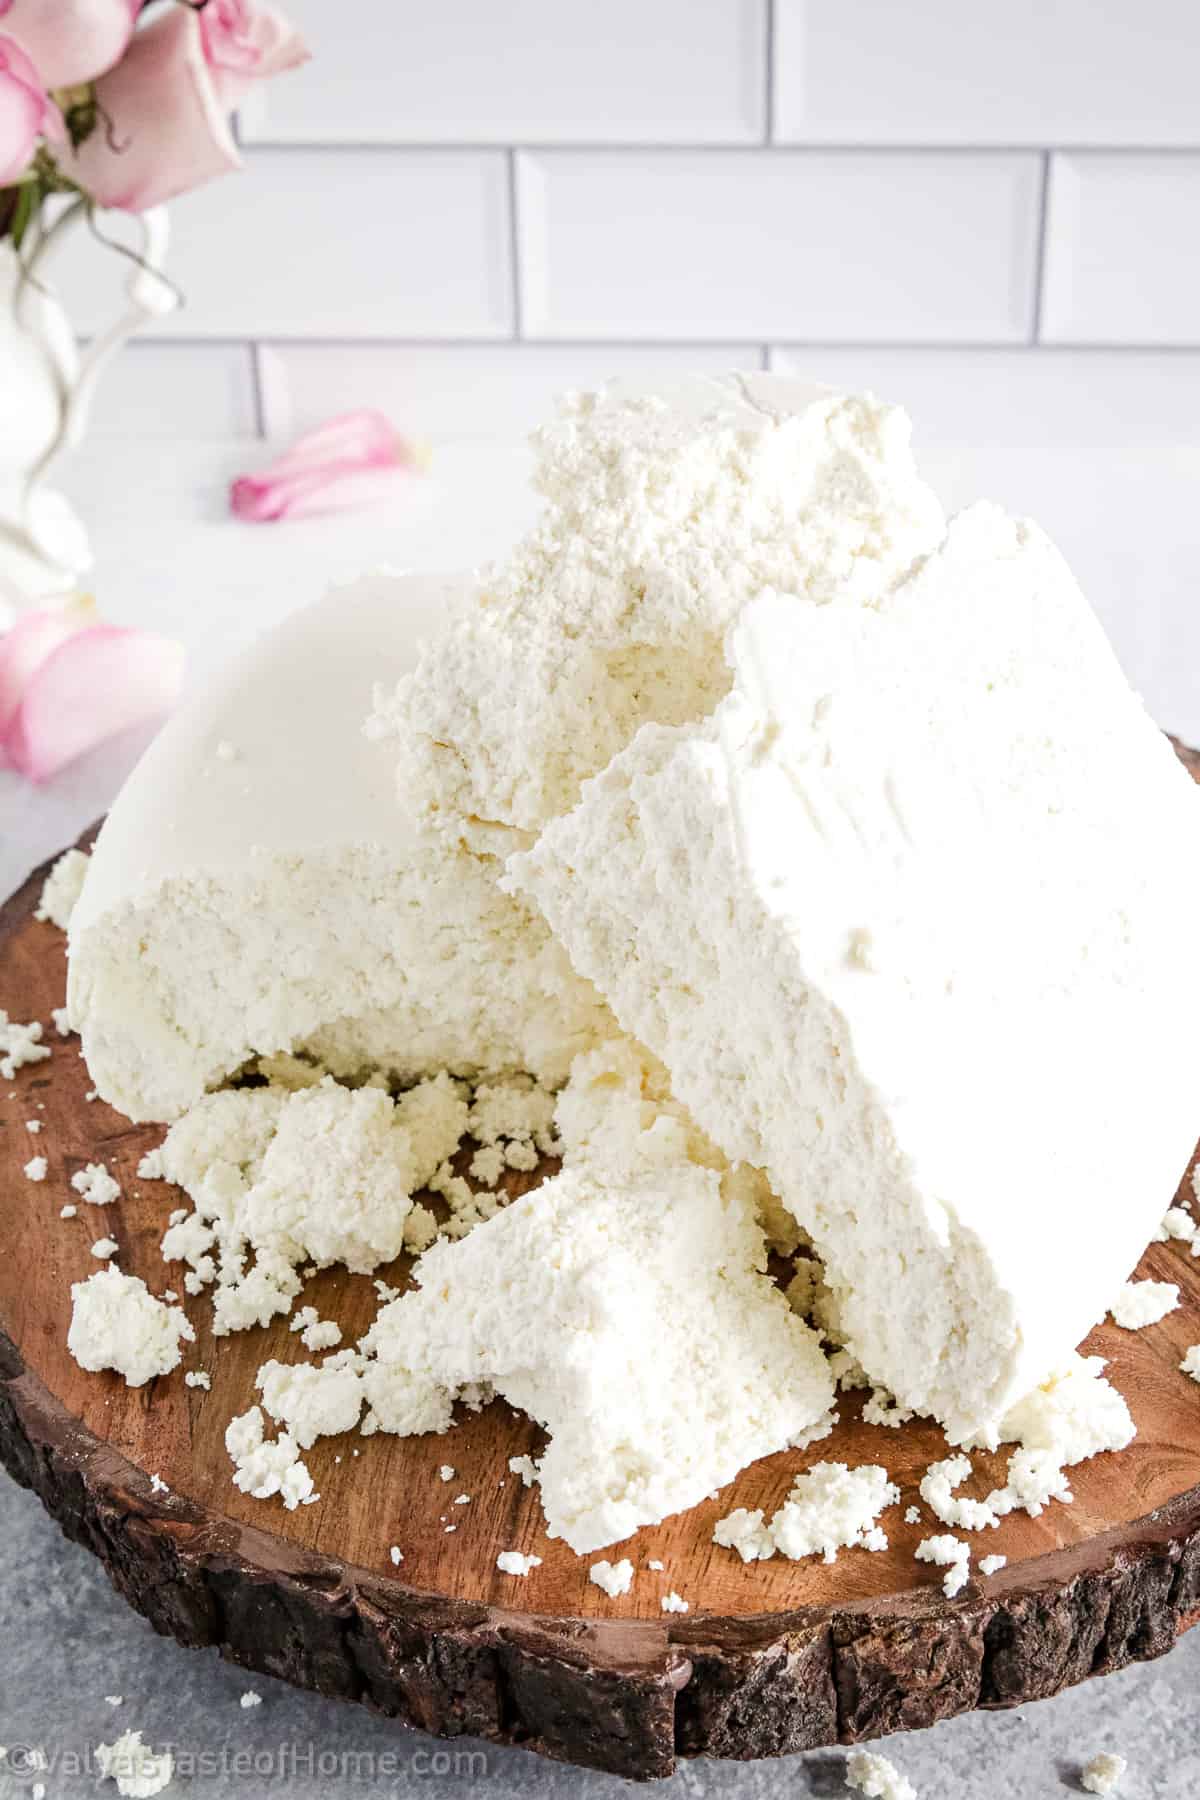
This Farmer’s Cheese recipe will give you soft, crumbly cheese that’s fresh and tastes incredible every single time! With a subtle flavor and incredible texture, this cheese is perfect to use in dishes like pierogies, blintzes, bulochki, nalisniki, or anywhere you would use some cottage cheese!
Not many things can beat homemade cheese, and I’ve been making my own at home for more than 20 years! It’s delicious and tasty enough to be eaten on its own plain, but versatile enough to use in a number of recipes. With just three simple ingredients and basic kitchen tools, you can make this homemade farmer’s cheese easily!
You can have it on toast with some honey or maple syrup, mix it in with some chives, Greek yogurt, or sour cream for a delicious dip, or even crumble on top of a salad for a fresh and delicious combination.
My recipe comes with easy-to-follow instructions to help you make it even if this is your first time trying out a cheese recipe. Making your own farmer’s cheese at home is incredibly rewarding and you’ll never want to buy store-bought cheese again!
Want to learn how to make Farmer’s Cheese at home? Then keep on reading!
What is Farmer’s Cheese?
Farmer’s cheese is a type of fresh cheese made from curdled milk. It is usually made with cow’s milk, but can also be made with goat or sheep’s milk. The curdled milk is then drained and pressed into a block or log shape. It has a mild flavor and soft texture, similar to that of cottage cheese.
The cheese has a mild flavor and is slightly crumbly in texture. It is often used in dishes such as pierogies, blintzes, bulochki, nalisniki, and cheesecakes to just name a few. This cheese is similar to Russian tvorog. And this recipe doesn’t call for rennet since it can be quite hard to find making it difficult to make cheese at home.
I love making sweet buns and add this delicious farmer’s cheese to the filling for a delicious breakfast. It’ll truly satisfy your sweet tooth. This is the perfect cheese to in place of cottage cheese for just about any recipe.
What Makes This Farmer’s Cheese Recipe Special?
This is seriously the best farmer’s cheese recipe ever, featuring the perfect combination and ratios of ingredients that’ll give you foolproof results every single time.
I’ve seen many different methods being used to make farmer’s cheese, but this recipe always gives the best taste and texture. Here are some other reasons why this recipe is extra special:
Healthy: This Farmer’s Cheese recipe is special because it is made with all-natural ingredients and does not require any preservatives or additives.
Easy: This recipe is also easy to make and requires minimal effort. All you need is a few simple ingredients and some time to let the cheese set.
Versatile: This cheese can be used in a variety of dishes, from savory pierogies to sweet blintzes. It can also be enjoyed on its own as a snack or spread on toast. The cheese is also soft enough to be eaten plain
Budget-friendly: Additionally, this recipe only requires a few simple ingredients, making it an easy and affordable way to make cheese at home.

What You Need to Make Farmer’s Cheese at Home
You only need some basic, pantry-staple ingredients to make this delicious farmer’s cheese at home. Let’s look at these ingredients in more detail:
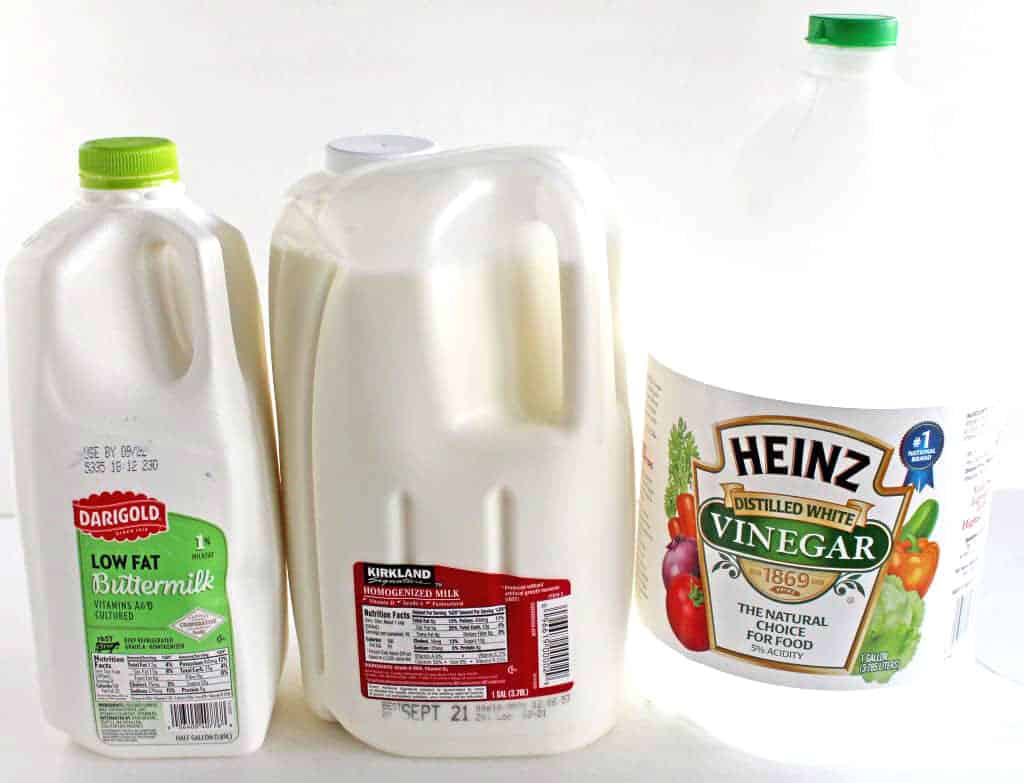
- Milk: First of all, you’ll need some milk to make your farmer’s cheese. Make sure you use good quality whole milk for the best results and flavor. I’ve used cow’s milk here, but this cheese can also be made using sheep’s or goat’s milk.
- Buttermilk: You’ll also need some buttermilk to kickstart the curdling process. This helps to give the cheese its unique flavor and texture and also adds a delicious richness to the cheese that’s absolutely unforgettable.
- Vinegar: We’ll also need some white vinegar to make our farmer’s cheese. You can also use lemon juice or apple cider vinegar, but I’ve gotten the best results using simple white vinegar in my recipe and that’s what I recommend you use.
How to Make Farmer’s Cheese (Step-by-Step)
Making this delicious farmer’s cheese is incredibly easy and can be done over a span of two days. Here’s what you need to do step by step to make it at home:
Day 1
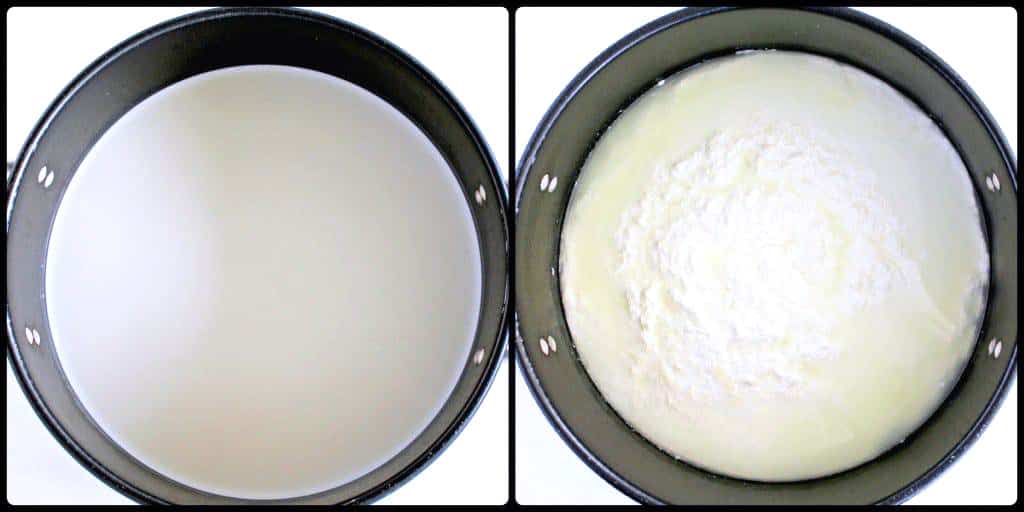
Start by pouring room-temperature milk, buttermilk, and vinegar into a large pot.
Next, place the pot onto a stovetop burner. Then heat the milk and vinegar mixture on low heat (3.5 if your cook stove is digital) for 30 minutes or just before it starts to boil.
Stir it occasionally to prevent the milk from scorching at the bottom of the pot. Remove from the stove and let it stand on the countertop overnight.
Day 2
Reheat the milk again the way you did it on day one. This means that the milk needs to be heated twice in order for the milk to form cheese curds. Then set it aside and let it stand until the evening or at least for 10 hours.

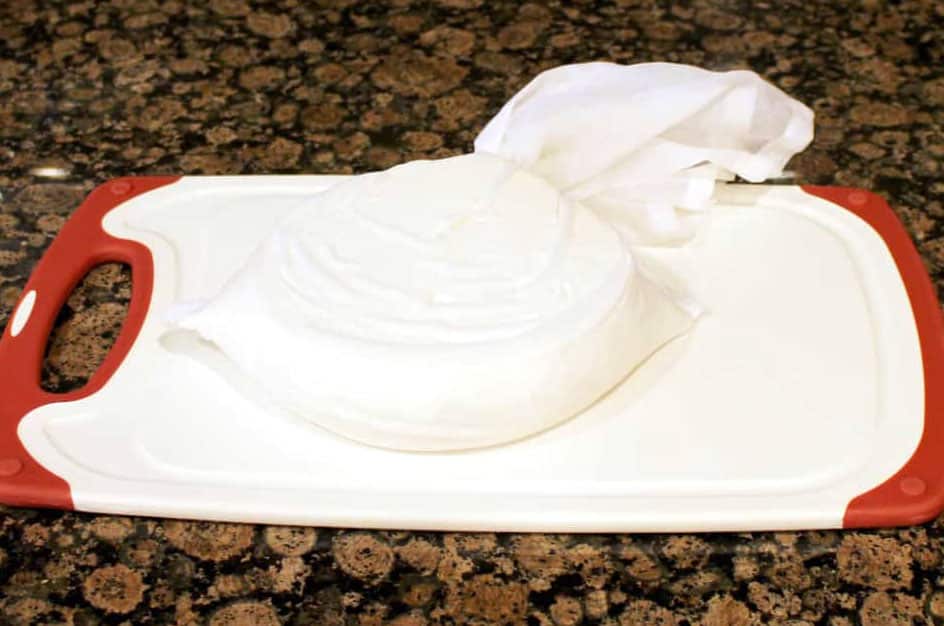
In the evening (or after 10 hours have gone by), line a colander or fine-mesh strainer with a cheesecloth and pour the milk through it to strain it. You can also pour the milk directly into the cheesecloth as I have in the pictures below.
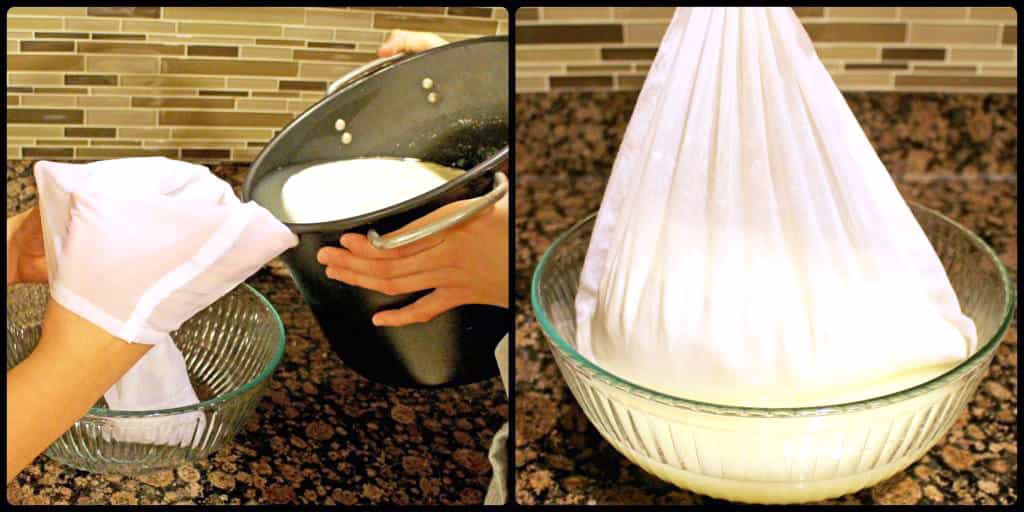
Next, gather the cloth around the cheese and squeeze it as much as possible to get the whey out, and then tie the end of the cheesecloth.
Flip the pot upside down into the sink, and then place cheese on top of the pot. Place a cutting board on the cheese and weigh the cutting board down with a heavy object. Let it sit overnight.
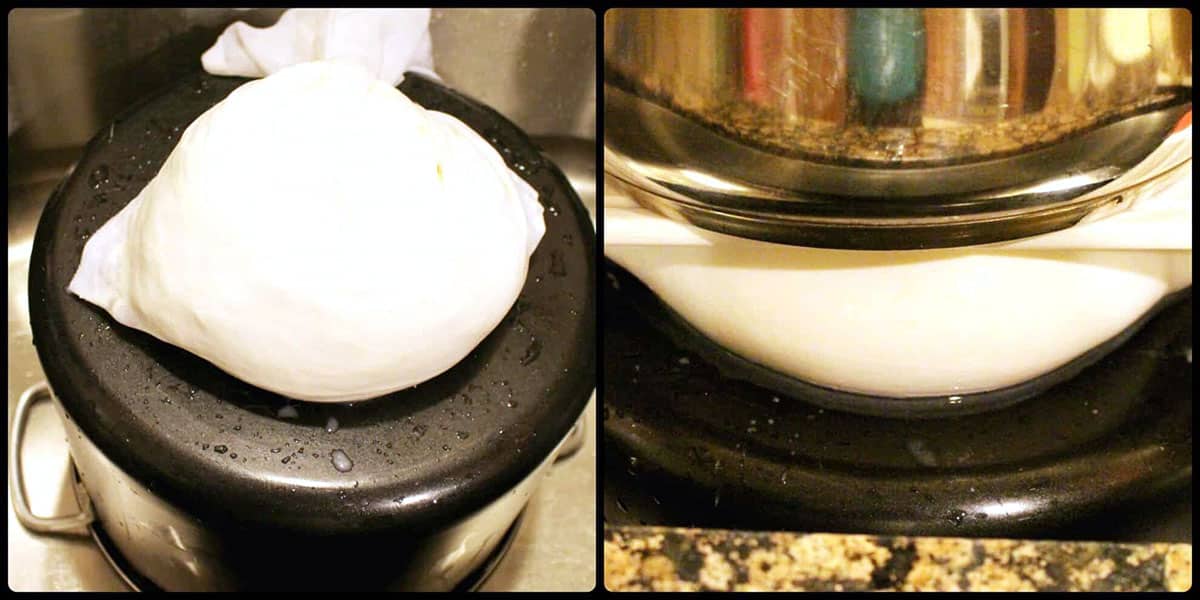
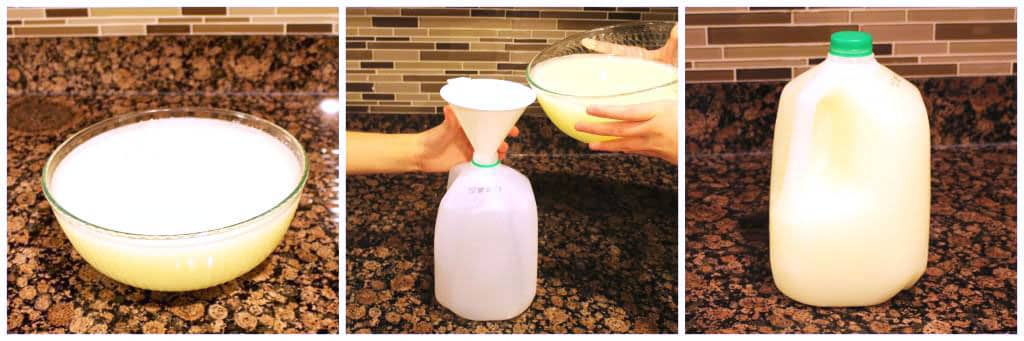
I collect the whey by pouring into an empty gallon bottle and storing it in the fridge for up to 2 weeks. I make many things out of whey like pancakes, muffins, vareniki, and pelmeni dough, etc.
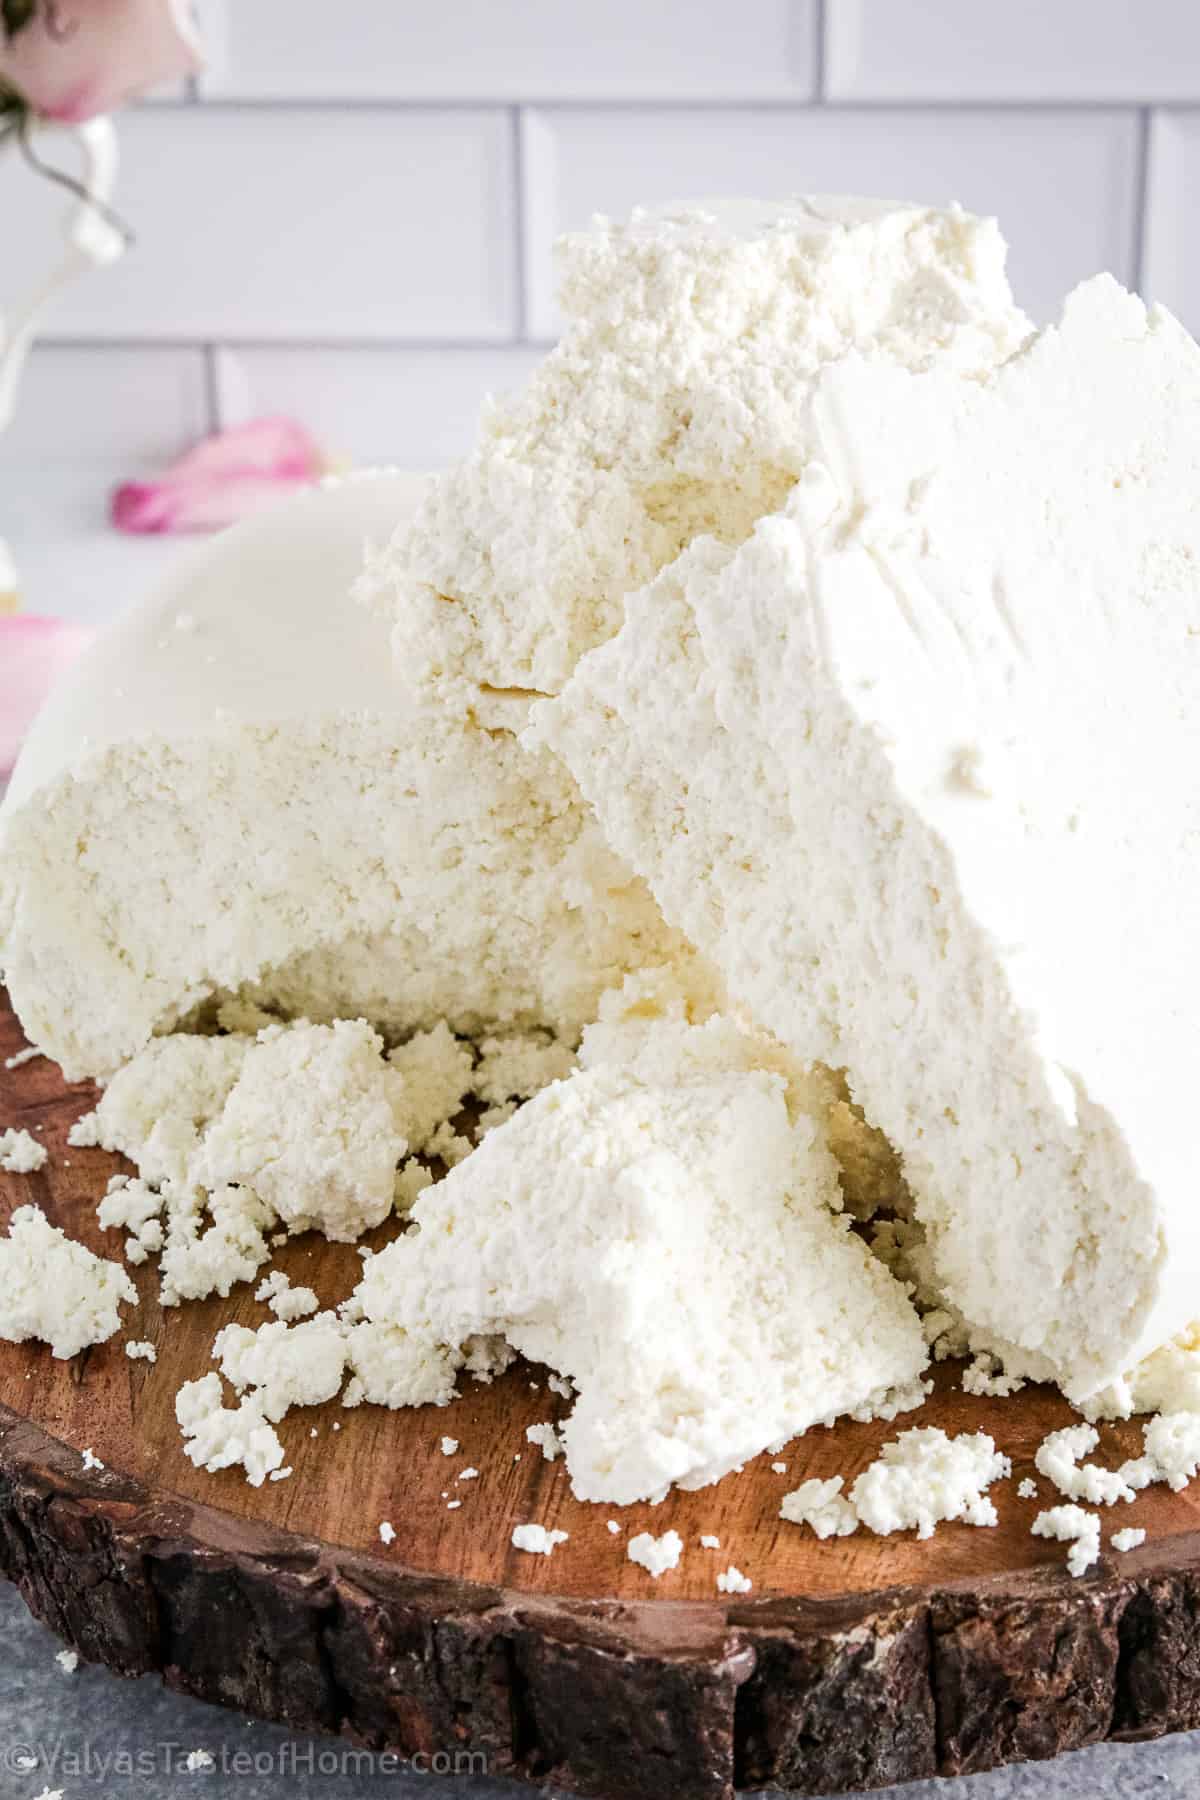
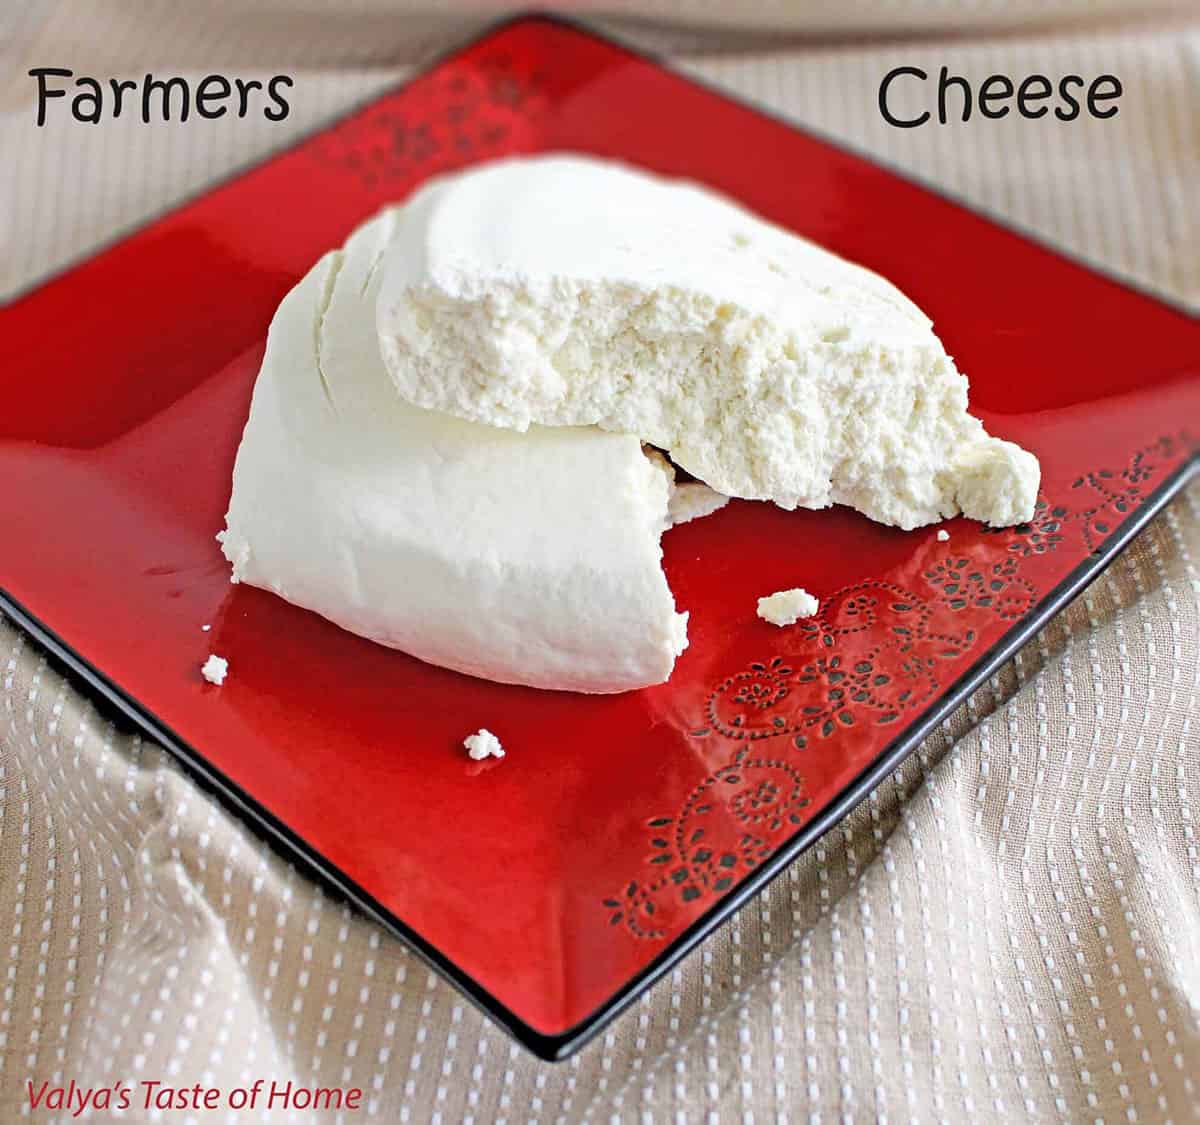
Now remove the cheese from under the press and take it out of the cheesecloth. Place the cheese on a place and cover it with plastic wrap.
Your delicious Farmer’s cheese is ready to be served and used.

How to Use Farmer’s Cheese
This delicious farmer’s cheese can be used in a bunch of different recipes ranging from pierogies, blintzes, bulochki, nalisniki, to cheesecakes. Here are some other ideas you can try out:
Sandwiches: You can add a slice of this farmer’s cheese to any sandwich you like for a delicious flavor in each bite.
Dips: Mix this farmer’s cheese with some chopped chives, radishes, Greek yogurt, or sour cream for a tasty dip.
Salads: You can also sprinkle it over salads to make them extra tasty! Another option is to replace it with feta cheese in your favorite Mediterranean recipes.
Pasta: Use this farmer’s cheese instead of ricotta in stuffed shells or lasagna for a healthier and more delicious alternative.
Toast: You can even have it on toast alongside some honey or jam for a delicious and quick breakfast on the go! Or have it on some crackers for a snack.
Recipe Variation Ideas for Farmer’s Cheese
If you’re looking to switch up your farmer’s cheese recipe, there are plenty of ways to do so! Here are some ideas you can try:
- Add herbs and spices: To give your farmer’s cheese a unique flavor, try adding in some fresh herbs and spices like black pepper, garlic powder, onion powder, oregano, basil, or parsley. You can also make it saltier by adding some salt to it.
- Use different kinds of milk: You can also experiment with different types of milk like goat milk, or sheep milk to create a unique flavor.
- Add in vegetables: To give your farmer’s cheese an extra boost of nutrition, try adding in some finely chopped vegetables like carrots, celery, or bell peppers.
- Use different cheeses: Another idea is to mix it in with other types of cheese like feta, goat cheese, or cream cheese to create a more complex flavor.
- Add sweeteners: If you want to make your farmer’s cheese a bit sweeter, try adding in some honey or maple syrup.
How to Store Leftover Farmer’s Cheese
You can store leftover farmer’s cheese in the refrigerator for up to 10 days. To store it, wrap the cheese tightly in plastic wrap or place it in an airtight container. I don’t recommend freezing this cheese as it will affect the texture and consistency.
Recipes to Try using Farmer’s Cheese
- Sweet Buns with Farmer’s Cheese and Raisins
- Farmer’s Cheese and Strawberry Braid
- No-Bake Farmers Cheese Cheesecake Desserts

Super Easy Farmer’s Cheese Recipe (No-Fail Results!)
Ingredients
- 1 gallon – whole milk room-emperature
- ½ gallon – butter milk room-temperature
- 1 tbsp. – vinegar
Instructions
How to Make Farmer's Cheese (Step-by-Step)
Day 1
- Start by pouring room-temperature milk, buttermilk, and vinegar into a large pot.
- Next, place the pot onto a stovetop burner. Then heat the milk and vinegar mixture on low heat (3.5 if your cook stove is digital) for 30 minutes or just before it starts to boil.
- Stir it occasionally to prevent the milk from scorching at the bottom of the pot. Remove from the stove and let it stand on the countertop overnight.
Day 2
- Reheat the milk again the way you did it on day one. This means that the milk needs to be heated twice in order for the milk to form cheese curds. Then set it aside and let it stand until the evening or at least for 10 hours.
- In the evening (or after 10 hours have gone by), line a colander or fine-mesh strainer with a cheesecloth and pour the milk through it to strain it. You can also pour the milk directly into the cheesecloth as I have in the pictures below.
- Next, gather the cloth around the cheese and squeeze it as much as possible to get the whey out, and then tie the end of the cheesecloth.
- Flip the pot upside down into the sink, and then place cheese on top of the pot. Place a cutting board on the cheese and weigh the cutting board down with a heavy object. Let it sit overnight.
- I collect the whey by pouring into an empty gallon bottle and storing it in the fridge for up to 2 weeks. I make many things out of whey like pancakes, muffins, vareniki, and pelmeni dough, etc.
- Now remove the cheese from under the press and take it out of the cheesecloth. Place the cheese on a place and cover it with plastic wrap. Your delicious Farmer’s cheese is ready to be served and used.
Thank you for following me on Instagram, Facebook, and Pinterest!
This recipe was originally posted on September 18, 2015 (original picture below), and updated for a better user experience. The post may contain affiliate links. Read my disclosure.


Very delicious recipe for farmers cheese. Thank you.
You are very welcome! I’m glad you liked it, enjoy 🙂
Hi, I would like to try it but didn’t understand the second step. You say “repeat step one and set it aside” , does that means i heat up the milk again , add vinegar and put it aside?
Thanks
Hello Zaneera! I see the confusion you have. You need to reheat the milk only, no need to add vinegar on Day 2. I will go back and reword that so it’s more easier to understand. Thank you so much for your question and for making my recipes! 🙂
I always make tvorog by just adding 3tbsp. Homemade kefir to 1 gallon of milk (doesn’t matter what fat content) let it sit in room temp. For 20+/- hrs then heat until whey seperates, leave for another day, then strain in cheesecloth over a bowl:) turns out every time:))
Could you please post some recipes where you use the whey? I’m always at a loss with what to do with it :/
Great recipe. That’s another way of making farmers cheese. Yes…, I’m posting a recipe tomorrow where I use whey as one of the ingredient. Stay tuned and thanks for your comment. 😉
My grandma doesn’t use cheese cloth she just puts it in drainer thing and put a it over big pot and let the water drip down and it’s turns out great. Less work 🙂 .. I also heard it’s easier to make tvorog in slow cooker but I never tried it..
Great idea. Thank you.
Valya, thank you for the recipe. Just one question. The first time I hear up the mixture, where you write to let it stand over night… Can I hear it up in 12 hours or 24 hours?
Thank you for your question. After I heat up the mixed milk for the first time, I let it stand on the counter for approximately for 20 – 24 hours. During this time the milk sours. I hope that helps Marina.
After 1 time heated, need wait overnight or 20,24 hours? Thanks.
Overnight or 12 hours. I hope this helps.
Thank you.
You are very welcome!
Today is my day 2. It doesn’t look anything like the photos you show. It’s yellowish and watery looking. What did I do wrong? And can I fix it? Was I not supposed to stir it?
It will be very watery. What you see on my picture is the cheese that floated to the top of the pot. You do not see the whey that got collected under the cheese. It sound right. Send me a picture to my email [email protected], I want to see how it looks. Thanks 😉
This is a great post, I will try this method next time, but I got a question, if I buy natural raw milk would I have to do anything different? I know if I let it sit out then I get a very yummy kefir, would I still need to add buttermilk to it or no?
I have not done it with raw milk. I remember that my mom used raw milk and not adding anything into it. I will have to give it a try sometime. If you make it, I would love to know the results. Thank you Nataliya. 🙂
wow! we have never made cheese at home but now we are quite tempted! looks authentic!
Thank you! I’ve just made another batch and used 3.25% fat Kefir instead of 1% butter milk. It’s much more softer and taste even better. You have a choice now how you want to make. Let me know how it turns out and how you guys like it. 🙂
Hi Valya,
When you use kefir do you add vinegar too?
Thank you.
Yes, I do. Vinegar removes the bitter taste. I hope this helps.
How big is it? Can you give the dimensions? Thank you
Mine is 12″ by 18″. It’s a little to thin and it’s harder to pour cheese into it. If you are making your own 24″ by 24″ will be better, and easier to pour the cheese into it.
What kind of cheesecloth are you using? Thanks
I’ve made my own. I had some material left from white see through curtain that I was making for my window. I like it better than regular cheesecloth, because it doesn’t let the cheese come through.
Oh, that is really neat! Thank you for your super quick reply, I started making the tvorog as I write and excited about the whey and tvorog series!!!!! Thank you for your time and expertise!
You are very welcome! 😉
Valya,
Thank you for sharing and posting your tvorog recipe. I do it the same except I didn’t add vinegar, and maybe that is why my “buttermilk-milk” mixture took a long time to become tvorog. Also, I wondered if vinegar is detected when eating it? Thank you again.
Not at all. It actually kills that extreme sour taste in tvorog. 🙂